A couple posts ago, I said I wouldn’t write any more about my game with Sergei Kudrin because I was planning to record a ChessLecture on it, and I didn’t want to post spoilers to my own lecture.
However, an interesting point came up near the end that I DIDN’T address in my ChessLecture, so this is my opportunity to do so.
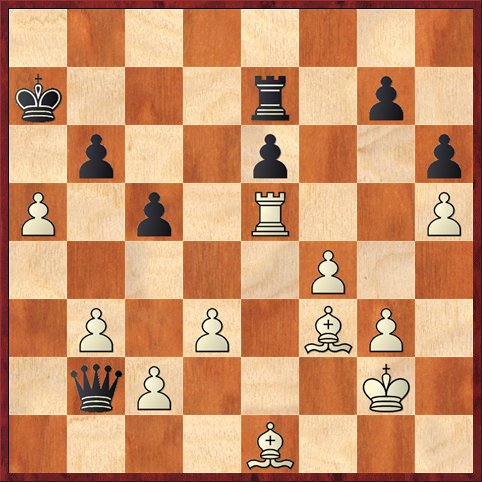 FEN: 8/k3r1p1/1p2p2p/P1p1R2P/5P2/1P1P1BP1/1qP3K1/4B3 w – – 0 43
Position after 42. … Qb2. White to play.
Last night I was going over the game with Gjon Feinstein, and he said something like, “So you played 43. Bf2, right?”
This surprised me, because I hadn’t played 43. Bf2. In fact, I don’t think that I even considered it during the game. I was so excited about the possibility of going after Black’s king that I played 43. ab+, without really considering any other possibilities.
Lesson one: Control your emotions, even when you think you are winning. Stay calm and look at all the options before you leap.
I told Gjon, “Well, I think that 43. Bf2 would just transpose to the game after 43. … Qxc2 44. ba+ Kxb6.”
Gjon: “No!! You don’t take the pawn! You want to keep the tension with 44. b4!”
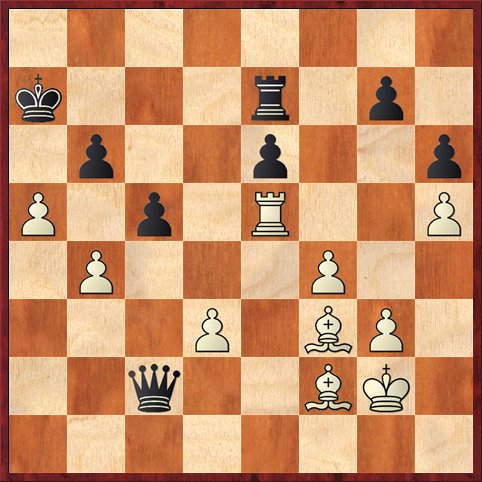 FEN: 8/k3r1p1/1p2p2p/P1p1R2P/1P3P2/3P1BP1/2q2BK1/8 b – – 0 44
Position after 44. b4!! (Analysis)
I have to admit that I was bowled over by Gjon’s suggestion. It never ceases to fascinate me that different players will have completely different interpretations of the same position. It’s one thing that makes chess so rich.
My philosophy, certainly a reasonable one, is that White wants to rip open the lines to Black’s king, and therefore 43. ab+ was a no-brainer. Gjon’s philosophy, which I think is more sophisticated and, dare I say it, more masterly, is that 43. ab+ releases the tension too soon and makes it clear to Black what the key targets are. After 43. Bf2 Qxc2 44. b4, what is White’s target? Is it b6? c5? e6? Checkmate on the a-file? Really, all of the possibilities are still open, and that makes life for the defender extremely difficult, even if he is a grandmaster like Kudrin. He’s got to defend everything at once. On the other hand, after 43. ab+ Kxb6 44. Bf2, which happened in the game, Kudrin really had only two reasonable possibilities. One was 44. … Qxc2?, which loses to 45. b4. The other is 44. … Rc7, which Kudrin played after a long think.
Lesson two: If you only allow your opponent one playable defense, he is very likely to find it. This is why, as an attacker, it is best not to resolve the tension, but to keep the position fluid and have many different threats.
Anyway, in the second diagrammed position Gjon and I went over several possibilities, the most critical one being 44. … cb, and we convinced ourselves that White was winning. Rybka agreed with us, although not for the reasons we thought!
Lesson three: See if you can analyze the position in the diagram after 44. … cb and find a win for White. I am not going to give you the answer below. The lesson is to figure it out for yourself.
As it turned out, the only thing wrong with Gjon’s line is that it is not forceful enough! After 43. Bf2 Black can transpose to the game, but not with 43. … Qxc2? Instead he should play 43. … Rc7!, after which Rybka says and I agree that there is nothing better for White than to play 44. ab+ Kxb6 45. Rxe6+ Kb5, transposing back to the game.
As it turns out, if White really wants to blow the position open, there’s no need to play 43. Bf2 first. Why not just play 43. b4!? right away?
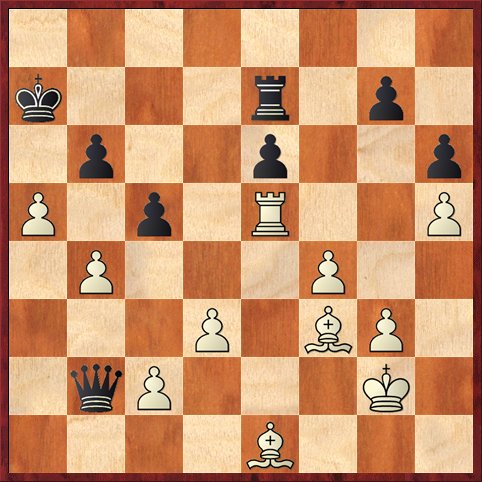 FEN: 8/k3r1p1/1p2p2p/P1p1R2P/1P3P2/3P1BP1/1qP3K1/4B3 b – – 0 43
Position after 43. b4!? (Analysis)
You might notice that I didn’t give 43. b4 an exclamation mark. That’s because not everything is peachy keen after this move. In fact, Black has at least five different options here, one of which is (according to Rybka) slightly better for Black, although I suspect it’s going to end up drawn in the end. The other four options are either losing or doubtful.
Question 4: Which do you think is the best defense for Black in diagram three?
(a) 43. … ba
(b) 43. … c4
(c) 43. … Rc7
(d) 43. … Qxc2
(e) Something else
Again, I’m not going to give you any answers. Any one of these variations is probably worth a whole hour of study, maybe more. That’s how sick the tactics are.
However, I do want to show you just one sample variation that Rybka comes up with, just because it is mind-boggling beyond belief. It comes in variation (a). No exclamation points or question marks given, partly to avoid giving anything away, but also because Rybka’s analysis is so far beyond me that I couldn’t possibly tell you whether its moves are right or not.
43. … ba 44. Bf2 Rc7 45. bc Qxc2 46. Rxe6 a4 47. d4 a3 48. d5 a2 49. d6 Rb7 50. Re7 a1=Q (diagram)
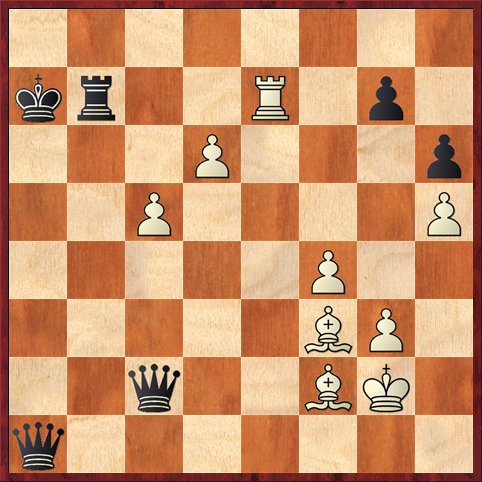 FEN: 8/kr2R1p1/3P3p/2P4P/5P2/5BP1/2q2BK1/q7 w – – 0 51
Position after 50. … a1=Q. White to move.
Everything about this variation beggars belief. First of all, there’s the absolute chutzpah for White, entering into a pawn race when he is two tempi behind! Black has already queened, White is still two moves away from queening, yet White is winning. Second, look at the material balance, which I would venture to say has never been seen in a master-level game. After White takes Black’s rook, it will be rook, two bishops, and three pawns, against two queens! Finally, in this position White has, according to Rybka, only one winning move. Everything else loses.
Question 5: What is the winning move?
Ironically, one conclusion from all this is that my move 43. ab+ was not a mistake in the strict sense of the word. However, I could have given Black more ways to go wrong with either 43. Bf2 or 43. b4. I could have played with more chutzpah.
Finally, there are no better words to sum up the position than the ones that Kudrin himself said after the game. “The two bishops were very strong.”


