I’m going to take a short break from my series of 6 memorable games, partly because I haven’t decided on game #4 yet and partly because of a cool e-mail that I got from Larry Smith. Larry, you might recall, was one of my teammates at the U.S. Amateur Team West tournament this year. He doesn’t write a blog, but he does send out periodic e-mails that could be described as blog-like. On June 19, he wrote about a game, Pavel Simacek versus Evgeny Postny, that went down to a bishop and wrong-color rook pawn endgame.
Every chess player above C class should know that the K + B + RP versus K endgame is drawn if the queening square is on the opposite color of the bishop. The defender puts his king down on the queening square and it can never be chased away; at best, it can be stalemated.
But things get a little bit more interesting when there are more pawns on the board! That was the case in Simacek-Postny. If the defender has one or two pawns, paradoxical situations can arise where the position is not drawn or where the draw requires something a little bit different from the brain-dead plan that I just described. This is an extreme example of “traitor pawns” — pawns that turn against the player they belong to.
Here is the key position in Simacek-Postny that caught Larry’s eye, and mine too.
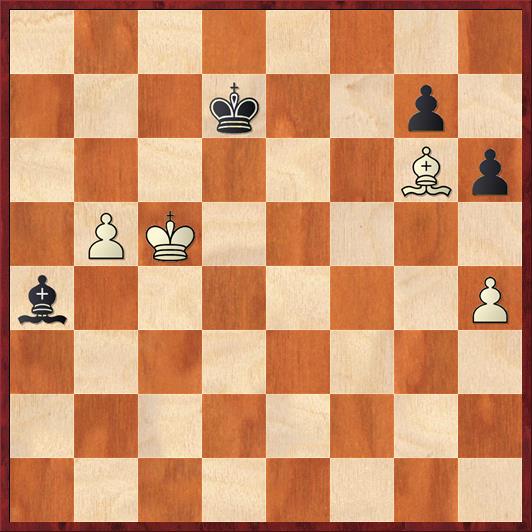
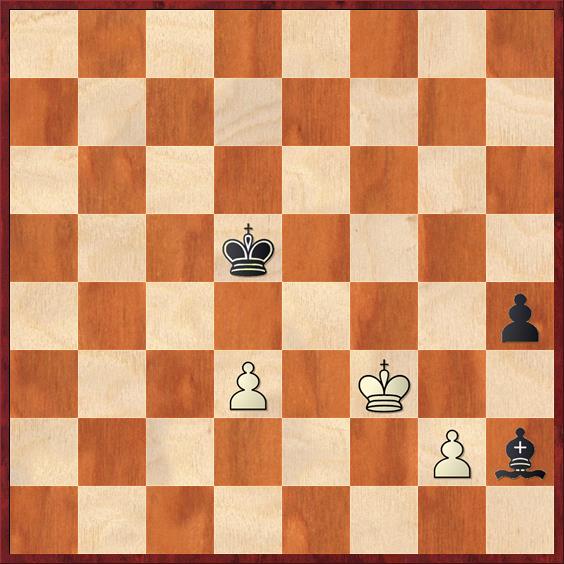 Position after 80. … Bh2. White to play.
FEN: 8/8/8/3k4/7p/3P1K2/6P1/6b1 b – – 0 80
If White could just get his king to h1 it would be a “brain-dead” draw. But the traitor pawn at g2 stands in his way, and Postny has also done his best to keep White’s king out of the corner, by putting his bishop on h7. So, how does White save the game?
The answer is to get rid of the traitor pawn! Simacek played 81. g4! Strictly speaking, there are many ways for White to draw, because the d-pawn allows him to buy some time. But sooner or later he must play this move, or else g3. Otherwise Black will win. By playing g4 right away, Simacek eliminates any doubt. If Black plays 81. … hg then White plays 82. Kg2! and the point is revealed: Black’s bishop has no way out of the corner. Once the d-pawn is gone, White can simply shuttle his king between h1 and g2 forever. If Black’s king ever gets close enough to threaten g3-g2+, it will be stalemate. If Black tries to defeat this plan by not taking the d-pawn, then White will not play Kh1; he’ll just push the d-pawn and force Black to take it.
In the game Postny didn’t take, but after 81. … h3 82. g5 Be5 83. Kf2 the players agreed to a draw. White’s king is headed to h1, and if Black tries to keep it out with 83. … Bd4+, then 84. Kg3 wins the h-pawn and the game is drawn.
The pawn on d3 made this a less than perfect teaching example, because White did not need to find the drawing resource right away. If we take away that pawn, it’s a different story.
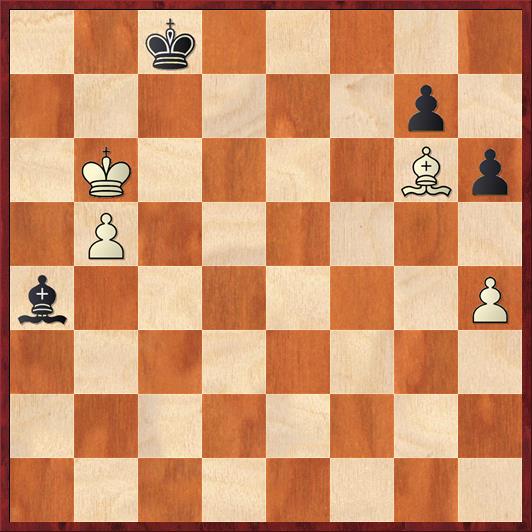
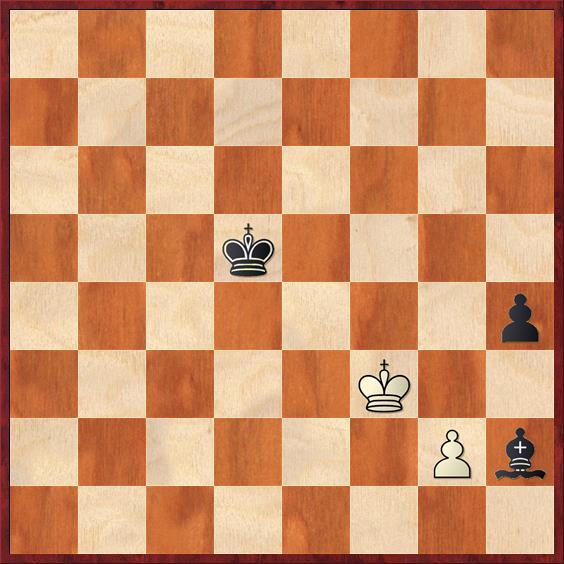 White to play and draw; Black to play and win.
FEN: 8/8/8/3k4/7p/5K2/6Pb/8 b – – 0 1
Here if it’s White’s move, he draws with either 1. g3 or 1. g4, as before. If it’s Black’s move, he wins with 1. … Bg6!, blockading the traitor pawn and not allowing it to reconsider its nefarious ways. Now it’s too late for White’s king to head to the corner with 2. Ke2 Ke4 3. Kf1 Bh2 4. g4 (or g3) h3! The bishop on h2 and the pawn on h3 make a barrier that White’s king cannot cross, and after 5. g5 Kf5 6. Kf2 Kxg5 7. Kf3 Kh4 White’s king will gradually be forced back, inch by inch.
Neither Larry nor I had previously seen this motif of playing g3 (or g4) and trapping the bishop on h2. Has anyone seen it in a book? Could you give me a reference? It’s really essential for understanding this ending (B + RP vs. NP), so it seems inconceivable that it hasn’t been noticed before.
In all of these cases it didn’t matter whether White plays g3 or g4. Naturally, Larry was curious whether there are any cases where it does matter. So he got into the online Nalimov tablebases, and sure enough he found some. They’re all very closely related, so I’ll just show you one prototype.
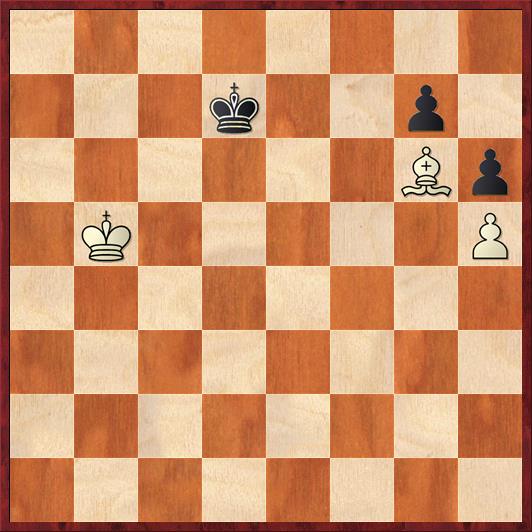
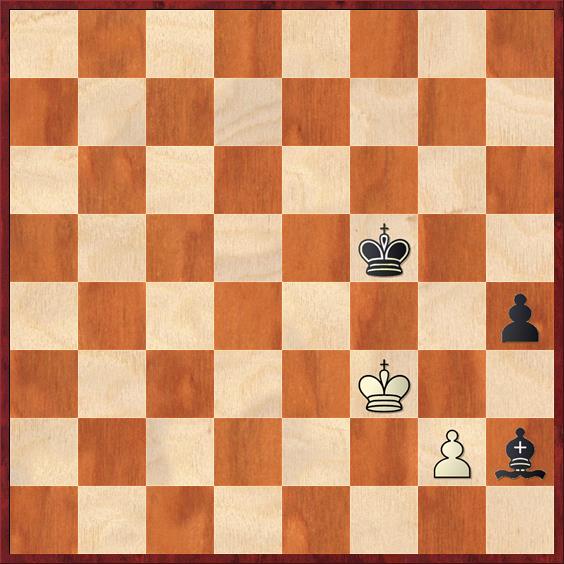 White to move and draw.
FEN: 8/8/8/5k2/7p/5K2/6Pb/8 w – – 0 1
If Black’s King is on f5 (as here) or h5, then White draws with 1. g4+! but loses if he plays 1. g3?? h3. If Black’s king is on g5, then White is simply lost, because either 1. g4 or 1. g3 is met by 1. … h3! Finally, if Black’s king is on f6, g6, or h6, then White draws with 1. g3! h3 2. Kg4 but loses if he plays 1. g4?? h3! Pretty cool, huh?
Something about the Simacek-Postny endgame was vaguely familiar, and this weekend I figured out why! This was a game I played in the Western States Open in Reno in 2001, against a National Master named Bill Heywood. It is a perfect complement to the Simacek-Postny game and the related positions that Larry found.
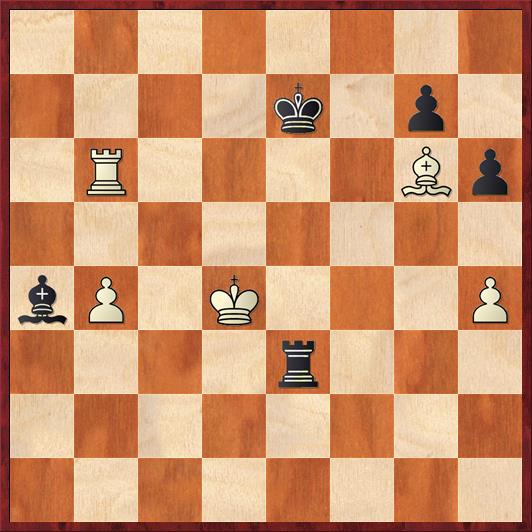
Position after 40. Kd4. Black to move.
FEN: 8/4k1p1/1R4Bp/8/bP1K3P/4r3/8/8 b – – 0 40
Here I was Black, and on the last move of the time control I played the excellent practical move 40. … Re1! This is the right move on general principle because Black needs to activate his rook. In fact, I managed to draw the game after seven more moves.
But what if Black plays the more forcing move 40. … Re6? In my annotations after the game, I wrote, “It would have been easy and wrong to play 40. … Re6? 41. Rxe6+! Kxe6. Even though White has the ‘wrong rook pawn,’ Black cannot draw by sacrificing his bishop for the b-pawn. The reason is that we will eventually reach a ‘stalemate position’ with the Black king on h8 and White’s king on f8. Then White will move his bishop. Black will be forced to play 1. … g6 or 1. … g5 2. hg h5 3. g7 mate — practically a helpmate! Ironically, if Black could just remove either the h-pawn or the g-pawn or both, it would be a draw — but with both pawns, he loses.”
This fascinating annotation is half right and half wrong.
- Yes, 40. … Re6? is a mistake.
- The way to refute it is not 41. Rxe6+? but 41. Rb7+! Kf6 42. h5, which leaves Black in a very bad way, with Rf7+ the main threat.
- If 41. Rxe6+? Kxe6 Black should draw with best play.
- Nevertheless, Black needs to be careful, for exactly the reasons I outlined.
Let’s push on and see what might have happened after the double blunder 40. … Re6? 41. Rxe6+? Kxe6 42. Kc5! Black should be able to draw if he can get his king in front of the passed pawn, so his best continuation is 42. … Kd7. Then White has two thematic choices.
(A) White can force Black to make a decision immediately with 43. b5. Is it okay to sacrifice the bishop for the pawn? I’ll let you think about that.
 Position after 43. b5 (analysis). Black to move.
FEN: 8/3k2p1/6Bp/1PK5/b6P/8/8/8 b – – 0 43
(B) Alternatively, White can continue the plan of activating his king with 43. Kb6. Black’s obvious response is 43. … Kc8. Now I think that 44. Ka7? achieves nothing; after 44. … Bb5 White’s king had better come back to b6 or it will get trapped in the corner. But White can again try 44. b5, and my question again is: Can Black sacrifice the bishop for the pawn?
 Position after 44. b5. Black to move.
FEN:2k5/6p1/1K4Bp/1P6/b6P/8/8/8 b – – 0 44
As you might have guessed, the answers to the two questions are different.
(A) Here 43. … Bxb5 is sound, but only if Black plays the right followup. After 43. … Bxb5 44. Kxb5, the one and only drawing move is 44. … h5! Black gets rid of the first traitor pawn! If Black plays any other move, White will complete the blockade with 45. h5 and win in the same way as in line (B). If White captures right away, 45. Bxh5, the most piquant way for Black to follow up would be 45. … g6! Getting rid of the second traitor pawn! Strictly speaking, to secure the draw you only need to sacrifice one of the traitors, but why not kill them both?
Alternatively, after 44. … h5, White could postpone taking the pawn and try 45. Kc5 instead, but then it is easy to see that Black plays 45. … Ke6 46. Kd4 Kf6 and forces White to decide. In fact, it doesn’t matter whether White takes on h5 or not, because black will play 47. … g5 on the next move and exchange White’s last pawn.
However, things are different in variation (B). Now 44. … Bxb5?? would lose. The difference is that after 45. Kxb5 Black does not have time to get rid of his traitor pawn with 45. … h5 because White plays 46. Kc6! Because the bishop controls e8, Black is unable to prevent White’s king from infiltrating the kingside and taking on g7. (Also, Black’s king is a tempo too slow to win the h4-pawn while White is doing this.) Alternatively, if Black liberates his king with 45. … Kd7, then White creates the prototypical traitor-pawn position with 46. h5!
 Position after 46. h5 (analysis). Black to move.
FEN: 8/3k2p1/6Bp/1K5P/8/8/8/8 b – – 0 46
This is exactly the sort of position I wrote about in my annotation, where if Black could just get rid of one of the traitor pawns it would be an easy draw. If he gets rid of the h-pawn it would be like Simacek-Postny. If he gets rid of the g-pawn it’s even easier, as the king can run straight to the corner. But with both of the pawns on the board, he loses. A sample losing line would be 46. … Kc7 47. Kc5 Kd7 48. Kd5 Ke7 49. Kc6 Ke6 50. Kc7 Ke7 51. Kc8 Kf8 (the king must yield) 52. Kd8 Kg8 53. Ke7 Kh8 54. Be4 …
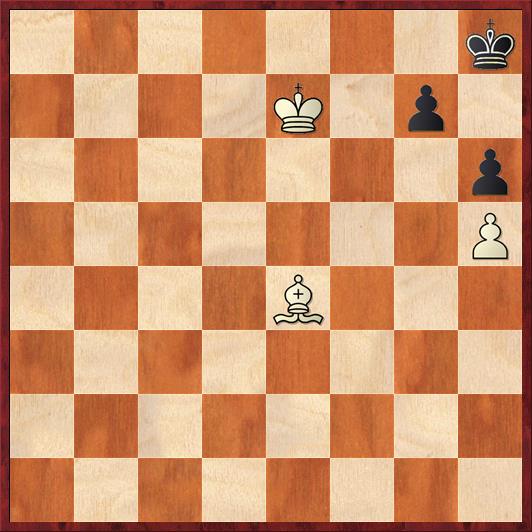 Position after 54. Be4. Black to move.
FEN: 7k/4K1p1/7p/7P/4B3/8/8/8 b – – 0 54
And now Black can either lose with 54. … g5 55. hg, or he can be obstinate and lose with 54. … Kg8 55. Ke8 Kh8 56. Kf8! (not stalemate) g5 57. hg (not stalemate) h5 58. g7 checkmate.
Oh, by the way, remember that I said the bishop and pawn endgame was a draw? I still believe that. But in the diagram after 44. b5, the correct move is not to take the b-pawn but simply to play 44. … Kb8! The point is that Black doesn’t need to play “heroic” defense by giving up his bishop. The bishop has better uses than that! Now that Black’s king is securely in the path of the b-pawn, White will have to cross his king over to the kingside if he wants to win. But that will leave the b-pawn vulnerable. In order to protect that pawn, White will have to move his bishop away from g6, which breaks the blockade. Black will then play … Bd1 threatening … g5, trading off White’s last kingside pawn.
Even if the “heroic” defense is not the best one here, I do think that it is the best place to start your analysis. In some ways, you need to analyze endgames back to front — starting with a target position that is either a draw (if that is what you are playing for) or a win (if that is what you are playing for) and working back from there.
Thanks, Larry, for the great idea for a blog post! I’m done now.


{ 4 comments… read them below or add one }
I must say that the plan with the exchange of the rooks and rushing the king to b8 looks like the easiest draw to me, much easier than 40. … Re1.
RE ” Has anyone seen it in a book? Could you give me a reference? It’s really essential for understanding this ending (B + RP vs. NP), so it seems inconceivable that it hasn’t been noticed before.”
The position in diagrams 2 and 3, with colors reversed. are known to theory and to me. It was reached in L, Paulsen versus Metger Nuremburg 1888. Paulsen had a forced win but was not able to find it over the board.
The position is discussed in Steve Giddins’ 200.7 book “101 Chess Endgame Tips” It’s -tip #17 in the book. “Bishop and Wrong Rook’s Pawn.”
The winning technique is to bring the stronger side’s king up the Knight file. creating a zugzwang position with the bishop blockading the defender’s pawn when the defender brings his king to Bishop 3. The aggressor’s king will be two squares behind the bishop. on the knight file and will move forward when the defender’s king retreats.
Then a second zugzwang position is reached with the defender forced to move his king from the Bishop 1 square. The aggressor puts his bishop behind the knight pawn. When the defender brings the king back to bishop one, the aggressor transfers his bishop to the long diagonal After that it is trivial.
The key is to make sure that the defender never gets to push the knight pawn with check. Paulsen allowed the check.
Perfect, Mike! Thanks for the information.
Sup Dana. The equivalent position W: Kf5 g6 Bh7, B: Kg7 appears in Dvoretsky’s Endgame Manual. It is a blue-colored position, which means Dvoretsky recommends you memorize it.
And he credits the analysis to D. Ponziani, year 1782!