We’ve arrived at game number six in my series of Six Memorable Games. It is not at all a perfect game, but in some ways it is a perfect illustration of both the good and bad features of my chess: occasional moments of creativity interspersed with frustrating moments of self-sabotage. Does that sound familiar? I’ll bet that I’ve just described lots of amateurs. But in this game, creativity won out in the end. The endgame was beautiful, and I think that makes the suffering worth it.
Memorable Game #6 took place just last year, at the National Open in Las Vegas. This was the game that finally put my rating back over 2200, after 19 years and 10 months of being under 2200. My opponent was Emily Nguyen, a 12-year-old from Texas. In a nice small-world moment, it turned out that her coach was Michael Feinstein, whom I used to play with on the Duke University chess team thirty years earlier. After the game ended, he came up to me and paid me the ultimate compliment: “That’s exactly how that endgame should be played.”
This game was also the subject of my final ChessLecture, so it brought to an end another important episode in my chess career.
Another oddity: this is the fifth of my six Memorable Games in which Black won! Maybe that’s not such an accident. Games where Black wins are almost always more competitive and interesting than games where White gets an advantage and just cruises to victory.
Emily Nguyen — Dana Mackenzie
Las Vegas, 2015
1. d4 Nf6 2. Bg5 Ne4 3. Bf4 d5
Black has two main options in this variation of the Trompowsky: 3. … c5 or 3. … d5. In spite of the fact that I had watched a lecture of Roman Dzindzichashvili at chess.com in which he says that 3. … c5 is the most “competitive” move and basically drives the Tromp out of business, I still liked the solidity of the setup with … d5 and … Nd6. A knight on d6 is a killer defensive piece, keeping watch on several important squares: e4, c4, b5, and b7. I also felt this was a variation I could play without knowing any theory.
4. e3 g6 5. Bd3 Nd6 6. Ne2 Bg7 7. O-O Nc6 8. a3 e5 9. de Nxe5 10. Nbc3 c6 11. Nd4 O-O 12. Be2 Re8 13. Rb1 …
Let’s come up for air and our first diagram.
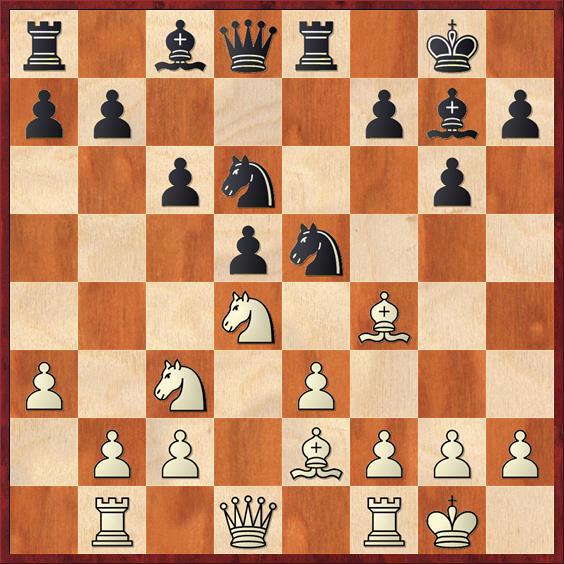 Position after 13. Rb1. Black to move.
FEN: r1bqr1k1/pp3pbp/2pn2p1/3pn3/3N1B2/P1N1P3/1PP1BPPP/1R1Q1RK1 b – – 0 13
White has played a rather unambitious opening but does not have any obvious weaknesses. The last two moves for both sides (12. … Re8 and 13. Rb1) were waiting moves. However, I felt that I had gained a bit more with my waiting move than she gained with hers, and so I thought I was justified in making a committal move that alters the position.
13. … Nf5 14. Nxf5? …
Doing me a big favor! Sometimes you should look at the position through your opponent’s eyes and ask what their biggest problem is. My problem was that I didn’t know the best place to develop my light-square bishop, and until I solve that problem my army is not fully organized. With this trade, my opponent simply solves the problem for me.
Looking at this position and the position on move 19, I think we can perhaps see a pattern: Nguyen doesn’t like tension and wants to resolve it with exchanges, even if they benefit her opponent more than her. This is a very common weakness of amateur players (even very strong amateurs, such as 12-year-old 2100 players). I’ll bet Michael Feinstein talked with her about that after the game.
14. … Bxf5 15. Qd2 Qe7 16. Rfd1 Rad8 17. h3 h5 18. Bf1 Rd7
Here again I played a waiting move (18. … Rd7) and again it paid dividends. Mike Splane would be proud! My opponent now plays another unnecessary trade, after which her position goes from bad to critical.
 Position after 18. … Rd7. White to move.
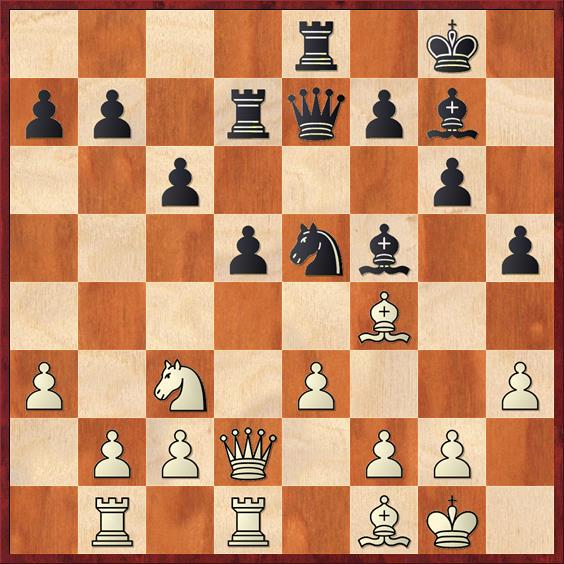
FEN: 4r1k1/pp1rqpb1/2p3p1/3pnb1p/5B2/P1N1P2P/1PPQ1PP1/1R1R1BK1 w – – 0 19
19. Bxe5? Bxe5
White has done pretty well at not creating targets. But now I can focus my attention on the biggest target of all — her king.
20. Ne2 Bc7 21. Nd4 Qe5 22. g3 Be4
I wasn’t too keen on 22. … h4 23. Nxf5 gf 24. Qd4, when Black wins a relatively meaningless pawn and White solves a lot of her problems. Now, though, 23. … h4 is definitely in the air, and White has to create new weaknesses to stop it.
23. h4 g5! 24. hg Qxg5
Patience! 24. … h4 is still premature because of 25. f4.
25. Bh3 Rd6 26. Qe2 Rf6 27. Bg2 …
 Position after 27. Bg2. Black to move.
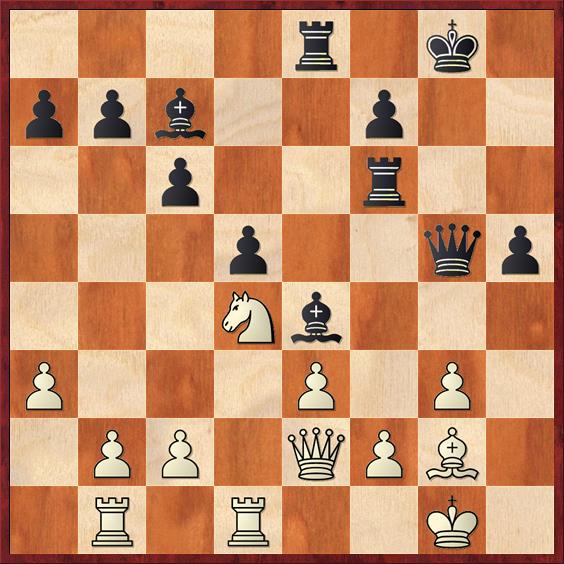
FEN: 4r1k1/ppb2p2/2p2r2/3p2qp/3Nb3/P3P1P1/1PP1QPB1/1R1R2K1 b – – 0 27
Here I certainly looked at the bishop sacrifice 27. … Bxg3, but I couldn’t find a clear-cut win. Instead I played a simple, risk-free move that increases the pressure on White nearly to the breaking point:
27. … h4.
After the game I was a little bit surprised to see that Rybka considers 27. … Bxg3! to be clearly Black’s best move. The conclusion is justified by lines like this: 28. fg Qxg3 29. Rf1 Rg6 30. Nf3 h4 and Black wins back the piece by force. The point (hard to see over the board with a limited amount of time) is that the White’s only move to unpin the bishop, 31. Kh1, also takes away its only flight square, so that 31. … h3 wins the piece anyway!
In retrospect, though, I don’t think I would change the move I played. Unless you can see very clearly that you get more than enough compensation after the bishop sac — and in this case there are a lot of variations to look at, not just the one I just gave you — there is absolutely no reason to risk it. The bishop sacrifice introduces the possibility of three results: win, draw, or loss. With 27. … h4 there are still great chances of winning and no chances of losing.
And by the way, there is a tactical trick with 27. … h4 too. I saw the trick, and it’s one of the main reasons I decided to play this move.
28. g4 …
Of course, White can’t let the g-file open up.
28. … Bxg2 29. Kxg2 h3+!
This is the trick I mentioned earlier. White cannot capture the h-pawn because 30. Kxh3? Qh6+ 31. Kg2 Qh2+ 32. Kf1 Qh1# is mate. So far the attack is going wonderfully, and I was expecting a quick victory. My opponent, though, has other ideas.
30. Kg1 …
In view of White’s next move, you might wonder whether she should have gone to h1 right away. The answer is no, because 30. Kh1 would be met by 30. … Qe5 31. f4 Qxe3 with a large advantage. After the text move, though, 30. … Qe5?! doesn’t work as well because of 31. Nf3! The exchange sacrifice on f3 doesn’t work because … Qh2 is no longer checkmate (and also there is no checkmate with … Qh1). Miraculously, even White’s rook at b1 is doing something useful, preventing … Qxb2!
30. … Re4
Simple, strong. I thought the game was over.
31. Kh1! …
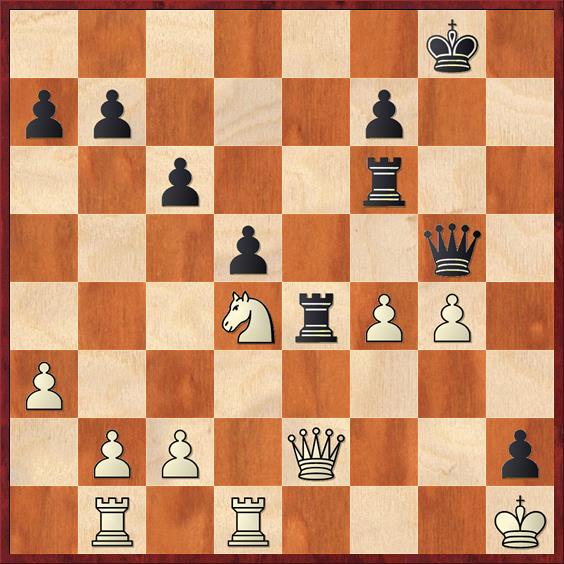
 Position after 31. Kh1. Black to play.
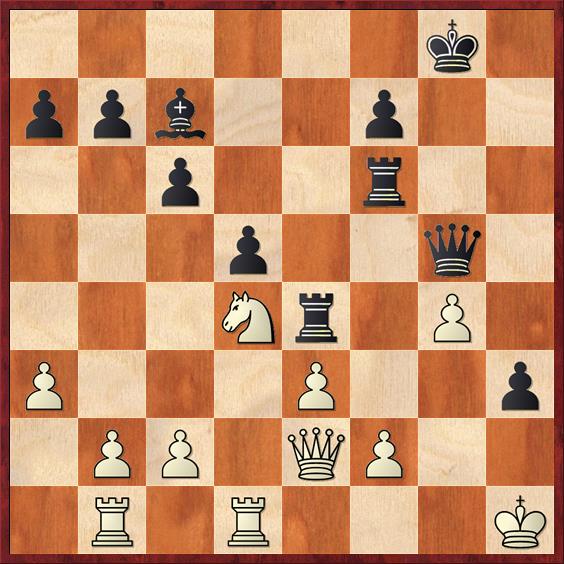
FEN: 6k1/ppb2p2/2p2r2/3p2q1/3Nr1P1/P3P2p/1PP1QP2/1R1R3K b – – 0 31
What a shock! I realized with dismay that 31. … Rxg4? 32. Qxg4! Qxg4 33. Rg1! gets White out of trouble with a minimum of damage. Actually, the ultra-precise computer says that White can do even better by playing first 32. f4! (stealing a tempo) and after 32. … Qg7 33. Qxg4! Qxg4 34. Rg1, with a nearly even position.
My opponent’s brilliant defense changed the course of the game. Suddenly, I had to come up with a Plan B. And now we get to the frustrating part of the game: Time trouble. It has been my nemesis throughout my career. How appropriate that, to win the game that would put my rating back into the master territory, I would have to conquer that demon.
I was down to ten minutes for ten moves, and had to come up with a new plan fast. I chose the wrong one.
31. … h2?
Mike Splane and I had a big argument… er, debate about this move when I showed the game at one of his chess parties last summer. He said it was a mistake. I stubbornly insisted that it was all right.
Well, today I’m saying that he was right and I was wrong. He explained the reason perfectly last year, but I was just too pig-headed to acknowledge it. As long as the pawn remains on h3, White has two checkmates to worry about, on h2 and on g2. After the pawn moves to h2, there are no more checkmates. (Well, technically Black could triple on the g-file and mate on g1, but White is very unlikely to allow that.) So Black, whether he admits it or not, is now playing for a win in the endgame. That’s a huge concession, considering that just one move ago I was expecting to win by checkmate in short order.
The move 31. … h2 would be forgivable if it was the only way to prevent Rg1. But it’s not! I had the perfectly good alternative of 31. … Kf8!, which also takes away the threat of the skewer on the g-file. It’s not hard to see that this makes a major difference. For example, if White now plays 32. f4, as she did in the game, then 32. … Bxf4! is an easy winner. If 33. ef Rfxf4 34. Qd3 Rxd4! 35. Qxd4 Rxd4 36. Rxd4 Qe3! it’s over. And why is it over? Because after 37. Rd3 Qe4+ Black has a checkmate on g2. Alternatively, if White plays 32. Rg1 to hang onto the pawn, she loses a piece to 32. … Qe5! Now it’s the checkmate on h2 that kills her, because 33. Nf3 is met by 33. … Rxf3. And if she defends the mate some other way, like 33. f4 or 33. Rg3, then 33. … Qxd4 does the trick.
So why didn’t I play 31. … Kf8? Because I never even considered it! The ugly fact about time trouble is that it causes me to reduce my candidate-move list, and as soon as I decided that 31. … h2 looked okay, I went ahead and played it. As it turns out, even my analysis of 31. … h2 was flawed, as I found out one move later.
32. f4 Bxf4!
What can I say about this move? Of course it’s the right move and the only move for Black, so it gets an exclamation point. But when I played it I thought I was winning a pawn. In reality, I’m losing a bishop. The piece sacrifice was completely unintentional, and I was just plain lucky that it works. Who says there is no luck in chess?
33. ef! …
 Position after 33. ef. Black to move.
FEN: 6k1/pp3p2/2p2r2/3p2q1/3NrPP1/P7/1PP1Q2p/1R1R3K b – – 0 33
My second shock in three moves. I thought the pawn was pinned, but it’s not! My queen is hanging too.
For a few seconds I was absolutely sure that I had blown the game. But time pressure doesn’t leave any time for moping. Very quickly I realized that Black has tons of compensation, and in fact I can win the piece back by force. It’s funny that earlier in the game I was too chicken to sacrifice this bishop, but now I did it without even meaning to. I guess it was just that bishop’s destiny to be sacrificed.
33. … Qxf4 34. Rf1 Qe5 35. Nxc6?! …
Very tempting, and I really can’t criticize it. Nguyen sees that the knight is lost, and she plays a “desperado” move that at least wins a pawn for it. Rybka thinks that 36. Nf3 is a somewhat better try for White, but the endgame is still probably won for Black.
35. … bc 36. Qa6 …
This is only the second non-capturing move beyond the fourth rank that White has played in the entire game. The other one was 2. Bg5! Unfortunately, the “attack” is short-lived, as Black’s mate threats force the White queen to hustle back.
36. … Re2 37. Qd3 …
The queen has to come back. 37. Qa4 would be met by 37. … d4, and 37. Qxe2 would be met by 37. … Qxe2 38. Rxf6 Qe4+ 39. Kxh2 Qe5+.
37. … Re3 38. Qd2 …
Again the only move. What a relief, in time pressure, to be able to repeat the position.
38. … Re2 39. Qd3 Re3 40. Qd2 Qe4+
Making the time control. Even though the queens now come off, I felt confident of winning the endgame.
41. Qg2 Qxg2+ 42. Kxg2 Re2+ 43. Kh1 Rxf1+ 44. Rxf1 Rxc2 45. b4 Kg7 46. Rd1 …
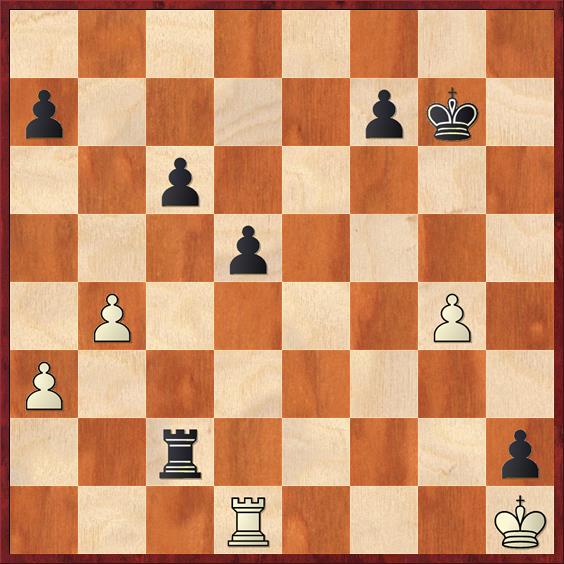 Position after 46. Rd1. Black to move.
FEN: 8/p4pk1/2p5/3p4/1P4P1/P7/2r4p/3R3K b – – 0 46
My favorite position of the whole game! This is the position where I earned my master rating.
Of course Black ought to be winning; I’m two pawns up. It’s easy to say that, but not so easy to formulate a winning plan.
The main problem, as I saw it, is that White is threatening to undermine my passed pawn with b5. After that the pawns start dropping like flies. It’s important to realize also that if White can eliminate the queenside pawns, he has a very good shot at drawing. If the game went to K+R+h+f versus K+R, it would be drawn. (Normally this endgame is a win, albeit a difficult one. But one of the key points of that endgame is that Black does not want to move the h-pawn to the seventh rank prematurely. In this game it’s already there. So White will be able to draw with the greatest of ease by using stalemate traps.)
For this reason it also makes no sense to prevent 47. b5 with 46. … a6. White just plays 47. a4, and the same thing happens but with an extra pawn trade, which of course is just what White wants.
So how else can Black prevent 47. b5? Well, I could play 46. … Rb2, which ties down both the a- and b-pawns. (Black would be happy to take the b-pawn with his rook, even though it means giving up the h-pawn, because it would give him connected passers.) But, alas, 46. … Rb2 simply loses the c-pawn after 47. Rc1. It’s just a blunder, right?
Wrong! Here it really pays to remember that rook endgames are not about material, they’re about tempi. It’s often said that in the middle game, three tempi are worth a pawn. Well, in a rook-and-pawn endgame tempi become even more valuable, and in many positions a tempo is worth a full pawn. To win this endgame, all I need to do is activate my king and push my d-pawn. To that end, I am happy to let White waste several tempi snatching my c- pawn and my a-pawn.
46. … Rb2!! 47. Rc1 Kf6 48. Rxc6+ Ke5 49. Rc7 f6
Here, 49. … d4 also works but I didn’t want to have to calculate the pawn race after 50. Rxf7.
50. Rxa7 Kf4 51. Rc7 d4!
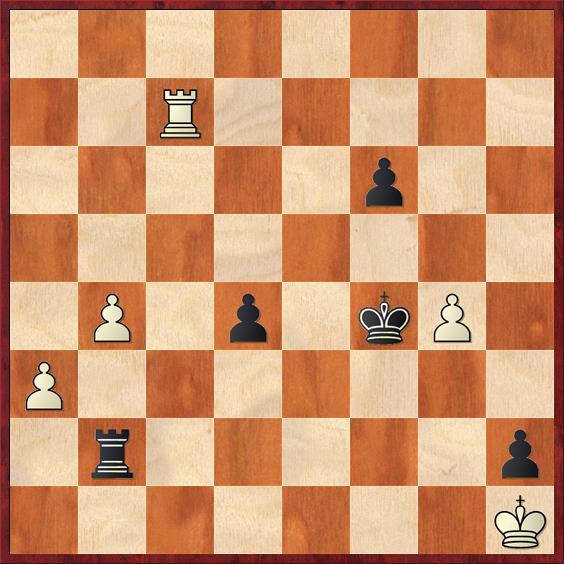 Position after 51. … d4. White to move.
FEN: 8/2R5/5p2/8/1P1p1kP1/P7/1r5p/7K w – – 0 52
This is my second-favorite position of the entire game. White is totally stymied. The simple threat is 52. … Kg3 followed by 53. … Rb1 mate. You see, Mike, I really did have checkmate in mind when I played 31. … h2!
How can White stop this? She does not have time to attack either the d-pawn or the f-pawn. She can’t check my king from behind because he takes shelter behind the “traitor pawn” at g4. She can’t stop me on the third rank because my d-pawn covers c3. If she pushes her g-pawn, I just ignore it and play 52. … Kg3.
I love the way that every piece has a role! Even White’s a- and b-pawns have a role. They prevent any stalemate tricks. And they look pretty without actually threatening anything.
The only way for White to stop the mate threats is to retreat her rook back to the first rank. But that is exactly what Black wants — to paralyze White’s pieces so that she can offer no resistance to the march of the d-pawn.
The rest of the game is completely straightforward.
52. Rc1 d3 53. b5 Rxb5
It might show a little more bravado to continue 53. … Kg3, but that requires some calculation. At this point I do not mind trading the b-pawn for the h-pawn because my king penetrates to e2 and there is not much left to calculate.
Farewell, h-pawn! For better or for worse, just about everything that happened after move 27 revolved around you.
54. Kxh2 d2 55. Rf1+ Ke3 56. Kg2 Rg5
Why not? There are a million ways to win, this is as good as any.
57. Rf3+ Ke2 58. Rf2+ Kd3 59. Rf1 …
If 59. Rxf6 the absolutely precise move is 59. … Rxg4+, building a bridge.
59. … Kc2 White resigns.
Okay, the glories of yesteryear are now over. Now I’ve got to get work on playing some new memorable games!


