In my last post I showed you a game where the computer completely embarrassed me, by playing as if it were the reincarnation of Aron Nimzovich. Of course, after that game I had to get my revenge, and there is no better way to get revenge against a computer than to play the Bryntse Gambit. In this game Shredder’s rating was once again set to 2220.
Dana Mackenzie — Shredder
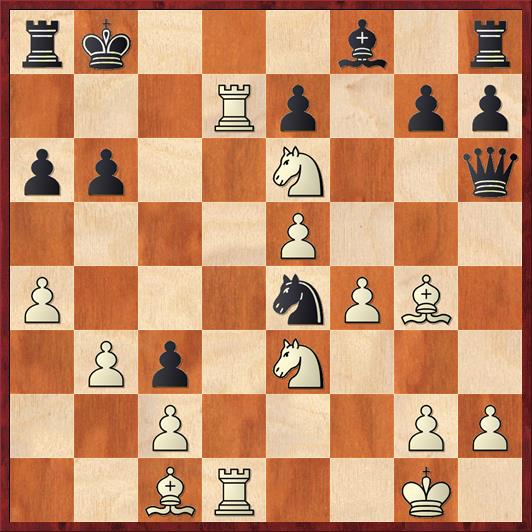
1. e4 c5 2. f4 d5 3. Nf3!? de 4. Ng5 Nf6 5. Bc4 Bg4?! 6. Qxg4! …
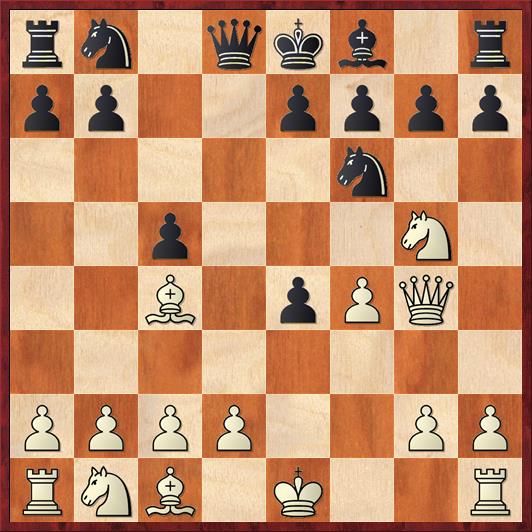 Position after 6. Qxg4. Black to move.
FEN: rn1qkb1r/pp2pppp/5n2/2p3N1/2B1pPQ1/8/PPPP2PP/RNB1K2R b KQkq – 0 6
I doubt if this move requires introduction for any regular readers of this blog. But for new readers, this is the defining move of the Bryntse Gambit: White sacrifices his queen on move six. Originally played by the Swedish correspondence player Arne Bryntse in the 1960s, it was rediscovered by me as an “anti-computer” variation around 2003. It is also good against human opponents, if you can find someone brave enough to play the provocative 5. … Bg4. So far I have been able to play the queen sac in three tournament games: against an A-player named Drayton Harrison, IM David Pruess, and GM Sergei Kudrin. The first two were wins for me, and the third was a draw that should have been a win. Coincidentally, all three were played in Reno, which is appropriate for an opening with such a gambling spirit.
Against Shredder, the Bryntse is not as effective as it used to be against Fritz 7 and 9 (the engines I was using back when I first started playing it). The reason is that Fritz would go into this line every time I gave it the chance. Shredder varies more often, with moves like 2. … Nc6 or 2. … d6. And even when Shredder lets me play the queen sac, I don’t always win. But this game is a beautiful example of how the Bryntse works when it works right.
6. … Nxg4 7. Bxf7+ Kd7 8. Be6+ Kc6 9. Bxg4 Qd4
Black has lots of choices here. I consider the “main line” to be 9. … e6, which is what Pruess and Kudrin played, and also what Fritz used to play. The trap variation is 9. … e5 10. Nf7 Qh4+? 11. g3 Qxg4?? 12. Ne5+ Black resigns, as in D. Mackenzie – D. Harrison, Reno 2006 (the first OTB game with the Bryntse). Shredder pretty consistently plays either 9. … Qd4 or 9. … Qd6.
10. Ne6 Qf6
Now, unlike in the “trap variation,” 11. … Qh4+ is actually a threat.
11. O-O Qg6
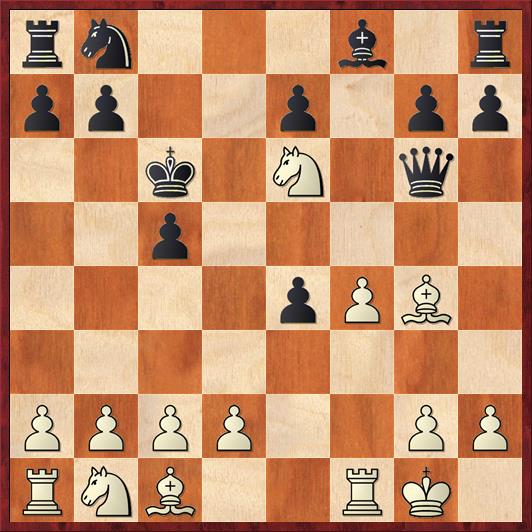 Position after 11. … Qg6. White to move.
FEN: rn3b1r/pp2p1pp/2k1N1q1/2p5/4pPB1/8/PPPP2PP/RNB2RK1 w – – 0 12
This was the first time that Shredder has played 11. … Qg6 against me, so from here on I was in new territory. However, an important thing about the Bryntse is that it is not based on memorizing move sequences. White has an overall strategy that is more or less independent of what Black does: 1) keep files closed; 2) don’t “cash in” too soon; 3) aim for maximum coordination of your minor pieces; 4) encourage him to give up his bishop for a knight, which will give you two unopposed B’s against the Q [in many positions, these B’s will be as strong as two R’s!]; 5) Creep forward, ever so slowly. In particular the Bryntse is usually not about checkmating Black’s king, but if Black neglects his development (as in this game) you can often shift gears into a mating attack.
I do not like Shredder’s 11. … Qg6, because both the e- and g-pawns are now obstructed, leaving Black with no way to develop his kingside. In fact, as you’ll see, in this game Black never touched his KB, KR, or QR. As Jesse Kraai would say, Black only played with his “pretty pieces,” the ones that were free to move around, especially his queen.
12. Bh3 Nd7 13. a4 …
I wanted to bring my knight to c4 without getting it chased by … b5. Also, a4 hints at the possibility of a queenside attack, and does one more thing, as we’ll see soon.
13. … b6 14. Na3 Kb7 15. Nc4 a6
 Position after 15. … a6. White to move.
FEN: r4b1r/1k1np1pp/pp2N1q1/2p5/P1N1pP2/7B/1PPP2PP/R1B2RK1 w – – 0 16
Here I decided on an unconventional development of my rook.
16. Ra3! …
Why not? The queen bishop is sometimes a problem child for White in the Bryntse Gambit. In this case I can simply develop around it. In at least a hundred games with the Bryntse against the computer, this is the first time I’ve ever developed my queen rook this way. But I like it! One nice example of White’s piece coordination would be 16. … b5 17. Rb3 Kc6 18. Nxf8 Rhxf8 19. Bxd7+! either winning a piece or a queen (19. … Kxd7? 20. Ne5+).
16. … Ka7
I have to say that I don’t understand Shredder’s play in this part of the game. The king is no safer on a7 than on b7, and meanwhile Shredder continues to ignore Black’s biggest problem, his lack of development. I think the explanation in terms of “computer psychology” is that it doesn’t see any threats that it needs to defend, but it also doesn’t see any ways to improve its position. So it just passes.
17. d3! …
To me, Black’s 16th move was a sign that it was time for me to accelerate my play. I don’t mean in minutes and seconds, but in chess time. This move opens the d-file, allows the QB to get out, and makes White’s threats more immediate, rather than “sometime in the future.”
This move comes with certain risks. My opponent is a computer, and as soon as you let the position get tactical, you have to deal with the fact that the computer has better tactical vision. So you need to have real faith that White’s position is so strong that White will be the only one with tactics.
Also, this move violates one of my principles of playing the Bryntse, namely to keep files closed. The reason for this principle is that as long as there are no open files, Black’s rooks will have nothing to do and White’s minor pieces will be the most effective pieces on the board. However, all rules need to be interpreted with common sense. Inevitably a file will be opened at some point; the important thing is for White to control which one and make sure that it’s a file that White is prepared to dominate. In this case, Black cannot possibly contest the d-file. He hasn’t even connected his rooks yet.
17. … Qh5!?
This move surprised me. Any human would trade pawns here. But if Black trades pawns, White’s attack is a tempo faster than in the game, and it’s just overwhelming. Here’s a sample line: 17. … ed 18. Rxd3 Nf6 19. Ne5 Qh5 20. Rfd1 Qe2 (there is nothing better) 21. Rd7+! Nxd7 22. Rxd7+ Kb8 23. Nc6+ Kc8 24. Rc7 mate. This is another great example of piece coordination!
The computer’s move is pretty clever, and it almost works.
18. de Qe2!
Here is the point! The queen invades the heart of White’s position and creates havoc: it attacks undefended pieces on c2, c4, and e4.
This is why Black’s Queen is Public Enemy Number One in the Bryntse Gambit. You must keep her under surveillance at all times. Fortunately, her escape here is only temporary.
19. Rd3 …
White defends with attack — he threatens to take the knight with check.
19. … Nf6
But now White seems to have a problem: how can he defend both the c2 and e4 pawns?
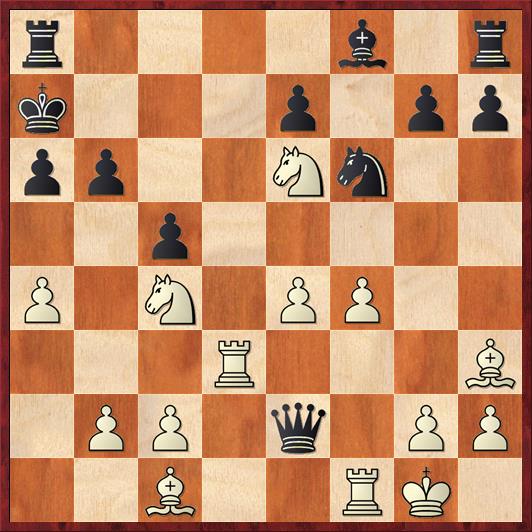 Position after 19. … Nf6. White to move.
FEN: r4b1r/k3p1pp/pp2Nn2/2p5/P1N1PP2/3R3B/1PP1q1PP/2B2RK1 w – – 0 20
20. Ne3! …
A neat solution. White’s pieces surround the Black queen like Lilliputians. If Black grabs the pawn with 20. … Nxe4?, then 21. Bg4 traps the queen. Of course the queen can give herself up for a rook, but in the resulting position White has two pieces for a rook, a huge lead in development — in short, a won game.
20. … c4 21. R1d1 c3 22. b3 …
Patience! There is no need to rush with 22. Nd4, which would allow 22. … cb.
22. … Qh5
The queen beats a shame-faced retreat. Around this time the computer starts to realize that its position is in shambles. (Up through 18. … Qe2 it thought it was ahead.)
23. e5 Ne4 24. Rd7+ Kb8 25. Bg4 Qh6 26. Rfd1 …
 Position after 26. Rfd1. Black to move.
FEN: rk3b1r/3Rp1pp/pp2N2q/4P3/P3nPB1/1Pp1N3/2P3PP/2BR2K1 b – – 0 26
At this point a human would probably resign. Shredder does the computer equivalent: it starts shedding huge amounts of material.
26. … Nd6
Of course I expected 26. … Nd2, but the fact is that after 27. Bxd2 cd 28. Rxd2 White will checkmate very soon. Black sees this and gives up a piece to prevent mate.
27. ed Qxf4
Now giving away a whole queen! This shocked me during the game, but after the game I realized that after 27. … ed 28. Nd4, checkmate is absolutely unstoppable. For example, 28. … Qxf4 29. Nc6+ Kc8 30. Nd5 with another version of the R+2N checkmate that we saw earlier. In the computer’s perverse logic, it is better to give up the queen than to be checkmated. Even better, of course, would be to resign.
28. Nxf4 ed 29. Rd8+ resigns
As I pointed out before, Black’s two rooks and bishop are still on their original squares. Even though they never did a thing — in fact, precisely because they never did a thing — they are responsible for the demise of their king.