Continuing from last time…

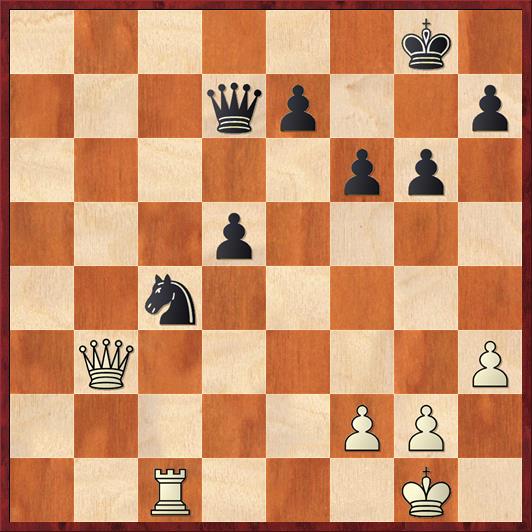
Position after 33. Rc2. Black to move.
In my last post, we reached this position from my game with IM Ed Formanek in the 1994 Cardinal Open in Columbus, Ohio. The title of the post refers to the fact that I had a positive mental attitude throughout the game. Even though I made some mistakes, I had a definite idea of what I wanted to accomplish, and I think that was a major reason why I eventually managed to win.
Let me talk about the questions I asked at the end of the last post.
What is Black playing for, and what should his plan be? This is a really interesting question, with three components. (1) Black should absolutely try to trade queens. With queens off the board he does not have to worry about being mated, and he can advance his king and pawns together in a grand phalanx. I think his chances of losing would drop to near zero. The problem is: how can he force a queen trade? (2) If Black is playing for a win, he eventually needs to start pushing his central pawns. If they start rolling, the clock starts ticking on White’s attack. On the other hand, pushing the central pawns definitely opens Black up to some risk. (3) A much safer course of action is to activate the pieces first, and only start moving the pawns forward after the queen and knight have been well centralized (or until the queens have been traded). Activating the pieces gives Black better chances of a quick-strike counterattack if White pushes too hard for the win (e.g., leaving the back rank uncovered).
What is White playing for, and what should his plan be? (1) White has every right to play for a win even though material is nominally equal. The rook is a stronger piece than the knight, and you will see its superiority demonstrated very clearly in this game. (2) The main way to win this position is to play for a checkmate, and that means White has to focus on the kingside and especially on controlling the back rank, which Black cannot defend. (3) To achieve this, White has to keep queens on the board but should trade a pair of rooks. The rook trade accentuates the disparity in strength between the remaining rook and the knight. With no black rooks on the board, White’s remaining rook has the freedom to set up shop on any rank or any file, unopposed. (4) The trickiest part of the position is balancing defense and attack, because if White goes all in on the attack, he may leave his king vulnerable.
Let me make one little comment about point (2). I think that the importance of checkmate in the endgame, particularly multiple-piece endgames, is greatly underrated. People think that once you get to an endgame, you don’t have to think about checkmate any more. But, as I was editing Daniel Naroditsky’s book “Mastering Complex Endgames,” I saw one example after another of positions where a checkmate threat tipped the balance. The difference between a middlegame and an endgame is that in the middlegame, checkmate is an end in itself. In the endgame, checkmate is usually a means to an end. Typically you can’t force mate, but the threat of mate forces your opponent to make concessions that eventually cost him. We’ll see that in this game. The threat of mate forces Black’s king out into the center of the board and leaves his kingside pawns without any defenders.
The importance of checkmate threats in multi-piece endgames was a major revelation to me. Alas, Daniel was not so impressed by my revelation and did not mention it in his book.
Now let’s see some concrete moves and discuss these general themes in the context of what happened in the game.
33. … Rc8?!
I believe this is an inaccuracy, and the computer agrees. As discussed above, the trade of rooks helps White. Black may be forced to allow a trade eventually, but he should follow the principle of maximum resistance and tell White, “I won’t trade until you make me.”
You may say, “but doesn’t trading help Black defend, because it reduces the amount of mating material?” No, not really. The second rook does not help White as much as the one rook helps Black.
The computer likes 33. … Rb7. White can double all he wants on the c-file, but Black covers all the penetration points. White will have to switch over the b-file with 34. Rb1 and force a trade of rooks that way.
34. Rxc8+ Nxc8 35. Qe3 d5
A natural move, as otherwise the knight on c8 has nothing to do. Initially Rybka evaluates the position at +0.25 for White. But even without any errors from Black, White’s advantage grows markedly over the next few moves. A fundamental problem is the fact that this d-pawn is now disconnected from its brethren. This may be another indictment of 33. … Rc8, because it led to burying the knight, which led to playing … d5 in order to unbury it. I’m actually starting to think that 33. … Rc8 might have been the losing move!
36. Rc1 Nd6
Another key decision. You can see that Formanek has decided to activate pieces first, then pawns. If I had been playing Black, I would have been very tempted to play 36. … e5, and in my postgame analysis I didn’t see a way for White to break through Black’s pawn fortress.
However, in 1994 I didn’t have a chess computer to help me. In 2018 I do, and it says that the position really starts going sour for Black after 36. … e5 37. f4! This powerful stroke gives White’s queen and rook new lines with which to operate. One key point is that 37. … ef is met by 38. Qc3! — taking advantage of the exposed position of Black’s knight. White will win the f6 pawn and have good chances of winning the f4 pawn eventually and swarming the kingside. Another point is that if 36. … e5 37. f4 Qe6, White gets a beautiful new file for his rook after 38. fe fe 39. Rf1! Black’s phalanx of pawns no longer looks so imposing, and the rook on the f-file strikes terror into the Black king.
I can state categorically that if Formanek had played 36. … e5 I would not have found 37. f4! I feel sorry for him. He may have made the mistake of assuming a 2200 player would find a 2500-caliber move.
The move 36. … Nd6 is strategically sounder than 36. … e5, because in general you want to activate your pieces before pushing pawns in the endgame. But it has one flaw: it cuts off the d-pawn even more from the rest of Black’s army.
37. Qb3 Nc4
Now we get an interesting missed opportunity.
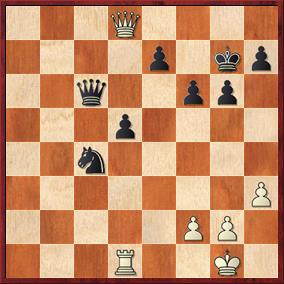
Position after 37. … Nc4. White to move.
FEN: 6k1/3qp2p/5pp1/3p4/2n5/1Q5P/5PP1/2R3K1 w – – 0 38
38. Qb8+?! …
I’m sticking to my plan of invading the eighth rank with the queen and rook, but there is a small tactical detail that I missed. Meanwhile, my over-commitment to this plan blinded me to an opportunity to win in a different (but also thematic) way.
The key move, pointed out by Rybka, is 38. Rd1! The principle is this: Black’s position at this moment has multiple weaknesses: the pawn on d5, the pawn on e7, the pawn on h7. In the endgame, a “weakness” is a pawn or square that isn’t protected by another pawn, and needs a piece to protect it. The Principle of Two Weaknesses, a major contribution of the Soviet school of chess, says that to win most endgames you need to create two weaknesses in the enemy camp. Here there are three, and this means that Black is in major trouble.
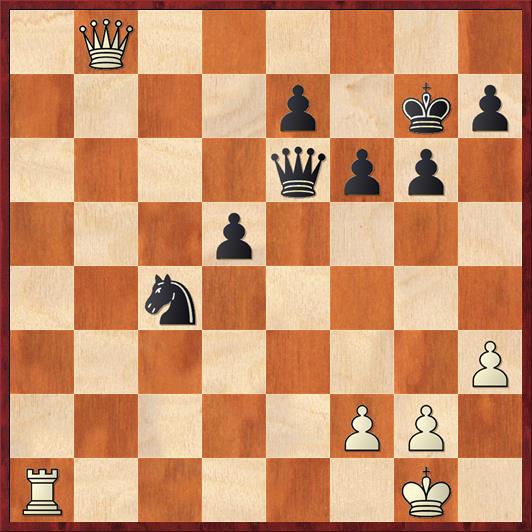
The best illustration of this theme comes after 38. Rd1! Qc6 (to defend against Qb7). Then White would win with 39. Qb8+ Kg7 40. Qd8 (diagram).
Position after 40. Qd8 (analysis). Black to move.
FEN: 3Q4/4p1kp/2q2pp1/3p4/2n5/7P/5PP1/3R2K1 b – – 0 40
A classic illustration of the weakness principle. Black is unable to defend the weaknesses on e7 and d5. (40. … e6 would create a new weakness on f6, which would fall after 41. Qe7+.)
We can see now that my answer to the Mike Splane question, “How am I going to win this game?” was incomplete. One way to win is by making checkmate threats. That way is heroic, exciting, and risky. The other is by poking at Black’s weaknesses. That way is calm, clinical, less risky. Guess which one is better?
Well, really the answer is that to be a well-rounded player, you need to be flexible enough to do both.
Going back to the position after 38. Rd1, Black’s other moves also work out badly. If 38. … Qd6 then 39. Qb7 Nb6 40. Rb1 Nd7 41. Qc8+ is strong, with the threat of 42. Rb7. If 38. … Qf5 39. Qb7 wins a pawn immediately, because after 39. … e6? 40. Ra1 forces checkmate. Note again how it’s the threat of checkmate that forces Black to make concessions. Finally, if 38. … Qe6 (best) Rybka finds the very computer-esque variation 39. Qb8+ Kg7 40. Qd8 Nb6 41. Kf1! +/- with the threat of 42. Re1.
So 38. Rd1 is the way the game should have gone. This is another good example of the “last drop” principle I mentioned in my last post: strong players wring every last drop of advantage out of a position. Even though Qb8+ is a good move, White could have made it even better by first playing 38. Rd1 and asking Black’s queen where it wants to go.
But let’s go back now to what actually happened in the game, after 38. Qb8+. There are lots of interesting things yet to come.
38. … Kg7 39. Ra1 Qe6!
Position after 39. … Qe6. White to move.
A clever defense, which must have taken me by surprise. I’m sure I thought at first that 40. Ra8, threatening Qf8 mate, was just winning. But then I noticed that 40. … Qe1+ 41. Kh2 Qe5+! forces a queen trade. In this way Black would achieve one of his main endgame goals. He would then have little risk of losing, and some significant chances of winning.
Nevertheless, I recovered from my surprise and found a pretty good option to keep the pressure on Black.
40. Qb4! …
I like the combination of defense (protecting e1) and attack (eyeing e7). Formanek plays a relatively obvious response.
40. … Qd6 41. Qb7 …
Here the computer stunned me by announcing that 41. Qxd6! was the best move, with an evaluation of +0.72 for White. Doesn’t this go against everything we just said? Certainly Formanek thought the queen trade favored Black. And I thought so, too; I was avoiding queen trades at all costs.
But the computer has a point. The difference between 41. Qxd6 Nxd6 and the line we just looked at is that Black’s knight is at d6, not e5. And that is almost the worst place it could be. White can now play 42. Ra5! and Black cannot defend the pawn with 42. … e6 because of 43. Ra6, skewering the knight and pawn.
However, Black does have a heroic defense that is to me very unclear: after 41. Qxd6 Nxd6 42. Ra5 Black plays 42. … d4! 43. Rd5 Nf5 44. g4 Nh4! and miraculously, White cannot take on d4 because of … Nf3+. Instead best play seems to be 45. Rd7+ Kh6 46. f4 followed by Kf2, and who knows what is going on?
I am not convinced that White is winning here, but the computer variation does highlight once again the value of an open mind. Both players assumed that White would never, ever want to trade queens — and that blinded us to the very real advantages that this particular version of the queen trade offered to White.
Back to the game:
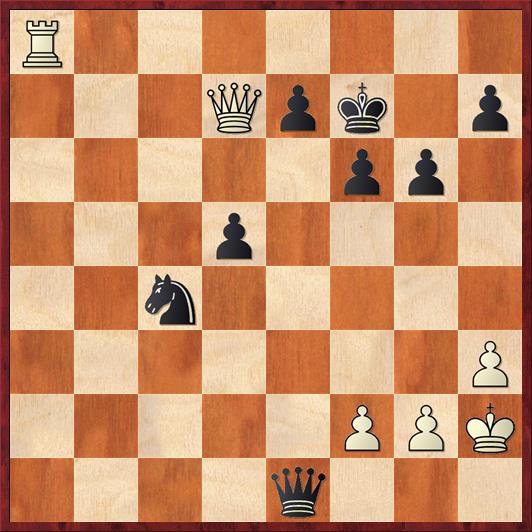
41. Qb7 Kf7 42. Ra8 …
In for a penny, in for a pound.

Position after 42. Ra8. Black to move.
FEN: R7/1Q2pk1p/3q1pp1/3p4/2n5/7P/5PP1/6K1 b – – 0 42
Now Formanek gives me my second undeserved gift of the game. (The first was 18. … f6; see my last post.)
42. … Qe5?
It’s very odd, in retrospect, that he found the right idea on move 39 but then missed the same idea three moves later. Black should play 42. … Qe6!, which once again prevents White from setting up a battery on the back rank. The queen covers c8, and if 43. Qb8 then 43. … Qe1+ 44. Kh2 Qe5+ trades queens as before.
Probably Formanek thought that e5 was a “more aggressive” or “more natural” square for the queen than e6. And so it would be… ordinarily. But not in this position!
My next move is equally odd.
43. Qd7? …
Why, why, why, why? Why didn’t I play 43. Qc8, setting up the queen/rook battery I have been trying to achieve for the last ten moves? It threatens 44. Qg8 mate, and Black can’t get out with 43. … Kg7 because 44. Qf8 is a beautiful twin to the other checkmate. Black’s only real defense is 43. … f5 (either before or after … Qe1+), but after 44. Qg8+ Kf6 45. Rf8+ Kg5 46. Qxh7 it feels as if Black’s king is going on the same sort of death march he did in the actual game.
The text move hands Black a free tempo at the worst possible time.
43. … Qe1+ 44. Kh2 …
Position after 44. Kh2. Black to move.
FEN: R7/3Qpk1p/5pp1/3p4/2n5/7P/5PPK/4q3 b – – 0 44
Can you find Black’s saving resource?
44. … Nd6?
White burned his bridges already. If Black wants to save the game, it’s now time for him to burn his bridges, too.
The correct move (found by Rybka) is 44. … Nd2!! That’s right, Black abandons the d-pawn and allows his king to be chased into mortal peril. It’s all okay, because White has no good way to prevent … Nf1+ with a perpetual check. For example, after 44. … Nd2 45. Qxd5+ Kg8 46. Qg8+ Kh6 47. Qf8+ Kh5 (only move) 48. g4+ Kg5 there are no checkmates to be found, and White had better start thinking about cease-fire negotiations.
After the text move, Black is probably lost.
45. Qd8 …
Finally the queen-rook battery is complete. Black’s king is no longer safe on the kingside, and has to come out into the open.
45. … Ke6 46. Qg8+ Ke5 47. Qxh7 Nf5 48. Ra2! …
Once again I like the way this move combines attack and defense. White defends his only weak point, and Black cannot defend his. At this point the computer starts showing a very large advantage for White, like 1.74 pawns. Of course, when you’re playing the game you don’t know this. It’s still not easy to chase down Black’s king — it takes exact calculation.
48. … Kd4 49. Qxg6 Qe5+ 50. g3 Kc3 51. Qg4 Nd4 52. Qd1 …
The noose starts to tighten. Even though I don’t see exactly how I’m going to win yet, I’m beginning to sense it.
52. … Qe4 53. Ra3+ Kc4 54. Re3 …
Again, attack and defense. Now it becomes possible to calculate all the way to the end. I am finally happy with a queen trade: if 54. … Qc2 55. Qxc2 Nxc2 56. Rxe7 d4 57. Kg1, and my king is able to stop the d-pawn in time. On any other move, I simply win the knight.
54. … Qf5 55. Qa4+ Kc5 56. Rc3+ Black resigns
I know it seems as if there are quite a few mistakes in this endgame, but keep in mind how complicated an endgame it is. Several of the mistakes only become apparent when you look at the game with a computer. In general, I think that I had a good plan and stuck to it, and in the end it worked. However, there were a couple places (moves 38 and possibly 41) where I should have considered deviating from the plan, and one place (move 43) where I deviated slightly and shouldn’t have. Oh well. Chess is hard.
I mentioned at the beginning that this game had some personal significance to me. One reason, of course, is that I don’t often beat International Masters. In fact, I think I have only beaten four people who had the IM title at the time of our game: Formanek (twice), Walter Shipman (twice), David Pruess, and Vladimir Mezentsev. Every one of those games is a keepsake for me.
The other significance of this game is that this tournament increased my rating to its highest mark ever (2257). Although USCF doesn’t do ratings while tournaments are in progress, only after they end, you can argue that this game was, rating-wise, the high-water mark of my career. In the next round I drew an expert, which probably cost me 3 or 4 rating points, and in my next tournament I started a long downhill rating slide that would last for 17 years.
Of course, you never know this at the time. In fact, my previous rating peak had been 2248 four years earlier, so I didn’t think that getting to 2257 was anything special; I expected to keep on going to 2300. I did know that the tournament might put me at my highest rating ever, but that was less important than just playing good chess. In the end, that’s all that matters.


{ 3 comments… read them below or add one }
Two comments: I would suggest that 43 … Qe1+ might deserve a question mark, because it unguards the d5 pawn. I think Black can improve with the move order 43 … Nd6 44. Qc8 Ke6 45. Qg8+ Kf5 ( now this is playable because the d5 pawn doesn’t hang with check. ) 46. Qh7 Qe1+ 47. Kh2 Qf2 and Black is safe with his king in front of the pawns.. After 48. Qe7? Qf4+ 49. Kg1 Qc1+ White must allow the perpetual check because of 50. Kf2?? Ne4+ 51. Ke3 Qf2+ 52. Kd3 Qd2# Maybe you can check this with Rybka.
I really liked your analysis of the starting position of this post. I particularly think your observation about trading rooks being bad for Black is a key take-away. That was not clear to me during my initial appraisal of the position. Thanks!
Two other questions Black should have asked himself are “what is my worst-placed piece?” and “where do my pieces belong?” The knight is completely useless on b6 and needs to be posted on a protected square in the The rook on e8 would stop attacks on both the first and second ranks . Move the knight to e5 and protect the e7 pawn from frontal attacks. After that the Black position looks rock solid. There’s your answer. How does Black reach that position? although it is counter-intuitive and looks crazy, he should start by moving the knight to the rim (a4) and then swinging it back to the protected c5 square. From there it can reach e5 from either d7 or d3. I think Black has a nice solid fortress and I would expect a draw to be the natural result.
And one short comment. In the Mike Splane question, “How am I going to win this game?” The word ” I ” is the key. There are often many ways to win, you want to find the way that best suits your individual playing skills, your style, and your comfort level.
Thanks for another great post.
Sorry, there’s a typo at the end of my note in the first paragraph. It should be 51. Kf3 Qf1+ 52. Ke3 Qf2+ 52. Kd3 Qd2#
Thanks for this post! The three things that resonated with me were:
1) The importance of establishing your own opening repertoire. Your 5 e3 isn’t the mainline in the Benko (not as far as I know), but it a) has a point, b) is not very common, and thus c) may throw one’s opponent on their own resources. This all leads to your main point (and my second point) that:
2) Playing your pet line in an opening will make you feel happy, and therefore make you play happy. And I see this principle all the time in my own games: I think I’m doing well in my game, and I end up winning, but the engine tells me afterwards the game around move 18 was only equal or – heaven forbid – I was actually worse! Ignorance can indeed be bliss sometimes.
3) Finally, the last drop principle is always good to keep in mind. I just missed this concept in my most recent game. In a B v N ending that I thought was clearly won (and I was happy; see point #2 above), I played … Bc4-e2 winning a sitting duck doubled pawn on g4. But, I should have played … Bc4-f1! attacking his g2 pawn, inducing it to move one square forward. Then I would play … Bf1-e2 winning his doubled pawn on g4. The point? I could now engage his g3 pawn via my g and h-pawns more quickly via … h5 and … h4 and create an outside passed pawn a move or two faster than in the game. As it turned out, it didn’t matter, but missing the opportunity to extract the last drop from such positions is a sort of sloppy chess sin than must be avoided on principle.