You know the move I’m talking about. Or if you don’t know, you SHOULD know. Ossip Bernstein versus Jose Raul Capablanca. Moscow 1914.
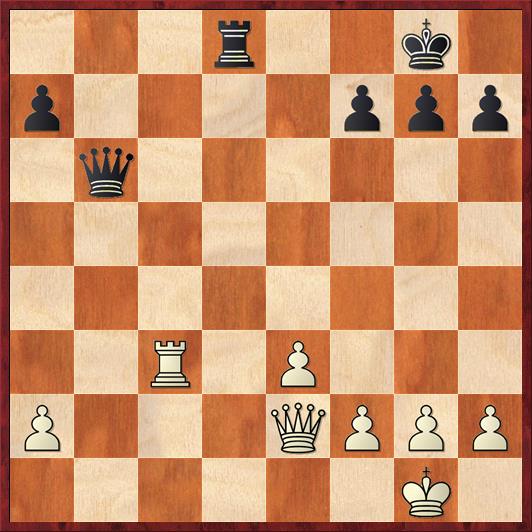
FEN: 3r2k1/p4ppp/1q6/8/8/2R1P3/P3QPPP/6K1 b – – 0 29
In this harmless-looking position, Bernstein (White) was surely expecting Capablanca to play something like 29. … Qb1+ 30. Qf1 Qxa2, when White should be able to hold a draw. But Capablanca played a shot that should be the dictionary definition of “bolt from the blue”:
30. … Qb2!!
Amazingly, White has no way to simultaneously defend the rook and prevent checkmate. For example, 31. Qe1 Qxc3!, or 31. Rc2 Qb1+ 32. Qf1 Qxc2, or 31. Rd3 Qb1+ 32. Qf1 Qxf1+ 33. Kxf1 Rxd3, or 31. Qd3 Qa1+ 32.Qf1 Qxc3, or … you name it, Black has an answer.
One hundred five years later — yesterday in fact — I got to the position below in a game against my computer. Shredder had Black, and it was set to a rating of 2288, which I have found to be a good level where it is hard to beat but not impossible.
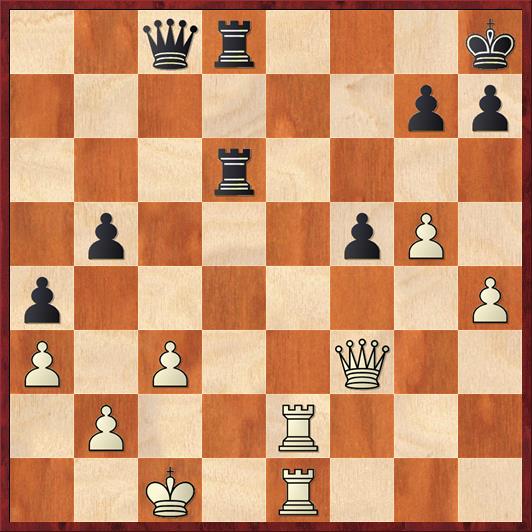
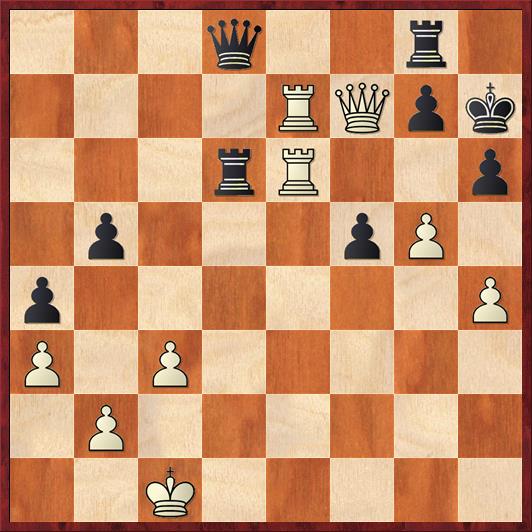
FEN: 2qr3k/6pp/3r4/1p3pP1/p6P/P1P2Q2/1P2R3/2K1R3 w – – 0 49
Shredder has just played 48. … Qc8 to stop the back-rank checkmate. Something about the position gave me the sense that there might be a combination in the air. Even though the back rank is defended for the moment, Black’s queen looks overloaded. Black’s rook at d6 is not able to help atall with back-rank defense.
The first moves I considered were 49. Qe3 and 49. Re7, but although they were promising, they didn’t look decisive to me.
That’s when a voice in my head said, “Wait, isn’t this kind of like the Capablanca position?” And I played:
49. Qb7! …
As in the Capablanca game, Black can’t take the queen because of Re8+ followed by mate. But I didn’t just make this move for show; I have some serious threats. The main threat, of course, is 50. Qxc8 followed by mate. Meanwhile, I’m also threatening Qf7 (the dream square for my queen) as well as the prosaic Qxb5.
Shredder played the move that I thought was forced.
49. … h6
Actually this move is not forced, and Rybka after the game pointed out 49. … Kg8, which defends f7 and also escapes from the back-rank mating net. I completely missed this! Nevertheless, White is winning after 50. Qxb5 Qd7 51. Re8+! Rxe8 (51. … Kf7 52. R8e7+ is also hopeless) 52. Rxe8+ Kf7 53. Qxd7+ Rxd7 54. Ra8. White wins a second pawn and the rook gets back just in time for defense. A really thematic variation is 54. … Ke6 55. Rxa4 Ke5 56. Rd4! (diagram)
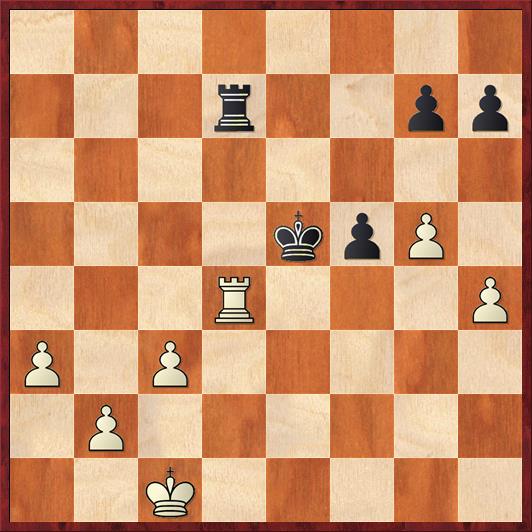
FEN: 8/3r2pp/8/4kpP1/3R3P/P1P5/1P6/2K5 b – – 0 56
If you’re not sure, you should really play out a few moves after 56. … Rxd4 57. cd+ Kxd4 58. Kd2 to convince yourself that White’s connected passed pawns easily trump Black’s protected passed pawn. If Black doesn’t trade rooks, ,then White’s rook at d4 just dominates the board, and the armada of three connected passed pawns will decide.
Okay, now back to the game.
FEN: 2qr3k/1Q4p1/3r3p/1p3pP1/p6P/P1P5/1P2R3/2K1R3 w – – 0 50
50. Qf7! …
Threatening a check on e8. This time I believe Black’s reply is forced:
50. … Kh7
51. Re7 Rg8
52. R1e6 …
I have to admit, after this I thought the game was just over. I was expecting 52. … Rxe6 53. Rxe6 (threatening Rxh6 mate) Kh8 54. hg, when White’s attack will not be denied. But Shredder came up with a move I hadn’t counted on.
52. … Qd8!
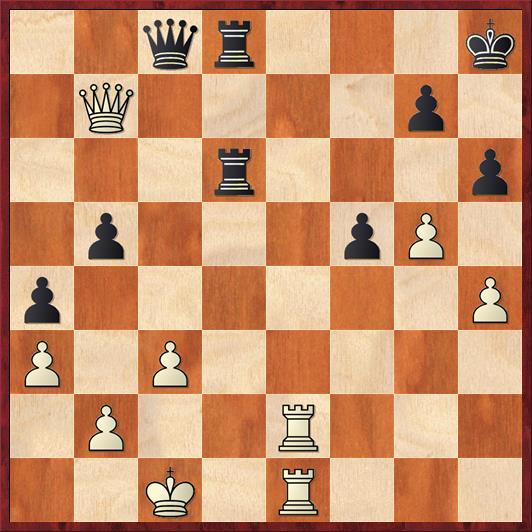
FEN: 3q2r1/4RQpk/3rR2p/1p3pP1/p6P/P1P5/1P6/2K5 w – – 0 53
Whoa! All of a sudden Black is threatening mate in two, so it’s do or die for White’s attack.
There is probably more than one way for White to win here, but I found what I think is a really neat solution.
53. g6+! Kh8
54. Qxg8+! …
That’s right, my second queen sac in five moves! If Black plays 54. … Kxg8, then 55. Re8+ Qxe8 56. Rxe8 mate is a very pure checkmate. So Shredder played
54. … Qxg8
55. Rxd6 …
Black can’t defend the back rank and his queen is way too far from my king to force a perpetual check. For example, 54. … Qa8 55. R6e6 Qh1+ 56. Re1 and White can start celebrating. Instead the computer goes into material giveaway mode.
55. … b4
56. R6e6 Qf8
57. Re8 Kg8
58. Rxf8+ resigns
My combination is not quite as clear-cut as Capa’s, but I still love the idea of Qf3-b7-f7 and I love the second queen sac, 53. Qxg8+. I also think that this may be the first time when knowing chess history enabled me to find the winning move. I readily admit that I do not know as much chess history as I should, so this was a rare treat.


{ 3 comments… read them below or add one }
A great catch and a very nice finish!
This topic of potentially utilizing the patterns of famous games in one’s own is a very interesting one to me. You may recall a post here at this site a few years ago where a modern player had essentially duplicated the back-rank motif from the brilliancy prize game Reti-Bogolyubov, New York, 1924. Of course, tactical motifs and ideas reoccur all the time; the interesting thing is when they very closely mimic the original or seminal game in which the tactic occurred, as Dana describes here.
Last year, I wrote an article titled “Antecedents” which was published in the Southern California Chess Federation’s magazine “Rank & File.” In it, I described how a position that could have occurred in one of my games closely resembled a striking tactical finish from one of Frank Marshall’s games. However, in my case I did not realize this during the game itself, but only a few days later whilst taking a shower (a detail not mentioned in the article!).
I’m now working on a follow-up article based upon my seeing a position at a local tournament, and flashing on a specific Alekhine game. Here, as in Dana’s experience, something clicked, and I made the connection between the position on the board and what had occurred in the Alekhine game. At-home analysis confirmed that White could have successfully channeled Alekhine’s idea from that game, although in the game itself White played another move.
As for me, perhaps my closest example of this nature is when I nearly pulled off the famous Swiderski fork trap. You might recall this miniature: 1 e4 e5 2 d4 exd4 3 Qxd4 Nc6 4 Qe3 Nf6 5 Bc4 Ne5 6 Bb3 Bb4+ 7 c3 and now 7 … Bc5! 8 Qg3 Bxf2+!! and wins the queen for two pieces. Still a stunning example of minor piece forks.
Anyway, in my game I got to the point where, as Black, with my KB on d4 and White’s Ke1 and Qg3, I played … Nc5 with the threat of Bf2+! followed by either Kxf2 Ne4+ or Qxf2 Nd3+. No doubt, the presence of White’s king and queen on the Swiderski squares is what gave me this idea.
Unfortunately for me, my move … Nc5 attacked the White KB@b3, and so the most natural move for my opponent was to retreat it with Bc2, from which the bishop covered the sensitive light squares. So I was left with my Nc5 blocking my Bd4’s retreat along the g1-a7 diagonal. For the sake of a one-move trap, I had jumbled up my pieces… Oddly, my opponent’s name in this game was … Frank Marshall!
Good job Dana!
Recently a Tal move, and now a Capablanca one.
Myself, I proud to have been able to carry out the Zagoryanski-Ojanen-Penrose attack:
1.e4 e5 2.Nf3 Nc6 3.Bb5 Nge7 4.c3 g6 5.d4 exd4 6.cxd4 Bg7 7.O-O a6 8.Ba4 b5 9.Bb3 O-O 10.Nc3 d6 11.h3 h6 12.Re1 Bb7 13.Bf4? Na5 14.Bc2 c5 15.d5 Nc4 16.Bc1 Qa5 17.Qd3 Rfe8 18.Re2 Kh7 19.Nd2 Ne5 20.Qg3 Qb6 21.f4 Nd7 22.Nf3 a5 23.Be3 a4 24.a3 Ba6 25.Ree1 Qc7 26.Rad1 Nc8
I know that I messed up around moves 13-17, but my opponent was playing extremely fast and carelessly so I was able to consolidate.
27.e5 dxe5 28.f5
Here my opponent finally sank into thought, a wee bit too late, though.
Nf8 29.Nh4 Qd6 30.Ne4 Qc7 31.d6 Qc6 32.fxg6+ fxg6 33.Nxg6 Kg8 34.Nf6+ Bxf6 35.Ne7+ 1-0
Ha this is funny.. I was just looking at some games that involve the hanging pawns set up. This was one of them. Also, nice move!