It’s been amazing to me to see how double e-pawn openings have changed over the last 10 to 20 years. Once upon a time, White would always press for an advantage, making threats, working toward the pawn break d2-d4, keeping Black on the defensive.
Not any more. In the new era, White just chills out. He plays d2-d3. He maneuvers his pieces around. For people like me, brought up in the old era, it’s not so easy to figure out what to do as Black.
Let’s look at the following example, from my most recent tournament (back in January — that shows you how little I’ve been playing).
Naman Kumar — Dana Mackenzie
Bay Area International, 2019
1. e4 e5 2. Nf3 Nc6 3. Bc4 Nf6 4. d3 …
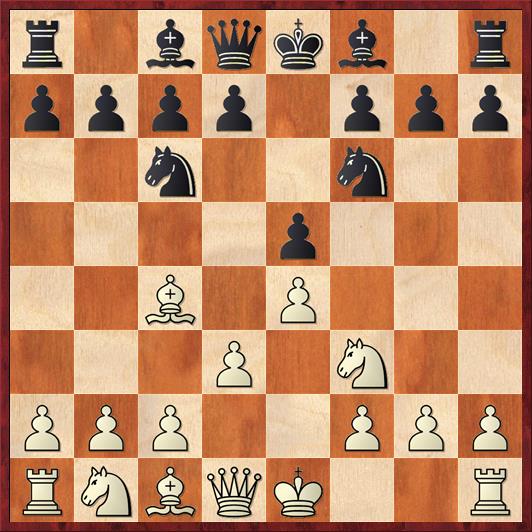
FEN: r1bqkb1r/pppp1ppp/2n2n2/4p3/2B1P3/3P1N2/PPP2PPP/RNBQK2R b KQkq – 0 4
What are we to make of this move? White has three exciting, dynamic alternatives to choose from: 4. Ng5, 4. d4, or 4. O-O. By contrast, 4. d3 was always a “nothing” move, a sign that White was either timid or didn’t know opening theory. As Black, until recently, I never bothered studying or preparing for that move.
But in the last 15 years, I’ve faced 4. d3 more and more often. Strong players — FM’s and IM’s and GM’s — now play it. And my record against 4. d3 is abysmal, far worse than it is against any of the sharp theoretical moves.
For the Black player, this position is disorienting. In double e-pawn openings, I’m used to sharp play, with threats and counterthreats on every move. But here, White makes no concrete threats!
Conventional wisdom says that Black should try to punish White’s lack of ambition by playing … d5 himself. If you analyze with a computer, it will say that Black is doing just fine. And yet this move really plays into White’s hands. After Black plays … d5, White will have a target to attack on e5, and that will give him the initiative. In effect, White is saying that Black has made the mistake of being the first player to play concretely, and because he is a tempo behind, he is even less able to do this successfully than White.
This morning, I got on ChessBase to see what GM’s are playing as Black these days. I found a whole raft of games by Ian Nepomniachtchi, who plays either 4. … h6 and 5. … d6, or the reverse order. In an earlier era, I would have scoffed. How can Black have time to play a non-developing move like 4. … h6? But in the Abstract Era, it makes sense. Black meets abstract with abstract. If White ever plays d4, Black argues that he has gained a tempo with … h6, creating luft and keeping White pieces out of g5. If White develops with 5. Be3, Black argues that White has now made a concrete move and 5. … d5 can now be played advantageously. After 6. ed Nxd5, it’s Black who has a target, namely the White bishop on e3. Finally, if White plays, say, 5. O-O and/or Nbd2, Black has ideas of playing … g5 and … Bg7. This is a completely different way of taking advantage of White’s lackadaisical play; Black seizes space on the kingside that would not ordinarily be available in the sharper classical openings.
All of these thoughts are very tentative. I haven’t played 4. … h6 in a single game yet. In my game against Kumar in January (my most recent tournament), I played the same move I’ve always played.
4. … Be7 5. c3 O-O 6. Bb3 d6 7. O-O Be6 8. Bc2 d5 9. Qe2 …
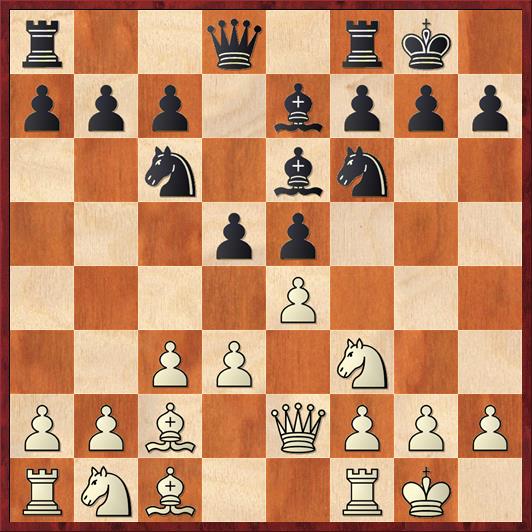
FEN: r2q1rk1/ppp1bppp/2n1bn2/3pp3/4P3/2PP1N2/PPB1QPPP/RNB2RK1 b – – 0 9
A crossroads for Black, who has a lot of choices. I’ve never liked 9. … d4, which I think overextends the center. The computer prefers 9. … Qd7 or 9. … Qd6. I distrust 9. … Qd6 because Black gets this ugly mass of pieces in the center that are all stepping on each others’ toes. As for 9. … Qd7, it feels to me like the move that should be played, but it involves a pawn sacrifice after 10. ed Nxd5 11. Nxe5. I don’t know this line at all, and my young opponent might be booked up on it.
When I was going over this game with Gjon Feinstein, he suggested yet another idea that had never even crossed my mind: 9. … b5!? His idea, I think, was to prevent White from bringing a knight to c4. But this move looks as if it creates huge weaknesses on b5 and c6! How can Black possibly get away with it?
The answer is, once again, that Black is taking advantage of White’s slow, abstract development to seize territory that ordinarily would belong to White. The natural way for White to probe those weaknesses is with 10. d4, but that works out terribly after 10. d4? de 11. Qxb5 ef 12. Qxc6 Bd5. Likewise, I don’t see any advantage for White after 10. ed Qxd5 11. Bb3 Qd6 12. Bxe6 Qxe6. Black has goaded White into opening the position, and Black’s better development compensates for the mild weakness of the b5 pawn. What a great idea by Gjon! It really shows me that I need to take a fresh look at these “abstract” positions. Routine plans may not be the best ones.
Instead I chose a move that disables White’s intended pressure on e5. I’ve played it many times in this position or similar ones. It isn’t bad, but my planless play afterwards looks very bad compared to Gjon’s dynamic, original approach.
9. … de 10. de Nd7?!
I was worried about the open d-file and worried about White’s threat of Qb5. But … Ne8-d6 is a better way to block the d-file, and White’s “threat” of Qb5 is a non-threat. After 10. … Ne8 11. Qb5? a6 12. Qxb7 Na5 White loses his queen. The fact that I didn’t see this indicates my poor form in this game. When you see a “threat” by your opponent, it’s very important to ask whether it really is a threat. Weaker players constantly defend threats that they don’t need to, and in this game I played like a weaker player.
11. Rd1 Qc8 12. Be3 Nb6?!
Black’s pieces are all tangled up. It’s amazing how much worse my position has gotten in three moves. What is the knight doing on b6? What is my queen doing on c8? In fact, what are any of my pieces doing, period?
For the next 17 moves, my young opponent played very strong, confident chess, and got a nearly won position. Then the endgame happened — the Great Equalizer that lets old men like me survive against young prodigies. Let me skip the details and go to the position where he gives me a chance to save the game.
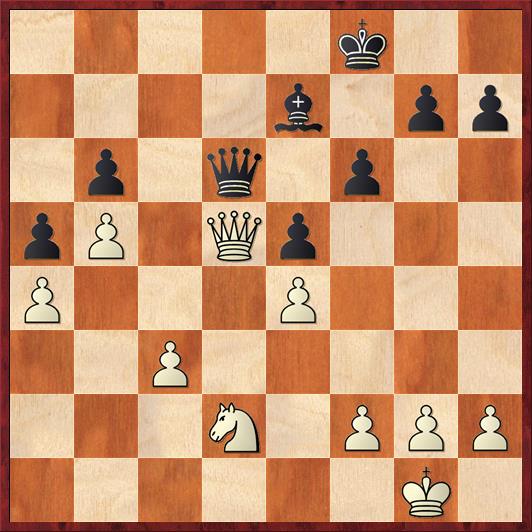
FEN: 5k2/4b1pp/1p1q1p2/pP1Qp3/P3P3/2P5/3N1PPP/6K1 w – – 0 30
Clearly a Queen trade is in the offing, because White has no good way to get away from it. But still, he can dictate the terms under which the trade happens. What should he play here?
The answer is 30. Nc4! Qxd5 31. ed. By forcing Black to initiate the trade, White gains the following advantages:
- He gets a pawn to d5. The importance of the pawn is not so much that it is a passed pawn, but the fact that it enables White to control all the squares c6, d6, and e6 and thus shut Black’s king out.
- He opens up the square e4 for his king. This is huge! The king can threaten to come to f5, or support an f3-f4 break. By comparison, in the game, the only square for White’s king is c4, a square where it threatens nothing and only gets in the way of his own c-pawn.
- If, as seems likely, Black plays … f5 to keep White’s king out, then White will have the opportunity to play Nxe5. This will have to be timed carefully, because Black can answer Nxe5 with … Kd6 winning back the pawn. I’m not 100 percent sure that White is winning, but the knight can create a lot of havoc, and the computer really likes White’s chances.
Instead, Kumar played 30. Qxd6? Bxd6 31. Nc4.
The only difference between this position and the above line is the position of White’s pawn on e4 instead of d5. But what a difference! In the game, White has no pawn breaks except c4-c5, but he is never able to get all of his pieces in a position to support that break. By contrast, Black is able to use his b6 pawn, bishop, and king to prevent it.
By the way, 31. Nb3 was also an interesting possibility, threatening (for example) 31. … Ba3 32. c4 Ke7 33. c5! and White wins. But instead Black should play 31. … Ke7 32. c4 Bb4! Now White cannot play his pawn break 33. c5 bc, because Black’s pawn on a5 is defended. Instead White has to bring up the reserves with 33. Kf1, and then 33. …. Kd6 clamps down and makes the c4-c5 break unfeasible.
It’s very instructive that the decisive factor in this endgame is not White’s extra pawn but the presence or absence of good pawn breaks or good routes for White’s king to penetrate the Black position. In the game, White has neither, and he is unable to convert the extra pawn to a win. I’ll give the remaining moves quickly:
31. … Bc5 32. Kf1 Ke7 33. Ke2 Ke6 34. f3 Kd7 35. Kd3 Ke6 36. g3 g5 37. g4.
I was happy to see this. Now the lines on the kingside are permanently closed, and all I have to do to secure the draw is, literally, to do nothing. And I have to make sure his king never gets a chance to come to d5. Ironically, this was a game where all my practice against the computer helped, because the computer very often allows me to save difficult positions by creating a fortress. (Computers to not understand fortress positions very well.)
37. … Kd7 38. Ke2 Ke6 39. Kd1 Kd7 40. Kc2 Ke6 41. Kd3 Kd7 42. Nd2 Kd6 43. Nf1 Bg1 44. h3 Bf2 45. Ke2 Bg1 46. Ng3 Ke6 47. Kd3 Bc5 48. Kc4 Bf2 49. Nf5 Bg1 50. Ng7+ Kf7 51. Nh5 Ke6 52. Ng7+ Kf7 53. Nf5 Ke6 54. h4 Bf2 55. h5 Bg1 56. Ng7+ Kd6 57. Ne8+ Ke6
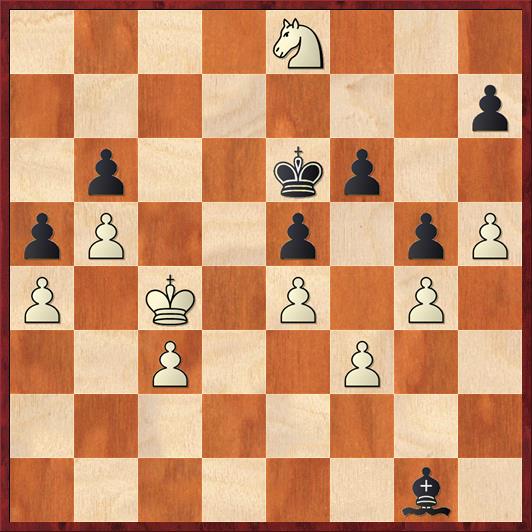
FEN: 4N3/7p/1p2kp2/pP2p1pP/P1K1P1P1/2P2P2/8/6b1 w – – 0 58
58. h6 …
Or 58. Nc7+ Kd6 59. Nd5 Ke6, when the White knight on d5 wins the beauty contest but is unable to generate a single threat.
58. … Bf2 59. Ng7+ Kd6 60. Nf5+ 1/2 – 1/2
From move 32 on, the computer never budged from its belief that White had a 1-pawn (or more) advantage — even in the final position. But it is easy for a human to see that White’s knight cannot break down Black’s fortress.
This was one of five draws I played in nine rounds — not a bad result (I even gained rating points), but a sign that I was slightly off form. I never put the slightest amount of pressure on my opponent, and the awkward plan (if you can call it a “plan”) of … Nd7, … Qc8, and … Nb6 made a terrible impression. This was actually the second time in this tournament that I got into big trouble with a misplaced knight on b6.
I’m not sure yet when my next tournament will be, but it’s always tricky to come back from a months-long hiatus. The first thing that goes is my practical decision-making ability.


{ 1 comment… read it below or add one }
The position after 9. Qe2 might feel modern, but actually this was the favorite structure of no other than Wilhelm Steinitz and inspired the Chigorin Opening.
Steinitz-Mongredien, 1863
Steinitz-MacDonnell, 1865
Steinitz-Blackburn, 1876
Steinitz-Chigorin, 1892