Have you ever had a game that you won and you didn’t understand why? I call it a Billy Preston game, in honor of the singer who had a #1 hit in the 1970s called “Will It Go Round in Circles.” The lyrics go:
“I’ve got a story ain’t got no moral / Let the bad guy win every once a while.”
Except that in the 1000 times I heard this song, that’s not what I thought Billy Preston was saying. I thought he said, “And the bad guy win and he wants to know why.” I like my version better!
I won a game against Shredder a couple days ago that was just like this. The opening led to a position that seemed pretty drawish to me. Then there was a little bit of a skirmish on the queenside, and all of a sudden, Wham! I had a winning kingside attack. After it was over, I felt like the guy in the black hat who has just killed the Lone Ranger, scratching my head and wanting to know why.
Here’s the position where things started to heat up. I’m playing Black (the bad guy), Shredder is playing White (the Lone Ranger), and Shredder’s rating is set at 2321.
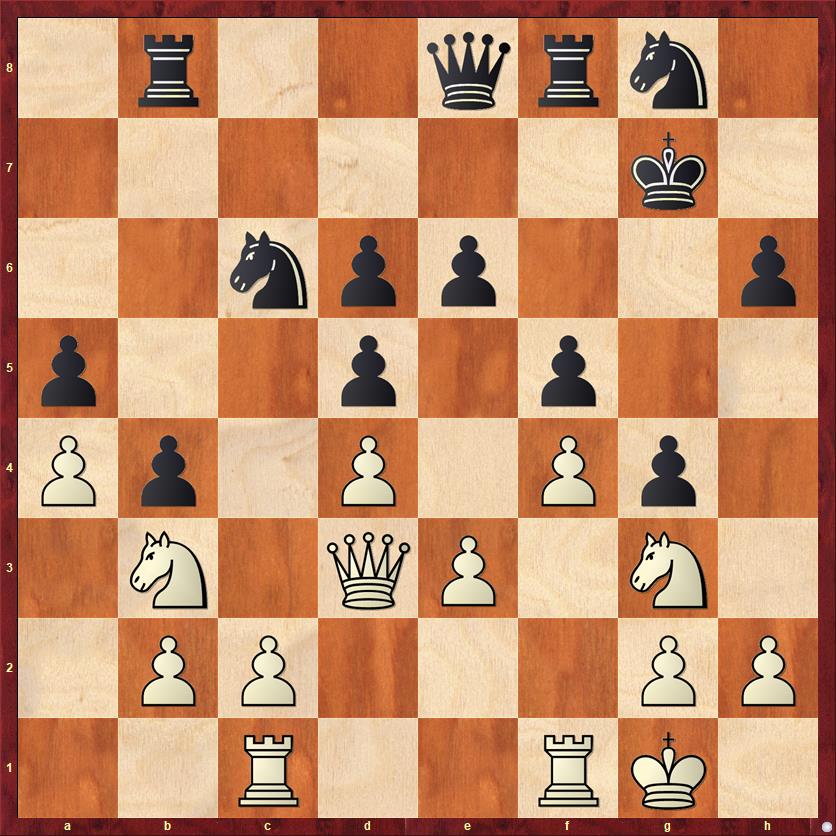
FEN: 1r2qrn1/6k1/2npp2p/p2p1p2/Pp1P1Pp1/1N1QP1N1/1PP3PP/2R2RK1 w – – 0 22
How do you evaluate this position? I think we can all agree that it is somewhat promising for Black. I have a space advantage on both sides of the board. However, as I learned from Robert Hess, White has the “pawn break advantage.” I don’t have any way to open lines or dramatically change the pawn structure. If I push my g- and h-pawns, White can always just sit there until I push to g3, and then he can play h3. Or if I play h3, he can play g3. This is why a pawn storm on only two files seldom works, unless you can back it up with a piece sac (as in the King’s Indian). I also have a potential pawn break with … e6-e5, but it’s very difficult to make this work because it leaves the f-pawn very weak. So for the foreseeable future, I have zero pawn breaks. White has one, or one and a half breaks: c2-c3 or c2-c4. This means that White can choose when he wants to open up the position.
So, to be honest, I was thinking that the game would be at best a 100-move draw for me. I was surprised when it turned into a win in twenty more moves. Shredder started by playing its trump card right away.
22. c4!? …
Both Shredder and Fritz seem to think that this is the right move, so who am I to argue? But when you have the only trump card (or the only pawn break), you should think very carefully about when to play it. Is this the position where opening up the position gives you the maximum play? If you don’t think so, then you should save it. In this case, perhaps Shredder saw my threat of … Nf6 and … Ne4 and felt that if it doesn’t start some active play on the queenside now, it’s never going to get another chance.
22. … bc 23. Rxc3? …
Now this, according to Fritz, is a mistake by Shredder. It should have played 23. Qxc3, with the idea of answering 23. … Nb4 by 24. Qc7+. This is a very double-edged line. One of Fritz’s ideas is to sacrifice the b3 knight for a dangerous attack. Thus, after 24. … Rf7 25. Qxd6 Na2, instead of the passive 26. Ra1, Fritz thinks White should go all in for the attack with 26. Qe5+! Nf6 27. Rc6! or 26. Qe5+ Kh7 27. Rc7! Rxb3 28. Nxf5!, exploiting the simultaneous pins on e6 and f7.
Of course I did not see any of this, and I could not tell which was better, 23. Rxc3 or 23. Qxc3. That is yet another reason to think carefully before opening lines. In a closed position, you have lots of time to maneuver your pieces to the right places. In an open position, you might get only one chance.
23. … Nf6?! 24. R1c1?! Nb4
The queries on the last two moves were assigned by Fritz. The reason is that 23. … Nf6 gave White a second chance to activate his queen with 24. Qa6! but White missed that chance. I should have played 23. … Nb4 first, with play similar to the game.
25. Rc7+ Rf7 26. Rxf7+ Qxf7 27. Qb1 …
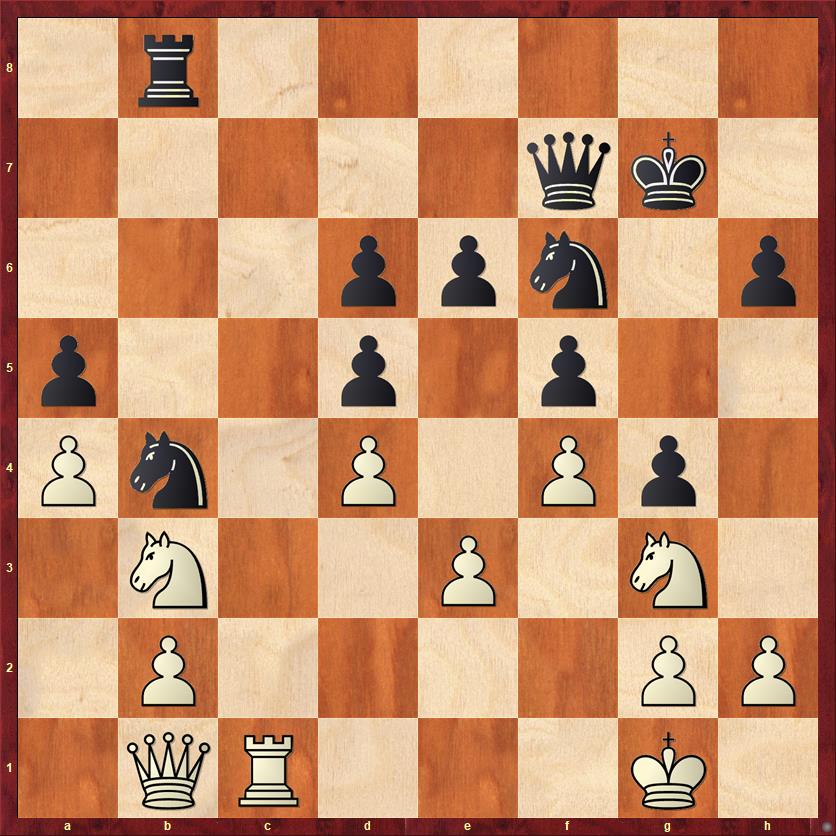
FEN: 1r6/5qk1/3ppn1p/p2p1p2/Pn1P1Pp1/1N2P1N1/1P4PP/1QR3K1 b – – 0 27
Mike Splane often talks about his “spidey sense,” and when I saw the move 27. Qb1, my “spidey sense” definitely started tingling. Compare this position to the lines we just saw, where White’s queen was invading Black’s position. Or compare it even to the position six moves ago. White’s position has clearly taken a turn for the worse. The queen is now kept under lock and key by Black’s knight. Any time you can immobilize a 9-point piece (the queen) with a 3-point piece (the knight), you have won a major strategic victory.
Surprisingly, neither Shredder nor Fritz saw it that way. I let Fritz think about White’s 27th move for several minutes, going 31 plies deep, and after all that time it evaluates 27. Qb1 at -1.15 for White, while the best move, 27. Qd1, is -1.09. So White’s mistake was earlier, when he didn’t take the opportunity to activate his queen with 23. Qxc3 or 24. Qa6.
It seems like such a tiny mistake, but the position just starts coming alive for Black and looking grim for White.
27. … Qa7
It’s funny, both queens are just one step away from the corner, but how much better Black’s queen is! My queen is licking her lips at the possibilities on the a6-f1 diagonal.
28. Kh1? …
White is in a position where he has to play “do-nothing” moves, but this move is worse than nothing.
28. … Kg6
Another irony. We’ve both “wasted a tempo” on king moves, but mine is more productive than Shredder’s.
29. Nd2 h5 30. h3 Qa6
Because Black won the battle on the queenside, he is now prepared to win the war on the kingside. Black’s queen threatens to descend on d3 or e2, while White’s queen is still condemned to exile on b1, where it is neither an effective defender nor an effective attacker.
31. hg?! …
I would never have played this move. To me, White’s only hope for saving the position is to keep lines closed, so I would play 31. h4. But computers don’t think in this “big picture,” strategic way. Plus, the computer also works out that after 31. h4 Qd3 32. Qxd3 Nxd3, White’s position is way too leaky to have any hope of building a fortress.
31. … Nxg4
I debated long and hard between this move and 32. … hg, but I decided to take with the knight because I liked the way that my knights were starting to swarm. Of course, the pawn capture is also good.
32. Rc3 h4 33. Ngf1 Qe2
Boom! Now it’s more than a spidey sense. I should win this game unless I blunder.
34. Nf3 h3!
The blows are just coming too fast for White to defend.
35. Nh4+ …
Careful!
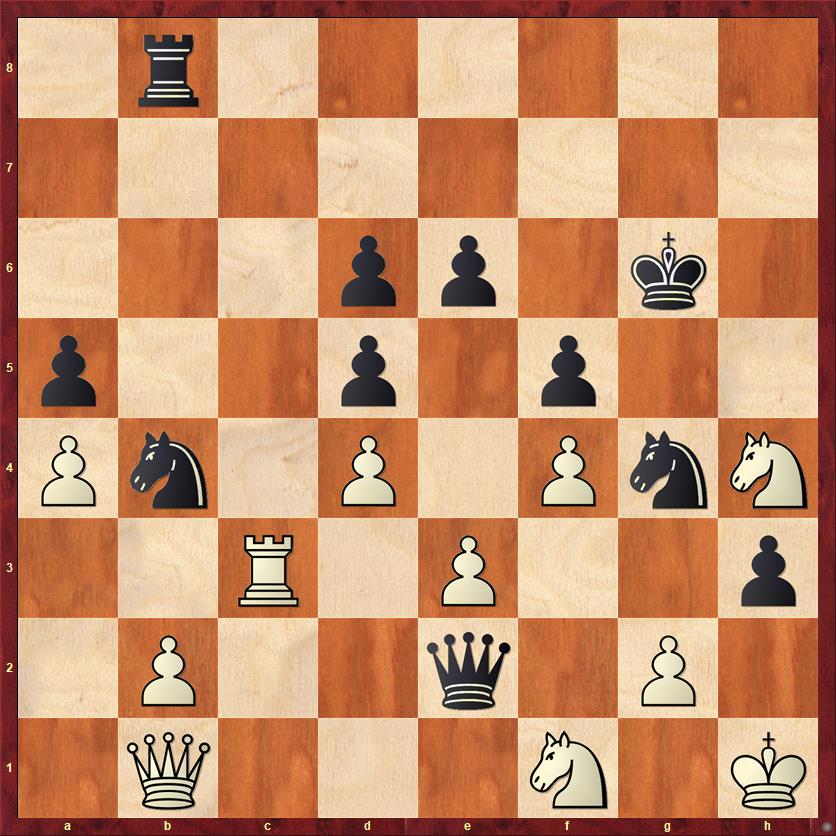
FEN: 1r6/8/3pp1k1/p2p1p2/Pn1P1PnN/2R1P2p/1P2q1P1/1Q3N1K b – – 0 35
Okay, I have a shameful confession to make. I thought for a while about 35. … Kh5 but finally decided not to do it because I wanted to keep the h-file open for my rook. Can you see a slightly better reason not to play 35. … Kh5?
The answer, of course, is that 35. … Kh5?? walks into a fork with 36. Ng3+. I did not even see this during the game, and that was a pretty bad failure. Dan Heisman has written a book called, “Is This Move Safe?” which is supposed to get you in the habit of doing a blunder check before you play your moves. But obviously it hasn’t worked for me yet.
35. … Kf6!
My reasoning wasn’t completely bogus. It is important to keep the h-file open for my rook. In fact, it makes all the difference in lines like 36. Ng3 hg+ 37. Nxg2 Rh8+, with mate to come, or 36. g3 Rh8, when White has no defense against … Rxh4 followed by … Qg2 mate.
Instead of those options, Shredder opted for
36. gh Nf2+ 37. Kh2 Ne4+ 38. Kh1 Nf2+
Saving time on the clock, but also changing my mind. I decided I liked a different discovered check better.
39. Kh2 Nd1+ 40. Ng2 Rg8 White resigns.
If White plays 41. Ng3, really the only move, then 41. … Qf3 will win the knight and a lot more to follow.
Lessons:
- Pawn breaks are incredibly important. They can either help you or hurt you, so you should be very careful about when to play them.
- When a piece of greater value is immobilized by a piece with lesser value, it often creates a major temporary imbalance that can be exploited by an attack on the part of the board the immobilized piece can’t get to.
- Even if you love attacking your opponent’s king, consider a different approach now and then. Sometimes a clear victory on another part of the board will give you extra resources that transform your attack from unclear to overwhelming.
- Don’t forget to blunder-check, even if you’re completely winning! In fact, especially if you’re completely winning.


