In choosing a game to show you from 1988, I have a problem. My biggest tournament success that year was the Georgia Congress, which I won with a 5-0 score, my first-ever win in an open tournament and indeed my first time ever with a 5-0 score in any tournament (even when I played in sections with a rating cap). Of course I want to show you a game from that tournament, but I’ve already shown you my best game! That was my last-round win against Mark Coles, which I annotated in a post called I Think It Was the Unicorns. I chose that game as one of my Six Memorable Games (a nod to Bobby Fischer’s famous book, My Sixty Memorable Games). If you haven’t seen that post, you really ought to read it first.
There were three reasons I won this tournament: endgames, endgames, and endgames. In round one, I won a really cool opposite-color-bishop endgame (with a pair of rooks) against a class-B player named Edward Briggs. In round two, I pulled out a win in a totally drawn rook-and-pawn endgame against Curtis Graham. I want to give Curtis a shout-out of support. He is currently fighting cancer, undergoing chemotherapy at Duke University Hospital, and I feel confident that he is going to whip cancer’s ass. I would really love to show Curtis’s game against me, in which he fought hard. But he did mess up the endgame, so perhaps showing you that game would not be seen as a “shout-out of support.”
Round three was a really messy game against an expert named Larry Johnson, who had beaten me in the same tournament the previous year. He played the King’s Gambit, and I unsoundly sacrificed a pawn back at him, on the theory that the gambiteer would not be happy with defending. I turned out to be right, and eventually he made a mistake that let me get to a winning endgame. But the game was just too sloppy for me to show it to you.
So that takes us to round four, the only one in this tournament that didn’t go to an endgame. This one was a sparkling miniature that ends with a Morphy-esque mate on move 21.
My opponent was a class-A player named Michael Spencer, who until that point was having the tournament of his life, going 3-0 with two consecutive wins against masters. He also played a gambit against me. As I did against Larry Johnson, I offered a pawn sacrifice in return. He greedily gobbled the pawn, and his king paid the price. Let’s see how!
Dana Mackenzie – Michael Spencer
1. d4 Nf6 2. c4 e5
The Budapest Gambit. I had played this for a short period myself, so I respected it and I decided that I would just try for rapid development, not worrying too much about holding on to the pawn.
3. de Ng4 4. e4 Nxe5 5. Nf3 …
More normal is 5. f4, but as I just said, I just wanted to develop my pieces.
5. … Nxf3 6. Qxf3 Bc5 7. Bd3 …
White’s setup with Q on f3 and B on d3 looks awkward and unnatural to me now. I can’t really recommend it. But it’s amazing how such an un-promising beginning turns into a brilliant victory in just a few moves.
7. … Nc6 8. O-O d6 9. Qg3 Qf6?!
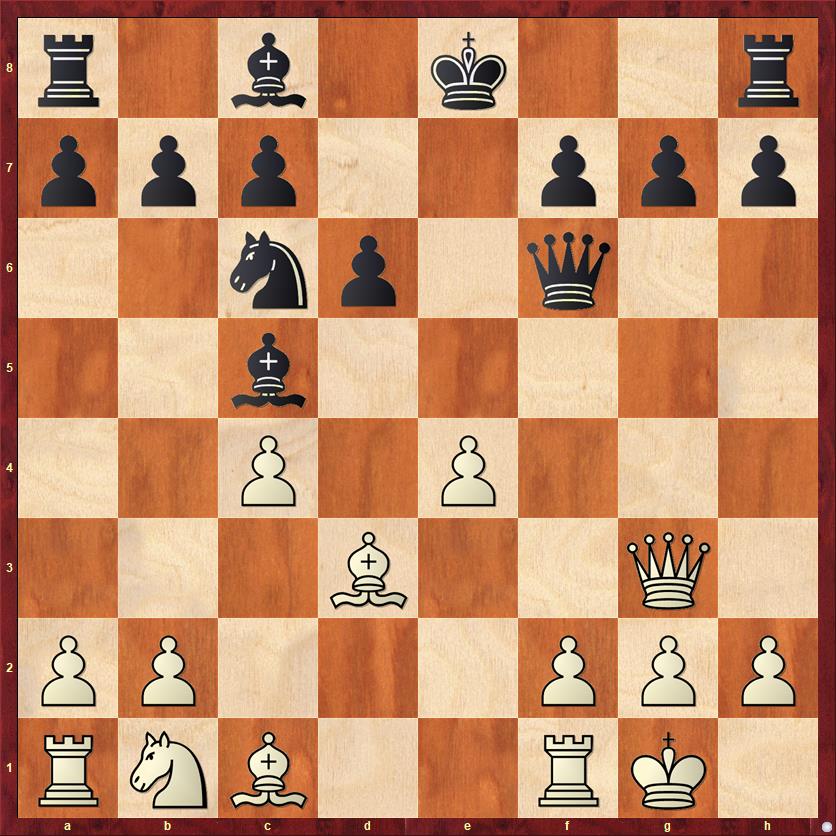
FEN: r1b1k2r/ppp2ppp/2np1q2/2b5/2P1P3/3B2Q1/PP3PPP/RNB2RK1 w kq – 0 10
Black starts getting into a little bit of trouble here. Queens at f6 (f3) are rarely well posted if they can be harassed by a knight coming to d5 (d4). There is nothing wrong with castling here. Maybe he was afraid of 9. … O-O 10. Bh6, but Black can easily parry White’s threat with 10. … Bd4 or 10. … Qf6.
10. Nc3 Be6?
Now White’s attack really starts to gain momentum. Black could still castle here. It’s a little bit embarrassing after 10. … O-O 11. Nd5 Qd8, because Black has wasted two tempi for nothing, but there is still no fundamental weakness in his position. Alternatively, 10. … Qg6 would be solid.
11. Nd5 Bxd5
Opening lines against his own king. Yikes! But the alternative is giving up a pawn for nothing with 11. … Qd8.
12. ed Nb4
Perhaps he was thinking that I would take time to move my bishop, and then he could castle. But I’m looking at that open e-file and smelling raw meat.
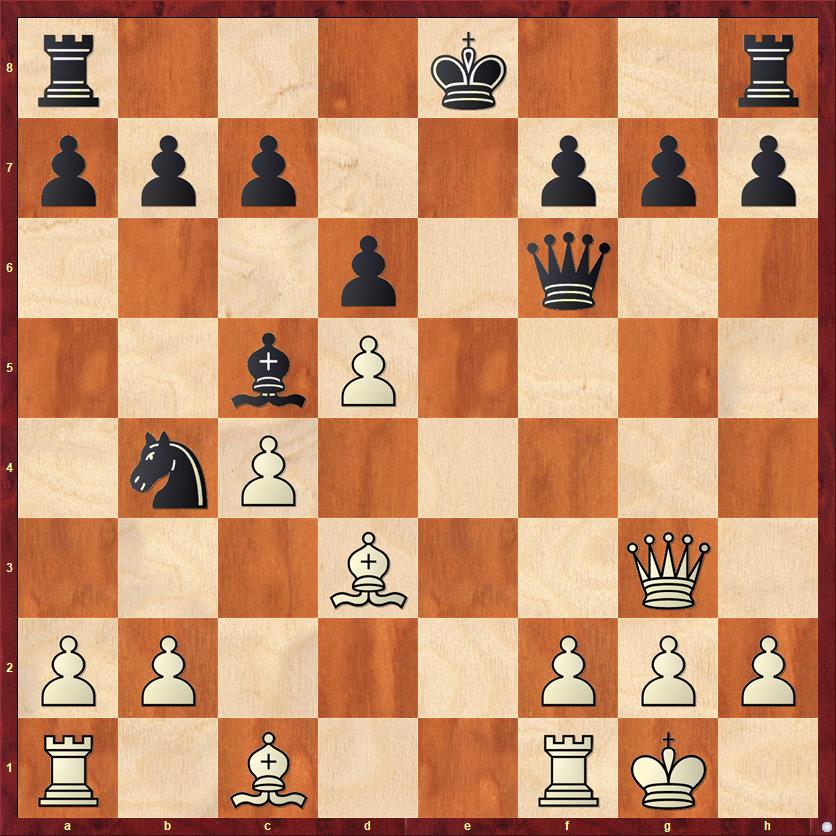
FEN: r3k2r/ppp2ppp/3p1q2/2bP4/1nP5/3B2Q1/PP3PPP/R1B2RK1 w kq – 0 13
13. Bg5! …
Note that 13. Re1+? is not as good because after 13. … Kf8 14. Bg5?? Black would have the answer 14. … Bxf2+! It’s important for me to keep f2 protected, so the check has to be played with the other rook.
13. … Qxb2
Black had a really tough choice here, because 13. … Qd4 is also a serious possibility. But Spencer probably saw that he is going to be under attack in either line, and figured that he might as well get a pawn for his troubles.
My home analysis after the game went as follows: if 13. … Qd4 14. Rae1+ Kf8 15. Bb1 Qxc4 (“the only conceivable point of 13. … Qd4”) 16. Be7+ Kg8 17. Bf6 g6 18. Bxh8 Kxh8 19. Re4! Qxd5 20. Qc3+ Kg8 21. Rxb4 Bxb4 22. Qxb4. “With a piece for two pawns White should win,” I wrote. This line is basically correct, but it does show some of my misconceptions as an annotator and player. The comment that 15. … Qxc4 is the “only conceivable point of 13. … Qd4” might be true, but it doesn’t mean that Black has to play this move immediately. The move 15. … f6 very much needs to be taken into account, contesting the dark squares and trying to give the king some luft before chasing the c4 pawn.
When I play against the computer, I’m constantly making this sort of mistake. I look at the most “logical” line, and I forget that both players can play little intermezzos that are designed to improve upon the “logical” line in some way.
14. Rae1+ Kf8 15. Re7! …
The move is pretty obvious. The exclamation point is because I had to calculate a lot of possible Black defenses. But at that point in my life, as I’ve said before, 90 percent of my thinking was calculation, so I loved positions with a lot of “if he does this, I do that” thinking. I had more difficulty in positions where there is nothing to calculate.
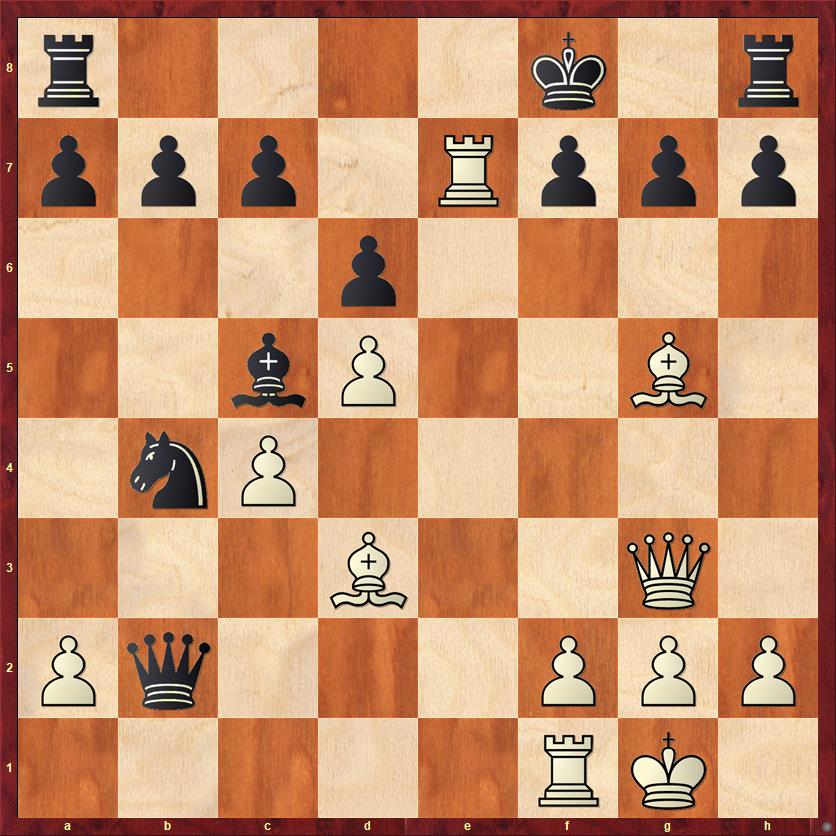
FEN: r4k1r/ppp1Rppp/3p4/2bP2B1/1nP5/3B2Q1/Pq3PPP/5RK1 b – – 0 15
15. … Nxd3
Everything loses for Black. Let’s walk through some of the options.
15. … f6 is the first move that I would look at. White has two pieces en prise! My intention was to play 16. Bc1, and this move works, but there are some complications I didn’t see. Black can throw in an intermezzo: 16. … Bxf2+!, forcing White to give up the protection of his bishop. Then 17. Rxf2 Qxc1+ 18. Rf1 Qh6 and Black has survived the first wave of the attack and even has two extra pawns. But the attack continues: 19. Rxc7 Rd8 (forced; if 19. … Nxd3 20. Qxd6+ followed by mate) 20. Qe1!! (an exquisite little move, once again threatening mate and oh, by the way, attacking Black’s loose knight on b4) 20. … Re8 21. Qxb4 Qe3+ (Once again, Black proves to have more resources than expected. He’s winning the piece back.) 22. Kh1 Qxd3 and now do you see how to end the game?
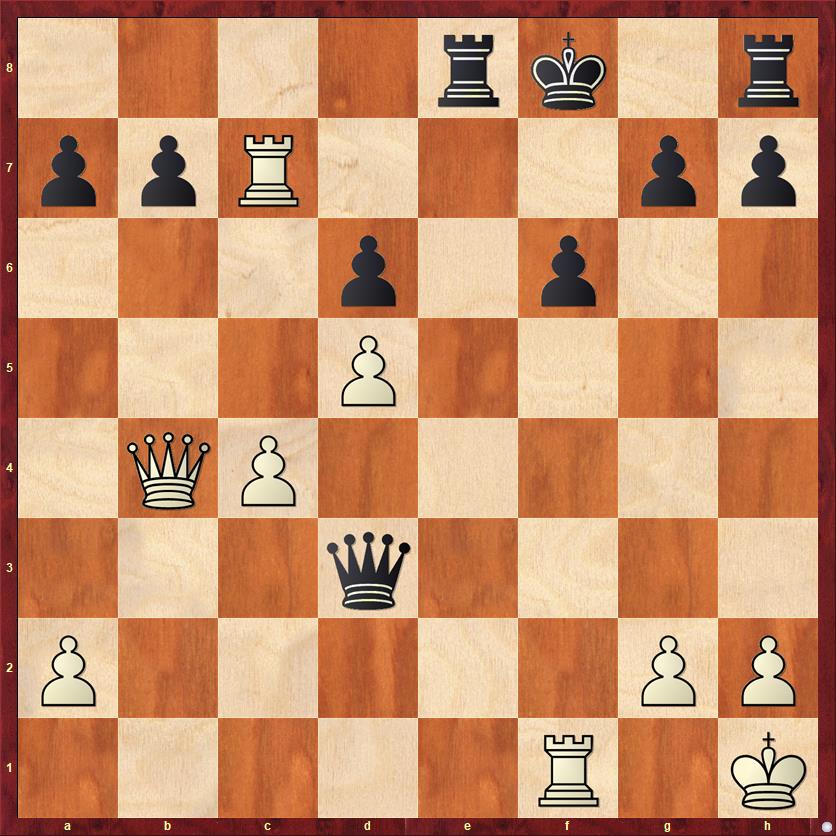
FEN: 4rk1r/ppR3pp/3p1p2/3P4/1QP5/3q4/P5PP/5R1K w – – 0 23
Give yourself a gold star if you spotted 23. Qxd6+ Kg8 24. Rxg7+!! Kxg7 25. Qxf6+ Kg8 26. Qf7 mate. Give yourself about twenty gold stars if you calculated this entire combination on move 15. Obviously, I didn’t. I missed 16. … Bxf2+.
Okay, now let’s go back to the third diagram. Here are some other options for Black.
If 15. … Re8, White wins with 16. Rxe8+ Kxe8 17. Qg4! f6 18. Qc8+ (but not 18. Re1+ Kd8 and the f2 pawn has been left unguarded). The queen hoovers up the c7 pawn, the b7 pawn, and finally the h8 rook.
If 15. … Qd4 (the move I was most worried about), White has another subtle answer: 16. Qh3! Qxd3 17. Rxf7+! and either 17. … Kxf7 18. Qe6+ or 17. … Kg8 18. Qe6 lead to mate very soon. It’s striking to me how White is able to force mate even with only two attackers, the queen and the bishop. Of course, the pawn on d5 helps, and it also helps that none of Black’s pieces are defending their king.
Instead, as I said above, Black played 15. … Nxd3 and the game continued as follows:
16. Qxd3 f6 17. Bc1 …
Reminiscent of the line we analyzed above, but here White would answer 17. … Bxf2+ with the simple 18. Kh1.
17. … Qd4 18. Qe2 …
Of course, a queen trade is the last thing I want.
18. … Qh4 19. Re1 …
My rook gets tired of not participating in the attack. This does give Black a chance to bail out into a losing endgame with 19. … Qxf2+ 20. Qxf2 Bxf2+ 21. Kxf2, but I would have no problem with that.
The best way for Black to continue the fight would be 19. … Bb6, but here I worked out another neat tactical finish: 20. Rd7 (threatening Qe7+, so Black’s reply is forced) 20. … f5 21. Qe6 Qf6 22. Qxf6 gf 23. Bh6+ Kg8 24. Rg7+ and we get an unusual version of “the mill,” where White will take, in succession, the c-pawn, the b-pawn, the a-pawn, the rook on a8, and the rook on h8. A truly picturesque finish! I really wish it had ended this way.
Instead, Black just missed my main threat and played
19. … f5? 20. Re8+ Kf7 21. Qe6 mate.
Maybe this was a “ghost piece” scenario where he thought his pawn was still on f6, so that his king could escape to g6. Or maybe he was just tired of defending.
Lessons:
- There’s a word for people who enter into middlegame-style complications before they castle. That word is “losers.”
- In tactical positions, you can often identify a “main line,” but you should not end your analysis with that variation. Very often there are subtle tactical tweaks you can make to the position, called intermezzos, which either improve or weaken the main line. You need to consciously seek these moves out, because often they will seem “illogical” at first sight. Both the attacker and the defender can make use of these “illogical” moves.
- When you’re behind in material and attacking, don’t rush to recover your material. Very often you can get more material (or checkmate) by playing moves that keep the attack going and make new threats. You can call this “twisting the knife,” although that is a very unpleasant metaphor when you think about what it really means.
- A common kind of analysis error is the “ghost piece” error, where you move a piece and then, later in the analysis, expect the piece to still be on the square where it started.


{ 3 comments… read them below or add one }
The windmill in the note to 19…Bb6 is a truly fine one. I will show it to my kid students, who love windmills almost as much as smothered mates.
Yup, my kids give two thumbs up to the windmill. They also spotted how much of Black’s disaster stemmed from not castling–a point we are trying to work on.
Hi Mary, I’m so excited to hear that one of my games was immediately useful for a lesson! It’s one that I might use for my students too.