Today I’m going to write about yet another team chess game. This is one that I played last night, playing Black with Thadeus Frei against Cailen Melville and Gjon Feinstein. We were using new experimental rules. The time control was 7 minutes for both sides, and each player would make five moves in a row. For instance, I played moves 1-5 for my team, Thadeus played moves 6-10, and so on.
Thus, when we got to the position below, it was Thadeus’ move, and I had the privilege of sitting on the sideline and nodding sagely while he played the last few moves of the game with courage and brilliance. “Oh yes, of course, that’s what I would have done …”
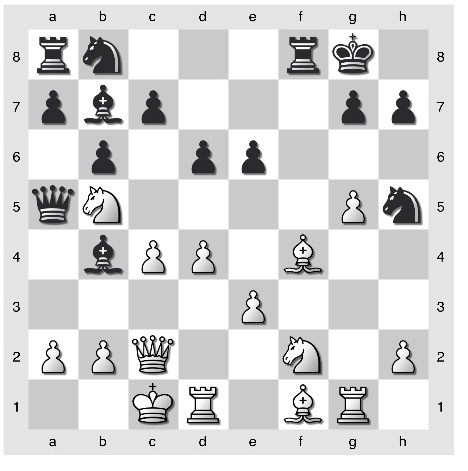
Black to move.
1. White has just played 16. Nb5. What would you do here and why?
Well, the answer to the “what” question is going to be pretty obvious when you look at the next position, so you should try to answer this question before scrolling down and seeing the next position.
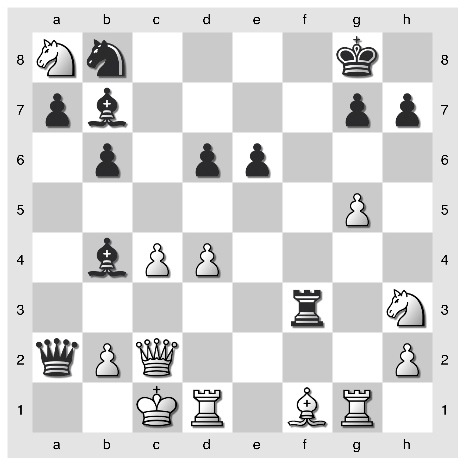
The move that Thadeus played was 16. … Qxa2. White continued 17. Nxc7, which is more or less forced because otherwise White has lost a pawn and severely compromised his queenside for no reason. “We” (i.e. Thadeus) played 17. … Nxf4 18. ef Rxf4, and arrived at the position below:

White to move.
2. What is wrong with the “obvious move” 19. Nd3? (This is in fact what White played in the game.)
When we went over the game afterwards, Gjon asked what would have happened if White had played the move 19. Nh3 instead. Of course the first reaction that Thadeus and I had was to play 19. … Be4, but this turns out to be surprisingly ineffective after 20. Bd3. Black suddenly has a lot of pieces hanging.
That’s when I suggested the move 19. … Rf3! I admit that when I suggested it I had no idea of all the rich tactical ideas underlying this move. We discovered almost all of them in our post-mortem analysis, one fantastic line after another. There was just one thing we missed, which I’ll get to at the end.
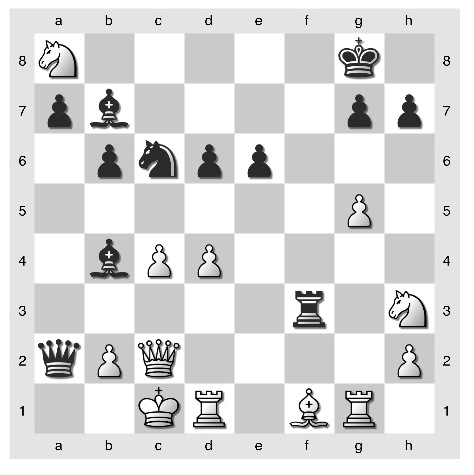
3. It seems hard to believe at first that Black can get away with 19. … Rf3 because 20. Bg2 seems to skewer everything. But what is Black’s winning resource?

Black to play and win.
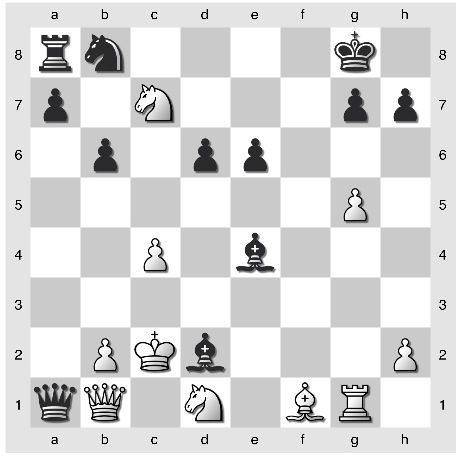
4. Next it’s reasonable to ask what Black’s plan is if White simply takes the exchange with 20. Nxa8.
Black to play and win.
Note that I want a plan here, not just a move. Again, you should see if you can answer this one before you move on to the next question. There are actually a couple of possible answers here, but I think that there is a primary one that will make the first move of the combination apparent. This is probably the most well-hidden point behind 19. … Rf3, although that is of course a matter of opinion.
Okay, have you found your plan?
Assuming you have, let’s move on. After 20. … Nc6!! White has several ways that he can try to foil Black’s plan.
White to move.
5. How does Black win after 21. Rg3?
6. How does Black win after 21. Rd3?
7. How does Black win after 21. Bg2?
8. Finally, we get to the one thing that the computer spotted that the humans failed to spot. We have now seen that after 19. Nh3! Rf3! both 20. Bg2? and 20. Nxa8? fail. Can you find any way for White to save the game?
And now for the answers:
1. Thadeus’ move 16. … Qxa2! is right on principle because White’s king is nearly in a mating net. That is where all the later tactics come from. As a chess player you need to learn to “smell blood in the water.” When you get a king in this much trouble, there’s a good chance it’s worth sacrificing an exchange. Also, if Black plays a lame move like 16. … Rc8 to defend the c-pawn, he is just going to lose material after 17. a3. Black must play energetically to avoid getting his bishop trapped.
2. The game ended 19. Nd3? Rxd4!! and White ran out of time. The main point is that 20. Nxb4? loses the queen to 20. … Qa1+ 21. Qb1 Rxd1+. Also, of course, Black threatens … Rxc4, and even though White can get two rooks for a queen this sort of variation never works out for him because his pieces are too disorganized. If White tries 20. Nxa8, he is swiftly checkmated by 20. … Qa1+ 21. Qb1 Rxc4 mate. Perhaps the best try for White is 20. Nf2, both defending c4 and d1. But now Black wins with an extraordinarily brutal series of moves: 20. … Qa1+ 21. Qb1 Rxd1+ 22. Nxd1 Bd2+! 23. Kc2 Be4+ (diagram)
After 24. Bd3 Bxd3+, White’s king is finally pried away from the defense of the queen, and Black should win.
3. Black smashes White’s defenses with 20. … Be4!! 21. Qxe4 Rc3+!! If 22. bc Ba3 is mate. If 22. Qc2 Rxc2+ 23. Kxc2 we get another position where White gets two rooks for a queen but his forces are too badly scattered. The computer likes 23. … Ba3 best, but 23. … Qxc4+ 24. Kb1 Qxc7 25. Bxa8 d5!, trapping the bishop, also wins.
4. The winning plan is … Nb8-c6-a5-b3+. Take partial credit if you said the winning plan is … Rf3-b3xb2 followed by … Ba3. The trouble is that this plan is easily defended by Rd3, and so Black needs to play … Nc6 first anyway.
5. If 21. Rg3 then 21. … Nxd4! is annihilating. The rook on d1 is overloaded. This is another point of … Nc6; there is more than one route to b3!
6. If 21. Rd3 then Black just continues with his plan of 20. … Na5. For example, if 21. Rxf3 Bxf3 and the bishop on f3 prevents White from using his rook on g1 to defend b3. Cute, huh?
7. If 21. Bg2 now we go with Plan B: 21. … Rb3! The point is that now 22. Rd3 is met by 22. … Nxd4! and again it’s annihilation: 23. Rxd4 Rxb2 24. Qxb2 Ba3 25. Qxa3 Qxa3+ etc.
8. Finally we get to the point that the humans missed. (But I think we might have found it if we hadn’t been so exhausted and thrilled by finding all of these beautiful wins for Black after 20. Bg2 or 20. Nxa8.) The correct defense for White would have been 20. Rg3! In the line above, 20. Nxa8 Nc6, 21. Rg3 was a tempo too late because Black had the reply 21. … Nd4. But here Black hasn’t developed his knight yet, and so there is nothing better than 20. … Rxg3 21. hg Nc6 22. Nxa8 (White has to grab the exchange while he can) Na5. And now the computer says that White can draw with 22. Qe2!, abandoning his king to the furies in order to secure a draw by perpetual check. I’ll assume that it’s right, because computers are good at computing such things. To be honest, I think that very few, if any, humans would be able to play such a fantastic defense with White.
Lessons? Well, I think the chief lesson is that when you have your opponent’s king in a mating net, virtually any material sacrifice is justified if it gains tempi. That is when you have to play your most creative chess, and when moves like … Be4!!, … Rc3+!! and … Nc6!! become possible.


