This weekend I played (and botched) a pretty cool endgame.
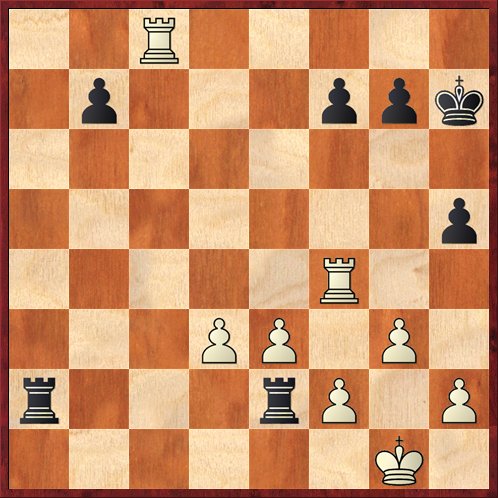
Here’s the scene: I’m playing tandem chess at one of Mike Splane’s chess parties. I’m Black, and my teammate is Richard Koepcke, a National Master. Our opponents are Gjon Feinstein (also a NM) and Dan Burkhard. The time control was 10 minutes for the game. We got to this position, where it was my move.

Black to play and … what? Win? Draw? Lose?
Here I chose 1. … Re2?, which turns out to be losing or close to it. My excuse is that I have just been studying double-rook endgames and I have seen positions over and over where the doubled rooks on the seventh rank wreak havoc.
Gjon and Dan played 2. Nc2, of course, and Richard and I played 2. … R8a2. The trouble is that this leaves the back rank unguarded. After 3. Nxb4 Bxb4 4. Rxb4 (not 4. Rc8+?? Bf8 — a resource I saw in the original position) Black cannot take on f2 because he has to stop the checkmate. And after 4. … h5 5. Rc8+ Kh7 Dan, whose move it was for the White team, found the star move 6. Rf4!
This is an important maneuver in double-rook endgames, and worth a picture.
The rook on f4 defends the weak f-pawn from the front, and at the same time threatens Black’s kingside pawns. This leaves Black’s “blind pigs” on the seventh rank looking rather impotent — one rook holding off two.
On the other hand, taking the b-pawn would have been a mistake, because 6. Rxb7 would allow 6. … Rxf2, and now Black’s doubled rooks on the seventh rank fulfill their destiny.
From the above position the game went 6. … f6 7. Rc7 b5 8. Rxf6, and White eventually won.
Now, let’s go back to the original position. (I’ll copy it again so you don’t have to scroll up.)
What should Black have done? The other move that I considered was 1. … Ra1!, and in fact this move appears to be winning. Gjon’s first suggestion for White was 2. R1b1, but in fact that loses instantly to 2. … Bxe1. (Amusingly, we did not notice this, but we did eventually find 2. … R8a3, which also wins for Black because White is baffled on which rook to take.)
So after 1. … Ra1! White’s only playable move is 2. R3b1. Here is where I had my other failure in analysis. I only looked at 2. … Rxb1 3. Rxb1 Ra1 4. Rxa1 Bxa1 5. Nc2 b3 6. Na3, when White’s knight controls the queening square in time and White should win.
But Black can do better: 2. … b3!! A pretty move, leaving both pawn and bishop hanging, but of course White cannot take either because he would lose a rook. This move also takes the important c2 square away from White’s knight.
Best play from here seems to be 3. Rxa1 Bxa1 4. d4! (A nice idea, trapping the bishop on a1.) 4. … b2! (Black is not afraid of entombing his bishop.) 5. Rb1 Rc8 (Rybka initially prefers 5. … Ra3, but this is better.) 6. Nd3 Rc2 7. Kf1 b5 8. Ke1 b4 9. Kd1 b3 (An amusing slow-motion race, as White’s king tries to chase the rook away from c2 and Black’s pawn races up the board to defend it. The pawn gets there just in time.)
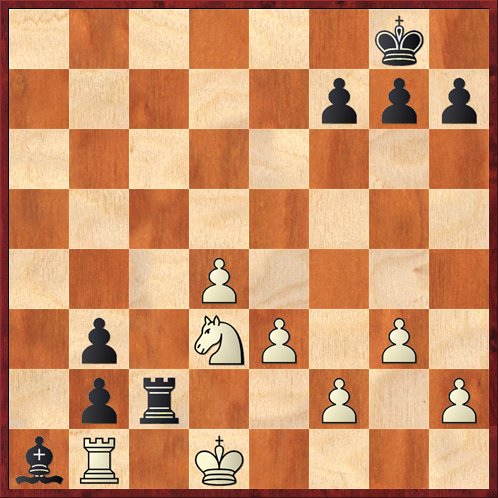
Position after 9. … b3 (analysis)
What’s going on in this position? It’s kind of a mutual zugzwang on the queen side, with all of the pieces either unwilling or unable to move. So all Black has to do is bring up the reserves. After 10. e4 f6! (it’s useful to try to hold back these pawns) I think that White can do nothing about Black’s glacially slow king march: Kf7-e7-d6 (watch out for the d7 square, though–it’s mined due to Nc5+)-c7 (c6 is also mined due to Nb4+)-b6-b5-c4, and it’s curtains. It’s interesting to watch Rybka’s evaluation of Black’s position get better and better as it “sees” this plan emerge, one agonizing step at a time.
Interesting to see how, in this position, Black’s doubled b-pawns turn out to be more powerful than White’s protected passed center pawn–a very unusual circumstance. Of course, they had a lot of help from Black’s other pieces.


