We had a great turnout at Mike Splane’s latest chess party (on Sunday, November 18) — thirteen people by my count. We were quite an international mix, too, with players originally from Brazil (Paulo), Poland (Milos), India (Praveen), Holland (JL), and Spain (Felix).
After the introductions we analyzed three games: Praveen’s first win against a master (Hayk Manvelyan), a very old game between Craig Mar and our host from 1982, and a game played just last week between JL and Felix at the Kolty Chess Club. They all had different virtues, but I thought that the most instructive one for middle-level players was definitely the one from last week.
This game had a few mistakes — in fact, lots and lots and lots of them! But my intention is not to embarrass JL and Felix. I think that the kind of mistakes they made were pretty common for class-A players or below. JL, who showed us the game, seemed very satisfied at the end, because we had found lots of ideas that he was never aware of when he was playing. So the game points out some clear avenues for improvement.
J L DeJong — Felix Hernandez-Campos
1. d4 Nf6 2. Nf3 e6 3. c4 c5 4. d5 b5!?
The Blumenfeld Gambit, discovered by an amateur back in the early 1920s and played a few times by Alekhine. It shares some ideas with the Benko Gambit (1. d4 Nf6 2. c4 c5 3. d5 b5), but it is in other ways quite different. In the Benko, Black’s king bishop is fianchettoed and bears down on b2. In the Blumenfeld, Black’s play is generally based less on long-term pressure on the a- and b-pawns, and based more on his dominant and mobile center, which gives him a springboard for a kingside attack. A key point for this game is that the Blumenfeld is very tactical, while the Benko is more of a positional pawn sacrifice. Neither player in this game was very alert to the tactical ideas.
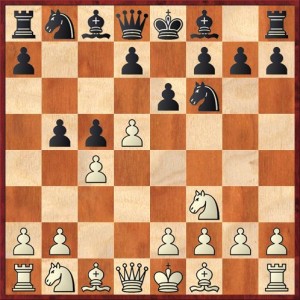
5. de fe 6. e3?! Bb7?!
With 5. de White is giving away the center to Black and allowing him full equality or more. The only possible justification for this abdication is to win a pawn with 6. cb. White says, “Okay, you can have the center, but I have my pawn and I’m going to keep it.” By not taking the pawn, White allowed 6. … bc 7. Bxc4 d5 with a very pleasant game for Black. However, Felix insists on the pawn sacrifice.
I don’t want to be too critical because this was Felix’s first time playing the Blumenfeld and he was just trying to get the idea of it. But the idea of a gambit is to give up material in order to obtain other positional imbalances in your favor. When your opponent is willing to give you those positional advantages for free, you should allow him to do so!
7. cb d5 8. Nc3 Bd6 9. Bd3 (JL thought this might have been a mistake, but the mistake was later.) 9. … O-O 10. O-O …
We now have a fairly normal Blumenfeld position, except that Black has perhaps lost the opportunity to play … a6 and recapture with his bishop. (To do so now would lose a tempo.)
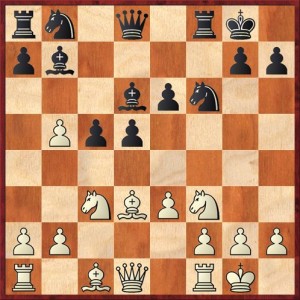
Question 1: What do you think Black should be doing here? What is your opinion of 10. … e5, 10. … Nbd7, 10. … Qe7, and 10. … Kh8?
Question 2: The move that Felix played was 10. … e5. Obviously the threat is to play … e4, forking the bishop and knight. What do you think White should do about this?
Here J.L. played 11. Be2?, a craven retreat (yes, that’s what I called it at Mike’s party) that is positional capitulation. You should never make a move like this unless you are absolutely sure that there is nothing better. And even if there is nothing better, you should still play something else!
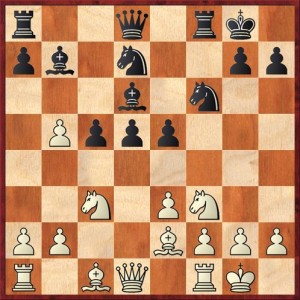
But the fun was not yet over! Instead of playing 11. … e4, Black returned the blunder by playing 11. … Nbd7. From the strategic point of view this is a sensible move, as he wants to finish his development, but the problem is that the tactics initiated by … e5 do not allow him the time.
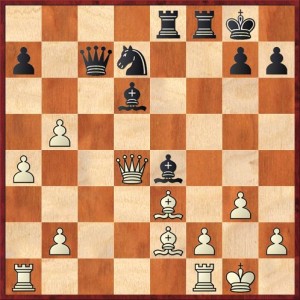
Question 3. What is the tactical Achilles heel in Black’s position? What can White do to exploit it? (Hint: Loose pieces drop off!)
Now as I said, both players were pretty oblivious to the tactical bullets whizzing by them, so J.L. played the routine 12. a4, which would not be a bad move if it were not for the fact that he had something better. The game continued 12. … e4 13. Nd2 Qc7 (This move was criticized at the party as being too “one-dimensional.” The assembled masters preferred 13. … Qe7 with ideas of going to e5 and g5.) 14. g3 (A source of some trouble later on, as it creates weaknesses on the kingside. 14. h3 was probably preferable.) 14. … d4 15. ed cd
Again Black’s pawns are advancing in a menacing way, and J.L. plays a move that I can only describe as panicky. He played 16. Ncxe4?, giving up a piece for two pawns.
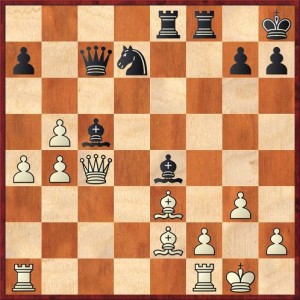
Question 4. What should White have played? (Hint: How can he take advantage of one of Black’s earlier missteps?)
There are so many things wrong with 16. Ncxe4 that it’s hard to know where to begin. First of all, when you give up a piece for two pawns, most of the time you are really sacrificing more than a pawn. If you have a choice between that and giving up a pawn, you should almost always give up the pawn. (This might give you another hint for question 4.)
J.L. said his thinking was that he would at least wipe out Black’s pawn center and get to a position with nominal positional equality (three pawns for a piece). But you have to go a little deeper than that. Three pawns can be worth a piece (or more) in the endgame, when they are passed and mobile. Are we in the endgame? No. Are White’s pawns passed? No. Are they dangerous to Black in any way? No. Meanwhile, Black’s pieces are poised to take over the board. They’re almost glad that the pawns are out of their way, because it gives them more room to operate. So this three-pawns-for-a-piece position should be avoided like the plague.
A final point, as J.L. himself pointed out, is that White doesn’t even necessarily get three pawns for a piece! Felix played the automatic 16. … Nxe4 (which is not necessarily a mistake), but he could have played the non-traditional 16. … Bxe4! 17. Nxe4 Nxe4. The point is that if White plays 18. Qxd4, as in the game, Black can play 18. … Nxf2! On any recapture, Black will play … Bc5 and win a queen or a rook. And 19. Qc4+ Qxc4 20. Bxc4+ does not save White because after 20. … Kh8 21. Rxf2 Bc5 is still a killer.
We had an interesting discussion of this at the party. Some of the assembled masters were nevertheless of the opinion that Black should play 16. … Nxe4, and they objected to 16. … Bxe4 on principle. I disagree. I think that the fact that Black wins a pawn — especially the f2 pawn, a linchpin of White’s position — counts for a lot, and 18. … Nxf2 is the sort of concrete blow (in both senses of the word “concrete” — it’s like a concrete block to the head!) that can really demoralize your opponent. I would play 16. … Bxe4.
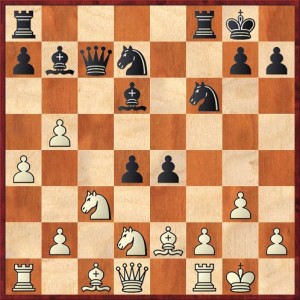
But as I said, 16. … Nxe4 was played, and the game continued 17. Nxe4 Bxe4 18. Qxd4 Rae8 19. Be3 and we come to my last quiz question.
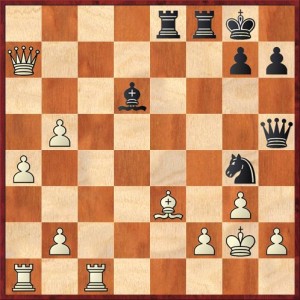
Question 5. Does Black need to worry about White’s threat to take on a7? What move would you recommend for Black?
In fact, Felix did worry about that pawn, and he played 19. … Bc5 in an effort to protect it. Ironically, this move backfired after 20. Qc4+ Kh8 21. b4!
The apotheosis of the b-pawn! Previously it was sitting at b2 doing nothing, and now it strikes the winning blow. If Black retreats with 21. … Bd6 or 21. … Bb6, then White plays 22. Qxc7 Bxc7 23. Bxa7, and the passed pawns on the queenside should decide. Rather than submit to this torture, Felix played the desperate piece sacrifice 21. … Qb7, but after 22. bc Ne5 23. c6 Qc8 24. Qxe4 Nf3+ 25. Bxf3 Rxe4 26. Bxe4, faced with White’s enormous material advantage (rook, two bishops, and three pawns for a queen!), Black gave up.
Answers to Questions.
1. It is premature to play … e5 before Black has completed his development, and so either 10. … Nbd7 or 10. … Qe7 would be preferable. This conclusion is based on general principles, but we will also see in answer 2 the concrete tactical problems with 10. … e5. As for 10. … Kh8, it makes some sense (part of Black’s problems later in the game arise because he did not make this prophylactic move), and in fact I suggested this at the party. But the computer says that White can get a significant advantage after 10. … Kh8 with 11. Ng5! Qe7 12. Qc2, forcing Black to weaken his kingside. Just as a matter of principle, developing the pieces should come first, the prophylactic … Kh8 should come second (if at all), and then Black would be ready to open the position.
2. The very first move that White should consider in any position of this sort is 11. e4! This stops the threat and, more importantly, it immediately puts pressure on Black’s overextended center. This is always the fate of overextended centers!
It was clear from J.L.’s reaction that he never seriously considered 11. e4, because it seems to walk into a fork after 11. … de. But this is exactly the place where an amateur differs from a master. An amateur says “fork, end of story.” The master says, “fork, not end of story.” In fact, after 11. … de? 12. Bc4+ Kh8 13. Ng5 White has not only gotten out of the fork, he is winning material with a fork of his own at f7 or at e6.
A more serious question is what happens after 11. e4! d4! 12. Bc4+. (The computer prefers 12. Na4, with some analysis where White walks a tightrope to an advantage, but this is computer chess.) The game might continue 12. … Kh8 13. Nd5 Nxe4. Here there is a case to be made for either 14. Qc2 or 14. Qd3, but in computer analysis it looks as if 14. Qc2 is better because it is out of the range of Black’s pawns. The sequel might be 14. … Nf6 15. Ng5 e4 16. Ne6 Qe8 17. Ndf4! (An important move, found by Rybka. White doesn’t go after the exchange yet but prefers to keep a bind on the position.)
Even if you can’t analyze to the end of this line, White is at least getting active play and it is clear that 11. e4 has to be better than the abject retreat 11. Be2.
3. The problem with 11. … Nbd7 was that it cut off the defense of Black’s bishop on d6. White can take advantage of this immediately with 12. Nxd5! and on either recapture, with the bishop or the knight, he can play 13. e4 winning back his material. White ends up at least a pawn ahead and Black’s center pawns, the pride and joy of his position, are shattered.
Pouncing on opportunities like this is part of winning chess. You can have your multi-move plans, but you always have to be alert to little two-move tricks like this, especially in a tactical position. This is your only chance to wreck Black’s center — it’s a sure thing that he will play a move that defends his bishop next, and the opportunity will be gone.
When your opponent plays a move like 11. … Nbd7, leaving a piece unguarded, a red light should start blinking in your mind. “Is there any way, any way at all that I can exploit that loose piece?” You have to make yourself think outside the box. The answer probably won’t be immediately obvious, or else your opponent wouldn’t have made this mistake.
4. Gjon Feinstein correctly pointed out 16. b6!
In any position where you are on the defensive, you should be on the lookout for ways to change the conversation, to make the position be about your opponent’s liabilities and not about yours. The one problem with Black’s position is the somewhat exposed location of his queen, a result of his careless move 13. … Qc7. After 16. b6, no matter how Black recaptures you will gain a tempo with an attack on his queen — 16. … Nxb6 17. Nb5 or 16. … Qxb6 17. Nc4. And if he doesn’t capture on b6, so much the better! If 16. … Qc6 you attack the queen with 17. Bb5. Or if 16. … Qc8 you attack the bishop with 17. Nb5. All of a sudden White’s pieces are doing something. Change the conversation.
5. No, Black should not be unduly concerned about the attack on a7. Look at all the pieces he has pointed at White’s kingside! One, two, three, four, five, six! In a situation like this it’s almost inconceivable that White could get away with wasting a tempo and moving his queen to the far corner of the board with Qxa7.
Now it’s Black who should be looking for ways to change his conversation. Instead of having the conversation be about his weak pawn on a7, he wants to talk about White’s poorly guarded king and his kingside that is full of holes on the white squares. The best move is 20. … Nf6, a simple and natural move, bringing the knight into attacking position. Black’s plan now is to play … Qd7 (or … Qc8), … Qh3, maybe … Ng4 after that, sac, sac and mate.
This is absolutely a position where experience is everything, and where a master will look at the position differently from an amateur. The master will know intuitively that 19. … Nf6 is the move that “wants to be played,” and he will look for ways to make it work.
If he has enough time, the master would supplement his intuition with some concrete calculation. First of all, if White trades queens with 20. Qc4+ Bd5 21. Qxc7 Bxc7, the a-pawn is still taboo because of the undefended bishop on e2. (Loose pieces drop off!) If White goes after the pawn more directly with 20. Qxa7, then the line we analyzed at the party went 20. … Qc8 21. Rfc1 Qh3 22. Bf1 Qh5 (threat: Qf3!) 23. Bg2 Bxg2 24. Kxg2 Ng4.
None of Black’s moves have been hard to find, and already White is completely lost. For example, 25. h3 Nxe3+ 26. fe and either 26. … Qe2+ or 26. … Qf3+ is curtains. I believe it was Richard Koepcke who said, “This is so easy, it’s Reinfeld stuff.” (My favorite quip of the day! Perhaps young players won’t know the reference, but Fred Reinfeld was a very prolific chess writer whose books tended to be very beginner-oriented.)
Looking at a couple lines like this should convince Black (if he wasn’t convinced already) that White cannot get away with taking the a-pawn, particularly while queens are still on the board.
To sum this long post up, I think the key things to learn are:
1) Watch out for automatic moves. Both players played far too many moves that were “business as usual” while important tactical threats were going unnoticed all around them. Look for things like unguarded pieces, in-between moves, etc. that can be used as the basis for little combinations.
2) When you are on the defensive, look for ways to change the conversation. Make the game be about the problems in your opponent’s position, not the problems in your position. (Granted, this is not always possible — but it is possible much more often than you realize, and often the little tactical devices I mentioned in point 1 are the way to get things started.)
3) By playing lots of games, develop and learn to trust your intuition about when an attack is decisive, dangerous, or insignificant. I think that one of the most fun things in chess is to simply ignore your opponent’s threats, as Black could have with 19. … Nf6. It tells your opponent, “Peon, your worthless threats do not concern me. Prepare to bow down before my superior army.” SEE your opponent’s threats, and then FIND A WAY TO IGNORE THEM. It’s a recipe for victory in many positions.


{ 5 comments… read them below or add one }
In regards to position 3, During the party I pointed out the blow you mentioned in your answer to the question, 12 Nxd5 followed by 13. e4.
But then, a few minutes later, I asked that we go back to take another look. I pointed out that Black should not take the knight. Instead 12. Nxd5 can be met by 12 … e4 when White has two pieces hanging. It looks like 13. Nf6+ is forced. Now Black has a forced draw after 13 … Rf6 14. Ne1 (or Nd2) Bh2+ 15. Kh2 Rh6+ 16. Kg1 Qh4 17. f3 Qh2+ 18. Kf2 Qh4+ Kg1
After the party I looked at this again. Black may be winning after 14 … Rh6 15. h3 Qg5 or 15. g3 Ne5. It looks like Black has time to bring up reserve forces to break through to the king, I don’t see where White gets any counterplay. How does the computer evaluate the position after 12 … e4?
I’d so hate to play against this opening. With all the messiness, it leaves little room for quiet manoevring. A lot gets said about sub-master level players being weak on positional understanding. But I guess we ought to improve in our tactics even more so.
Hi Praveen, I keep being puzzled by your insistence on wanting to play only quiet, positional games. First, the game you played against me showed that you definitely can “do” tactics when you have to — your piece sacrifice was great and it was only by a miracle that I could save myself. Second, even if you do have a positional style, strong positional players *use* tactics to achieve positional goals.
I think you have huge potential for improvement if you can get over your phobia about tactics. Your game is out of balance right now — remember how Mike pointed out that you were constantly relieving the pawn tension too early, because you were afraid of complications.
That doesn’t mean you should change your style. Be true to your positional convictions. But realize that chess isn’t a *competition* between strategy and tactics, where you have to choose one way or the other. Instead, strategy and tactics should work *together* to achieve a harmonious game.
Mike,
Rybka insists that the position after 12. Nxd5! e4! is +1.23 for White. The main thing that you (and all of us) missed is that 13. Nxf6+ Rxf6 can be answered by the impudent 14. Ng5! This takes the bishop sacrifice off the table, because White is able to interpose with his knight on h3. Meanwhile, Black now has to worry about the checks on b3 or c4. Rybka says, and I totally agree, that Black’s best (after 14. Ng5) is 14. … Ne5, with visions of sacrifices on f3.
And now here is where computer chess comes in. Rybka’s move for White is 15. Qa4!, a move that I would never consider and did not understand. The point of Rybka’s move is that on Black’s 15. … Rh6 White plays 16. h4! Rxh4 17. f4! and the e4 pawn is pinned! This is a motif I have never seen in all my years of chess, where a piece is pinned even though there is an opponent’s piece between it and the target. This could only happen with an en passant capture!
If you eliminate 15. Qa4!, a move that no human would play, the evaluation of the position drops to +0.75 in White’s favor, meaning that Black has some really serious compensation for the two pawns.
Houdini recommends 16…Nex4 as better than 16…Bxe4 due to the following lines.
16..Bxe4 17. Nxe4 Nxe4 18. Qxd4 Nxf2? 19. Rxf2 Bc5 20. Qc4+ Rh8 21. Be3! where the Bishop can’t take on e3 because it’s pinned against the Queen.