I recently decided not to record a ChessLecture on one of my recent games, a game against a teen-aged expert named Stephen Zierk that ended up in a drawn rook-and-pawn endgame. It was a very close decision, and I’d be interested in what you think. If people feel strongly enough that this would have made a good lesson, then I could still change my mind and record a ChessLecture on it.
Here’s the position we reached after White’s 25th move. Zierk is White and I’m Black:
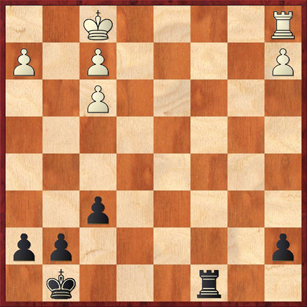
This position is interesting for two reasons. First, I mis-evaluated it; and second, I didn’t even consider a move that I should have looked at very seriously.
First, the mis-evaluation. I really thought Black ought to be able to win this game. This conclusion was based on the fact that Black’s rook will be actively posted on the seventh rank, Black’s king will be able to come to the queenside while White’s will remain locked up on the kingside, and eventually I felt that Black would be able to win White’s a-pawn. This would lead to a type of endgame that happens a great deal in practice: a rook and pawn endgame with balanced pawns on the kingside and one passed pawn on the queenside (usually an a-pawn).
In spite of the fact that this is an extremely common type of endgame, I was not clear on how to evaluate it. Let’s look at what Reuben Fine says in his classic, Basic Chess Endgames:
The game is drawn if the defender’s rook is behind the pawn, but lost if it is in front of the pawn.
Seems pretty clear, huh? If we believe Fine, White has a totally clear plan for drawing this game. Give up the a-pawn; don’t even bother to defend it! Instead, activate the rook and get it behind White’s passed a-pawn. But there’s a catch. Fine mentions two exceptions:
[The side with the extra pawn] has winning chances in (analogous) positions in two cases: when the [defending] pawns are too far advanced or too widely scattered … or when (usually with pawns other than a rook pawn) the attacker can afford to give up one pawn on the kingside, blockade the remaining pawns, and win his opponent’s rook.
Whoa, all of a sudden things are less clear. So there is a possibility for Black to win, based on setting up a blockade (with 2 pawns against 3) on the kingside, and then running to the queenside. White’s doubled pawns are quite relevant here, because ordinarily three pawns cannot be blockaded by two. But in this position, Black does have chances to blockade and run his king to the queenside.
Of course, my knowledge of this endgame was much hazier than this. All I knew was that it was kinda drawish but maybe not completely, and I thought that maybe the weakness of White’s doubled pawns would be an additional ingredient in my favor. But what really matters here is not the weakness of the doubled pawns, but their blockadability. (Is that a word?)
Okay, back to the diagrammed position. The second interesting thing was that I immediately played 26. … Rc2, without even thinking about it. Then I showed the game to a master friend of mind, Gjon Feinstein, and when we got to this position, he immediately said, “So you played 26. … Rc3, right?”
It always amazes me when two people see the same position in different ways. I just assumed that Black wanted to set up shop on the seventh rank. But Gjon saw it differently. He saw it in terms of limiting the activity of White’s rook. The idea becomes clear after 27. Kg2? Ra3, when now White’s rook is completely tied down to a1 if it wants to defend the a-pawn. If White continues to play passive defense, we could get a position like this:
(28. Kg3 Kf7 29. Kf4 g5+! 30. Kg3 Kg6 31. Kg2 h5 32. h3 Kf5 33. Kg3 h4+ 34. Kg2 a5)

It’s a zugzwang. White to play has to give up a pawn. Not only that, Black has a winning plan. After winning the a-pawn he can bring his rook back to f4, push his pawn to a4, and now White has a dilemma. If he allows … a3 and … Ra4 he loses, because Black now has his rook behind the pawn. So White needs to get his rook behind the a-pawn, with Re1-a1. But now Black has the perfect blockade setup on the kingside, and can calmly bring his king over to the queenside and win. One again, notice that this blockade setup (pawns on f6, g5, h4, and rook on f4) is only possible because White’s f-pawns are doubled.
Wow! So does this mean Black was winning after 26. … Rc3? No! Because White’s defense was unforgivably passive. If there is one thing of paramount importance in rook-and-pawn endgames, it’s rook activity. So White should have played 27. Rb1! (or Rd1!) instead. Note that Black’s threat to win the f-pawn is an illusion: 27. … Rxf3? 28. Rb8+ Kf7 29. Rb7+ wins the a-pawn and is an easy draw. So Black has to play 27. … Ra3, and now White plays 28. Rb7, giving up his a-pawn to activate his rook. (Diagram)
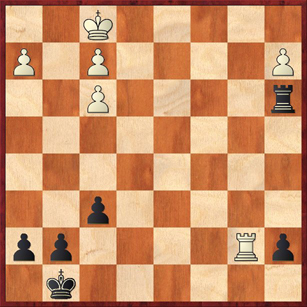
This position is, I think, an easy draw for White. Black’s king finds it almost impossible to get into the game, let along cross over to the queenside. With a timely f3-f4, White can make it impossible for Black to carry out his blockade idea, because … g5 would lead to a pawn trade (which makes White’s defense much easier). If Black tries running his pawn all the way to a2, White can sit on the position by moving his king back and forth between g2 and f3 (or g2 and h2, after pushing the pawn to h3), and Black will have no way of making progress.
Strangely, when I analyzed the game with the computer, it did not like 28. Rb7 at all. Instead, it wanted White to go back to passive defense with 28. Rb2. Although this may be a little better than having the rook buried at a1, I still think it’s a step in the wrong direction. The important thing for White to do is defend actively. Although White can draw after 28. Rb2, his best and most principled plan is to play active defense right from the beginning.
So … after this long digression, we conclude that 26. … Rc3 was a very interesting try that would have given White a chance to go wrong with 27. Kg2? However, in the objective sense it is no better than 26. … Rc2.
Now let’s look at what really happened in the game.
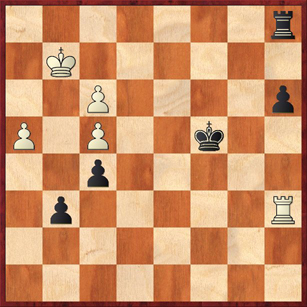
26. … Rc2 27. a4 a5 28. Re1 Kf7 29. Re4 Ra2 30. Kg2 g6 31. f4 f5 32. Rd4 Ke6 33. Kg3 Ra3+ 34. f3 Rb3 35. Rc4 Rb4 (diagram)

Success, of a sort, for Black: He now wins White’s a-pawn. Nevertheless, White is easily drawing here. Contrast this position with the blockade-and-win position we saw earlier in the post. Now Black has not set up anything even remotely resembling a successful blockade on the kingside. If Black tries to run with his king to the queenside and force White to sac his rook for the a-pawn, it won’t work. White will win the h-pawn, the g-pawn, and the f-pawn for good measure, and then Black will actually be in danger of losing. All because White defended actively instead of passively.
The game continued 36. Rc7 Rxa4 (Note that 36. … h5 is no better. To escape the checks Black will have to move his king to h6, but then White can stalemate him in there with h4.) 37. Rxh7 Ra1 38. Ra7Â and now I faced my last big decision of the game.
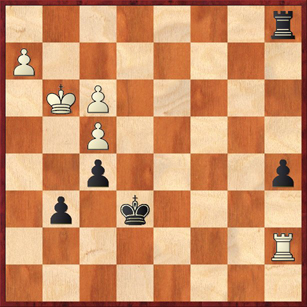
Should I push my a-pawn? Head toward the queenside with my king? I think that either way would have led to a draw, because Zierk knew what he was doing. However, 38. … a4 might have been a little better on the principle of giving White a chance to go wrong. 39. Ra6+ should be good enough to draw, and also the computer finds a nice and very surprising draw variation with 39. Kh4. But there’s always a chance that White will opt for passive defense with 39. h3? with the idea of shuttling the king between g2 and h2 and daring Black to make any progress. But if Black has not yet advanced his pawn to a2, this passive defense technique is dangerous for White. Black can bring his king to a2 and then free his rook. Here’s a sample line: 39. … a3 40. Kg2 Kd5 41. h4 Kc4 42. Ra6 (diagram)
Black to play and win.
I’ve put this position up here because it’s an example of what computers do well in the endgame. As we’ve noted before, they aren’t very good at strategic decisions, but they are excellent at tactical tricks. And here Black has a neat tactical trick: 42. … Kb5! Oh, so you thought Black was going to b3? Wrong! That allows White to snatch the pawn on g6, and (at least in the computer variations I looked at) White manages to draw by a single tempo. The point of 42. … Kb5! is, paradoxically, that by taking a step in the “wrong” direction Black actually manages to get his king to a2 one tempo quicker! Here’s the proof: 42. … Kb5 43. Ra8 (note that White cannot take on g6, because Black plays … a2 and the White rook can’t get back in time) Kb4 44. Rb8+ (White has to change his defensive plan! If he tries 44. Ra6, once again hoping for 44. … Kb3? 45. Rxg6, Black crosses him up with 44. … Rc1! This is hugely important. Once the rook is liberated from its jail in front of the pawn, Black is winning.) 44. … Kc3 45. Ra8 Kb2 46. Rb8+ Ka2 47. Rb6 Rb1 and Black wins. He has gained one tempo over the previous line, and that is enough. Or anyway, that’s what the computer says.
This is un-be-LEEE-vable! Who would think that, from the diagrammed position, … Kb5 would get you to a2 faster than … Kb3 does? Computers amaze me sometimes. I would never in a million years have figured this out over the board.
Now, back to the game. I actually didn’t play 38. … a4, but I played 38. … Kd5 instead. The game soon ended peacefully, after 39. Kh4! Kd4 40. Kg5 Rg1+ 41. Kh6 Ke3 42. Rxa5 Kxf4 43. Ra6 Kxf3 44. Rxg6 Rh1 45. Kg5 Rxh2 ½-½. Notice how purposefully White played. I was a little bit skeptical of the 39. Kh4 idea at first, but White proved that active play was his ticket to the draw. Very nicely defended by my teen-aged opponent. I thought that kids were supposed to be weaker endgame players?!
After all this analysis, I regretfully decided that this really wouldn’t make a good ChessLecture. There is too much “fantasy chess” here — side lines that didn’t really happen in the game. I always feel a little bit nervous about delving too deep into fantasy chess.
Also, the themes are not really as clear as I would like for an endgame lesson. White can get away with some passive play as long as he doesn’t do it exclusively. Black gets some winning chances if he can run to the queenside quickly enough with his king, but it’s very tricky and hard to tell the winning lines apart from the drawing (or even losing!) ones. There isn’t a really clear overall message to this lecture, except maybe the stuff about blockades. The last diagrammed position, with its clever win of a tempo, would be a nice endgame study (if the computer analysis is really correct, which I’m not 100 percent sure of), but it has nothing to do with the rest of the lecture.
In the final analysis, I thought that some listeners (or readers) might consider this lecture to be much ado about nothing. There are zillions of rook endgames just like this one, and most of the time they are boring draws, so why spend so much time on this one?
By the way, I did record a lecture yesterday on a rook-and-pawn endgame, but it was a different one where I was able to identify a clear lesson to impart to the listener. You can tell me later this week what you thought of it.


{ 3 comments… read them below or add one }
Dana, I do think it is an interesting lesson. Let me try to refute your own hesitations:
1) “There is too much ‘fantasy chess’ here — side lines that didn’t really happen in the game.”
Actually, most of what we “see” and calculate in a game never materializes.
2) “Also, the themes are not really as clear as I would like for an endgame lesson.”
In my view, that is often a problem with chess lessons in general. They train us to see ideal situations rather than real situations. BTW, I disagree, and think you covered the themes quite clearly.
3) “The last diagrammed position, with its clever win of a tempo, would be a nice endgame study (if the computer analysis is really correct, which I’m not 100 percent sure of), but it has nothing to do with the rest of the lecture.”
Real chess games turn on a dime and change “themes” routinely. A little tactical trick may waste a good conceptual understanding of the position.
4) “There isn’t a really clear overall message to this lecture, except maybe the stuff about blockades.”
Just like in real chess! At least my games tend to be blurry and not attach to one single theme… but I’m sure I’m not alone there.
5) “There are zillions of rook endgames just like this one, and most of the time they are boring draws, so why spend so much time on this one?”
Precisely because there are zillions of rook endgames like it! They may technically be boring draws, but we often blunder them or get lucky and win them. It is important to be well-trained on how to play them.
Hope this helps!
Steven Zierk isn’t your average teenager when it comes to studying endgames. He quotes from Batsford Chess Endgames like Sunday preachers quote the Bible. He’s a bibliophile and I’m sure that Dana noticed his backpack filled with at least a half dozen chess books.
Perhaps Steven’s greatest flaw is that he can be overly optimistic about his endgame talent. In fact, he has matured a bit; a year ago, he would have tried very hard to *win* this endgame with white, even willing to cross the line into losing territory.
Michael,
Not only was I very impressed by Steven’s endgame play in this game, but also he played a wonderful endgame against Yian Liou in the same tournament. The two of them raced through the opening as if they were racing to catch a bus. They had finished move 20 before I even got to play move 1! (My opponent was half an hour late.) I thought it was going to be a draw, but Steven played with great assurance. It was a bishop and pawn endgame where both players had connected passed pawns on opposite sides. Somehow Yian’s pawns got blockaded and static while Steven’s pawns remained mobile, and Steven was able to set up a clever bishop sacrifice that Yian couldn’t take because it would deflect his bishop and allow Steven to promote one of his pawns. I wish I had the game score, because I think it would be well worth studying.