It might not have the resonance of Batman versus the Joker, but the rivalry of Bishops versus Knights is one of the eternal dramas or morality plays of chess. Sometimes the straight-arrow bishop triumphs. Other times it’s the crooked, shifty knight. “Other things being equal,” the bishop is supposed to be a little bit better than the knight. But other things are seldom equal, and their relative strengths can even change during the course of the game. (They often do, in fact.)
Twenty years ago I played a game against International Master Tim Taylor that was about as pure a test of the “other things being equal” theory as you’ll see. Out of the opening, we got a position where basically the only imbalance in the position was that Tim had the two bishops and I had a bishop and a knight.
Was that, by itself, enough for Tim to win? No, I don’t think so. But I think you can see from this game that the bishop’s task is easier. The player with the knight has to strive to keep the knight active, and has to seize any chances he gets to use the knight’s shifty nature. The bishop can wait, seemingly out of play, for a very long time but then emerge as a force in the endgame.
Besides being a nice illustration of bishop versus knight play, this game also features a really neat winning combination in the king and pawn endgame, an idea that every player should know.
Thanks to Sara Walsh, whose comment on my post “Romance and Chess” reminded me of Tim Taylor and inspired me to look at this game. The game was played at the Summer Heat tournament in Jacksonville, North Carolina, in 1988. As usual, moves actually played are in red, while analysis moves are in black.
Taylor was White, and the game started as a Nimzo-Indian: 1. d4 Nf6 2. c4 e6 3. Nc3 Bb4 4. e3 O-O 5. Nge2 d6?!
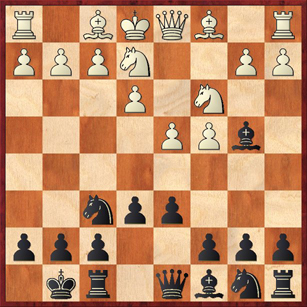
Already a dubious, one might even say naive move by me. Normal here is 5. … d5, and Black is supposed to be fine. With 5. … d6 Black allows White to win the dark-squared bishop for a knight, without making any positional concessions. This is a key point. You will find plenty of openings where one player gives up a bishop for a knight — the Exchange Ruy Lopez, for example — but this sort of trade, as a rule, is only justified if there is a specific positional concession by the other player. For example, in the Exchange Ruy Lopez (1. e4 e5 2. Nf3 Nc6 3. Bb5 a6 4. Bxc6 dc) White saddles Black with doubled c-pawns, and also gains a 4-against-3 pawn majority on the kingside.
In this game, Black does not inflict any positional damage with the bishop-for-knight trade, and therefore White should be slightly better. It is interesting to see how an IM takes this single imbalance and eventually turns it into a winning position … with a little bit of help from his opponent.
The game continued 6. a3 Bxc3+ 7. Nxc3 e5 8. de de 9. Qxd8 Rxd8. This is interesting. White is actually willing to trade queens and accept a small lag in development. That’s because he has such faith in the long-term advantage of the bishop versus the knight.
Continuing: 10. Be2 Be6 11. O-O Nc6 12. b4 Ne7 13. Ra2 Ne8 14. Rd2 Rxd2 15. Bxd2 Rd8 16. Bc1 b6 17. f3 f6 18. Kf2 Kf7 19. g4 c6 20. f4 …

What you would have done here? In particular, do you prefer 20. … Nd6 or 20. … ef? Why?
(Space added in case you want to think about it before continuing.)
I had been working for several moves to set up … Nd6, which puts pressure on the one weak point in White’s position, the pawn on c4. However, White’s last move worried me a bit — it seemed as if White was gaining some significant space on the kingside, and I wanted to counter this with … f5. But I can’t play … f5 with my king pawn hanging. So I decided on 20. … ef? and missed my best shot at equality. 20. … Nd6 was better because after 21. Rd1 Ke8 22. c5 (White has no way to defend this pawn on c4) 22. … bc 23. bc Nb7 and White cannot defend the pawn on c5. He doesn’t actually lose a pawn because he has various tricks, such as 24. f5 Bf7 26. e4 Nxc5 27. Be3, which picks up the loose pawn on a7. But after 27. … Nd7 28. Bxa7 c5, Black is very happy with the position.
Basically the point is that the pawn exchange on f4 gave White the square e3 for his bishop, so he was able to maintain the pawn on c5 in the game. I think there’s a more general lesson here. The more the board opens up, the better the position tends to be for the two bishops. So on that general principle, the pawn exchange was an error for me.
The game continued 20. … ef? 21. ef f5 22. g5 Nd6 23. Rd1 Ke8 24. c5 bc 25. bc …
Here was another key decision for Black: to attack the pawn with 25. … Nb7 or try to dominate White’s bishop with 25. … Nc4? Again, I’ll give you a little space to think about it. Morally speaking I think that there is a correct answer, although in terms of the practical evaluation of the position White stands better either way.
(Space added in case you want to think about it before continuing.)
You’ve probably figured this one out from my comments before the game, and also my comments on the last move. The problem with 25. … Nb7? is that it doesn’t accomplish anything; it attacks a pawn that White can easily defend. Meanwhile it puts the knight in a rather awkward position. A much more principled move is 25. … Nc4! As I said, you have to seize your opportunities to make the knight a stronger piece. The bishop can be effective from the side of the board, but the knight is only effective if it’s in the middle of the action.
The reason I say that White has an advantage is that he can evict Black’s knight eventually. But this requires some care. After 25. … Nc4! 26. Rxd8+ Kxd8, my first inclination for White is to play Nc3-d1-e3. But that that would be wrong, because it allows Black to reposition his knight with … Nc4-a5-b3, where it is every bit as strong as it is on c4! So correct play for White is 27. Nb1! intending 28. Nd2, when his knight keeps Black’s away from both c4 and b3. The computer rates the position as +/=.
This line shows one difficulty of playing with knights against bishops. The knight needs an outpost to be effective. In this position, it’s hard for Black to create any kind of permanent outpost for his knight. The square c4 was almost an outpost, but Black couldn’t make it last. Still, I should have tried 25. … Nc4. It would have been better than what I played.
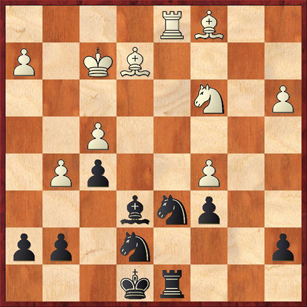
The game continued 25. … Nb7 26. Rxd8+ Kxd8 27. Be3 Nd5 28. Nxd5 Bxd5 29. Bd4 and now I made the losing move.
Here I played 29. … Kd7? No tactical analysis is required to see that this is wrong. It’s just what I said before. Black wants to avoid pawn exchanges, and wants to avoid opening up the board. He especially wants to avoid a situation where there is action on both sides of the board, because that is the bishop’s strong suit. (As those of you who subscribe to ChessLecture know, even as recently as March of this year I still hadn’t learned that lesson yet.) So 29. … g6 should have been automatic here, a no-brainer. Black still faces a real uphill battle after 29. … g6 30. Ba6, but after 30. … Na5 31. Ke2 Nb3 I don’t see a definite win for White. A good position for further study.
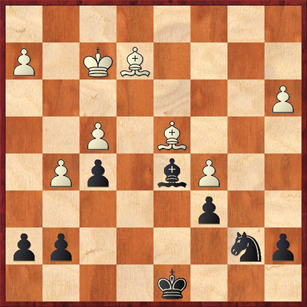
After 29. … Kd7? my position went quickly downhill, but there is still a very instructive trick near the end that you’ve got to see. The game went 30. Bxg7 Nxc5 31. h4 Ne4+ 32. Ke3 Ke6 33. h5 Kf7 34. Be5 c6 35. Ba6! (White now wins a pawn by force.) 35. … c4 36. Kd4 Be6 37. Bxc4 Bxc4 38. Kxc4 Ke6 39. Kb5! (This move took some chutzpah. It sets a trap that I fell right into.) 39. … Nxg5?! 40. fg Kxe5
White to play and win. There is only one correct answer; everything else loses.
(Space inserted in case you want to think about it.)
.
.
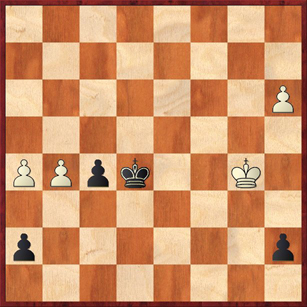
The correct move is 41. h6! This is a very neat trick, and I have to admit that I did not see it coming. Until Tim played this move, I thought that he had blundered in time pressure by allowing me to play 39. … Nxg5, but in fact the whole thing was a trap.
The move 41. h6! is a neat way of moving White’s pawn toward its final destination while keeping Black’s king at a distance. Even though Black was “in the square” of the h-pawn to start with, the g-pawn prevents him from staying in the square. 41. g6?, on the other hand, would have been a losing blunder because Black plays 41. … Kf6 and gets back in time.
After 41. h6, if Black plays 41. … Ke6 then 42. g6 forces a pawn through. Note that now 42. … Kf6 is insufficient because of 43. gh. (Well, 43. g7 also works, but 43. gh is neater.) Now it is the h6 pawn that serves as “helper” for the other pawn, by keeping Black’s king away from g7!
Instead I played the equally hopeless 41. … f4 42. g6 f3 43. gh and Black resigned because of the last point of White’s combination — he queens with check and thus prevents Black from queening!
This is such an exquisite little combination, and the amazing thing is that Taylor found it on move 39 with 30 seconds left on his clock for two moves!! It’s amazing to me that he could calculate it all that fast and be confident of what he was doing. If I had been White in that situation, I would have played a “safe” move instead of 39. Kb5, and would have collected my wits after reaching the time control on move 40. This is probably what makes International Masters different from national masters.
But there’s another point here worth mentioning, which is that I don’t think that Taylor actually had to calculate the combination. I suspect strongly that he did the whole thing by pattern recognition: he simply recognized the motif from endgame books or from his own experience. This motif of the king that appears to be “in the square” of the passed pawn but really isn’t, because of intervening pawns, is actually a standard idea that you can find in the books — it’s just that I didn’t recognize it until it hit me over the head. (Also, notice that the h-pawn is the important one, even though in the initial position it’s not a passed pawn yet. Again, you can find examples of this in endgame books.) He knew the motif, maybe did a quick 15-second check to make sure that it was sound, and then played it.
This is why you should never be afraid of playing stronger players — because you can learn so much from them!


