I know that games played against my computer aren’t the most interesting topic in the world, but recently I had an endgame against Shredder that blew my mind. I learned something new and I think you will, too.
Let’s start on move 88, when the computer played a move that totally shocked me. (Parenthetical remark — the computer’s strength was set at 2114, not at full strength.)
 FEN: Q7/P6p/2K3p1/8/8/3kb3/5p2/8 b – – 0 88
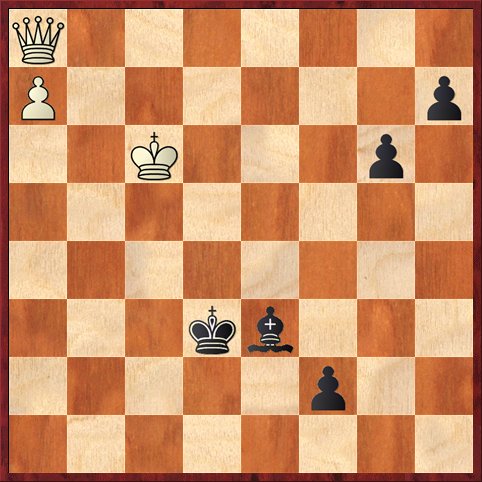
Position after 88. Kc6. Black to move.
Here I was expecting Black to play 88. … f1Q 89. Qd8+ Kc2 90. a1Q Qc4+, which I thought was likely to lead to a draw. But I guess the computer saw some way for me to escape the checks (maybe 91. Kd6, planning to run to the kingside?). Instead it played 88. … Bxa7!?!?
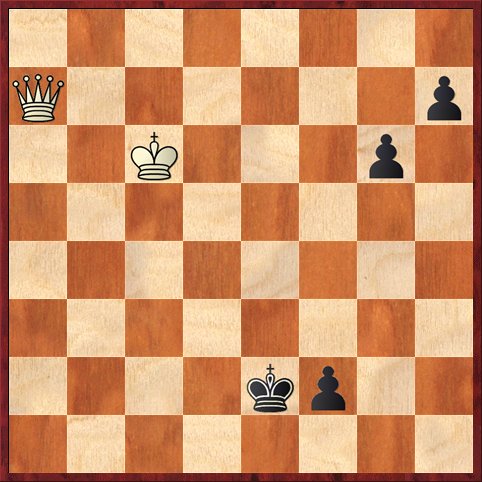
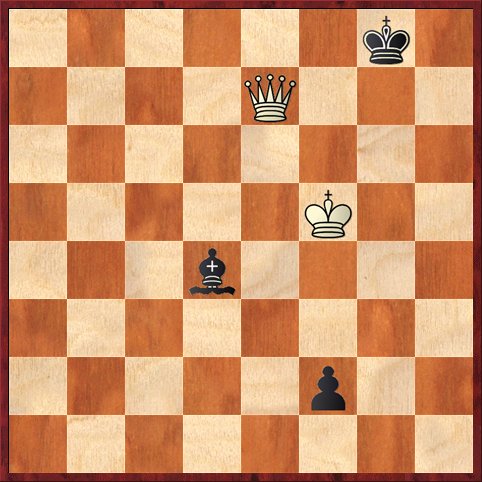
When I saw this move, I thought, “Oh damn, the computer hoodwinked me again.” Of course I saw that 89. Qxa7 f1Q?? 90. Qa6+ would lose for Black. But the real question is what happens after 89. Qxa7 Ke2 (diagram 2).
 FEN: 8/Q6p/2K3p1/8/8/8/4kp2/8 w – – 0 90
Position after 89. … Ke2 (analysis). White to move.
Here, unfortunately, my analysis was totally superficial. I thought, “Queen against an f-pawn on the seventh rank. Draw.”
Which it would be, if Black didn’t have the g- and h-pawns. But he does! And that changes everything. His standard drawing resource in such endgames is to move the king to h1 (if necessary) and set up a stalemate after Qxf2. But because he has other pawns on the board, it won’t be stalemate here!
This is why it’s so important in chess not to just memorize formulas like “queen against an f-pawn on the seventh rank is a draw.” You’ve got to think about why it’s a draw.
In fact, it’s pretty easy to work out that White wins in diagram 2 after 90. Qa2+ Kf3 (I’ll let you work out 90. … Ke1, but in my opinion Black’s best defense is to head for g2) 91. Qc4! (Shredder’s nice move. If Black lets the queen get to f1, White is definitely winning.) Kg2 92. Qg4+. And here it is. If Black steps in front of the pawn with … Kf1, White can start moving his king closer. If Black goes to the h-file with 92. … Kh2 93. Qf3 Kg1 94. Qg3+, we get the classic position where 94. … Kh1 95. Qxf2 would be stalemate. Except here it’s not, and White wins.
This morning I started wondering how far advanced Black’s pawns would have to be in order to make the game a draw. That’s the sort of question the Nalimov tablebase (which gives perfect play for both sides in positions with 6 or fewer pieces) is meant for.
I was quite surprised at the answer. Black’s pawns don’t have to be far advanced at all. In fact, if Black’s pawn were at h5 instead of h7, it would be a draw. (Maybe that’s not such a big surprise, because at h5 the pawn takes away the key move 92. Qg4+ in the above line.) Or if Black’s pawn were at g5 instead of g6, it would be a draw. Or — get this — if the g-pawn were off the board instead of at g6, it would be a draw!
I know you won’t believe this, so here’s a sample line to give you the idea. (Obviously I can’t show you all the variations.) Take the g-pawn off the board in diagram 2. Then after 1. Qa2+ Kf3 2. Qc4 Kg2! 3. Qg4+ Kf1! 4. Kd5 h5!! Black draws. If White takes the pawn it’s the regular book draw. If 5. Qf3 h4! 6. Ke4 Kg1 7. Qg4+ Kh2 White is reluctantly forced to take the h-pawn: 8. Qxh4+ Kg1, and we’re back in the book draw. Notice that if Black still had a pawn at g6, it would not be a draw! That’s why removing Black’s g-pawn made such a difference.
Pretty amazing stuff. But that’s not the end of this fascinating endgame!
Because I was determined not to get hoodwinked, I declined the bishop on a7, which meant that I did get hoodwinked. The game went on with some mistakes for both sides until we got to this position.
 FEN: 8/8/3b4/1k6/8/6pQ/5pK1/8 w – – 0 109
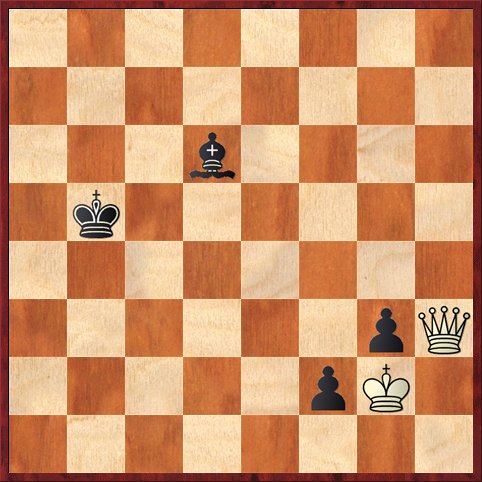
Position after 108. … Bd6. White to move.
You will look in vain for an endgame like this in Reuben Fine’s Basic Chess Endings. At this point I thought it was a dead draw, because I couldn’t imagine how White could make progress. How can I ever chase the bishop away from the defense of the g3 pawn? How can I possibly use both my king and my queen for a mating attack when one or the other has to constantly watch out for the advance of the g- or f-pawns?
I was surprised to see, though, that the computer rated the position at 2.2 pawns in my favor — a winning advantage. What the heck, I thought. Let’s forget about playing the game, and let’s see why the computer thinks that White can win. The next eight moves were basically Shredder versus Shredder.
109. Qf5+ Kc4 110. Qe6+ Kc5 111. Qe4 Kb6 112. Qd5 Kc7 113. Qb5 Kd8 114. Qb7 Bc7 115. Qc6 Kc8 116. Kf1 …
 FEN: 2k5/2b5/2Q5/8/8/6p1/5p2/5K2 b – – 0 116
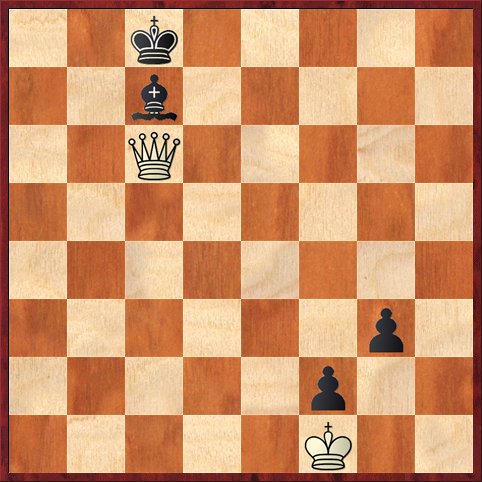
Position after 116. Kf1. Black to move.
First, let me say that I was amazed that the queen by itself could chase the king and bishop to the edge of the board. The Black king and bishop just can’t help getting in each other’s way. Over and over we get positions where the king and bishop are on adjacent dark squares. All I have to do is post my queen on the light square which is a knight’s move from each of them, and one of the two will have to retreat. That happened on moves 111 and 113, and it will happen on the next move, too.
Already I’ve learned something! I’ve never studied Q vs. B endings before (who has?) so I simply didn’t know that the queen can herd the king and bishop in this way.
The position in the diagram is a fundamental zugzwang position, where Black can’t retreat any more. If 116. … Kd8 then 117. Qe6! wins (putting the queen on the square a knight’s move away from the bishop and king). After 117. … Bb8 White has 118. Qg8+! and Black has to block the bishop in order to defend it: 118. … Kc7 119. Qxg3+ and the win is easy.
Alternatively, if 116. … Kb8, which the computer played, now 117. Qa6! forces the bishop to depart the b8-h2 diagonal. If 117. … Bd8 118. Kg2 Bc7 119. Kf3 and the g-pawn must die.
For the sake of completeness, let me mention that this position was no accident. Going over the Nalimov tablebase, it became clear to me that White always wins with a Q vs. B+2P if the pawns are blockaded on the color of the bishop. It doesn’t matter how far advanced they are or what files they are on. This example is completely typical. In fact, it isn’t even necessary in most cases for White to win the trailing pawn (the g-pawn in this case). Usually, with enough care, White can use both his queen and king on the attack and either checkmate Black or force him to sac a pawn to avoid checkmate. The reason is that if Black ever tries to play … g2, White will be able to win one or the other of the pawns with a series of checks. White does need to keep an eye on f1, but it really isn’t that important to keep an eye on g2.
It’s sort of funny that when I first saw the position after move 108, I saw all these insuperable obstacles. How can White ever chase the bishop away from the b8-h2 diagonal? How can White ever activate his king? It all seemed impossible. Yet in fact, it’s all possible! Now I’ve almost come around to the other point of view — I wonder why these things ever seemed like such huge obstacles to me in the first place.
Now let’s skip ahead to the end of the game.
 FEN: 6k1/4Q3/8/5K2/3b4/8/5p2/8 w – – 0 131
Position after 130. … Kg8. White to play and win.
Even after I won the g-pawn [with oodles of help from the computer], the win still wasn’t completely trivial. What is the quickest way to finish Black off here?
The answer, of course, is 131. Kg6! After all this time (54 moves after Black played … f2, and 43 moves after diagram 1, where he had his first real opportunity to promote the f-pawn), I finally tell him, “Go ahead and queen your pawn.” After 131. … f1Q 132. Qd8+ Qf8 133. Qd5+ Kh8 I don’t even have to take his bishop — I can mate in two moves with 134. Qh5+. A neat trick to know about! The computer resigned after 131. Kg6.
P.S. I’ve now written about a 211-move draw against Shredder and a 131-move “victory” (with a massive assist from the computer itself). I’m starting to think that if a game against the computer doesn’t last 100 moves, I haven’t gotten my money’s worth!


{ 1 comment… read it below or add one }
The beginning (with Q vs. fgh) is a wonderful example of one of my favorite life(?) principles: If you know the statement of a theorem, you can use it. If you know the proof of a theorem, you can generalize it.