At Mike Splane’s latest chess party, Austen Green showed one of his games from the recent U.S. Game/30 championship. Although his score was only 2½ out of 5, he beat an International Master and drew a Grandmaster, so it was a very good tournament for him. He raised his rating from 2221 to 2235.
The victory over an IM was especially sweet because the victim was his coach, Keaton Kiewra (2529). Austen has been taking long-distance lessons because Kiewra lives in Texas, and this was the first time they’ve met (at least over the chessboard). I’d say that Austen schooled his coach!
So how do you beat your coach, and score a 300-point upset in the process? Basically by being extremely patient. Austen got to a position where Kiewra had no counterplay and then just sat and waited, doing nothing until the time was right. Kiewra, for his part, also played a “do-nothing” strategy. It seemed as if he wanted to win this game by waiting until Austen screwed up.
In some ways it wasn’t a great game for spectators, because of all the waiting, but I think it’s instructive because it shows that certain kinds of doing nothing are good and certain kinds are not.
Here is the first place where Kiewra could have done something. Austen is White and Kiewra is Black.
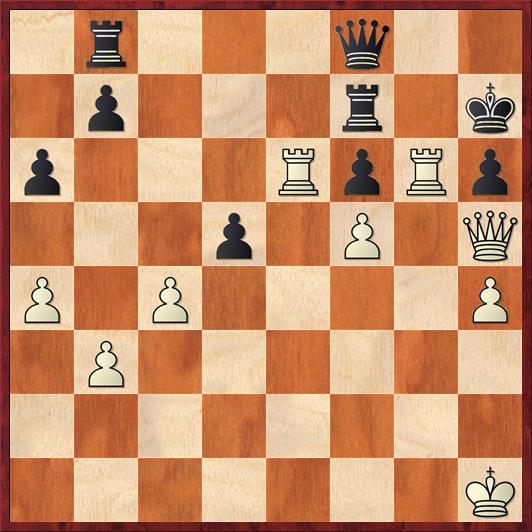
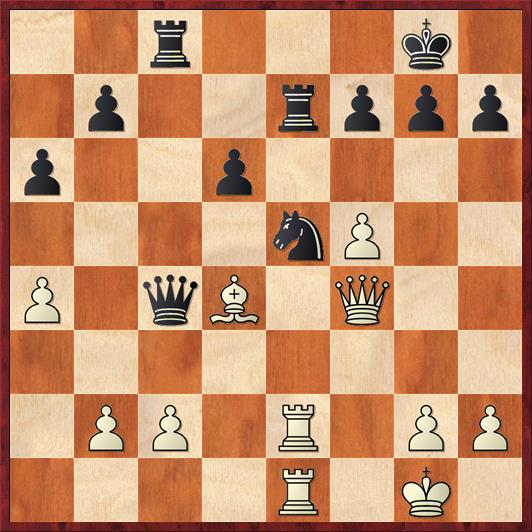 Position after 23. R1e1. Black to move.
FEN: 2r3k1/1p2rppp/p2p4/4nP2/P1qB1Q2/8/1PP1R1PP/4R1K1 b – – 0 23
The opening was a Scheveningen Sicilian that has gone pretty well for White. Black has a permanently weak pawn on d6, White has more space on the kingside and has a dangerous-looking pawn on f5. Black’s knight is pretty on e5 but it’s also pinned, and in danger of just being a bystander. Finally, note that White’s a4 pawn is not hanging because 23. … Qxa4?? would be met by 24. Bxe5 winning a piece.
Basically, almost all the positional factors are in White’s favor, and Black is in danger of being slowly squeezed to death. For that reason I think it was imperative for Black to seize his opportunity to trade off the knight for the bishop and escape the pin on the e-file. After 23. … Nf3+! 24. Qxf3 Qxd4+ 25. Qf2 Black has two options. He can trade down to a slightly worse but almost certainly drawable rook endgame with 25. … Qxf2+ 26. Kxf2 Rxe2+ 27. Rxe2 Kf8. Or, if he wants to be more ambitious, he can win two rooks for a queen with 25. … Rxe2 26. Qxd4 Rxe1+. Although Black’s d6 pawn will fall, so will White’s c2 pawn after 27. Kf2 Rc1, and with the rooks connected Black is in no danger of losing.
Why didn’t Kiewra do this? I can only speculate. I think his strategy in this game was to play it safe, safe, safe — do nothing that requires any calculation, but keep pieces on the board to preserve the possibility of a screw-up by his lower-rated opponent. He didn’t like the rook endgame because there is too little screw-up potential, and he didn’t like the 2R vs. Q endgame because it’s always scary to fight against a queen.
Instead the game went 23. … f6 24. b3 Qc6 25. Bb2 Rce8 26. Kf1! (Austen isn’t going to allow the Nf3+ trick again) Qd7 27. Ba3 (piling up pressure against Black’s isolated pawn) Rc8 28. Qe4 Rc6 29. c4 (queenside clamp) Kh8 30. g4 (kingside clamp) Re8 31. h3 (diagram).
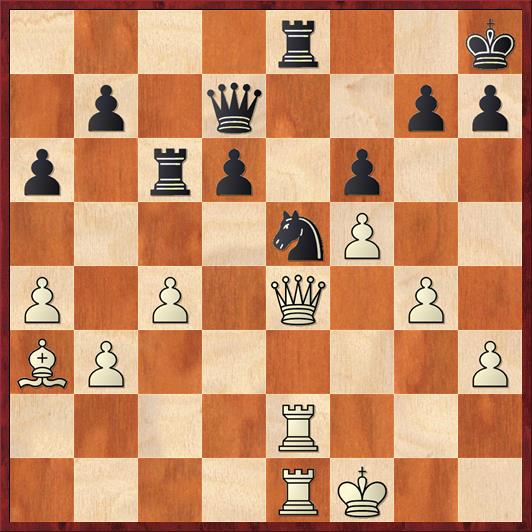 Position after 31. h3.
FEN: 4r2k/1p1q2pp/p1rp1p2/4nP2/P1P1Q1P1/BP5P/4R3/4RK2 b – – 0 31
Here is Kiewra’s second opportunity to do something. Austen’s last move (which I think was not best) gave him a chance to scramble the position with 31. … b5! 32. ab ab 33. cb Rc3! White cannot hold all of his weak pawns at b3, b5, and h3. In this line, Black has finally gotten some activity for his pieces, and if anything, White is now in a bit more danger than Black.
Again it’s hard to see why an IM like Kiewra would pass up this opportunity. But he continued playing passively, with 31. … h6 32. Qd5 (preventing … b5) Qc7 33. Re3 (prophylaxis — defending his weak points on b3 and h3, just in case) Qb6 34. Kg2 Kh7 35. R1e2 (prophylaxis again — Austen foresees the possibility of a knight coming to g4 and the queen to f2, and stops it in advance).
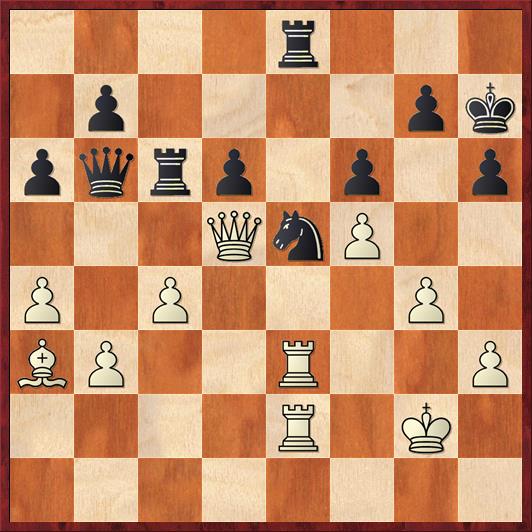 Position after 35. R1e2. Black to move.
FEN: 4r3/1p4pk/pqrp1p1p/3QnP2/P1P3P1/BP2R2P/4R1K1/8 b – – 0 35
I’ve written before about the art of doing nothing, or in Russian, nichevo-ne-dyelanye. Mike Splane is always looking for secrets that separate grandmasters from ordinary masters, and I think this is one of them. Grandmasters are better at doing nothing. But they are also better at timing — knowing when it’s right to do nothing, and when it’s time to do something.
There’s a good way of doing nothing and a bad way. The good way is to make tiny, incremental improvements to your position while awaiting the right moment to open lines. The wrong way is to miss the right moments to open lines, while doing nothing to improve your position. In short, the right way is to play exactly the way Austen has done in this game. The wrong way is to do what Kiewra has done. You would think that Austen is the 2500 player and Kiewra is the 2200 player.
But now an interesting psychological moment occurs. Kiewra does nothing in such a provocative way that Austen is finally goaded into action.
35. … Rb8!?
Whaaat? The only point behind this move is to unpin the knight, but why put your rook at b8? It makes no sense. As Austen said, it’s as if Kiewra is waving a red flag, “Come and get me!” And so Austen did:
36. h4?! …
Which was exactly the wrong thing to do! Except that it worked, so it was the right thing. Chess is confusing sometimes…
White could continue playing the maneuvering game as long as he wants. I’m a fan of the idea of putting the queen on d1, lining up both rooks on the d-file in front of it, and then playing h4. White maximizes his pressure both in the center and on the kingside. I’m not really sure how Black can hang on to the d-pawn over the long term, if his knight has to come back to f7 and if White is then able to chase it with g5 and g6. Of course, White has to be careful about not leaving Black opportunities for counterplay, but time is on his side. He can let the game go to move 100 if he wants.
Instead Austen let himself be provoked into sacrificing a pawn, and it’s not clear that he is quite ready for it. So we could say that Kiewra’s rope-a-dope strategy was a success — if he had handled the ensuing complications correctly. But he didn’t. Which is another bad thing about playing rope-a-dope: it demands perfect execution and Petrosian-like calm.
36. … Nxg4 37. Rg3 h5??
The losing move. Black just has to retreat his knight back to e5, resuming his obstructionist policy. He probably didn’t do this because the exchange sac 38. Rxe5 looks ultra-scary. But it’s not! After 37. … Ne5 38. Rxe5?? de 39. Qf7 Rg8 White can try either 40. Bf8 or 40. Bc1 but neither one works after 40. … Qc7, contesting the seventh rank just in the nick of time. (40. … Rc7 also works.) Of course White doesn’t have to sacrifice the exchange, but then his attack is just a little bit nebulous. Maybe he has compensation for the pawn, but not more.
After the text move, though, White is clearly winning, and Austen proves it in fine style.
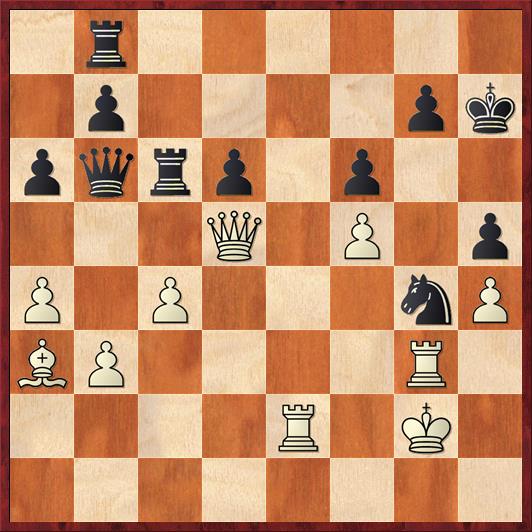 Position after 37. … h5?? White to move.
FEN: 1r6/1p4pk/pqrp1p2/3Q1P1p/P1P3nP/BP4R1/4R1K1/8 w – – 0 38
First step is to infiltrate with the queen: 38. Qf7! Black can’t defend the h5 pawn, because 38. … Kh6?? 39. Qg6+ would be mate. Kiewra played 38. … Rc7 39. Qxh5+ Nh6 40. Bc1! (All of White’s pieces are now participating in the attack) Qc6+ 41. Kh2 d5 (finally getting some activity, but it’s too little too late) 42. Bxh6 gh 43. Rg6 (43. Re6 is quicker, but this move also works.) Qd6+ 44. Kh1 Qf8 (Austen missed this defensive trick, but no problem — he’s still winning) 45. Re6 Rf7 and now it’s White to play and win.
 Position after 45. … Rf7. White to move.
FEN: 1r3q2/1p3r1k/p3RpRp/3p1P1Q/P1P4P/1P6/8/7K w – – 0 46
Austen played 46. Rxh6+!, which simply wins a pawn and gets all the pieces off the board. After 46. … Qxh6 47. Qxf7+ Qg7 48. Qh5+ Kg8 49. cd Rc8 50. Re8+ Rxe8 51. Qxe8+ Kh7 52. Qg6+! Black resigned. In the king-and-pawn endgame he can’t stop both the h-pawn and the d-pawn.
Not a perfect game, but very instructive. First, when you’re in a defensive position and your opponent gives you a chance to bust out, do it! Kiewra was just courting disaster by playing his rope-a-dope non-strategy.
On the other hand, when you are in control of the position, and your opponent has weaknesses that won’t go away, very often the right thing to do is sit on the position for a while, play on different parts of the board, and keep your opponent guessing about when and where you are going to strike. Austen’s patience in this game was really admirable, and if he made any error it was not being even more patient.


