Today we’ll see the conclusion of my three-part epic game against Jay Bonin from the 2005 HB Challenge. The first two parts show how we followed and finally deviated from a terrific GM battle, Polugaevsky-Tal from the 1969 Soviet Championship. I’ve really enjoyed reading everybody’s comments about that game. Even if it was home analysis by Polugaevsky, it was an amazing feat of home analysis for those pre-computer days.
But in the not-so-terrific not-GM battle, Bonin-Mackenzie, mistakes were made. After move 25 we got to a position that no longer has theoretical relevance for the opening. Yet there are still very important lessons to be learned. Most games are won and lost not by opening theory but by who plays better the rest of the game, and that was certainly the case here.
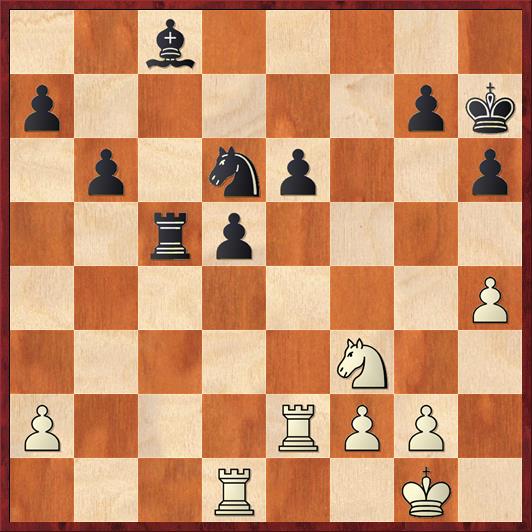
Position after 25. … Nd6. White to move.
FEN: 2b5/p5pk/1p1np2p/2rp4/7P/5N2/P3RPP1/3R2K1 w – – 0 26
I was feeling pretty good about my position here. From a position where my king looked as if it might come under a mating attack, I’ve bailed out into an endgame where material is even (two pawns for the exchange) and I have some real winning chances due to the passed d-pawn and the excellent squares available to my knight. It was a real shock to me when I lost this game, and I wanted to understand why.
We start with two natural moves, as both knights go to their most inviting squares:
26. Ne5 Ne4
Now already White has to think about how to meet the threat of … Nc3. He plays the most aggressive, but I believe incorrect, alternative.
27. Re3?! …
It’s funny that the rook moves to this square three times this game. The first two times it was a blunder. I believe White had to play 27. Ree1!, so that he could meet 27. … Rc2 with 28. Rc1. If Black plays 27. … Ba6, intending to keep White’s rooks from returning to the second rank, 28. Rc1 is still a good answer. Or if 27. … Nc3 28. Rd2. In all of these cases I think that Black is putting pressure on White but I haven’t been able to find anything conclusive.
However, let’s look at the position from Bonin’s point of view. He is rated 300 points above me, he has played thousands of games against players at my rating and he knows that if you put pressure on them, they almost always crack. He would much rather do that than play a very passive position after 27. R1e1 where I am putting pressure on him.
27. … Rc2 28. h5! …
In spite of the fact that the computer considers this move a blunder, I consider it the best move of the game, even the winning move. How can this be?
At the time, I struggled to articulate what is so good about it, but I can explain better now. The reason this is the best move of the game is that White asked the Mike Splane question: how am I going to win this game? His answer is: I’m going to put the pawn on h5, the knight on g6 and a rook on the back rank, and then I’m going to checkmate on h8.
By contrast, I never asked the Mike Splane question. I never really asked how either player was going to win. Certainly I saw here that White was setting a trap for me; if either 28. … Rxf2? or 28. … Rxa2? White wins with 29. Rxe4! But I thought of the checkmate threat as a mere annoyance. I didn’t realize that it was in fact White’s winning plan.
(Lengthy digression based on the computer: Actually my analysis was faulty: 28. … Rxa2 29. Rxe4 de 30. Ng6 Ra5! 31. Rd8 Rxh5 32. Nf8+ Kg8 33. Rc8 gets Black out of the mating net and into a fascinating four-pawns-versus knight endgame. Thanks to Rybka for pointing this out.)
(Also, Rybka confirms something I suspected: Black’s third way of accepting the pawn sacrifice, 28. … Nxf2!, is actually a good move. It looks as if Black is just walking into White’s attack with 29. Rf1 Ne4, but in fact … Nf6 is going to close off all the files to White’s rooks and make it very difficult for him to make progress. White can win back his pawn with 30. Ra3 a5 31. Rb1, but Black should be very happy about this because White has gotten sidetracked from his plan of attacking on the kingside. Rybka gives the position an evaluation of +0.7 for Black.)
(There’s another lesson here from the computer analysis: Don’t trust your opponent! Bonin was rated 300 points above me, and I was scared: against a player like this, it must be suicide to play 28. … Nxf2, because that is just what he wants me to play. Rybka, on the other hand, is rated 600 points above Jay Bonin, and has no such qualms.)
28. … Ba6!
I still think this is a pretty good move, even though the brave 28. … Nxf2 would have been more accurate. I avoid the traps, and moreover I make a pretty big threat of my own.
29. Ra3 …
In for a penny, in for a pound. I don’t see anything better for White; he can’t defend f2 and a2 otherwise.
29. … Be2 30. Re1 …
In my home analysis afterward I thought that this was a blunder, and that White should have played 30. Rd4 instead, blockading the d-pawn. But looking at the endgame again after twelve years, I think there is no salvation to be found here. After 30. Rd4 Black plays 30. … a5! and now, unlike in the game, White’s rooks find themselves very short of squares. For example, on a move like 31. Nd7 (seemingly strong, threatening to win a pawn two different ways, with Nf8+ or Nxb6), Black has 31. … Nc3!, with an even bigger threat, … Nb5 forking the rooks. If, say 32. Rb3 to step out of the fork, now 32. … Bb5 threatens both … Bxd7 and … Ne2+. This is only a sample line, but White is in deep deep trouble, with Black’s pieces crawling all over the place.
Now let’s go back to the position after the move Bonin actually played, 30. Re1.

Position after 30. Re1. Black to move.
FEN: 8/p5pk/1p2p2p/3pN2P/4n3/R7/P1r1bPP1/4R1K1 b – – 0 30
A wonderful, complex, dynamic position. It’s also my last move of the time control. For twelve years I have thought that I blundered here, but the computer says that I played the right move! (Or at least a good move.)
30. … a5
Not the losing move! Nevertheless, when I analyzed the game at home I was convinced that I should have played 30. … d4 here, with a win. The point is that Black needs to ask the Mike Splane question too: How am I going to win? The answer is, by queening the d-pawn. And in the tempo race, Black’s winning plan is faster. If 30. … d4 31. Rxa7 d3 32. Ra8? (32. Rd7 Nf6 is unclear) d2 33. Ng6 deQ+ 34. Kh2 Bxh5 destroys the mating net.
However, there is a problem with 30. … d4, which I didn’t notice during the game and also didn’t notice when analyzing it at home. The computer, with its silicon nerves of steel, says that White doesn’t have to play 31. Ra7, he can simply play 31. Ra4! Oops! Because of the pin, Black’s d-pawn drops off. Black still has a playable game after 31. … Nf6 32. Rxd4 Bxh5, but this isn’t the way that it was supposed to go. Black has given away his most prized possession, the passed d-pawn.
I should mention another factor here, which is that I was (as usual) in time trouble. This was the last move of the time control (30/90), and I probably had less than a minute left. In such situations it is usually better to play the safe move that lets you fight on than to play the highly risky move that you don’t have time to calculate fully (but your opponent will have all the time he needs!). From this point of view, 30. … a5 was a very sensible move. Perhaps even more sensible would have been 30. … Bxh5, because it eliminates once and for all White’s checkmate threats and forces him to find another plan. By contrast, 30. … d4 is rolling the dice, and as we’ve seen it has a flaw and basically transposes into an inferior version of the 30. … Bxh5 line.
But one more lesson: Don’t get into time trouble! Why was I in time trouble at all? As we’ve seen, the first 16 moves of this game hardly required any thought, so I should have had, like, 80 minutes for 14 moves.
31. f3 Nd6??
This move, on the other hand, throws away the game. It’s pretty clear that White’s breakthrough now has to come on the e-file, so Black’s first priority should be defending the e-pawn with 31. … Nc5.
Rybka offers the following equalizing line that looks pretty convincing (after the first couple moves all the moves are forced for both players): 31. … Nc5 32. Rb1 d4! 33. Nc6 e5! 34. Nxe5 d3 35. Kf2 d2 36. Kxe2 Rc1 37. Kxd2 (my, that’s a hungry king you have) Rxb1.
The strange thing about this move is that I find absolutely zero comments in my notes about why I played 31. … Nd6. Maybe I thought I was controlling e8, but if I stop him from taking on e6 (by playing … Nc5), then I don’t even have to worry about e8. Very puzzling.
Because I can’t remember why I played this move, it’s hard to learn from this mistake and avoid it in the future.
However, I will say this. Many of my worst blunders over the years have come on the move after the time control. I think that this is a very perilous time whenever you have been in time trouble. Your adrenaline is running wild, and very often this is the first time in several moves that you have a chance to really look at the position. It’s as if you’re waking up from a dream and seeing it for the first time.
In addition, if you are a messy scorekeeper (which I’m not, usually), there is often a temptation to hedge your bets by playing an extra move just to make sure you’ve really passed the time control.
I have realized from painful experience that the best thing for me is just to walk away from the board and let the flag fall. Let my nerves settle down and come back to the board when I’ve calmed down. I have never had a case where letting the flag fall cost me the game because I had counted the moves incorrectly.
I think that at the time I played this game with Bonin, I had not yet made it a ritual to let the flag drop, walk away and calm down. I’m not blaming my loss on that, but it’s possible that the ritual would have helped.
The rest of the game is, regrettably, quite one-sided.
32. Re3 Ba6 33. Nd7 …
I was surprised he didn’t play 33. Ng6, but this move has the extra threat of answering 33. … Bc8 with 34. Nxb6 d4 35. Nxc8!
33. … d4
Far too little, too late.
34. Rxe6 …
Now we see why d6 was the worst square for the knight.
34. … Nf5 35. R1e5 d3 36. Nf8+ Kg8 37. Ng6! …
The mating net is in place, and the game is over.
37. … Rc8 38. Rxf5 resigns.
I hope you agree that there were good lessons in all phases of this game. In the opening we had Polugaevsky’s great sweeper-sealer idea, 16. d5 and 17. e5, and his beautiful victory over Tal.
In the middlegame we had my strategically-good, tactically-bad idea of repositioning the bishop, which Bonin failed to take advantage of, but then we also had my unfortunate fixation on trading queens — trying to deaden the position when I should have been playing for advantage. The whole question of when to trade queens is a hugely important one for amateurs, and one that we very often get wrong. We had Bonin’s nice deflection sac on h7 — not deep, but still the sort of little trick that so many chess players forget to look for.
Finally, in the endgame we had the Mike Splane question, and Bonin’s very foresighted idea of setting up a mating net with h5 and Ng6. We had a case of “taking my opponent’s word for it” when I shouldn’t have, and just a general lack of awareness by me of where the danger in the position was. And a lack of asking the Mike Splane question on my side. With two pawns for the exchange, there are two things I should focus on: 1) Reducing the scope of the rooks by keeping all ranks closed; 2) Establishing my pawns as a threat to queen. It goes back to Silman’s theory of imbalances: in chess there will almost always be imbalances in your favor and imbalances in your opponent’s favor, and your job is to minimize the importance of your opponent’s advantages while maximizing the importance of your advantages. And finally, we had a classic case of the move-after-time-control blues, where I maybe needed to take my time a little bit more.


{ 1 comment… read it below or add one }
I think 26. Ne5 is not above scrutiny. The knight does nothing here, except to interfere with the activity of the e-rook and shield the e6 pawn from attack.
When I looked at the position at the end of your previous blog post, I thought the best idea for White was 26. Nd4 threatening to take on e6. 26… Ne4 is forced, Black can’t afford to let White take one of the center pawns because the pair of rooks will get too active. Note the knight on d4 is a. attacking e6, b. guarding against checks on e2, c. preventing …Rc2, and d. has the option of going to b3 to dislodge the rook from its safe square on c5, after which White can have real hopes of engineering a rook trade to take over the c-file.
Next White plays 27. Re3. The rook is very well placed on the third rank. The main threat is 28. f3 Nc3 29. Rc1 while 28. Ra3 a5 29 Rb1 is also a good plan, and even f4, making the d4 outpost permanent is a good plan.
After 27 … e5 ? 28 Nb3 Rb5 29. f3 or 28. Nb3 Nc3 29. Rc1 Black’ position collapses.
In general White is better if he can engineer a trade of rooks without altering the pawn formation. His remaining rook will penetrate to c7 and dominate the board when all of the black pawns will be weak. That would have been my answer to the Mike Splane question if I had held the White pieces.
Which brings up an interesting observation. There may be more than one best or correct answer to ” the Mike Splane question.” The answer could be different because of players having different skills. If Bonin lacked endgame technique then playing for mate makes a lot of sense. My strengths are more in the endgame so that would have been my choice.
I really liked this set of blog posts. Great games, and great observations. I learned a lot. Thanks Dana.