Happy April Fool’s Day! I really am going to show you my game with Magnus, only it isn’t the Magnus you’re thinking about.
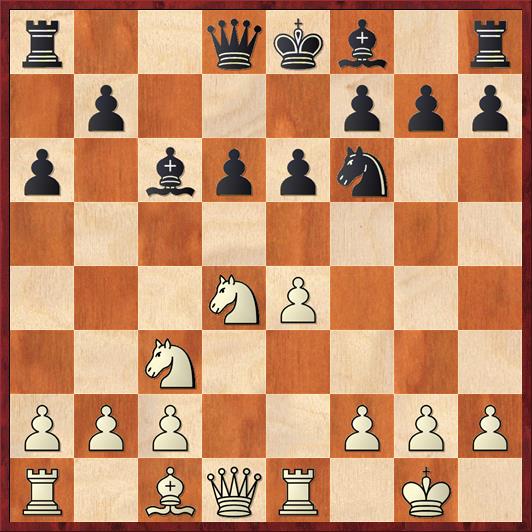
In 1995 I played in the World Open, and for once it kind of lived up to its name. In round one, I played against Leonid Filatov, a U.S. player born in St. Petersburg, Russia. In the last round I played against George Umezinwa, whose nationality is shown as “U.S./Nigeria” on several websites. And in round eight, I played against Magnus Ulfarsson, a FIDE master and electrical engineering professor from Iceland. Unlike the two players I just mentioned, it appears that he did not have a U.S. residence, but came over just for the sake of playing in this tournament.
The game is a little bit embarrassing to me, because I was beaten very easily after getting a good position from the opening. However, it is also extremely instructive. It shows (yet again) the failure of planless play. From move 10 to the end of the game, I just played what I call “connect-the-dots” chess, going from move to move without really thinking about the position: strengths, weaknesses, and long-term goals. After move 10, I never played a single move that you could point to and say, “That’s a master move.”
Dana Mackenzie — Magnus Ulfarsson
World Open, 1995
1. e5 c5 2. Nf3 d6 3. Bb5+ …
Back in those days I regularly played the Rossolimo Variation. It was only a few years later (2001 or 2002) that I started playing the Grand Prix.
3. … Nc6 4. O-O …
Our new world championship contender, Fabiano Caruana, has played 4. Bxc6+ bc 5. e5 in this position, but only in rapid games.
4. … Bd7 5. Re1 a6?!
Black is really determined to evict that bishop. I consider this move to be already an inaccuracy, as it loses a tempo. Notice his neglect of kingside development. 5. … Nf6 is better.
6. Bxc6 Bxc6 7. d4 cd 8. Nxd4 Nf6 9. Nc3 e6?!
An interesting (and better) alternative is 9. … e5, putting the question to White’s knight. It doesn’t really have a good square, and if 10. Nxc6 bc Black repairs the hole on d5 and contemplates pushing … d6-d5 in the future.
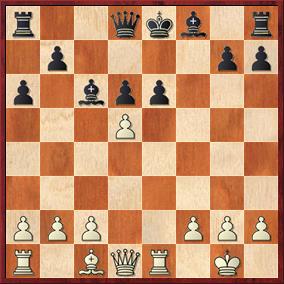
Position after 9. … e6. White to move.
FEN: r2qkb1r/1p3ppp/p1bppn2/3N4/3NP3/8/PPP2PPP/R1BQR1K1 b kq – 0 10
White now gets to play a very thematic move.
10. Nd5! …
My only good move of the game — but the followup shows that I did not really understand why it was good. Of course if 10. … ed 11. ed+ White recovers his piece (and more) with a great position. The real question is how White will reply to the several other possible captures: 10. … Nxe4, 10. … Nxd5, and 10. … Bxd5.
The most important question, I think, is what to do after 10. … Nxe4, because the correct answer is not what you might think at first. After 10. … Nxe4 11. Nxc6 bc 12. Rxe4 cd 13. Qxd5 Qc8! at first it looks as if White is pushing Black around, but in fact Black’s position is quite resilient. An important point is that White “owes” Black a tempo, because after natural moves like 14. f4 or 14. Bg5, Black can reply 14. … Be7! and suddenly White’s queen is hanging and White has to lose a tempo to move it to safety.
Instead, a far better move is 10. … Nxe4 11. Nxe6! This is not a “connect-the-dots” move, but one that shows true insight into the position. White weakens Black’s pawn shield. Now after 11. … fe 12. Rxe4 the e-pawn is very weak and cannot be defended with 12. … Qd7 because of 13. Rxe6+ Qxe6 14. Nc7+. If 12. … Bxd5 13 Qxd5 the e-pawn will fall. And if 12. … Bd7 13. Be3, Black’s position is passive, he has a hole on b6, his pawns on e6 and d6 are easy targets, and I would much rather be White.
I strongly suspect that I did not analyze 10. … Nxe4 carefully during the game. If I had, I would have recognized that the pawn on e6, not the bishop on c6, is the real target.
By the way, it’s interesting to see how this game echoes the same themes as Carlsen-Ehlvest from the 2018 PRO Chess League, which I wrote about recently! There, too, Carlsen had a choice to take on c6 or on e6, and correctly focused on e6.
10. … Nxd5
Now, stop and take a breath. Don’t play the automatic move. This is exactly when the position requires a master move.
11. ed? …
Fail! Double fail! This was a fail not only during the game but also later, at home, when I analyzed the game and wrote, “If 11. Nxc6 bc 12. ed cd 13. Qxd5 Black has a ticklish situation… Probably 13. … Qc8! followed by … Be7 is best.” This evaluation is wrong. After … Qc8 and … Be7 Black is fine; in fact this is essentially the same position that we saw earlier, except with the rook on e1 instead of e4.
There is no mention in my notes of the correct move, which is 11. Nxe6!! This already has some subtle points to it, which is why I give it two exclams. After 11. … fe (forced) 12. ed Black is forced to give back the material. (See diagram.)
Position after 12. ed (analysis). Black to move.
FEN: r2qkb1r/1p4pp/p1bpp3/3P4/8/8/PPP2PPP/R1BQR1K1 b kq – 0 12
If 12. … Bb5 13. a4 Black’s bishop gets hunted down, and Black either has to give it up or go back to d7. If 12. … Bd7 13. de! Bc6 White has the stunning move 14. e7! Bxe7 15. Bg5, and Black is in a world of hurt.
This is beautiful, master-class chess, combining so many different ideas: the pin on the e-file, the sacrifice on e6, the near-trapping of Black’s light-squared bishop, the “berserker pawn” going to e6 and e7 and rampaging through Black’s position. Most importantly, White has appropriately punished Black for his lack of development that all began with the wasted tempo 5. … a6.
That’s why it makes me so sad that I completely missed all of this. The brilliant move 11. Nxe6!! was eventually played, but not by me. The position came up again in the game Dmitry Frolyanov – Nikolai Kabanov, Khanty-Mansiysk 2013, and there Frolyanov (a 2570 player) found the move that a 2500 player should find, capturing on e6.
Okay, let’s go back to the game, where I have just played 11. ed? This move sacrifices a pawn, which is nice and brave — but bravery in chess has to be complemented by calm understanding of the position.
11. … Bxd5 12. Qh5 Be7 13. Rxe6!? …
In for a penny, in for a pound. If Black is allowed to castle then I’ll just be a pawn down for nothing.
13. … Bxe6 14. Nxe6 g6!
The trade of queens will take all of the steam out of White’s attack and leave Black with a better endgame.
15. Nxd8 gh 16. Nxb7 Kd7 17. Na5 Rac8?!
A slight misstep, in my opinion. The rooks belong on b8 and c8.
18. c3 Rg8 19. Be3 Bg5
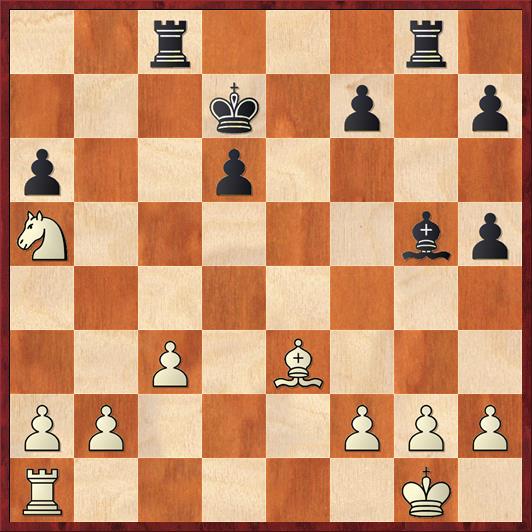
Position after 19. … Bg5. White to move.
FEN: 2r3r1/3k1p1p/p2p4/N5bp/8/2P1B3/PP3PPP/R5K1 w – – 0 20
In this position I once again fail to play like a master. It was a very different fail from the first time, when there were a lot of tactics involved. Here there are no tactics, it’s just a matter of understanding the position and what White should be trying to do.
Here are the questions I should have been asking:
- Where are the best squares for my pieces? That’s easy. The best I can hope for is bishop on d4, knight on d5. I will probably need to play b2-b3 in order to transfer my knight via c4 to d5. In fact, that’s a pretty good plan for the next five moves: Bd4, b3, Nc4, Ne3, Nd5.
- What are the possible trades, and which ones are good for me? This one is also easy. It’s clear from Black’s last move that he would like to trade bishops, and he’s right. If White can get his knight to d5 and bishop to d4, the two minor pieces work together and amplify each other’s power. When the knight is on its own, it isn’t as strong. Also, White must avoid all rook exchanges. I’ve mentioned this a couple times in recent posts: when you are an exchange down, it’s very important to keep your remaining rook on the board if you can. The reason is that it helps contest the power of your opponent’s rooks. Once the rooks are traded, your opponent’s remaining rook can take over any open file or open rank without being opposed. Although of course I was aware in a vague way that I should avoid exchanges, you’ll see from my next few moves that I did not fight against it with the urgency I should have. And in particular, I resisted the natural move 20. Bd4 because I thought “my knight belongs on d4.”
- What are the targets? Another important question I never asked. Black’s position does have one significant weakness: the pawn on h5. A nice long-term plan might be to put my pawns on g3 and h4, and then at some point (after I have established my knight on d5) harass the h-pawn with Nf4.
Of course I might not be able to achieve all of these objectives, but this is the way I should have been thinking about the position. Instead I play a near-sighted, short-term move that defeats all of my long-term objective.
20. f4? …
Not necessarily the losing move, but the beginning of a series of bad judgments that make it very easy for my opponent to bring home the victory.
20. … Bd8 21. Nb3 Rb8
By contrast with my planless play, Magnus’s play is very purposeful. He’s now ready to force the exchange of bishops.
22. Rd1 Bb6!
Black is not afraid of 23. Nc5+ because he just steps aside with 23. … Kc6 and wins a piece.
23. Bxb6 Rxb6 24. Rd5? …
Again, connect-the-dots chess. I see that the h-pawn is a target, but I neglect the fact that Black has a very easy defense that is consistent with his goal of exchanging rooks. A better idea would be 24. Nc5+ Kc6 25. Nd3, with a nice compact defensive formation. Black may be winning, but he will have to do some work to prove it.
24. … Rb5 25. Rxb5 ab
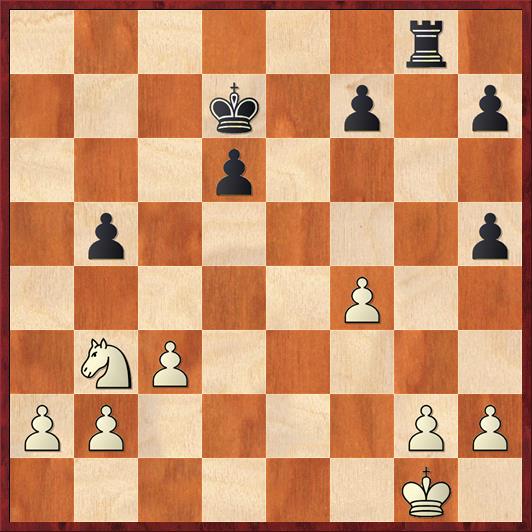
Position after 25. … ab. White to move.
FEN: 6r1/3k1p1p/3p4/1p5p/5P2/1NP5/PP4PP/6K1 w – – 0 26
Even after all of his mistakes, White still has a chance to put up a decent fight. What should he do next?
26. Nd4? …
Even more connect-the-dots chess. Having decided that d4 was the right square for my knight, I stick it there without even thinking about what my opponent’s response might be. Good defense means seeing your opponent’s threats, maybe even before he does. White should play 26. a3! here. After 26. a3 Re8 27. Kf2 Kc6 28. Nd2 White sits and asks Black, “How are you going to make progress?”
26. … Re8 27. Kf2 b4!
This resource is why it was important for White to play 26. a3. There’s a good lesson here about timing. Even if you have the right plan, you often have to play the moves in the right order. It was imperative for White to prevent Black’s pawn break first; he can bring the knight to d4 any time he wants, so that can wait.
Now White’s pawn formation gets destroyed and Black gets a sea of open lines for his rook. The rest of the game is just no contest. I probably played on longer than I should have.
28. cb Re4 29. Ne2 Rxb4 30. b3 Kc6 31. Ke3 Kc5 32. Kd3 h4 33. g3 hg 34. hg h5 35. Nc3 h4 36. gh Rxf4 37. h5 d5 38. a3 Rf3+ 39. Kd2 Rh3 40. b4+ Kc4 41. Ne2 Rxh5 42. Nf4 Rh4 43. Ke3 d4+ 44. Kf3 d3 45. Ke3 Rxf4 White resigns
I feel as if this game had two good lessons for the price of one: first, how to play dynamically and exploit your opponent’s mistakes in the opening; second, how to save (or at least put up a decent fight in) a difficult endgame.
By the way, the questions I mentioned above are all part of a longer list that I have written about on this blog before, which we developed at Mike Splane’s chess parties. If I’d had this list back then, maybe I would have won or saved this game.
Questions for Strategic Planning
- What are the pawn breaks?
- What are the best- and worst-placed pieces for me and my opponent?
- What are the targets?
- What are the possible trades, and which ones are good for me?
- Who would be winning the endgame?
- Who has the safer king?
- What side of the board should I play on?
- Should I play fast or slow?
- How will I win this game?


{ 1 comment… read it below or add one }
The third diagram, the position after 19 … Bg5 is very interesting. Can we discuss it at my next chess party? It would be a great exercise to look at all of the various candidate moves for White and figure out how Black wins against each one.
You suggested “a pretty good plan for the next five moves: Bd4, b3, Nc4, Ne3, Nd5.” This is what I also thought White should be playing when I first looked at the position. The problem is here isn’t enough time to play it after 20. Bd4 Bd8.
For a long time I thought White was just lost, but then I found an interesting “thinking outside the box” move: 20. Bc1 !!
After 20 … Bc1 21. Rc1 White’s plan is to play b4, a3, c4 and Rd1.
After 20… Bd8 White’s plan is to play Nbe Nd2 Nf3
Black might still be winning, but at least White’s pieces are coordinated and the queen-side pawns are safe.
In the fourth diagram you wrote
After 26. a3 Re8 27. Kf2 Kc6 28. Nd2 White sits and asks Black, “How are you going to make progress?” This is a great question. Maybe all of your previous moves were correct.