“Where did I go wrong?” is a lament that every chess player sings at one time or another. Here’s a game I played against Shredder, the computer, recently that had me totally baffled after the game was over. I felt as if I was winning the whole way, but in the end I had to settle for a draw.
Where did I go wrong? I’ll do this post in a somewhat different way. I’ve analyzed the game (but not with a computer) and copied five positions where I might have gone wrong. Your job is to figure out in which position or positions I lost control over the game. Then I’ll tell you where I think it happened.
Of course, you are welcome to disagree! If you think that the mistake was somewhere else, please say so. I want to know how I should have thought about the position!

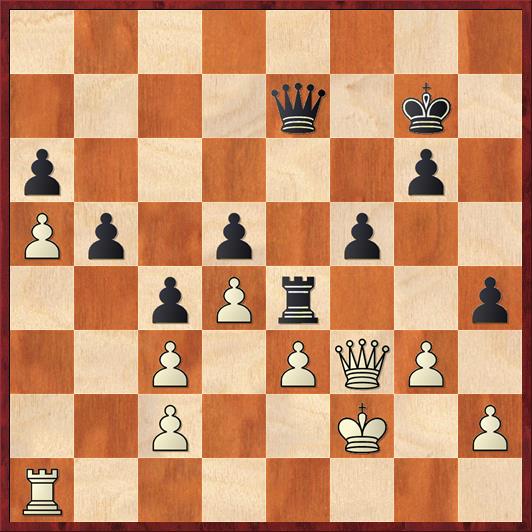
Position after 34. Kf1. Black to move.
FEN: 8/4q1k1/p5pp/Pp1p1p2/2pPr3/2P1P1Q1/2P3PP/4RK2 b – – 0 34
Position 1. I’m Black, Shredder is White. This is a position where White has the proverbial “two weaknesses,” the pawn on e3 and the pawn on a5. Not only that, he has some subsidiary weaknesses — the doubled c-pawns — which could become targets if I ever break through his shell.
But how am I supposed to win such a position? I played 34. … Qd8, “tickling” the a-pawn so that White would be forced to move his rook to the more passive square a1. Should I have taken a more direct approach with 34. … Qa3?
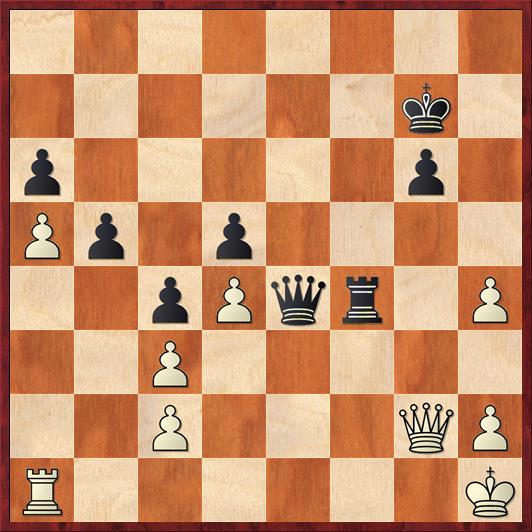
Position after 39. Kf2. Black to move.
FEN: 8/4q1k1/p5p1/Pp1p1p2/2pPr2p/2P1PQP1/2P2K1P/R7 b – – 0 39
Position 2. Here I really wanted to play 39. … g5, preparing a breakthrough with … f4. Of course White can take a pawn with 40. Qxf5, but then it looks as if I might be able to break down his defenses with 40. … Re3. Should I take the risk?
In the end I decided not to, and played 39. … Qe6 with the simple idea of preparing … g5 on the next move. However, Shredder played 40. gh!? and I never got the chance. The game continued 40. … Qf6 41. Qg3 f4 42. ef Rxf4+ 43. Kg2 Qf5 44. Kh1! Qe4+ (you might consider 44. … Rf1+ or 44. … Rg4, but I don’t think either one is clearly better than the text) 45. Qg2, bringing us to our next position.
Position after 45. Qg2. Black to move.
FEN: 8/6k1/p5p1/Pp1p4/2pPqr1P/2P5/2P3QP/R6K b – – 0 45
Position 3. Here, thinking that a queen trade was inevitable, I decided that I might as well snap off White’s rook pawn first while I have the chance. So I played the rather staid 45. … Rxh4. Could I have played something more forcing? Perhaps 45. … Qe3, or 45. … Re2, or 45. … Rg4?
The game continued 46. Qxe4 Rxe4 47. Rg1! I have to say that until this point I thought I was just winning easily, because I will penetrate with my rook to either e1, e2, or e3. It was only after 47. Rg1! that I saw the point of White’s ingenious defense, which is that on any of these moves he will move his rook to the corresponding square on the g-file. Therefore a breakthrough is impossible.
All of a sudden I felt considerably less optimistic, but still White’s position is extremely tied up. He can’t ever move his king to the g-file, because then I will be able to accomplish my goal of playing Re1 or Re2. So I continued to make incremental progress with 47. … Kh6 48. Rg3, reaching our next critical position.
Position after 48. Rg3. Black to move.
FEN: 8/8/p5pk/Pp1p4/2pPr3/2P3R1/2P4P/7K b – – 0 48
Position 4. Here the possibility arises that I could simply trade into a king-and-pawn endgame with 48. … Re1+. As we’ve just said, White doesn’t want to play 49. Kg2 because I can play 49. … Re2+ and 50. … Rxc2. So 49. Rg1 Rxg1+ 50. Kxg1 looks forced. Is this just a simple win for Black?
Instead I played 48. … g5, White played 49. Rf3, and I played 49. … Kg6, continuing my policy of not allowing White any counterplay. You might want to consider the ramifications of 49. … Re2 here, but I’d like to get to our final critical position:
49. … Kg6 50. Kg2 g4 51. Rg3 Re2+ 52. Kf1 Rxc2 53. Rxg4+ Kf5 54. Rg3 Rxh2 55. Re3 …

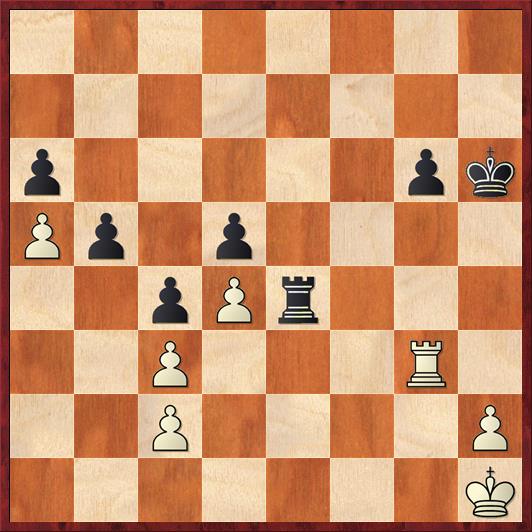
Position after 55. Re3. Black to move.
FEN: 8/8/p7/Pp1p1k2/2pP4/2P1R3/7r/5K2 b – – 0 55
Position 5. Here I played 55. … Ra2, going after the crippled a-pawn. But was this the right pawn for me to try to win?
After this move I don’t think there are any more critical positions, but I’ll give the rest of the moves in case you want to prove me wrong: 56. Re5+ Kf4 57. Rxd5 Rxa5 58. Ke2 Ra2+ 59. Kd1 Ke3 60. Rh5! (One more excellent defensive idea by Shredder. It sets up a sort of Philidor defense, with checks from the side.) 60. … a5 61. d5 b4 62. Rh3+ Ke4 63. d6 Rg2 64. d7 Rg8 65. Rh4+ Kd3 66. Rh3+! (My last hope was that Shredder would win my rook with 66. Rd4+ Kxc3 67. d8Q Rxd8 68. Rxd8 Kb2, when Black’s armada of pawns is unstoppable. However, Shredder’s defense remains letter-perfect to the end.) Ke4 67. Rh4+ Kd3 68. Rh3+ ½-½.
So, have you figured it out? Where did I go wrong?
Position 1. Not here! The whole lesson of this game is that Black has complete control over the position and should not let go of that control until it is absolutely necessary. This “no counterplay” policy is a favorite of Mike Splane’s, but in fact it is well known to all masters. It is especially important when you are playing a computer, which will turn a little bit of counterplay into a lot before you know what happened.
Still, if you want concrete analysis, I say that after 34. … Qa3 35. Qc7+ Re7 36. Qc6 Qxc3 37. Qd6! White’s counterplay is enough to equalize.
Position 2. Not here! I spent an hour at least after the game looking at 39. … g5 40. Qxf5 Rxe3 and I won’t bore you with all of my analysis, but the position seemed totally unclear to me after either 41. Qxd5 or 41. gh. I finally decided that this was a wasted hour. First, in a real tournament game I could never afford the time to work through all the possibilities. And second, there is absolutely no need to! Black should only enter complications when he is sure they work in his favor. Otherwise, he should just quietly improve his position. Note that there is very little White can do to improve his.
Position 3. Yes, here I definitely made life harder for myself. The h4 pawn is meaningless. With 45. … Rf2! I get my rook on the seventh rank, something I struggled to accomplish in the game. During the game I didn’t seriously consider this option because after 46. Qxe4 de it looks as if I have given White a strong passed pawn (on d4) while giving myself a weak passed pawn on e4). But that’s not important. What’s more important is getting connected passed pawns, and I achieve that easily after 47. Re1 Rxc2 48. Rxe4 Rxc3. The key strategic points that Black needs to grasp are: (1) connected passers in a rook endgame are stronger than disconnected passers, and (2) White’s king is very badly placed. A sample line, where Black does not even need to defend, is 49. Re6 Rd3 50. Rxa6 c3 51. Rc6 b4 52. a6 b3 53. a7 b2. White queens first, but Black queens with check and that makes all the difference.
Position 4. No, no, no! Never trade into a king and pawn endgame unless you’re sure that it’s winning. After 48. … Rg1+ 49. Rg1 Rxg1+ 50. Kxg1 Kg5 I at first though for sure that Black must be winning, because he has the distant opposition. But no! After 51. Kf2! Kf4 (or 51. … Kh4 52. Kg1!!) 52. Ke2 Ke4 53. Kf2 Black has no way to break through. The pawns on h2 and c2 are amazing. The whole concept is stunning. To me, this is a case where Shredder played beyond-human chess.
Position 5. Yes! This is the place where I missed the simplest win. And the sad thing is that it’s the logical culmination of everything else that I have done. With 55. … Kf4! I take away the rook’s base on the third rank, and I win the c3 pawn by force. As in the note to Position 3, that pawn is much more important than the a-pawn. Why? Because (a) Black gets connected passers. After winning the a-pawn, Black gets connected pawns but only one is passed. And because (b) The b- and c-pawns are further advanced by two tempi than the a- and b-pawns. In a rook and pawn endgame, two tempi are enormous.
So just on general principles, with no analysis, 55. … Kf4 has to be better. For those who want variations, 56. Re6 Rc2 57. Rxa6 Rxc3 58. Rb6 Rb3 59. a6 Ke4 60. a7 Ra3 61. Rxb5 Rxa7 is a typical line.
So the bottom line, to me, was that I didn’t play the endgame too badly. My policy of denying White any counterplay, and making gradual, patient progress, was exactly right. I got a little bit lazy in Position 3, partly because I thought I was easily winning. I did not grasp the point of Shredder’s ingenious defense (e.g., in Position 4) until too late. Even so, I didn’t get flustered, and still had a winning position as late as Position 5. But I didn’t grasp that not all pawns have the same value.
One final point is that the “no-counterplay” strategy breaks down once you get to a rook-and-pawn endgame. That’s what makes R+P endgames so hard. The trick is to deny your opponent counterplay as long as possible, and when you finally do get into a situation where every tempo counts, do everything you can to make sure your pawns are faster. Including little tricks like queening with check!


{ 2 comments… read them below or add one }
Just an idea. Would it make more sense to take the h2 pawn before taking the c2 pawn with 52. … Rh2? It seems like it gains a tempo on the … Rxc2 … Rxh2 … Rc2 line.
Absolutely right. This shows that from the beginning I had a faulty plan, focused on winning the a5 pawn rather than the c3 pawn. But here’s the kicker: Even if I wasn’t sure which pawn I wanted, I should still have taken on h2 first. If I take the c3 pawn your move is one tempo faster, and if I take the a5 pawn your move is the same number of tempi (h2-c2-a2-a5 versus c2-h2-a2-a5). So I should take on h2 first because there’s a 50 percent chance of gaining a tempo and a 50 percent chance of not losing any tempi.