Here’s a question for my esteemed readers. What sub-2700 player do you consider to be the best for an amateur to study? Why?
Well, for any player the answer is “Study your own games.” But we’re not allowing that answer.
The reason I’m asking is that I decided, in preparation for my next tournament (the Bay Area International) to study the games of Baadur Jobava. He seems to be the most similar to me in the sense that he is willing to play non-mainstream openings, but also quite dissimilar in the sense that he has incredible success with them! I want to understand how he gets so often into positions where he can sacrifice pawns or pieces, and I want to improve my tactical awareness of those possibilities.
My first game is an incredible example — incredible for anyone else, but somewhat typical for Jobava. In this game, he beats an ex-World Champion in 21 moves!
Admittedly, his opponent, Ruslan Ponomariov, is one of those pseudo-world champions that FIDE crowned in the 1990s and early 2000s. But still, he’s a legit super-GM, rated 2709 at the time of this game, and Jobava slices him up as if he were a patzer.
For 13 moves, both players play absolutely normal, solid opening moves. On move 14, Ponomariov makes a tiny mistake — so tiny that I think most players would do exactly what he did. Suddenly, piece sacrifices are flying everywhere and Black’s position becomes critical. Jobava’s attack defies easy description. It is a weaving together of so many tactical themes: shattered kingside pawn structure, mate threats on h7 and g7, loose pieces in the Black camp, pins, forks, back-rank mates — you name it. It’s truly a work of art.
Baadur Jobava — Ruslan Ponomariov
Olympiad, 2016
1. d4 Nf6 2. Nc3 …
A little bit unconventional, but with the general re-appraisal of White’s d-pawn openings these days, you can find even top players playing this way.
2. … d5 3. Bf4 c5 4. e3 cd 5. ed a6 6. Bd3 Nc6 7. Nge2 e6
After this game, some of Jobava’s opponents have preferred to play 7. … Bg4, which has led to wins for Black in Jobava-Nisipeanu 2018, Jobava-Grischuk 2016 and Jobava-Nepomniachtchi 2016. However, these were blitz games; surely they are not the final word on the subject.
8. Qd2 b5 9. O-O Be7 10. a3 Bd7 11. h3 O-O 12. Rfe1 Na5 13. Rad1 Qb6?!
Why not 13. … Nc4, which seems to be the point of 12. … Na5? Rybka gives Black a small (0.2-pawn) edge after that move. I don’t feel as if Jobava’s opening has been a great success. Nevertheless, he’s going to win the game in eight more moves. Sheer magic.
14. Ng3 Rfc8?
Now let’s pause and take a good look at the position.
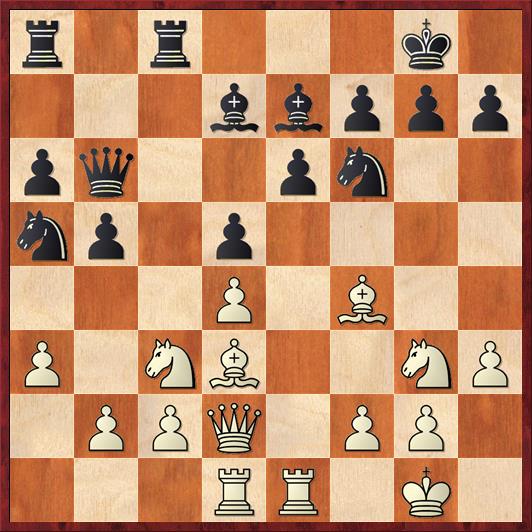
Position after 14. … Rfc8. White to move.
FEN: r1r3k1/3bbppp/pq2pn2/np1p4/3P1B2/P1NB2NP/1PPQ1PP1/3RR1K1 w – – 0 15
What do you think about this position? At first blush I thought it looked pretty good for Black. I like Black’s pressure on the c-file, the knight coming to c4, the other knight maybe coming to e4, the pressure on a3, the possibility of a pawn break with … b4.
On the other hand, Black’s last two moves have been perhaps too ambitious. In particular, notice the loose bishop on e7. The knight on a5 is kind of loose, too. The queen on b6 also turns out to be loose (undefended by any other pieces), even though that fact seems inconsequential. And who is defending the kingside? Nobody.
Knowing that the game was decided in only 21 moves, I thought about the moves 15. Nh5 and 15. Nf5 here. With the first one I’m trying to set up an overload with 15. Nh5 Nxh5 16. Nxd5 Qd8? 17. Nxe7+ Qxe7 18. Qxa5. But I just didn’t see enough compensation for a piece after 16. … ed 17. Rxe7 Nxf4 18. Qxf4 Be8 (keeping open the possibility of bringing the queen to the kingside).
So that leaves 15. Nf5, which takes advantage of the loose piece on e7. But, try as I might, I just couldn’t see a way to make this move work. In fact, I saw not one but two arguments against it. First, after 15. Nf5 Black could simply play 15. … Bf8, moving the bishop out of harm’s way. Then White’s knight has to move from f5. He could play 16. Ne3, but to me this didn’t seem like a great improvement in White’s position. White’s position seems solid but his pieces are getting in each others’ way.
Then there is the more serious problem that after 15. Nf5 Black could take on f5 and then trap the rook: 15. … ef 16. Rxe7 Be6, with … Nc6 coming next. Where is the compensation for the exchange?
Here I made an interesting psychological mistake. Because Black had (apparently) not one but two good answers to 15. Nf5, I didn’t really put enough effort into analyzing it. I think that if he had only one (apparently) good answer, then I would have worked really hard to try to refute it. But with two (apparently) good responses, I thought, “Well, that’s just not a good move.” Instead, I should have done what Jobava did: work twice as hard and find refutations to both of them.
15. Nf5! …
Seizing the initiative. The first point that I missed was that 15. … Bf8 fails to 16. Nh6+!! gh 17. Bxh6. This looks un-promising because Black seems to have the dark squares defended, but consider what happens after 17. … Bxh6 18. Qxh6. The knight is under attack, and he can’t move because of checks on h7. And after 18. … Qd8 19. Re3 Black can’t plug all the leaks. Alternatively, if Black plays 17. … Qd8 right away, then 18. Qg5+! Kh8 19. Bxf8 pulls the queen away from the defense of the knight. Or if 17. … Ne8 then 18. Bxf8 Kxf8 19. Qh6+ is doom. Black’s king can’t run away to e7 because 19. … Ke7? 20. Nxd5+ forks the king and queen. Isn’t it amazing how all of White’s pieces are in the right places, while all of Black’s pieces are in the wrong places?
According to Rybka, Black’s best after 15. … Bf8 16. Nh6+ gh 17. Bxh6 is 17. … Kh8 18. Qf4 e5. But this is desperate stuff; Black’s center is collapsing, and unsurprisingly Rybka evaluates the position as +1 pawn in favor of White.
From a more conceptual point of view, I failed to realize where the knight is going from f5. It’s not going back to e3. It’s going to h6 — the square from which all of White’s tactics flow.
15. … ef 16. Rxe7 Be6
According to the computer, Black’s last chance to stay in the game was 16. … Qd8. But White has a manifestly superior position after 17. Qe3! Nc6 18. Re5!, a nice positional exchange sac that blows Black’s position apart. Rybka says it’s +0.5 pawns for White, but I wouldn’t be surprised to see that go up in a few moves.
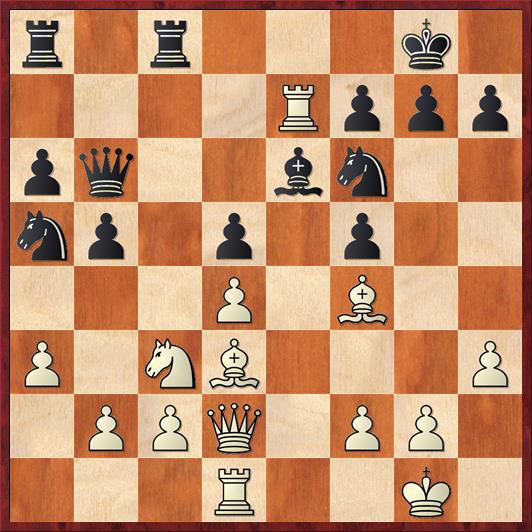
Position after 16. … Be6. White to move.
FEN: r1r3k1/4Rppp/pq2bn2/np1p1p2/3P1B2/P1NB3P/1PPQ1PP1/3R2K1 w – – 0 17
Okay, so we’ve disposed of one of Black’s defenses, but what about the other one? This is in fact what Ponomariov played, and he probably felt pretty good about Black’s position here. White’s rook has no escape. After a move like 17. Be5 Nc6 18. Bxf6 gf Black’s pawns look like a fright, but in order to keep from going a whole rook down White is going to have to play 19. Rxe6 fe, which repairs Black’s pawn formation. With the rooks able to defend on the seventh rank, Black has nothing to fear here. This variation was the main reason I didn’t think that 15. Nf5 was playable.
Do you see what I missed? Hint: What is the real target in Black’s position? It’s not the knight on f6. It’s the pawn on g7, and the possibility of checkmate on that square. Previously I called h6 “the square from which all White’s tactics flow.” And so it is again.
17. Bh6!! …
I didn’t even consider this move when I was looking at the first diagram. If Black ignores the sacrifice, he gets hammered. For example, 17. … Nc6 18. Bxg7!! Kxg7 19. Qg5+ Kf8 20. Rxe6 fe 21. Qxf6+. Or even cooler, 17. … Kf8 18. Bxg7+!! Kxe7 19. Bxf6+ Kxf6 20. Qh6+ Ke7 21. Nd5+! Once again, the undefended queen on b6 is the Achilles’ heel in Black’s position. One can only marvel at the way White combines threats on the kingside with threats in the center and queenside.
Faced with lines like these, Ponomariov is forced to take the bishop, but this hardly does anything to dent Jobava’s dark-square domination.
17. … gh 18. Qxh6 …
Now Black goes into desperation mode, trying to blunt White’s attack by returning material. But Jobava has another trick up his sleeve.
18. … Rxc3 19. Qg5+! …
A nice little wrinkle, chasing Black’s king to f8 and setting up multiple tactical threats, as we’ll see below. In chess, you don’t always want to take the straightest path from A to B (here, h6 to f6).
19. … Kf8 20. Qxf6! …
The point of this move is that on 20. … Rc6 White simply plays 21. Bxf5, piling up the pressure on e6. Black can’t take because of checkmate on f7. And if he plays 21. … Re8, White has an exquisite, economical back rank mate with 22. Bxe6! Rxe7 23. Qh8 mate.
Therefore Black has to get rid of the bishop, but it’s still hopeless.
20. … Rxd3 21. cd resigns
Everything fails for Black. 21. … Nc6 is met by 22. Rxe6. 21. … Re8 or 21. … Qd6 are met by 22. Rxf7+. 21. … Ra7 is met by 22. Re1. (Keep in mind that the rook on e7 cannot be taken because of the checkmate in the last note.)
So, how did Jobava do it?
- Even though he is a ferocious attacker, he didn’t start out in ferocious attacking mode. For the first 14 moves he played calm developing moves that set the stage for what followed. Remember that attacks are much more effective when you invite all of your pieces to the party.
- His higher-rated opponent got a little bit too cocky, leaving the bishop on e7 unprotected. The move 14. … Rfe8 would have shut down the tactics, and it’s not clear how White would then have made the knight on g3 into a useful piece. Look for and take advantage of opportunities the opponent gives you — even microscopic ones.
- He didn’t give up too early. Even when his opponent had two plausible defenses, he went beyond the obvious moves in two ways: first by looking at out-of-the-box moves like 17. Bh6 (broader search); second by seeing ideas like 15. … Bf8 16. Nh6+ gh 17. Bxh6 Qd8 18. Qg5+ Kh8 19. Bxf8! (deeper search).
- He understood the true targets in Black’s position. Once the bishop on e7 is gone, Black has nothing defending the dark squares except the pawn on g7. Eliminate that pawn, you win the game.
- He recognized the strategic power of the square h6. I don’t know how you teach this; maybe by knowing analogous games? When I look at h6 in the first diagram, I see a square my pieces can’t go to. When Jobava looks at that square, he sees a square that three pieces can go to, each one with devastating threats.
To expand on point 5 a little bit more: Because I am not a grandmaster, I don’t have the vast knowledge of comparable games and positions that Jobava probably has. Nevertheless, here is a “comparable position” that I do know. It’s one of my favorite variations in chess, the Fritz Variation:
1. e4 e5 2. Nf3 Nc6 3. Bc4 Nf6 4. Ng5 d5 5. ed Nd4!? 6. c3 b5 7. Bf1 Nxd5 8. Ne4 (This used to be the book main line, until computers came along and showed that 8. cd is better) 8. … Qh4 9. Ng3 Bb7!? (A super-enterprising piece sac) 10. cd Nf4 11. Bxb5+ Kd8 12. O-O … (See diagram.)

Position after 12. O-O. Black to move.
FEN: r2k1b1r/pbp2ppp/8/1B2p3/3P1n1q/6N1/PP1P1PPP/RNBQ1RK1 b – – 0 12
Here we again have a position where the only defender of the white squares for White is the pawn on g2. You might look at 12. … Bxg2 and 12. … Nxg2, but they are both a little bit too slow. But if you’re aware of the key square h3, you will think outside the box and see the queen sacrifice 12. … Qh3!!, after which it’s mate next move. I’ve won speed chess games with this trap, although never a tournament game.
Perhaps if I had thought of this example, I might have seen Jobava’s combination. We can call this the principle of comparable positions. Unfortunately, the similarity didn’t occur to me.


{ 1 comment… read it below or add one }
The amateurs should study the classics thoroughly. Jobava’s games are pure bliss of an entertainment, but their educational value is not high. Very similar to him are Emil Sutovsky (albeit with more classical approach), Vadim Zvyagintsev and Richard Rapport.
BUT.
The best (chess education wise) starting list of chess players for the amateurs to study:
Stage 1:
Morphy, Capablanca, Steinitz, Tarrasch, Chigorin, Alekhine, Lasker
Stage 2:
Marshall, Janowski, Pillsbury, Schlechter, Rubinstein, Reti, Nimzowitch