For the Bay Area International I am preparing in two different ways. I am doing tactics puzzles at chess.com, and I am studying games by Baadur Jobava. The puzzles are (for the most part) Tactics Lite, where the answers are short and clear-cut. Jobava’s games are good examples of Grown-Up Tactics, where the combinations are longer than two or three moves, and the evaluations are sometimes murky. These tactics are the kind you need to take down a 2744 player like Yu Yangyi.
Baadur Jobava — Yu Yangyi
FIDE World Cup, 2017
1. b3 d5 2. Bb2 Nf6 3. e3 g6
So one thing I’ve noticed about Jobava is that he plays offbeat openings (like 1. b3) but he doesn’t play bad openings. We’ll see in this game that he gets all of his pieces out and aims for a super-solid reversed Hedgehog formation.
4. c4 dc 5. Bxc4 Bg7 6. Nf3 O-O 7. O-O c5 8. Be2 b6 9. d3 Bb7 10. Nbd2 Nc6 11. a3 Nd5 12. Bxg7 Kxg7 13. Qc2 Qd7 14. Qb2+ f6 15. Rfd1 Rfd8 16. Rac1 Rac8 17. h3 e5
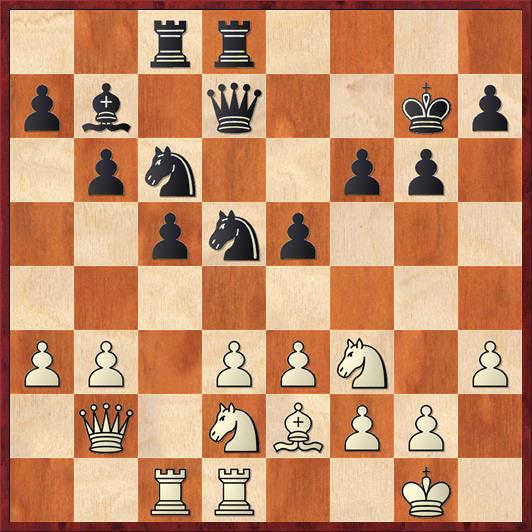
FEN: 2rr4/pb1q2kp/1pn2pp1/2pnp3/8/PP1PPN1P/1Q1NBPP1/2RR2K1 w – – 0 18
Here is where I personally struggle sometimes. Both players have developed their pieces logically, and the position is, according the computer (and according to the human eye test) completely even. So what are you supposed to do next?
Well, one step is to identify the targets on both sides. There is essentially only one weakness on each side. White’s weakness is on d3, but years of chess experience have shown that Black can almost never take advantage of this weakness as long as White maintains his wall of pawns. Black’s weakness is on f6. To the naked eye, this weakness looks well-defended, but I feel certain that Jobava looked at this position and said, “That is how I am going to win.” He is going to assault Black’s carapace in every way he can: with pawn thrusts like b4, d4, f4, and g5; with piece sacrifices on f6 or e5.
Does this mean Black is lost? No! Of course not! But forming a plan does not mean you have to find a forced win. A plan is just a compass to guide you through the ensuing middle game. Or it is like an outline for a story. The words remain to be written, but the author needs to have an idea of which way the story will go.
That’s why the Mike Splane Question is so useful: “How am I going to win this game?” Everything Jobava is going to do is done with an eye to his ultimate attack on the dark squares. Now and then he catches Yu napping a little bit, and then he can advance his plan forward. Step one is to achieve the thrust d4 at the most opportune moment.
18. Ne4 Qe7 19. Re1 Rd7 20. Bf1 Qd8 21. Rcd1 Nde7
This is comical: White has spent the last few moves shifting every piece one or two squares to the right! But there’s a reason for all of this rightward drift. 18. Ne4 was to get the knight out of the rook’s way and bring it to the kingside, where it eyes squares like f6 and g5. 19. Re1 was to (eventually) guard the knight at e4, and also put the rook on the same file as the queen. 20. Bf1 got the bishop out of the way so that the rook can defend the knight on e4 after an eventual pawn trade. 21. Rcd1 prepares d4. Black could have played … f5 at some point, and that is what I would have done, but Yu is wary of creating new weaknesses. Ironically, though, his latest move also weakens f6, just for a moment, and Jobava seizes on the tactical opportunity this creates.
22. b4! …
At first glance this looks suicidal. Black can play desperado knight moves like … Nxb4 or … Nxd4, or he can first play 22. … c5 and then, after 23. d4! Black can again try … Nxb4 to exploit the unguarded knight on e4. However, all of these ideas have flaws in them. First, 22. … Nxd4 would be met by 23. ed, protecting the knight. And the other desperado ideas, 22. … Nxb4 or 22. … c4 23. d4 Nxb4, are met by the counter-desperado 23. Nxf6!! See how rapidly the Mike Splane question starts coming into play?
22. … cb 23. ab Nf5 24. Rc1 …
Nice and patient. White gets out of possible pins on the d-file. The move d4 is still in the cards (thanks to the removal of Black’s c5 pawn), but not just yet.
24. … Qe7 25. b5 Na5
Everything is important at the level of the super-GMs. The fact that the knight has been chased to the rim is important because it is farther from being able to defend the kingside. Black might have done better to play 25. … Qb4, trying to trade queens, but Yu probably didn’t feel as if he was in trouble yet. Rybka will still tell you that White has little to no advantage, but the computer doesn’t realize that White is the one writing the story.
26. Rxc8 Bxc8
The bishop is temporarily deflected away from the attack on the e4 knight. That was the point of 24. Rc1. Now the board is set up for White to achieve his first goal. It’s really impressive to me how Jobava uses temporary circumstances to achieve permanent gains in this game.
27. d4! Bb7?
Too late! Jobava now enters phase two of his program: annihilate the pawns guarding Black’s king.
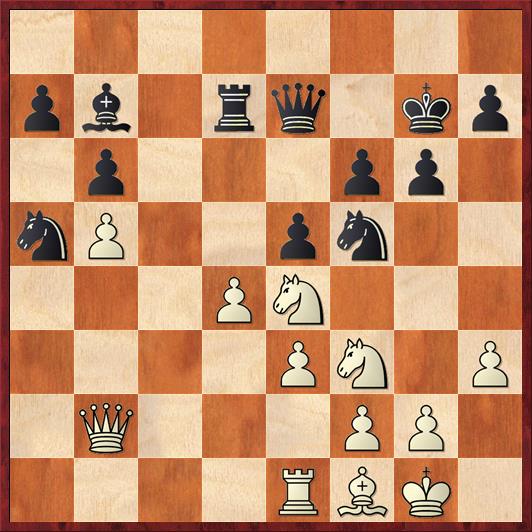
Position after 27. … Bb7. White to move.
FEN: 8/pb1rq1kp/1p3pp1/nP2pn2/3PN3/4PN1P/1Q3PP1/4RBK1 w – – 0 28
28. Nxf6!! …
When I was going over the game, this knight sac was first on my candidate move list but I didn’t see how it could possibly work. This is what makes Jobava Jobava. He is able to work his way through the thicket of complications that discourage lesser players.
It’s interesting to note that there is still no way that Jobava could have calculated this all the way to a win. We’ll see that Yu does have a defensive possibility later that would have given him drawing chances. So it’s not just calculation that Jobava relies on – it’s also courage and faith in his pieces. He is guided by his answer to the Mike Splane Question: The way I’m going to win is by destroying my opponent’s dark squares. Nothing will stop me from achieving that goal.
28. … Kxf6
Not 29. … Qxf6? because of 30. de, 31. Ng5, and 32. e6+. Everything matters, even the fortuitous placement of Black’s rook on d7.
29. de+ Kf7 30. e6+! …
If you and I were playing this position, we would cling to the two pawns we’ve gotten as compensation for our piece sacrifice. Jobava doesn’t want those pawns. He wants to lure Black’s king into the center and he wants to open lines, and that means giving away both of his extra pawns!
The reason I didn’t think 28. Nxf6 was playable was that I didn’t see the power of 30. e6+. Probably Yu didn’t either, even with his 2744 rating.
30. … Kxe6
Back out into the middle of the board! Of course 30. … Qxe6?? would be met by 31. Ng5+. So far Black’s queen has been completely useless as a defender.
31. e4! …
Partly with the intention of driving the knight away, but even more importantly, it prevents Black from blocking checks with … Bd5.
31. … Ng7
Black could bail out into an inferior endgame here with 31. … Nh4 32. Qe5+ Kf7 33. Qf4+ followed by 34. Qxh4, but then we would have been deprived of a chance to see Jobava’s attacking prowess.
32. Qa2+ Kd6
But how is White going to keep Black’s king from running away to the queenside?
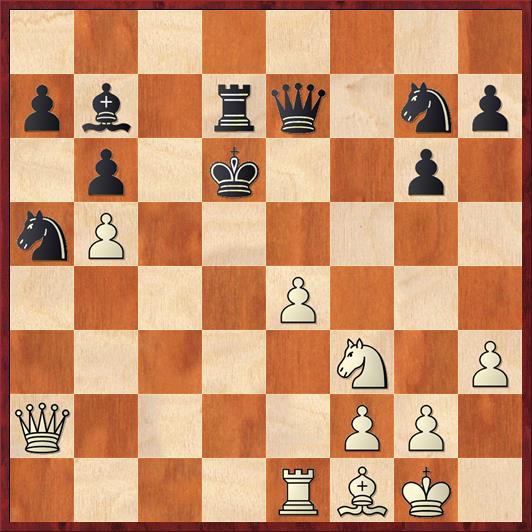
FEN: 8/pb1rq1np/1p1k2p1/nP6/4P3/5N1P/Q4PP1/4RBK1 w – – 0 33
33. Rc1!! …
In many attacks there comes a point where it’s more important to close the mating net than to keep chasing the king around. This is a lesson that I have learned time after time by playing against the computer and seeing how it wins. Take away the flight squares. Then play the check.
33. … Bxe4?
After Black grabs this poisoned pawn, the rest is (comparatively) easy. 33. … Qd8! would have prepared an escape route for the Black king and avoided all of the possible forks. The best continuation I could find is 34. e5+ Ke7 35. Ng5 Rd5! (Not 35. … Bd5? 36. Qa3+ Ke8 37. Nxh7 with two big threats: Nf6+ and Qf8 mate. After 37. .. Kf7 38. Nf6 Re7 39. Rd1 White’s shifty rook shifts back to the d-file!). White can win a pawn with 36. Qa3+ Ke8 37. Nxh7, but the game is far from over.
Does this mean that White’s brilliancies were not so brilliant after all? I think you can guess my answer from everything else I’ve said. White has forced Black to make incredibly hard decisions, not just once but over and over. Jobava’s faith and courage tell him that it is likely, almost inevitable, that his opponent will go wrong somewhere.
Or let’s put it another way, in terms of story-telling. If you write the script, you will probably get to write the ending.
34. Qd2+! …
The subtle moves of White’s rooks and queen are a joy to watch in this game. Without ever leaving the first and second rank (until move 38), they nevertheless orchestrate everything that happens. On d2, the queen protects the knight on g5 (in advance) and gains access to important checking squares on c3 and f4. Finally, it attacks Black’s rook on d7. To you or me, it looks as if the rook is attacking the queen, not the other way around, but Jobava sees things differently!
34. … Ke6
The most beautiful finish would have been 34. … Bd5 35. Qf5+ Ke6 36. Ng5+. It’s amazing how Black’s pieces surround the king but don’t do anything to defend him – in fact, quite the opposite, they get in his way.
35. Ng5+ Kf5 36. g4+ Kf6 37. Nxe4+ Qxe4 38. Qxd7 …
Black could resign here, but plays on for a few more moves.
38. … Ne6 39. Bg2 Qd4 40. Qxh7 Nf4 41. Qh8+ Ke6 42. Re1+ …
And now the queen falls, so Black resigns.
Next post: What’s up with that “hacked” warning?


