In my last post I wrote about the semester I spent in Russia in the winter of 1978. Even the people who lived in Leningrad said it was an brutally cold December. I experienced -25 degrees Fahrenheit (-32 degrees Celsius) for the first time in my life, and farther inland I believe the temperatures got down to -40 degrees. To go outside for more than five minutes with any skin exposed was to invite frostbite. I can still remember going to my friends’ apartment and having them put chicken grease on my nose (the most vulnerable part of my face), which they said would stop me from getting frostbite. I don’t know if that’s true or not, but anyway, I spent Christmas with a very shiny nose!
As I wrote last time, one of the highlights of the semester for me was the chance to play in a real Russian chess tournament, a quarterfinal section of the “Burevestnik” club championship. It started on October 20 and ended somewhat anticlimactically for me, with a forfeit win in the final round on December 26. I didn’t copy down the entire crosstable, but I did write down the final standings as well as my result against each player.
| Place | Name | Score of Player | My Result Against |
| 1. | Gellerstein | 11.5-2.5 | 0 |
| 2-3. | Kim | 10.5-3.5 | 0 |
| 2-3. | Mitrofanov | 10.5-3.5 | ½ |
| 4. | Kiselev | 9.5-4.5 | ½ |
| 5. | Trabski | 9-5 | 1 |
| 6. | Trubenkov | 8.5-5.5 | 1 |
| 7-8. | Mackenzie | 7.5-6.5 | – |
| 7-8. | Petrov | 7.5-6.5 | 0 |
| 9. | Shcherbakov | 6-8 | ½ |
| 10-12. | Meiroyan | 5-9 | 1 |
| 10-12. | Petrochenko | 5-9 | 1F |
| 10-12. | Yelpashev | 5-9 | 0 |
| 13. | Gladyshev | 4.5-9.5 | 0 |
| 14. | Bibik | 3.5-10.5 | 1 |
| 15. | Zakonov | 2-12 | 1F |
(1F = forfeit win. Ties listed in [English] alphabetical order.)
I mentioned last time that I had an awful lot of good luck in this tournament. But I did play a couple games I was proud of, particularly my win as Black against the #5 finisher, Trabski. It’s an incredibly complex game, and I feel as if I learned from this one game how to play rook endgames. Very useful knowledge for the rest of my chess career.
Trabski — Mackenzie, 11/20 – 12/1/1978
1. e4 e6 …
Yes, for a couple years I played the French Defense. It didn’t really suit my style, though, so eventually I went back to 1. … e5.
2. d4 d5 3. e5 c5 4. Qg4?! …
I was completely unfamiliar with this variation, and I still don’t think it is very good. Since I didn’t know any theory, I just tried to play simple developing moves, and it worked pretty well.
4. … ed 5. Nf3 Nc6 6. Bd3 Qc7 7. Bf4 N8e7 8. O-O Ng6 9. Re1 Nxf4 10. Qxf4 f6! 11. Qh4? …
Although White’s position was already questionable, this move cannot be right. White completely yields the center in order to win a wing pawn.
11. … fe 12. Bxh7 …
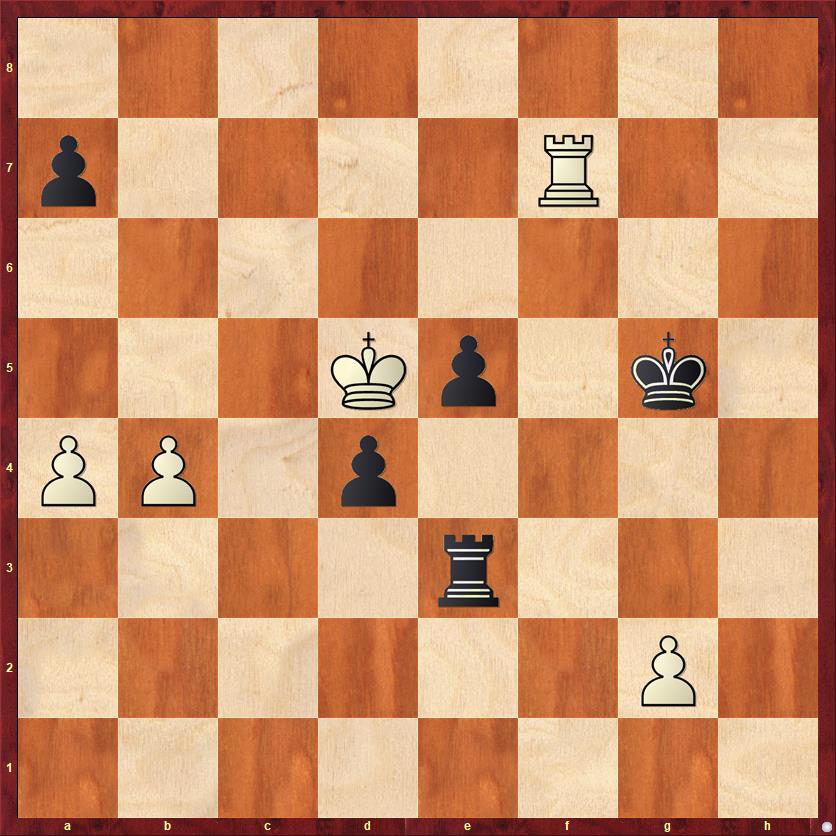
A good time for our first diagram.
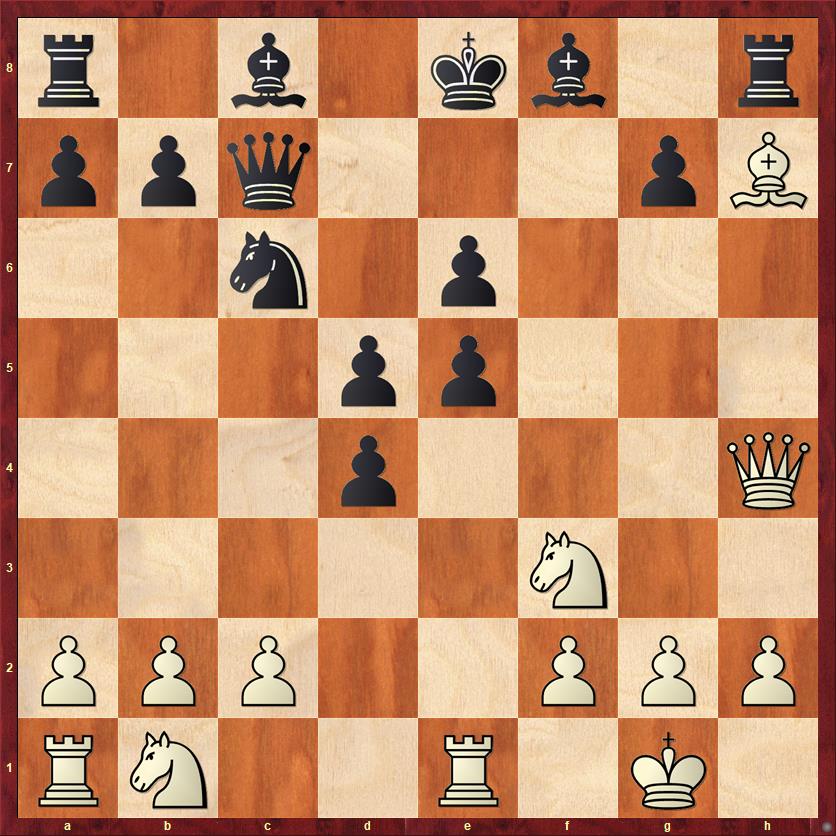
FEN: r1b1kb1r/ppq3pB/2n1p3/3pp3/3p3Q/5N2/PPP2PPP/RN2R1K1 b kq – 0 12
Here the computer says that Black’s best move is 12. … Qf7! My opponent was surely anticipating this, and his point was that after 13. Bg6! Rxh4 14. Nxh4 he wins back the queen and ends up with an exchange for the pawn. However, Fritz says, and I agree, that Black’s massive center gives me more than enough compensation.
However, I probably saw this “trap” and decided I’d better not fall into it. Instead I decided to head my king to what I saw as the safest part of the board. My reasoning was: With such a mass of pawns in the center, how could White ever get to my king if I just put him on d6?
12. … Kd7!? 13. N1d2 Be7 14. Qh5 Bf6 15. Rad1 Kd6!?
Another thing that appealed to me about this line was that the move … g5 is in the air. White has to strike hard to keep from just losing a bishop.
16. c4 Bd7
Actually, Black can play 16. … g5 here. In my notes to the game later, I wrote, “Black, unfortunately, can never win the White bishop. On 16. … g5 17. Qg6 Qe7 18. cd!” Well, this is a classic case of stopping the analysis way too soon. It’s still very unclear how White will hold after 18. … ed 19. Nxg5 Kc7 20. Ndf3 Bg4. In general, this is a position for madmen or computers.
Also, 16. … Qe7 was a calm option that might have been better than the game; Black opens up a route to safety for his king and keeps the threat of … g5 in the air.
17. Qg6 Be8 18. Qc2 g5?!
Now I think this move is already too weakening.
19. cd Qxh7?
This turns out to be bad, but the refutation is hard to see.
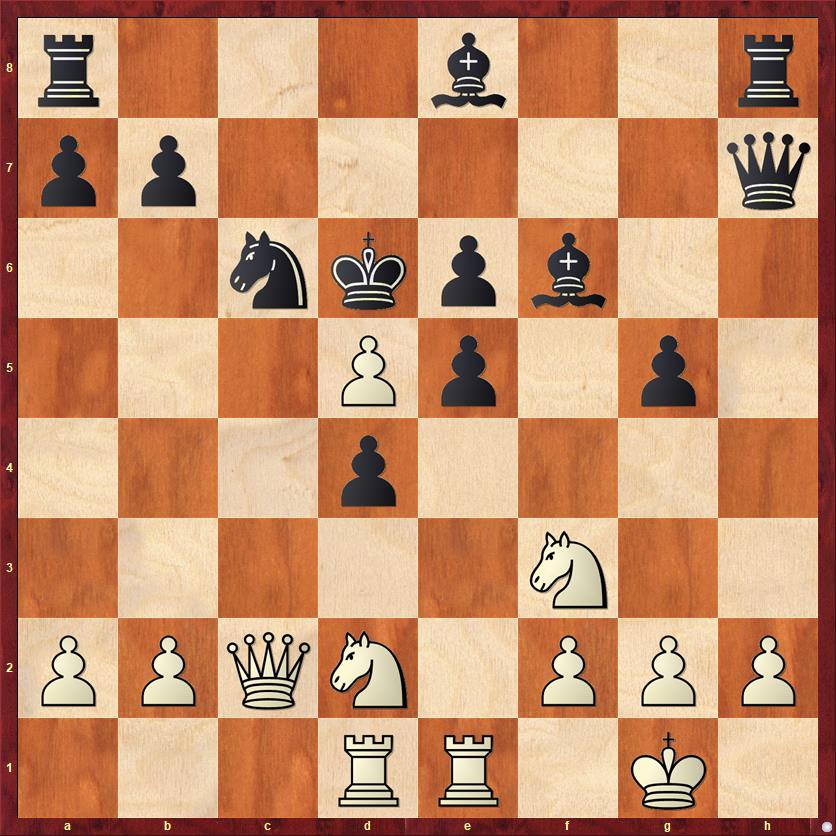
FEN: r3b2r/pp5q/2nkpb2/3Pp1p1/3p4/5N2/PPQN1PPP/3RR1K1 w – – 0 20
20. Qxh7? …
White misses the chance to play 20. Ne4+! Black has to retreat the king either to e7 or c7. If, for example, 20. … Kc7 than the computer says that 21. Qc5! (unpinning the knight) 21. … Be7 22. d6+! is winning. It would take unbelievable guts to play a line like this. Yes, White is getting back his piece but there are still issues like … g4 to deal with. As I said before, this is a position either for madmen or computers.
After the queen trade the position finally calms down a little bit and we get a position with approximate equality.
20. … Rxh7 21. dc Bxc6 22. Nc4+ Ke7 23. N4xe5 Bxe5 24. Nxe5 Rd8 25. Nxc6 …
Maybe White should have kept his knight, because it’s a very strong piece, but I can totally understand the inclination to trade knight for bishop while it’s still possible, and in the process make Black’s pawn structure even more discombobulated.
25. … bc
A position where none of Black’s five pawns are in contact with another! It would be really nice if White still had a knight — he could take them all in five moves. (Well, not really.)
I imagine that my opponent probably thought he had the advantage here, but actually I was able to heal my pawn formation pretty quickly. The pawn on d4 will soon be a protected passed pawn, and my centralized king is almost like an extra piece. So actually, maybe it’s not surprising that the position turns in Black’s favor in a few moves.
26. Re4 c5 27. R1e1 Rh6 28. Re5 R8h8!
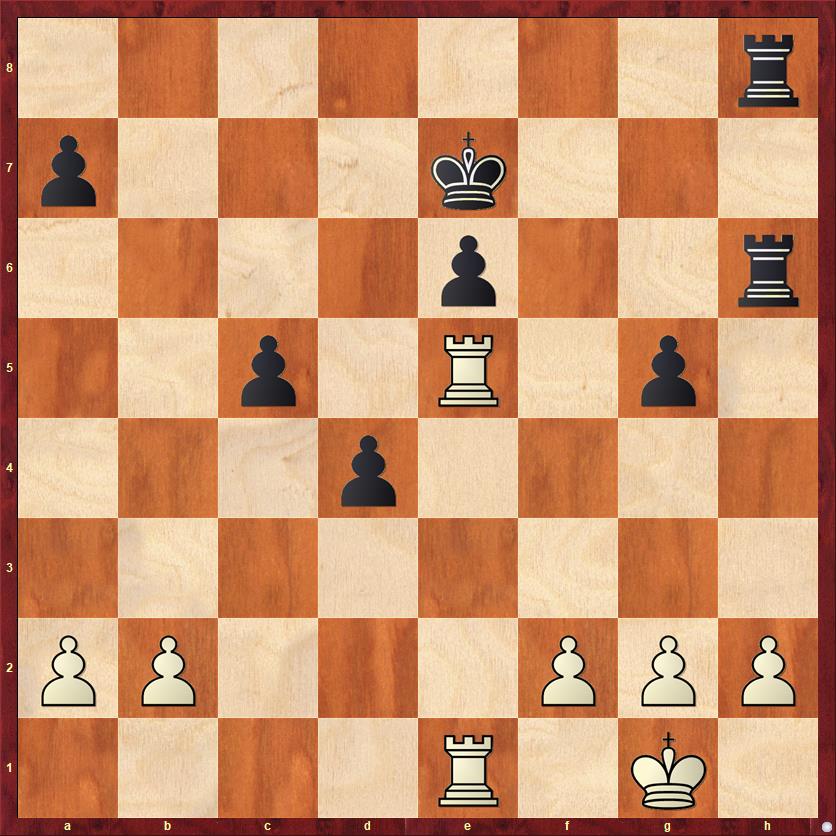
FEN: 7r/p3k3/4p2r/2p1R1p1/3p4/8/PP3PPP/4R1K1 w – – 0 29
I really like Black’s move, because it shows that even though White’s pawn formation is “weakness-free,” it’s just as open to attack as Black’s full-of-holes pawn formation. White can’t keep the h-file closed with 29. h3 because of 29. … g4! Meanwhile, Black doesn’t care about the fact that White is threatening two pawns because he can only take one of them!
One lesson I learned from this game is that in rook-and-pawn endgames, the optical strength of the pawn formation is not as big a deal as in other positions. Once the rooks start running rampage, every pawn on the board can become weak. Rook and pawn endgames are all about making dynamic threats and saving tempi, not about static advantages.
29. Rxc5 Rxh2 30. f3 Kf6?!
A slight inaccuracy. Black is helped more than harmed by a rook trade on e1.
31. R5e5?! Rh1+ 32. Kf2 Rxe1 33. Rxe1 e5 34. Ke2? …
After this move Black definitely gets winning chances. I really don’t know why White didn’t play the obvious 34. Rc1. He was in time pressure; perhaps that was the reason.
34. … Rh2?!
The computer really likes 34. … g4. I had not yet learned my lesson about dynamic play. Black is glad to give up a pawn if he can get his center pawns rolling.
35. Kf2 Rh7 36. Rc1 Rd7 37. Ke2 Ke6 38. Kd3 Kd5 39. b4 Rb7 40. a3 Kd6 41. Rc5 Rf7! 42. Ra5 (s) …
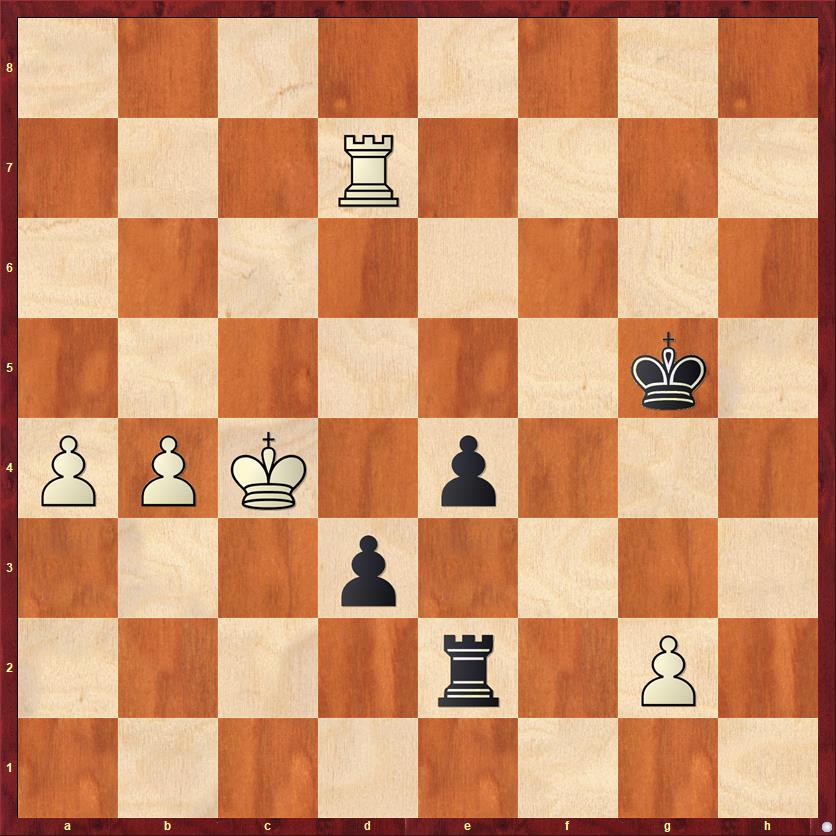
FEN: 8/p4r2/3k4/R3p1p1/1P1p4/P2K1P2/6P1/8 b – – 0 42
I’ve gone over the last few moves without comment because I really wanted to get to this position, which was the adjourned position. For those who are too young to remember these things, in the days before sudden-death time controls, if a game went on too long you would adjourn the game. One player would be given an envelope and would seal his move inside an envelope, so the other player couldn’t see it. In this case White sealed his move (that’s what the “s” indicates), so I didn’t know that he had played 42. Ra5.
I had never played an adjourned game before this tournament, but I had two of them and did very well. Against Mitrofanov I saved a draw from a previously lost position, and against Trabski, as we’re going to see, I managed to win from a position that is objectively equal.
The day to complete adjourned games was set for December 1, so I had eleven full days to analyze this position. I estimate that I spent about ten hours on it, longer than I had ever analyzed a position in my life.
The computer (which, of course, we didn’t have back then) says that the position is equal, and it continues to say so for fourteen more moves. Undoubtedly it is correct. However, I still felt that I had real practical chances to win, because of my protected passed pawn on d4. The only way I could find to push for a win was to bring my king to the kingside and try to loosen up White’s pawn formation. Black’s dream is to turn the d- and e-pawns into connected passed pawns. I think that the reason I won this game is that I had a clear objective. White probably did not spend nearly as much time on the position and did not have a clear plan.
At the risk of repeating myself, a lesson I learned very strongly from this game is that R+P endgames are all about active rooks and dynamic play. Activity, activity, activity! You don’t win a R+P endgame by defending stuff. If you want to win, you have to push the pedal to the metal. Time is of the essence, and it is very often worth sacrificing a pawn to gain a tempo.
42. … Ke6
As noted above, my plan is to try to infiltrate the kingside.
43. Ra6+ Kf5 44. Rc6 …
White’s play is a little bit lackadaisical. One thing he should consider here is shutting my king out with 44. g3. I would probably have played 44. … g4, and then White again has a tough decision between 45. fg and 45. f4. In my hours of home analysis I couldn’t find a definite win for Black, and in fact the computer says that both of these moves draw. However, that’s only if both players find good moves! Actually I’d say it is a draw if White plays really well, a win for Black if he doesn’t.
44. … Kf4
First goal achieved!
45. Rc5 Re7 46. Rc2 …
Although the computer will tell you that the position is still a draw (“All rook endgames are drawn”), Black is making tangible progress. White is backing up instead of moving forward.
46. … Rg7 47. a4 g4!
The next step in the plan.
48. fg?! …
And again White cooperates. Better was 48. Rc8!, activating the rook and not allowing connected passed pawns.
48. … Rxg4
It’s time to burn the bridges behind me. The a-pawn is a goner, but the center pawns are ready to steamroller down the board.
49. Rf2+ Kg5 50. Rf7 Rg3+ 51. Kc4 Rc3+ 52. Kd5 Re3
I had gotten to positions like this in my adjournment analysis, and made the pleasant discovery (which I hadn’t known before) that a rook and two connected passed pawns are “self-propelling.” White cannot hope to stop them. He can only hope to outrace them.
53. Rxa7 d3 54. Kc4 e4 55. Rd7 Re2
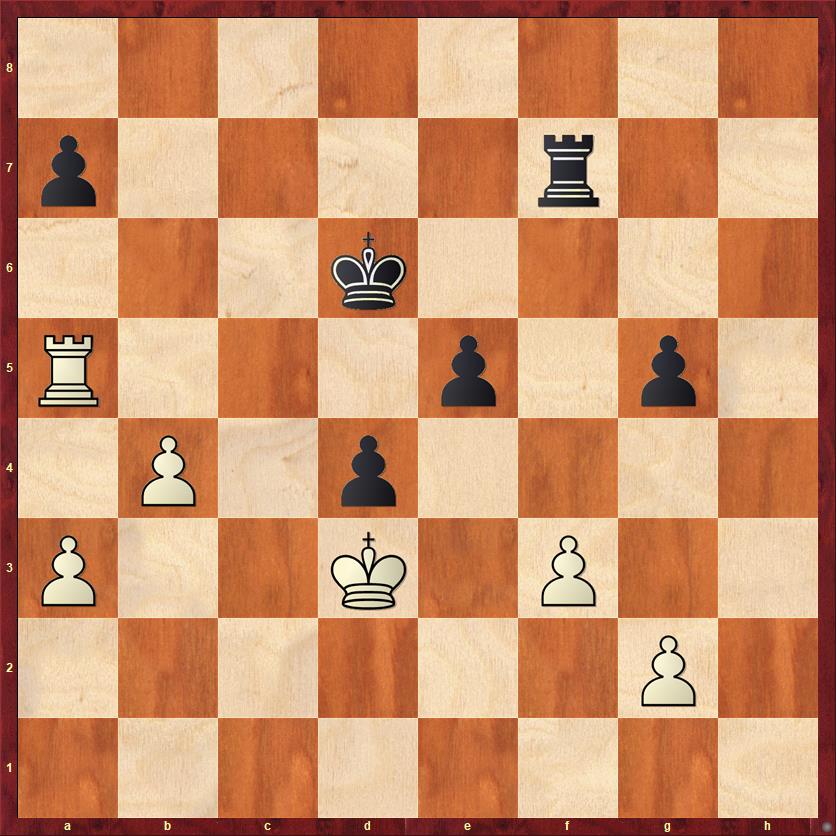
FEN: 8/3R4/8/6k1/PPK1p3/3p4/4r1P1/8 w – – 0 56
A critical, in fact the decisive moment in the game. Which pawn should White push?
I think that the hard part, perhaps, is realizing that it even matters. My opponent may have thought that 56. a5 and 56. b5 were essentially they same. But one of them loses, and the other one draws. He had the bad luck to pick the one that loses.
56. b5? …
He should have played 56. a5! The main difference is that the winning technique used by Black in the game will not work here. If 56. a5 d2 57. a6 e3 58. a7 Re1 59. a8Q with an easy win for White. So Black has to try something different, but moves like 56. a5 Rc2+ or 56. a5 Kf6 peter out to a draw if White plays carefully. For example, Fritz says 56. a5 Rc2+ 57. Kb3 Kf6 58. a6 Rc8 59. a7 Ke6 60. Rd4 Ke5 with a draw by repetition. White’s rook cannot afford to leave the d-file, but Black can’t make any progress either because his rook is tied down to defending against the a-pawn.
56. … d2! 57. b6 e3 58. a5 …
White realizes too late that 58. b7 Re1 59. b8Q loses to 59. … Rc1+. If the king moves to the b-file, then Black snatches the queen with an x-ray check. The other option is 60. Kd5, where I wrote in my notes that “Black almost certainly has a win beginning with 60. … d1Q+ 61. Ke6 Qg4+ 62. Ke7 Qe4+ 63. Kd8 e2.” The computer agrees, except that it says 62. … Qh4! is even stronger.
58. … Re1 59. Rd5+ Kf6 60. a6 Rc1+ 61. Kb5 e2!
White’s connected passed pawns on the sixth rank are strong, but Black’s connected passed pawns on the seventh rank are even stronger.
62. a7 d1Q 63. Rc5 …
Throwing in the towel. But if 63. a8Q, then 63. … Qb3+ 64. Ka6 Ra1+ 65. Ra5 Rxa5+ 66. Kxa5 Qa3+ is also the end.
63. … Rxc5+ 64. Kxc5 e1Q
I can’t resist putting in one more diagram, because this position represents the perfect culmination of Black’s plan to created connected passed pawns. Both pawns eventually queened!
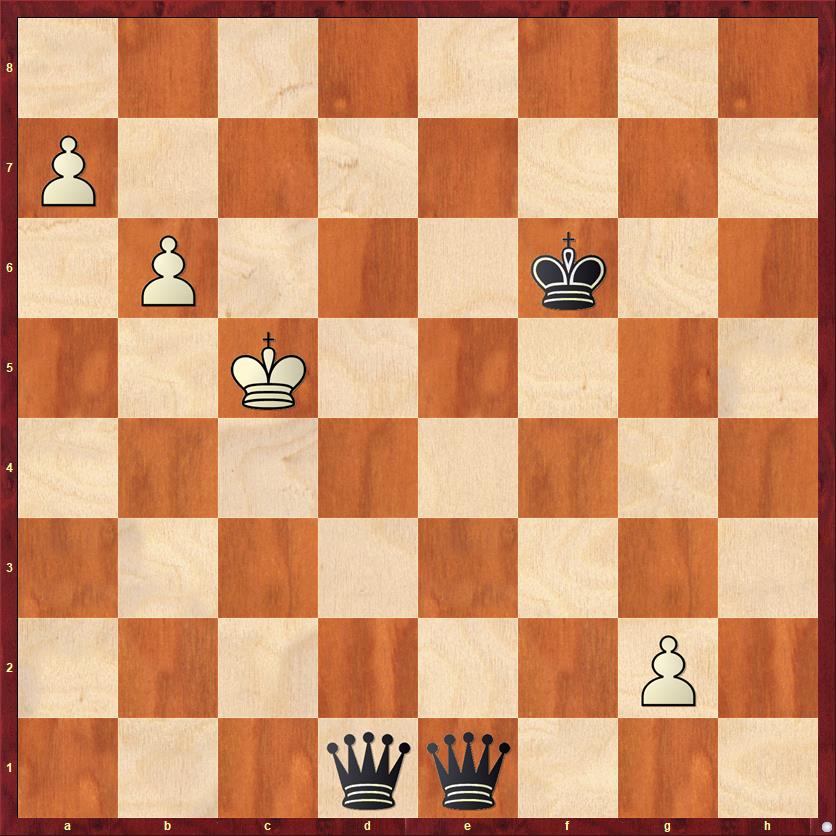
FEN: 8/P7/1P3k2/2K5/8/8/6P1/3qq3 w – – 0 65
65. a8Q Qc3+ 66. Kb5 Q1d3+ 67. White resigns
If you look at moves 42-67 on a computer, you get the impression that basically nothing happened. The position was drawn until move 56, then White had a brain fart, pushed the wrong pawn and lost.
But if you look at my notes, I hope you’ll see that move 56 was just the last of several questionable decisions by White, each one of which left him standing on a narrower and narrower ledge of safety until it was basically a coin flip whether he would fall off. And I think you’ll see that Black had a clearly defined plan. Even if White could have stopped it with best play, it’s much better to have a plan than not to have one.
Lessons:
- In an unfamiliar opening, put your trust in good developing moves.
- Rook endgames are all about dynamic advantages, about making threats and forcing your opponent to defend. Active rooks are key. Whether you are ahead and trying to win, or behind and trying to draw, it is paramount to keep your rook active.
- In rook endgames, it is very often worth giving up a pawn to gain a tempo, or giving up a pawn to activate your rook.
- Static advantages like pawn structure are less important in rook endgames than in most other positions, because the positions are so dynamic and so likely to change.
- In a rook and pawn endgame, a rook and two connected passed pawns cannot be stopped unless the defender’s king is in front of the pawns. If they can’t be stopped, the defender’s only hope is to outrun them.
- The player who has a plan will often beat the player who does not have a plan, even if the position is “equal.” One way to form a plan is to identify sub-tasks that need to be accomplished in order to achieve your goal (win or draw).
- In a pawn race, although it’s usually good to be the first player to queen, you have to watch out for x-ray checks. (See, for example, the note to move 58 above.)


{ 3 comments… read them below or add one }
I always remember when and where I learned about the self-propelling rook plus 2 connected passed pawns, at the home of my very good, and very missed friend, Normal Kravitz. Whenever I have seen them since I am transported back to his kitchen or dining room in Ventura, California. He was a good chess player and an even better friend.
http://view.chessbase.com/cbreader/2019/10/26/Game598115406.html
Look for the A38 game VCCC Summer Open. http://view.chessbase.com/cbreader/2019/10/26/Game598115406.html
Thanks for the link and the games! I have to admit that I clicked on the A38 game with some guy named Larry Christiansen before I clicked on the A38 game with Norman Kravitz. Both interesting games. Christiansen shows flashes of brilliance but was not quite Christiansen yet!