
When Mike Splane asked me to play on his team (the Kolty Club team) at the 2020 U.S. Amateur Team West tournament, I enthusiastically said yes. He had been trying to get me to play on their team for years, and now that I was officially the club champion it made sense for me to play on the club team.
Looking back, there were so many things that we didn’t know in February 2020. We knew that some strange new virus was causing trouble in China, but we didn’t know when or whether it would get to the U.S. Also, none of us knew that it would be the last tournament of Mike’s life. I did not realize that it would be my last tournament for at least 18 months.
At the time, the USATW was just another fun weekend of chess. It went very well, both for me and the team. In my five games, I had four wins and one draw. Even the draw was okay with me, because it provided the decisive half point in a 2.5 – 1.5 match. Our team had one bad round, in round three when we lost 3-1 to a team rated below us. (That was the only round I didn’t play.) However, we rallied from that defeat, won our last three matches and finished in third place on tiebreaks with a 5-1 record.
As team captain, Mike received the team trophy for third place, which is in the upper right corner of the photograph above. There are some other mementos of Mike in this photograph: his obituary at lower left, his hat (which he wore often, so when I look at the hat I already feel as if Mike’s presence is there) at upper left, a photo of his graduation with an M.B.A. at lower right. I never actually thought of taking a photograph of him myself, so these second-hand photos are the only ones I have.
Okay, let’s talk about chess. Even though my five games in this tournament were the only rated games I played in 2020, there were at least three really good games among them, so it was hard to make a choice for this post. I finally decided to annotate a game from the first round. Although my opponent was “only” a class-B player, with kids you never know whether you’re playing an ordinary class-B player or a future grandmaster. This game is a good lesson on the Grand Prix Variation of the Sicilian, and it has a neat sacrifice at the end.
Dana Mackenzie — Timothy Horng
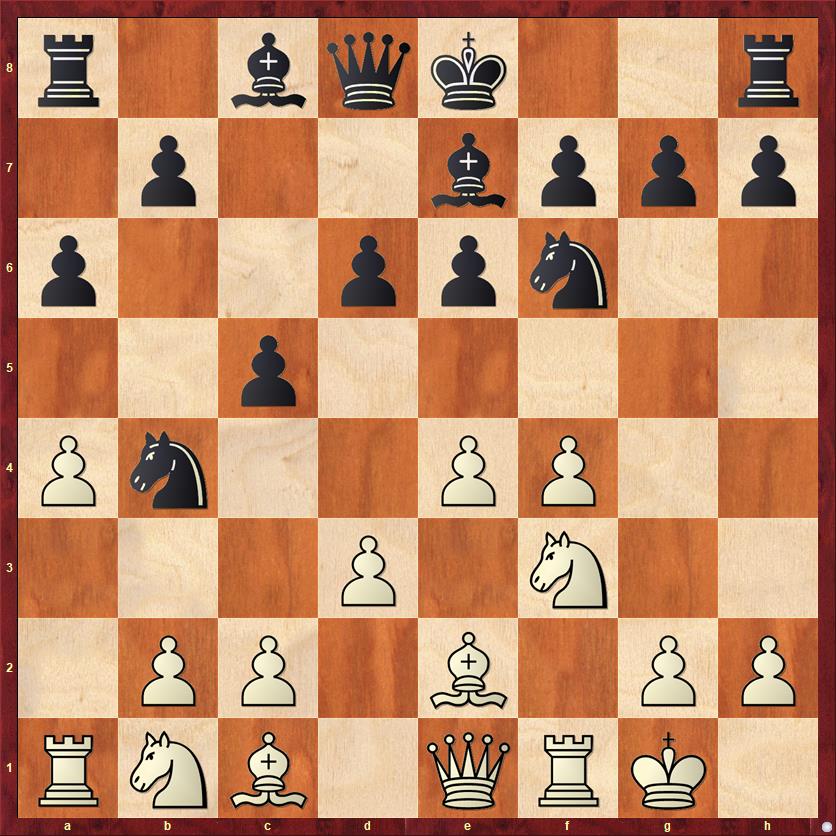
1. e4 c5 2. f4 d6 3. Nf3 Nf6 4. de e6
I fell into playing the Grand Prix sort of by accident. What initially attracted me to it was the amazing Bryntse Gambit (which I discovered on my own), 1. e4 c5 2. f4 d5 3. Nf3 de 4. Ng5 Nf6 5. Bc4 Bg4?! 6. Qxg4!, sacrificing the queen on move 6. But if you want to play the Bryntse, you’re going to have many, many games where your opponent plays something other than 2. … d5. The people who play 2. … d5 tend to be masters who know the history of the Grand Prix and know that this was the move that supposedly de-fanged it. Other players, expert or below, tend to follow more “normal” plans of development for Black.
If your opponent has never seen 2. f4 before, then the Grand Prix can be an amazingly strong weapon for White. This is especially the case when your opponent is a kid, who is most likely booked up on the Open Sicilian but doesn’t have any idea what to do in closed variations.
In my opinion, the most effective idea for Black is to fianchetto the bishop with … Bg7 and play for a queenside pawn expansion with … a6 and … b5. We saw a game like this in my last post, my game against Eric Steger in the Kolty Club championship. With 4. … e6, Horng is clearly not intending to fianchetto the king bishop. I have much less experience in these lines, so I was curious to see what differences that might make.
5. Be2 Be7 6. O-O a6 7. a4 …
This is a move that I normally don’t play in the Grand Prix. White’s objectives in the Grand Prix normally focus on the kingside, and opening lines on the queenside won’t contribute to that. Nevertheless, I had a feeling that it might be better here than in the … g6 variations. I still don’t know whether my feeling was right.
7. … Nc6 8. Qe1 Nb4
FEN: r1bqk2r/1p2bppp/p2ppn2/2p5/Pn2PP2/3P1N2/1PP1B1PP/RNB1QRK1 w kq – 0 9
To me this move doesn’t look right. It invites me to play Na3 and c3, two moves that I normally play anyway, and it costs Black two tempi.
9. Na3 Bd7 10. c3 Nc6 11. Bd1 O-O 12. Nc4 …
The difference between this move and his move 8. … Nb4 is that my knight has good squares to go to after he kicks it with a pawn (… b5 or. … d5).
12. … b5 13. ab ab 14. Rxa8 Qxa8 15. Nb6 …
The computer prefers 15. Nxd6, a sham sacrifice (because I recover my piece after 15. … Bxd6 16. e5 Be7 17. ef Bxf6). I’m sure I looked at this, but I liked 15. Nb6 better because it gains me a long-term advantage: the two bishops. My light-squared bishop is humbly posted now, but as we’ll see, it will become the piece that strikes the winning blow.
15. … Qa7 16. Nxd7 Qxd7 17. Bc2 …
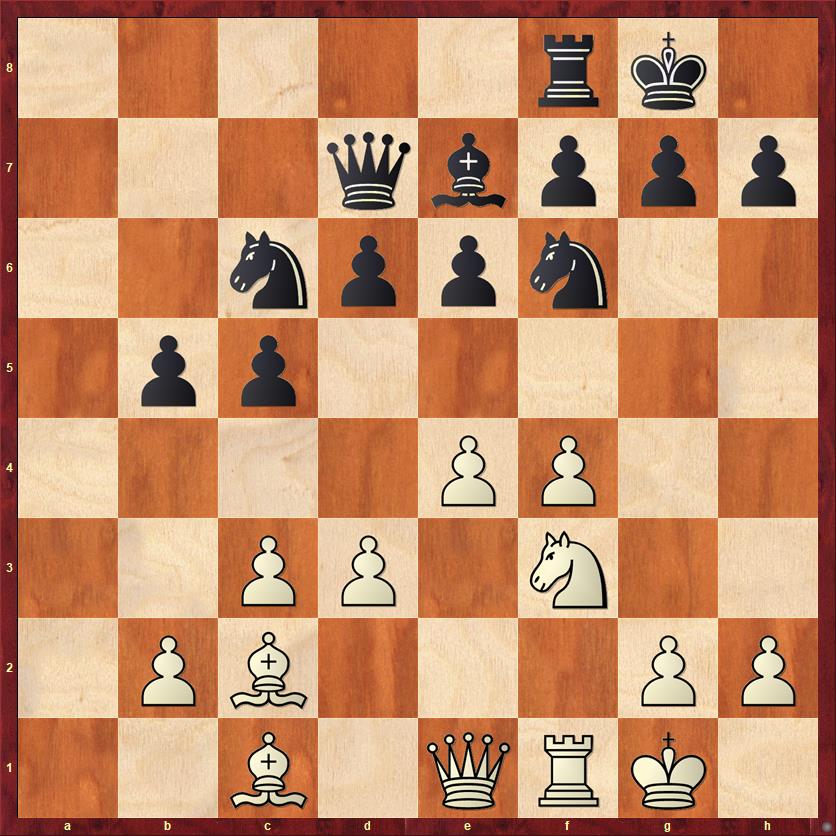
5rk1/3qbppp/2nppn2/1pp5/4PP2/2PP1N2/1PB3PP/2B1QRK1 b – – 0 17
A good moment to pause and take stock. There are no immediate threats yet for either side. For White it’s clear that the future lies on the kingside, because that is where my space advantage is, and where my pawns and bishops are “pointing” to. But for Black, I really don’t know what the plan is. A pawn storm on the queenside? But what does that actually accomplish? Bring the rook to the a-file, maybe the queen too? But again, what is the point? He can bring a rook to a2 or a1, but my bishops do a great job of sealing those squares off from the reset of White’s position, so that the rook’s penetration has little effect. The computer likes the idea of 17. … Ra8 followed by … Ra1, but all I can say is, “Bring it on.” If you are going to bury your rook on a1 or a2, it’s one less piece that can defend your kingside.
No matter what plan Black chooses, the position is always going to be easier to play for White. The end zone for any White attack on the kingside is Black’s king. That is the X factor that makes every threat more powerful and every sacrifice more dangerous.
In the end, Black chose what I think is a very reasonable idea: Play e5 to limit the scope of White’s unopposed light-squared bishop. Against an attack on the kingside, counterattack in the center. Generations of chess teachers have told us the wisdom of this idea. Yet somehow, for Black in this game it just … doesn’t work. It’s just as I said in the previous paragraph. Even when the position is “even,” it’s better for White.
17. … e5 18. h3 Nh5
Trying to create a little breathing room on the kingside, I guess.
19. f5 d5
Obeying classic chess principles, as I said above. Counterattack in the center. But what exactly is Black threatening?
20. g4 …
By comparison, White’s threats are direct and immediate.
20. … Nf4
Black plays consistently. The alternative 20. … Nf6 looks a lot worse: 21. g5 Nh5 22. f6! and wham, the storm has already descended upon Black. If 22. … gf 23. Qh4 wins. With 20. … Nf4, Black hopes White will trade off one of his bishops, leading to an opposite-color bishop situation. However, with so much material on the board, that is hardly any guarantee of safety. Also, the downside for Black is that the pawn on f4 will be very weak, and defending it will create more weaknesses in his position.
21. Bxf4 ef 22. e5 …
You’ll notice that I am hardly even commenting on White’s moves, which play themselves.
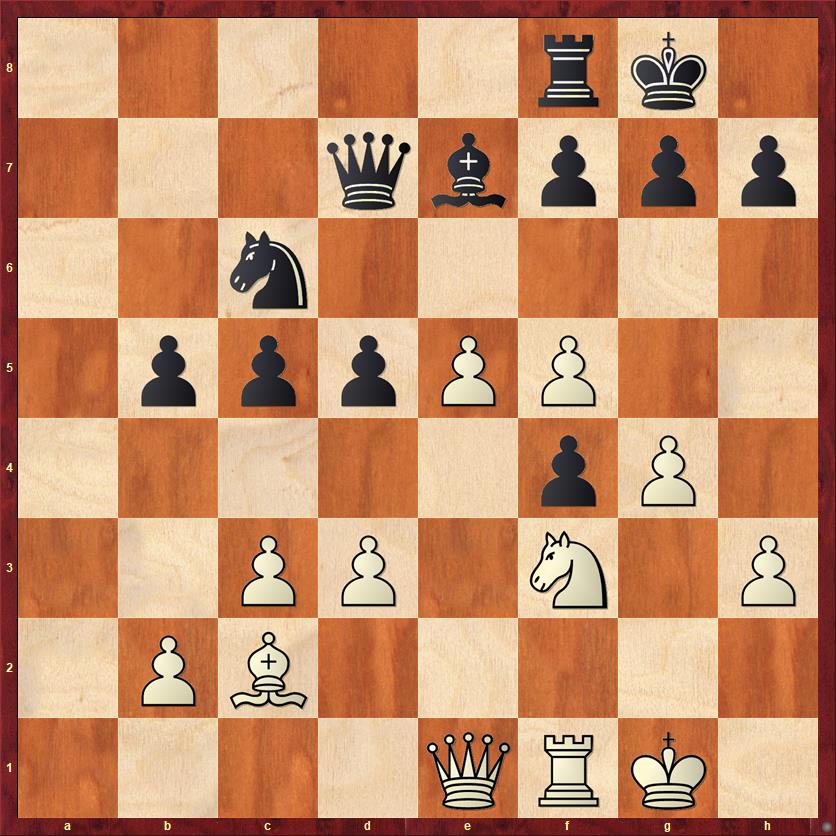
FEN: 5rk1/3qbppp/2n5/1pppPP2/5pP1/2PP1N1P/1PB5/4QRK1 b – – 0 22
Now Black plays his only move that looks like a probable mistake. But I think the position is a challenging one for any Black player. The computer clearly considers 22. … f6 to be Black’s best move, giving White an advantage of +0.4 pawns compared to +0.7 or so for anything else. I suspect that Horng didn’t want to play 22. … f6 because it seems to give White a powerful protected passed pawn after 23. e6. But this is exactly the wrong response for White! The pawn push liberates three Black pieces: the bishop can go to d6, the queen to c7, and the knight to e7. Black’s shaky pawn at f4 all of a sudden become much easier for him to defend. Meanwhile, that wall of White pawns prevents White’s light-squared bishop from playing any useful role in the attack. Finally, once we get a blocked pawn formation like this, with all of my pawns on white squares and all of his pawns on dark squares, then the equalizing tendency of opposite-colored bishops will tend to exert itself. In OCB positions, especially if you are trying for a win, you have to fight to maintain some control over the squares of the color of your opponent’s bishop. The pawns are better side by side on e5 and f5 than they are in a chain.
With these ideas in mind I would like to reply to 22. … f6 with 23. d4, but that tactically doesn’t work: 23. … cd 24. cd Nxd4! 25. Nxd4 Bc5 is equal or even better for Black. Therefore, after 22. … f6, the computer recommendation (which I found impossible to understand at first) is 23. Kg2! It’s simple prophylaxis. White gets his King off of the vulnerable diagonal so that d3-d4 will now become a threat, and White keeps the position as fluid as possible. I probably wouldn’t have even thought of this move, because it’s hard to play a patient prophylactic move when you’re itching to attack.
Instead Horng’s move made it very easy for me:
22. … d4?
Superficially an appealing move, because it continues according to the principle of “counterattack in the center.” But what’s much more important is that it gift-wraps a wonderful new square for White’s queen.
23. Qe4! Qc7
Of course, this was Black’s clever idea. If I go pawn-hunting with 24. Qxf4? he gets it back with 24. … Bf6. But there is no rush to take his pawn on f4. It will remain weak forever. Instead, a much better idea is to improve the position of my pieces. In particular I would like to prevent … f6, which explains my next move.
24. Bb3 Re8
He’s trying to crank up the pressure on e5, but he’s a tempo too slow. Nothing works any more.
25. Bd5! Nb8 26. g5 …
Now g5-g6 becomes a huge threat, and there is nothing that Black can really do about it. Also f5-f6 is a threat in some lines. It’s amazing how suddenly Black’s position has gone from reasonable to completely beyond repair.
26. … Nd7
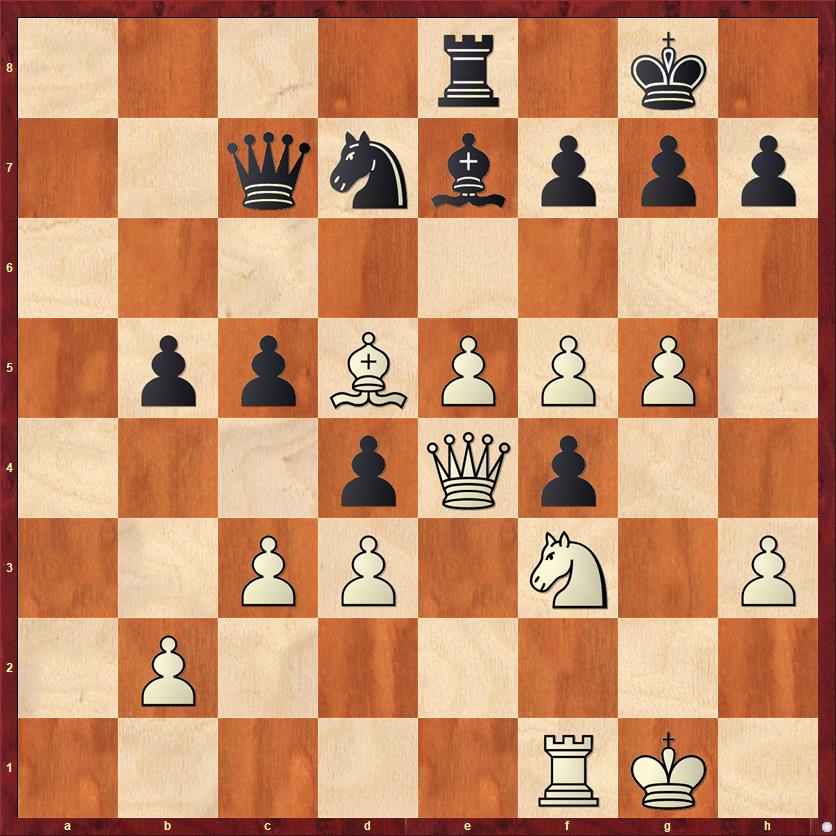
FEN: 4r1k1/2qnbppp/8/1ppBPPP1/3pQp2/2PP1N1P/1P6/5RK1 w – – 0 27
Now, of course, 27. g6 is completely winning for White. But another chess maxim is, “When you see a good move, look for a better one.” As I looked at the position I realized that White has the opportunity for a beautiful coup de grace, motivated the fact that Black’s move … Nd7 blocked the communication between Black’s queen and the kingside.
27. Bxf7+! Kxf7 28. Qd5+ Kf8 29. g6! …
Now this move is even stronger than before, because it threatens mate and Black has only two ways to defend.
29. … hg
The alternative was 29. … Nxe5 30. Nxe5 (still threatening mate as well as the almost-mate Nd7+) Bd6 (the only way to defend both) 31. gh. In a nice twist of the knife, White threatens to get a second queen. Black can only prevent this by 31. … Ke7, but then 32. Qe6+ Kd8 33. Nf7+ is curtains.
30. fg Nxe5 31. Nxe5 Bf6
If 31. … Bd6, 32. Rxf4+ brings White’s final piece into the attack, and Black can resign.
32. Nd7+ Black resigns
If 32. … Ke7 33. Re1+ Kd8 34. Nb6+ and mate next move. It’s funny that the pawn on f4, which looked like a goner a few moves ago, is just about the only part of Black’s position that survived.
Games like this make the Grand Prix Variation look like a forced win for White! It’s not true of course, but it really makes you wonder why 2. f4 is so much less popular than 2. Nf3.
Lessons:
- Don’t waste time provoking your opponent to make a move he probably wants to play anyway. (Black, move 8.)
- When playing with one bishop against two bishops, it’s often a good idea to try to contain THE BEAST, in other words the bishop on the same color complex as the bishop you lost. (Black, move 17.)
- When your opponent attacks on the side, it’s often a good idea to counterattack in the center. (Black, move 19.)
- However, even things that are often good ideas can turn bad! That’s why chess is so hard.
- When you are the attacker in an opposite-color bishop middlegame, try to keep the pawn formation flexible. A side-by-side pawn duo is usually stronger than a blockaded pawn chain. Use your pawns to keep some control over the squares of the color of your opponent’s bishop. (Analysis after White move 22.)
- In a superior position, don’t feel as if you have to rush. Often little prophylactic moves will pay dividends later. (Analysis after White move 22.)
- If you see a good move, look for a better one! (White move 27.)
Coming soon (I hope)… 50 Years of Chess: Year 50.


