Today I’m going to finish my series of posts on one of the classic rook-and-pawn endgames: the endgame with balanced pawns on the kingside, and with one player enjoying an outside passed pawn on the queenside. The prototypical position is number 367 in Reuben Fine’s Basic Chess Endings, which is why I’ve been calling it the “Fine endgame.”
In Part 2 we went over this position with a Fine-tooth comb (ha, ha) and found that there are more possibilities in the position than he let on. His summary judgment that all such endgames are drawn appears to be much too hasty. In Part 3, we looked at a tiny modification of this position, moving White’s rook from a8 to a7, where White seems to be winning! In Part 4, I want to look at what this means for practical endgames. What if White or Black have worse king position? What if the passed pawn hasn’t advanced so far?
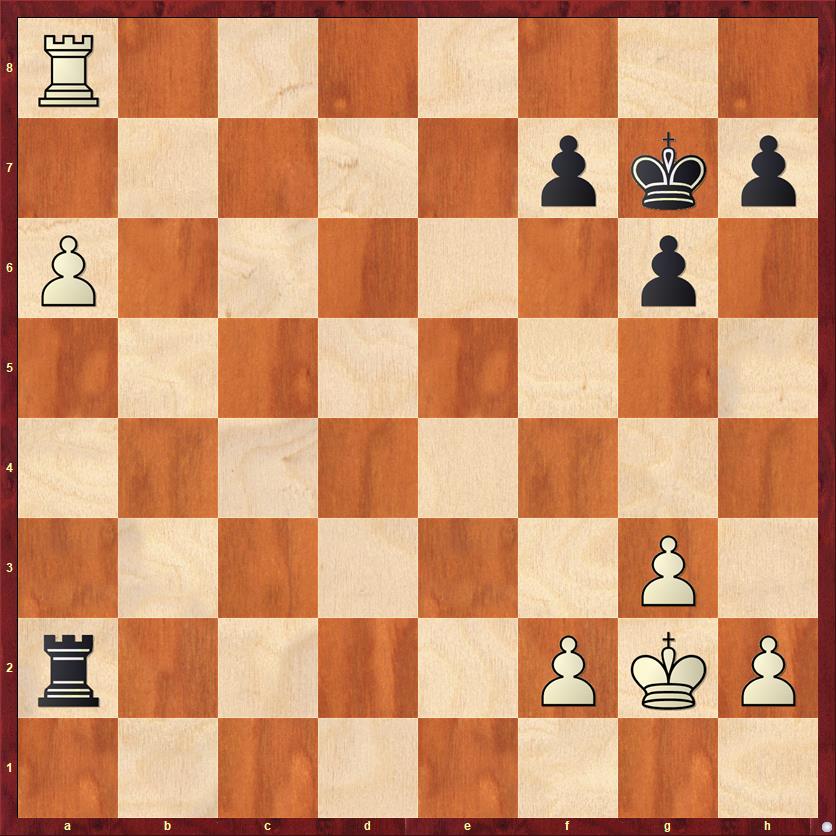
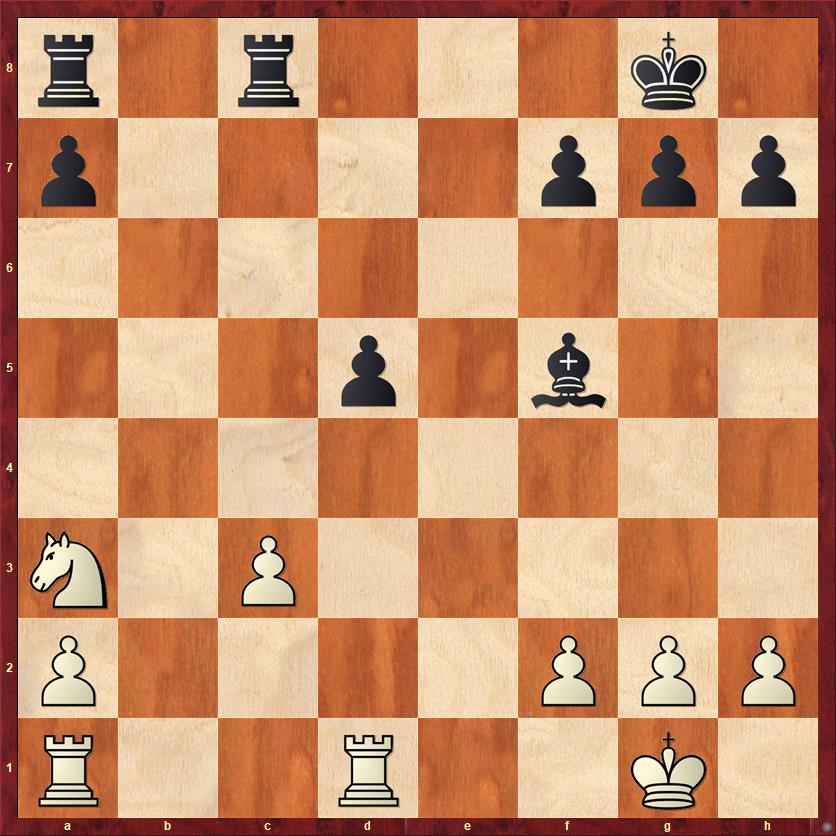
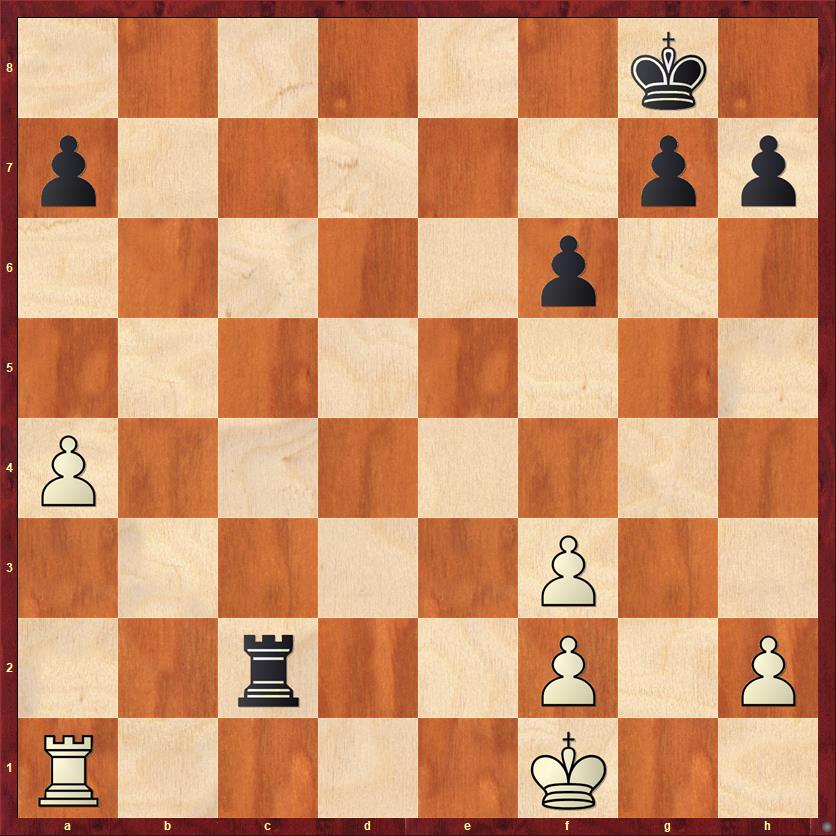
Let me start with the game that got me interested in this topic. One of my students, Emmy (rated about 500) reached the following position. Her opponent, I think, was about 1000 strength. So it’s fair to assume that neither of them have studied this sort of endgame before.
FEN: 5k2/1R3p2/p5p1/7p/8/7P/P1r2PPK/8 w – – 0 32
Here Emmy, as White, played 32. Rb6? In a certain sense this mistake doesn’t matter, because she will get more chances to put the rook in the correct place. But it’s disappointing that she didn’t realize yet that the ideal square is a7. First, because rooks belong behind passed pawns (the Tarrasch Rule). Second, because the rook on the seventh rank limits the activity of Black’s king. And third, because it eyes the pawn on f7, which we’ve seen can be an important pawn.
It’s also worth pointing out that there was no need to play 32. Ra7 just yet. White could also play 32. a4 Rc4 33. a5 Rc5. What is the point of this, besides prolonging the agony? Well, it forces Black’s rook to a less aggressive position after 34. Ra7 Rxa5. This may allow White’s king more freedom of movement.
Finally, there’s the question of pawn structure on the kingside. Where would White like to put her pawns? From parts 1-3, we know that the ideal formation is f2-g3-h4. So White could also think about moves like h4, Kg3, Kf3, and g3.
If you’ve read parts 1-3, all of these ideas are more or less obvious. Watch how Emmy gets into a more and more uncomfortable position because she doesn’t know these basic ideas.
32. … Rxa2 33. Rb8+ Kg7 34. Kg3 g5!
I like this move. White now can’t get to the ideal setup with pawns on f2, g3, h4, and king on f3.
35. Ra8 Ra3+ 36. Kh2 …
A painful choice. White’s king is going to be buried. Probably 36. f3 was better, fighting for every inch of space. After 36. … f5 or 36. … Ra4 White could try 37. h4!?
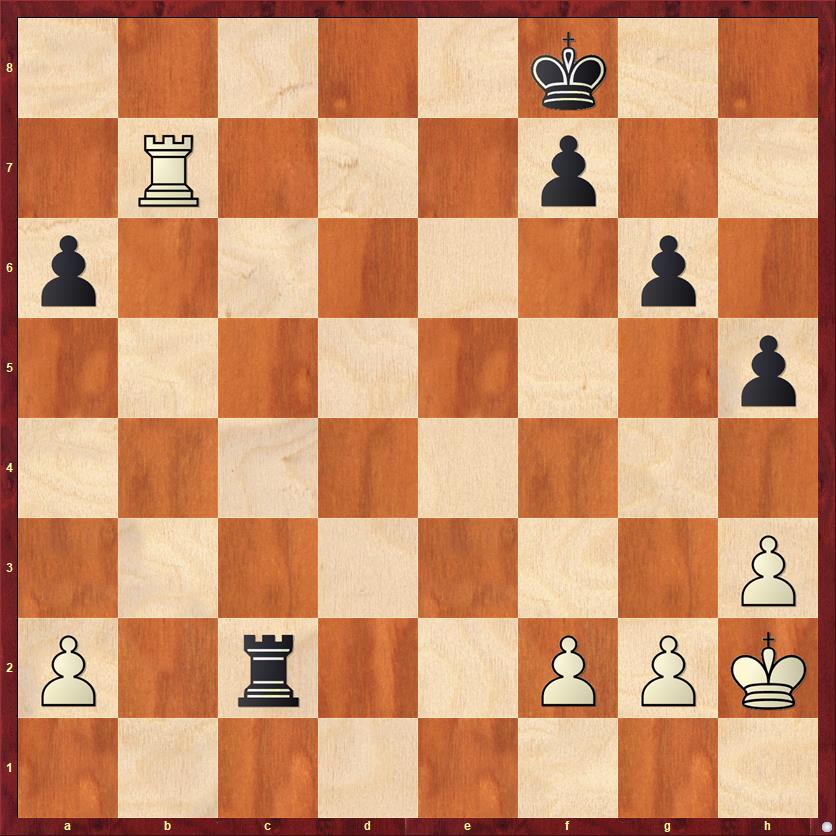
36. … h4 37. f3 Ra1 38. Ra7 f6 39. Ra8 Kf5 40. Ra7 f6 41. Ra8 Kf4 42. Ra7 Ke3?
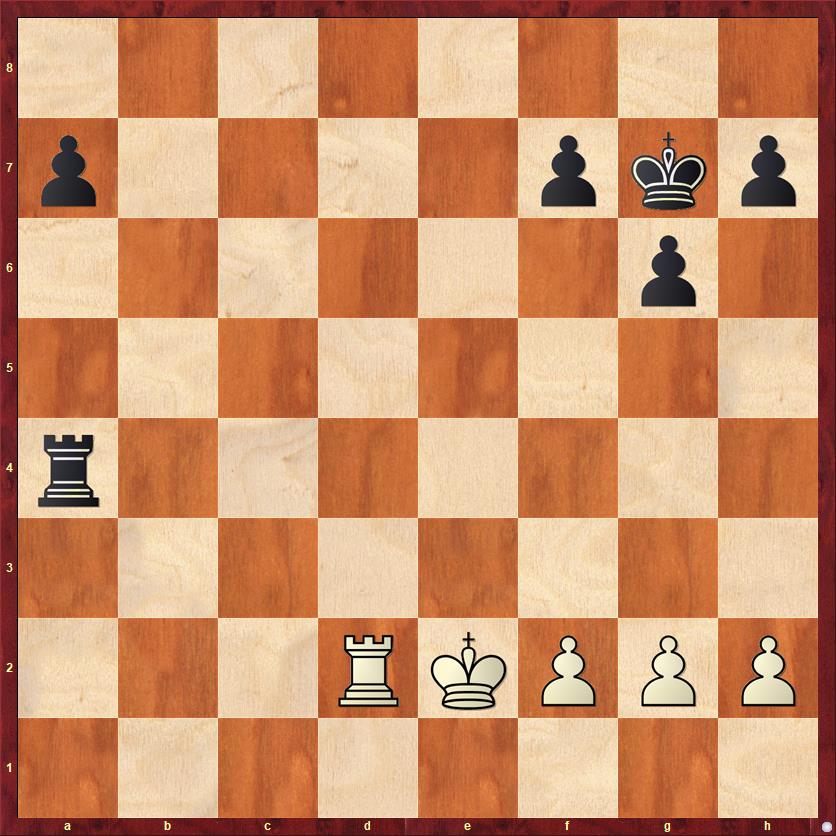
FEN: 8/R7/p4p2/6p1/7p/4kP1P/6PK/r7 w – – 0 43
Black makes his first mistake of the endgame. If he had studied the previous posts, he would know that White has a much worse version of the Fine position — a not-Fine-at-all position. Black should be able to win by pushing his pawn to a3 and bringing his king to the queenside. Fine’s usual drawing method for White — sacrifice the rook for the a-pawn, then push the kingside pawns — is not going to work here because the pawns are so far back and the king is so passive.
It’s ironic that Black failed to exploit the most obvious advantage in his position, the passed a-pawn. The farther you push that pawn, the more dangerous it becomes. (This rule only applies until it reaches a3. As I’ve said before, you have to be careful about pushing all the way to a2 because it introduces perpetual-check motifs for the defender.) Because Black has left it on a6, White has time to take some pawns on the kingside and then bring her rook back to the queenside.
43. Rf7! …
I’m delighted that Emmy found this move.
43. … Kf2
Black continues to play on the wrong side of the board. Admittedly, this looks very dangerous but it’s a middlegame move, not an endgame move. Black is trying to checkmate White, which shouldn’t work.
44. Rxf6 Rg1 45. Rxa6 …
Black has burned his bridges on the queenside. Now it’s win on the kingside or bust.
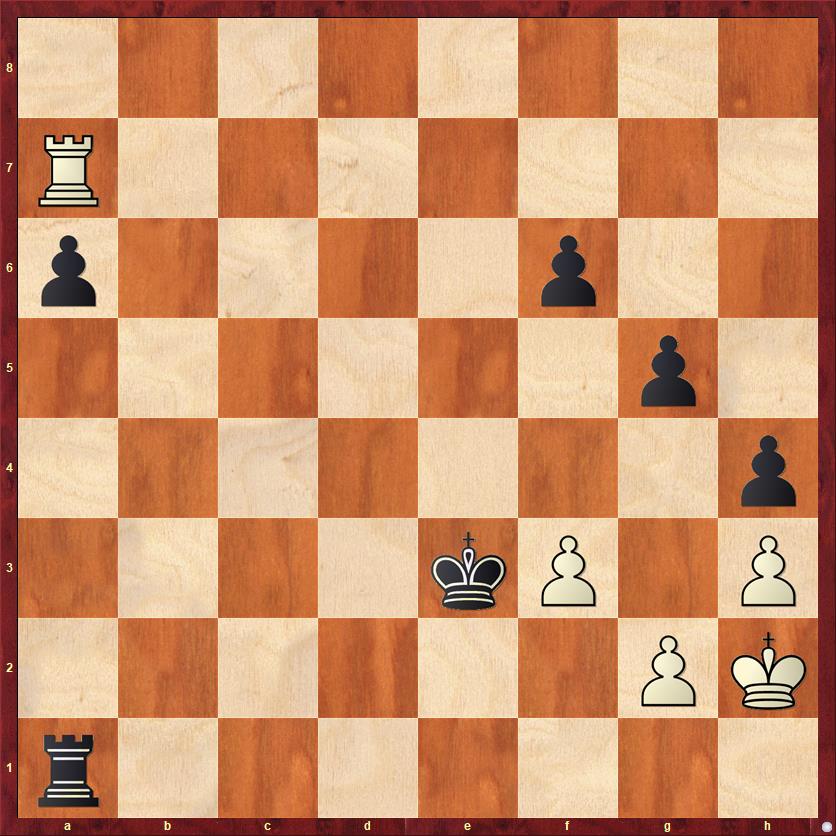
45. … Rxg2+ 46. Kh1 Kg3 47. Ra5 Kxh3
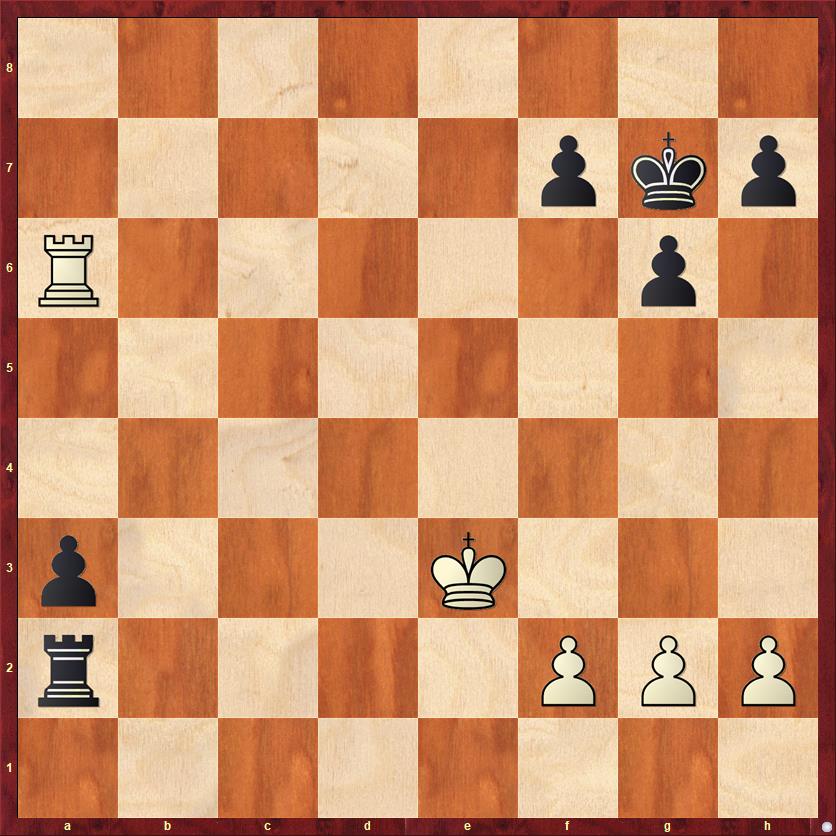
FEN: 8/8/8/R5p1/7p/5P1k/6r1/7K w – – 0 48
Here, again, I think it helps to know the endgame. Unless Black can win the f-pawn outright, it should be a draw. So White’s paramount objective should be either to hold the f-pawn or trade it for Black’s g-pawn. Looking more carefully at the position, notice that any Black attempt to win the f-pawn will instead hang the g-pawn. So … Kg3 runs into Rxg5+. If … R-?2 (where “?” is any letter from b to f), then Rxg5 both wins the g-pawn and defends against the back-rank mate. If … Rg3 White can just pass with any rook move on the fifth rank. Thus, because any attempt by Black to improve his position will fail, White can simply pass. All she needs to do is play R-?5, where “?” is any letter from b to f. Admittedly, this is a pretty subtle idea and so it is not too surprising that Emmy played
48. Ra4?? Rf2
Now the game is lost because Black wins the f-pawn and has a two-pawn lead. However, Emmy loses the thread here and forgets about the main threat.
49. Ra5?? Rf1 mate.
Now I’d like to show one more Fine-like endgame from my own tournament experience. Here I was playing a future Grandmaster, who was at the time “just” a 2200-level player, around the same rating as me. I was Black and got to the very promising position below.
Steven Zierk — Dana Mackenzie
2008 Memorial Day Classic
FEN: r1r3k1/p4ppp/8/3p1b2/8/N1P5/P4PPP/R2R2K1 b – – 0 21
What’s this? A position with minor pieces on the board, not just rooks? Well, one of the benefits of studying any simple endgame (K+P, R+P, etc.) is to help us orient ourselves in the more complex endgames that precede them. In this position, I clearly failed to make the most of my advantage. I was too impatient to activate my rooks, and I did not think enough about things like White’s stranded knight, how to maximize the advantage of my bishop over his knight, and whether I could do better than just trading into a rook endgame. The move I played was 21. … Rxc3?, and we’ll look at it a bit later. But first I’d like to look at the best move for Black:
21. … Rc5!
Black’s rook and bishop dominate the White knight, which has no moves. The rook move also serves two other useful purposes, threatening to double on the c-file and protecting the vulnerable d5-pawn. It’s very disappointing to me that I missed a move which had so many obvious strong points. Also, more subtly, we’ll see that Black gets a better rook and pawn endgame by avoiding the temptation to go into the rook and pawn endgame too soon with 21. … Rxc3. Patience is always a virtue in chess!
22. Rd2 …
Because this is not an actual game variation, I am mostly going to show you best play for both sides according to the computer. I’m almost certain that Zierk would have played this move.
22. … g6
Also possible is 22. … Kf8, leading to a very similar sort of position. I think that 22. … g6 is more obvious, though. It protects the bishop and thus establishes Rxc3 as a more serious threat, and it also prevents back-rank mates.
23. Nc2 Bxc2!?
A surprising move, because we’ve just avoided a B-for-N trade two moves earlier. But now, thanks to the tempo gained with … Rc5, Black has a tactic that wins a pawn by force. Also, Black judges here that once White’s knight gets to d4, Black won’t have the superior minor piece any more.
24. Rxc2 d4 25. c4 R8c8 26. R1c1 d3! 27. Rc3 d2 28. Rd1 …
White is forced to give up the c-pawn to prevent Black from promoting.
28. … Rxc4 29. Rxc4 Rxc4 30. Kf1 …
White has to guard against the back-rank mate. This allows Black enough time to win the a-pawn.
30. … Rc2 31. a4 Ra2 32. Ke2 Kg7 33. Rxd2 Rxa4
FEN: 8/p4pkp/6p1/8/r7/8/3RKPPP/8 w – – 0 34
Getting at last to a rook-and-pawn endgame with a passed a-pawn. Black is hoping to get to the Finer position (which would be a win, part 3) but not the Fine position (which would be a draw, part 2). However, in everyday, garden-variety endgames like this one, he isn’t able to reach either position. Let’s see what happens when Black tries to do so.
34. Rd7 a5
Here I would perhaps lean towards … h5 followed by … Kf6, to activate my king first. However, Fritz (the computer) has a strong preference for pushing the a-pawn first. As we saw in our first endgame, pushing the passed pawn is important to establish it as a real threat!
In any case, the computer’s move is a principled move. To reach either the Fine position or the Finer position, Black needs to push his pawn to a3. However, there is a cost: the tempi Black spends pushing the pawn are not spent activating the king. As a result, Black’s king will be too passively posted and the position will be a draw.
35. Ra7 Ra2+ 36. Ke3 a4
Again, no fooling around — Black means business with his a-pawn. But this gives White time to shut Black’s king out of the third rank.
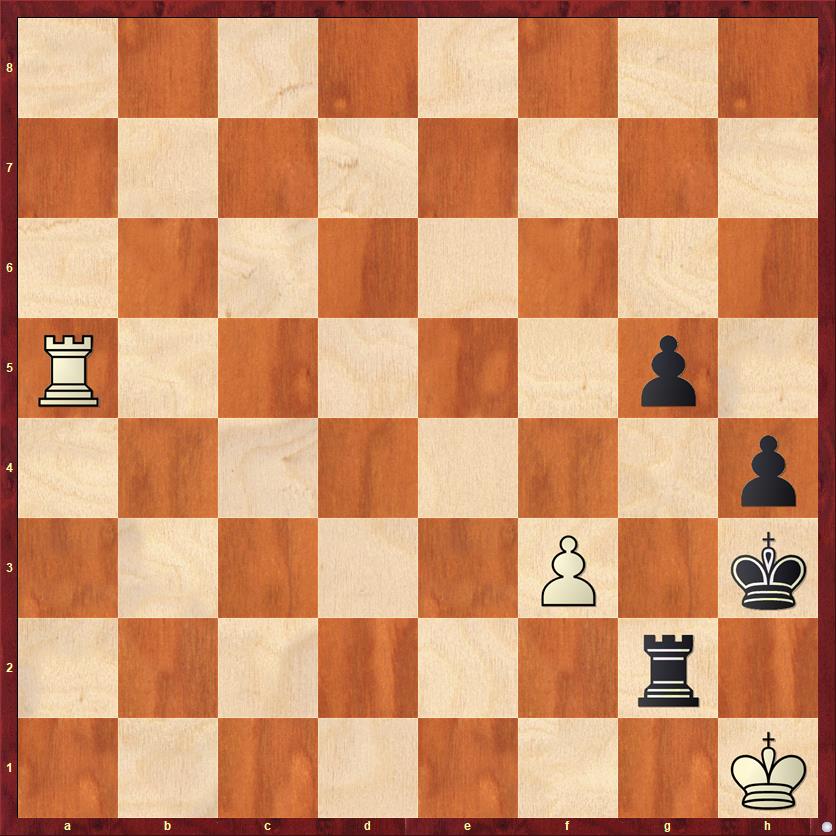
37. Ra6 a3
FEN: 8/5pkp/R5p1/8/8/p3K3/r4PPP/8 w – – 0 38
As we can see, Black has tried and failed to get to the Finer position. His rook and pawn are in the right place, but his king is still stuck back on g7, instead of on f6 where it should be. If Black wants to activate his king, he will have to come around via the back route, f8-e8-d8 etc., and this will cost him at least the f-pawn, as we discussed in part 2.
This example may explain Fine’s judgment that such endgames are typically drawn. To even have a chance to win, the stronger side needs to advance the pawn to the sixth rank. But in most practical cases, that takes time. The defender has ways to take advantage of that time. He can cut off Black’s king, as he has done here. In other cases, he might be able to make his own king more active — say, marching it to g5 in case Black’s king commits to the queenside. Or maybe White can play g4 and h4, preventing Black from achieving the desirable pawn chain f7-g6-h5 or bringing about favorable pawn exchanges. The only way for White to lose would be to sit around and do nothing, so that Black can advance the pawn to a3 and then play the “bridge-building” maneuver that I wrote about in Part 3.
Believe me, I’ve looked at a zillion variations to see if there is some way that I could have forced a win against Zierk in this endgame, but I have not found one. Black certainly had winning chances, but not a forced win.
I’m sure that some of you are curious about what actually happened, because as I’ve said, all of the above is computer analysis. What really happened (going back to the first Zierk-Mackenzie position) was
21. … Rxc3? 22. Rxd5 Rxa3 23. Rxf5 Rc8
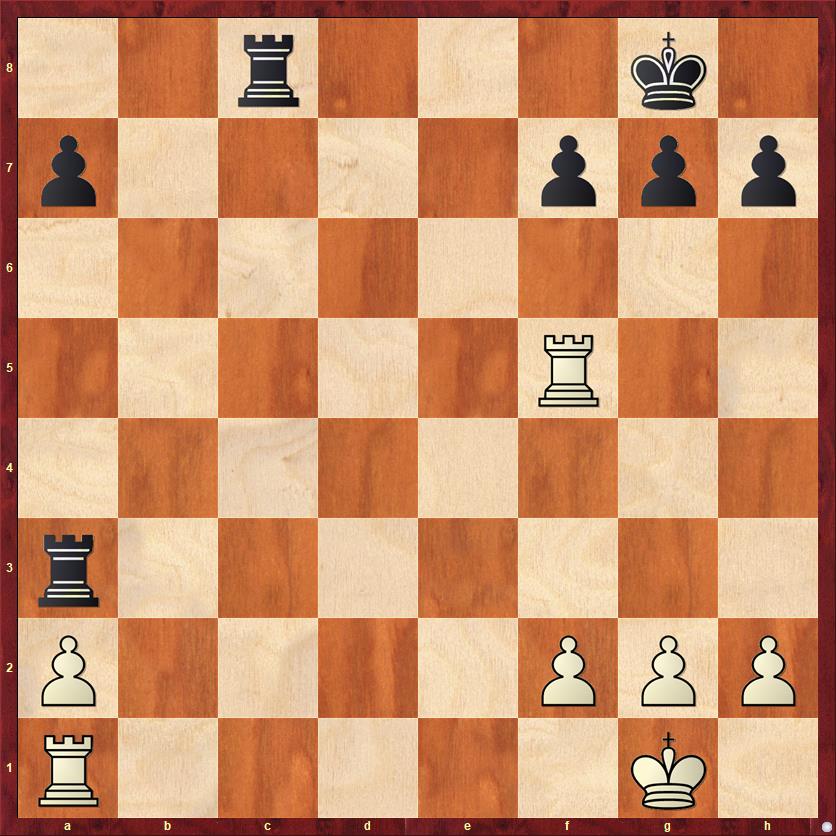
FEN: 2r3k1/p4ppp/8/5R2/8/r7/P4PPP/R5K1 w – – 0 24
The threat, of course, is 24. … Rxa2, when White can’t recapture because of a back-rank mate. I thought I was just winning a pawn, which is probably why I was so willing to trade my bishop for his knight. But as we have seen, winning a pawn is no guarantee of victory in a rook-and-pawn endgame!
24. Kf1 f6
Stopping back-rank threats, and also preventing him from defending the a-pawn via Rf5-e5-e2.
25. Rf3! …
I greatly underestimated this move. First, it saves the a-pawn for the time being. And even though White’s pawn formation on the kingside is wrecked, that is not usually fatal in these endgames. If White is able to advance his pawn to f5, it will actually be quite a strong pawn formation.
25. … Rxf3 26. gf Rc2 27. a4 …
FEN: 6k1/p5pp/5p2/8/P7/5P2/2r2P1P/R4K2 b – – 0 27
Here I made an instructive mistake.
27. … a5?
Probably played with a few seconds’ thought at most. I missed the fact that Steven’s doubled f-pawns (those supposedly weak doubled f-pawns) allow him to defend the a-pawn horizontally, with Ra1-e1-e4. For that reason, it was essential for me to play 27. … Rc4! 28. a5 and now 28. … a6!, when White can no longer play horizontal defense because his rook can’t go to e5. However, I think that White still has very good chances to save a draw if he activates his rook and does not bother with hanging on to the a-pawn. So I would recommend 29. Kg2 Rc5 30. Rb1! Rxa5 31. Rb7, followed by Ra7, f4, and f5, when will be hard for Black ever to free his king. Again, I’ve looked long and hard at this on the computer and have not found any forced wins for Black.
28. Re1! Kf7 29. Re4 …
White has consolidated and I never was able to win a pawn. The game finished as follows:
29. … Ra2 30. Kg2 g6 31. f4 f5 32. Rd4 Ke6 33. Kg3 Ra3+ 34. f3 Rb3 35. Rc4 Rb4 36. Rc7 Rxa4 37. Rxh7 Ra1 38. Ra7 Kd5 39. Kh4 Kd4 40. Kg5 Rg1+ 41. Kh6 Rg1+ 42. Rxa5 Kxf4 43. Ra6 Kxf3 44. Rxg6 Rh1 45. Kg5 Rh2 1/2 – 1/2
A really convincing endgame save by the future GM Zierk.
Thanks for my readers’ patience during this long series! You’re probably sick of rook and pawn endgames by now. Take-home points from this last installment:
- For beginners, it all starts with the Tarrasch Rule. Rooks belong behind passed pawns, whether it’s the defender’s rook or the attacker’s rook.
- For more advanced players, everything in this endgame matters. Advancing the pawn to the sixth rank (but not the seventh) matters. Having an active rook, ideally on the seventh rank, matters. Active king position matters. Pawn structure on the kingside matters (with f2-g3-h4 or f7-g5-h5 being best). If the player with the extra pawn is deficient in one of these areas, he probably won’t have a forced win. If the defender is deficient in one of those areas, he is in danger of losing.
- For the player with the extra pawn, giving up the passed a-pawn to win a pawn on the kingside is generally not a winning strategy.
- Think hard before trading into a R+P endgame with an outside passed pawn. If you are the defender and a pawn down, it may be the only way to save the game… but the draw may not be as easy as you think (if you’ve read books like Fine’s). If you are the player with the extra pawn, you will probably have winning chances but not a forced win. If you have other options that give you a clearer advantage, you should probably go for them.
- If you do get into this endgame and have the extra pawn, try to head for the Finer position (with the rook on a7) rather than the Fine position (with the rook on a8). Be bold about moving your king to the queenside. And try to set up the bridge-building maneuver discovered by Steckner, with Ra7-c7-(c2, c4, or c6)-(a2, a4 or a6), which is the key to winning that position.


