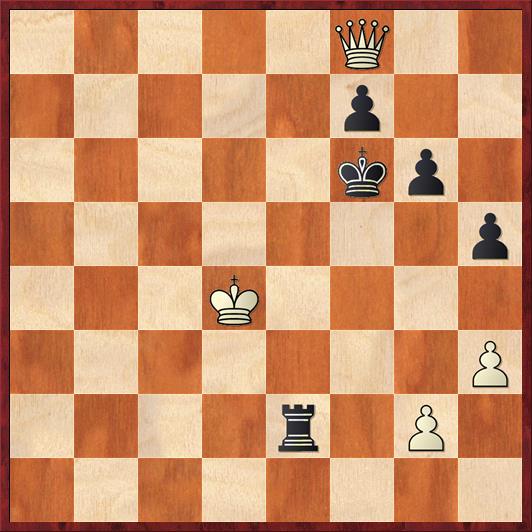
In my last pre-Christmas post I wrote about the game Magnus Carlsen – Levon Aronian, in which Carlsen played a beautiful rook sacrifice that enabled him to promote a pawn. However, when all was said and done he still found himself in a fiendishly difficult endgame to win. Here is the position after Carlsen’s 41st move:
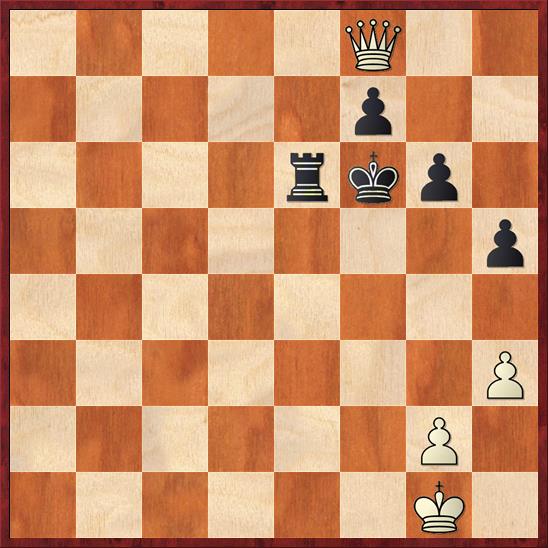
To understand this position it helps to first mentally wipe the g- and h-pawns off the board. If we do that, then this position is known to be a draw. Black has established a “fortress.” As long as he can prevent White’s king and queen from combining their forces to win the f-pawn, and as long as he can keep his rook on or near the safe haven of e6 where it is defended by the pawn, Black should be able to draw.
However, the extra pawns do make a difference. If White could get a passed pawn, of course, it would be decisive. However, it seems very unlikely that White can make that happen. It’s more likely that the pawns will be used as a tool to pry Black’s king away from the defense of the f-pawn. Also, we’ll see in the actual game a theme that Black’s extra pawns can turn into “traitor pawns” that give shelter to White’s king as he makes a pilgrimage to g7. Note, in particular, that the g6 pawn blocks Black’s rook from protecting either of the key squares h6 or g7.
Black’s strategy is simple in principle: try to exchange off two pairs of pawns to reach a fortress position. But to succeed, we first need to ask, “What are the possible fortress positions with R+P versus Q?”
It is fascinating to see how much computers have changed endgame theory, which one would expect to be eternal. Here is what Reuben Fine wrote in Basic Chess Endgames, the premier endgame manual of the pre-computer era (1941):
“In general KtP and BP always draw, but center pawn and RP usually lose. The problems involved have been completely solved.”
To support this conclusion, Fine shows the following basic drawn position (similar to his Figure 600, but I have flipped it over to the kingside to make it look more like our game).
FEN: 8/5k2/6p1/5r2/4K3/6Q1/8/8 w – – 0 1
But Fine is wrong on two counts. First, if we slide this position around the board, so that the pieces are in the same relative positions (although the queen doesn’t matter much and can be put almost anywhere), the Nalimov endgame tablebase (which gives perfect play for positions with 6 and fewer pieces) allows us to compile a “naughty” and “nice” list for the defender.
Nice (drawn): Pawn on h6 or h3; g7, g6, g5, g4, g3; f7 or f3; e7 or e3.
Naughty (lost): Pawn on h7, h5, h4; f6, f5, f4; e6, e5, e4.
This contradicts Fine’s statement that knight pawn and bishop pawn “for once obey the same laws!” Fine mistakenly thought that f6, f5, and f4 were on the nice list. In fact, we see that the knight pawn is by far the best one for the defender to be left with. If the defender is left with an e- or f-pawn he should keep it on its starting square (if possible). I think Aronian knew this, and you won’t see him touch that f-pawn. Carlsen definitely knew it, because I have seen a quote from him on chessgames.com where he said that the position with the pawn on f6 is not a fortress.
Fine’s second mistake is conveying too much optimism about the defender’s chances in general. To say that the “knight pawn always draws” is highly misleading. It draws only if Black can get to this exact position. Put the rook somewhere else on the board and it usually becomes difficult or impossible to maneuver it safely to f5. We’ll see that in the Carlsen-Aronian game, too.
Although Fine’s specific evaluations are wrong or misleading, his emphasis on this configuration of pieces is exactly right. Knowing this position will give us much more confidence in analyzing variations that would be otherwise impossible for humans to comprehend. Every step closer to a position of this type (Black king protecting the pawn, pawn protecting the rook, White king in front of the advancing pawn, and ideally cut off from it by both a rank and a file) is good for Black; every step away from it is good for White.
That was a very long preamble! Now let’s see how the general principles are put into play in the game Carlsen-Aronian. From diagram one, the game continued:
41. … Re5 42. Kf2 Rf5+ 43. Ke3 Re5+ 44. Kd4 Re2
Aronian plays aggressively. I think it’s very instructive to ask here what would happen if he tried to maintain the fortress with 44. … Re6. To make progress, I think that Carlsen has to advance his pawns, as he does in the game: 45. g4 hg 46. hg Ra6 (Black is trying to transfer the rook to f5) 47. g5+ Kxg5 48. Qxf7 (diagram three).
Black has succeeded in getting the “nice” g-pawn, but it’s not a draw yet! If Aronian tries to get his rook to f5 the direct way, he walks into a pin: 48. … Rf6? 49. Qe7 Kf5 50. Qe5+ and wins. An ongoing theme in this endgame is that it’s dangerous for Black to allow pins.
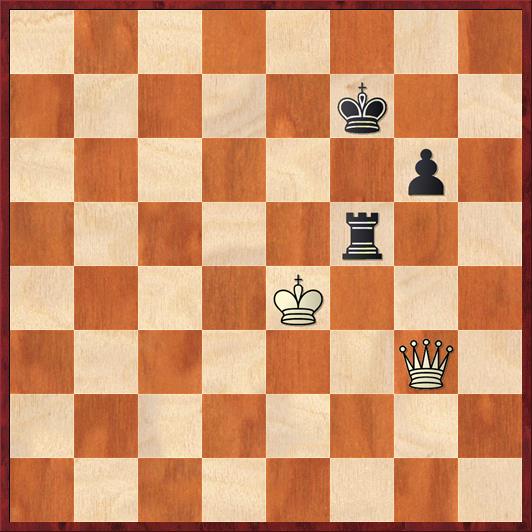
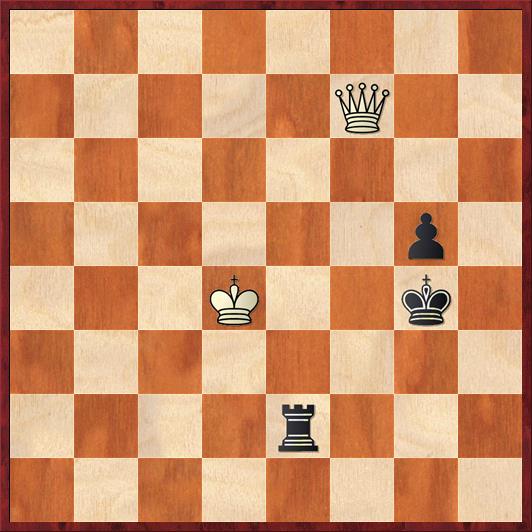
A more subtle try from diagram three, which looked to me like a draw when I analyzed it without a computer, is 48. … Ra5! If Black ever gets his rook to f5, it’s a draw. However, White can foil Black’s strategy by chasing the king to f5, where the rook wants to go. Here is the idea: 49. Qe7+ Kg4 50. Qe2+ Kf5 (diagram four).
FEN: 8/8/6p1/r4k2/3K4/8/4Q3/8 w – – 0 51
One reason that Q-vs-R endgames are so subtle is that there are so many times when mere checks do not work, and White has to put Black in zugzwang by playing a non-check. Here I looked at every queen check on the board and couldn’t find a way for White to make progress. But the Nalimov tablebase sets us straight: White’s correct move here is 51. Qe8!!
This move sets up an ultra-subtle zugzwang, so subtle that if you don’t know the ideal position that Black was aiming for, you won’t even realize that he is in zugzwang. Obviously, king moves either lose the pawn or the rook. So Black has two bad options: either move his rook off the fifth rank (51. … Ra1 is best according to the tablebase) or push his pawn with 51. … g5. Each of these options makes Black’s position worse (the definition of a zugzwang) because it takes him farther from Fine’s ideal setup. If 51. … Ra1 Black will have to look for another way to bring the rook to f5 (and will not find it). If 51. … g5 then f4 is now the rook’s ideal square, so he is once again two moves from salvation rather than one.
The tablebase tells us that White can continue to frustrate Black’s attempts to set up a fortress in this manner, and eventually will manage to bring his king into contact with Black’s pawn (frequently from behind). As Fine says, “If the White King can manage to attack the pawn the game is won.”
Okay, now let’s see how the game ended. Here is the position after Aronian’s actual move, 44. … Re2 (diagram five).
As in the line we just looked at, Carlsen mobilizes his pawns.
45. g4 hg 46. hg Rg2 47. Qh8+ …
Here Aronian faces a hugely important decision. Retreat with the king and try to maintain a fortress with the pawn on f7, or move the king forward and trade the f7-pawn for the g-pawn?
47. … Ke7?!
This was the hardest move for me to understand. From everything I have just said, it seems clear that Black should play 47. … Kg5. After 48. Qe5+ Kxg4 49. Qf6, Black has no way to defend f7, but he still has the g-pawn, which I have just said is the ideal pawn for him to be left with. If he could just maneuver his rook to f5 (with the pawn on g6) or f4 (with the pawn on g5) he would have a draw.
Unfortunately, the computer says this is impossible. But how could Aronian have known?
Even if the theoretical draw is unobtainable, Black has lots of other plans that require incredible accuracy from White to defeat – accuracy that I’m not sure even Magnus Carlsen could achieve in a blitz game. Here are two possibilities (after 49. Qf6).
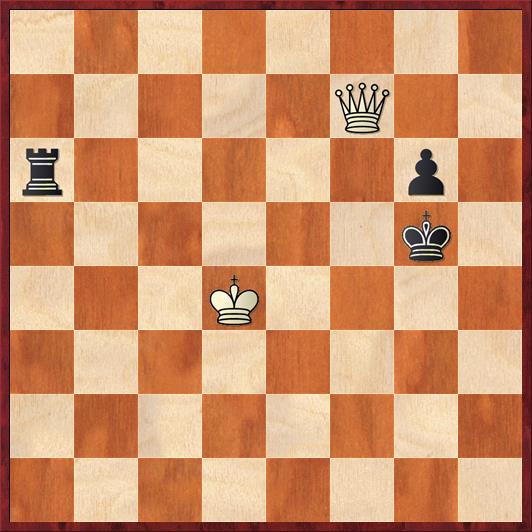
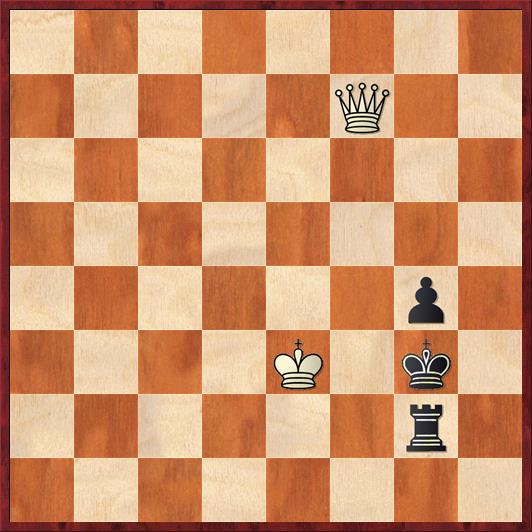
The e-file defense. Black uses his rook to control the e-file and separate White’s king from the kingside. The basic position arises after 49. … Re2 50. Qxf7 g5 (diagram 6).
FEN: 8/5Q2/8/6p1/3K2k1/8/4r3/8 w – – 0 51
How can White ever drive Black’s rook from the e-file? The queen can control only three squares. The king can control only three squares. So it seems as if Black’s rook will always be able to shuttle between the two remaining safe squares. How does White prevent this?
I’m not going to tell you the answer to this one. You’ll have to figure it out for yourself (or, more likely, use the computer to figure it out, as I had to).
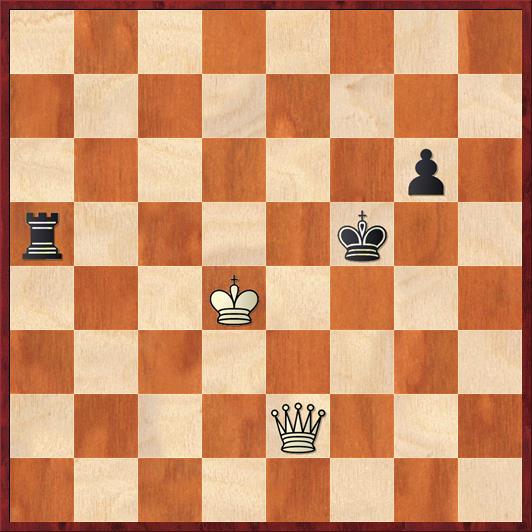
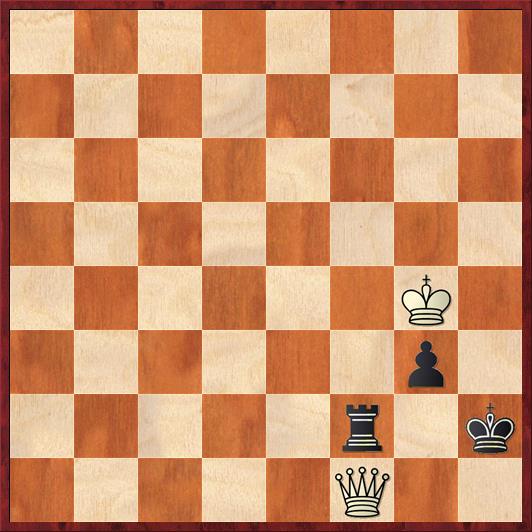
The g-file defense. Black establishes his rook on g2 and pawn on g4 and asks how White can ever break through. The basic position arises after 49. … g5 50. Qxf7 Kg3 (threatening … Rf2 and … Rf4 with a draw) 51. Ke3 (forced) g4. (diagram 7)
FEN: 8/5Q2/8/8/6p1/4K1k1/6r1/8 w – – 0 52
Again, how can White ever break through? I was not able to figure out a way, even with unlimited time. Could Magnus Carlsen have figured it out in a few seconds?
With the computer’s help I can tell you how to win from diagram 7. You’ll see that White needs to have a very clear idea what he is doing – there’s no way you could win this position just by making it up as you go.
Step one: Get the king to f4 in order to make contact with the enemy pawn. But make sure it can’t be driven away by checks from the side. The first move is 52. Qf1, not 52. Qf4+, because we want to get the king to the f4 square, not the queen. Also, 52. Qf1 is very useful because it prevents Black from “inching ” his pieces forward with … Rg1, … Kg2, and … g3.
Example Line 1: 52. Qf1 Ra2. Black plans to check from the side. 53. Qe1+ Kh3 54. Kf4 Ra4+ 55. Kg5. Unfortunately, Black cannot keep chasing the king with Ra5+, and he also can’t play 55. … g3 because of 56. Qh1 mate! The rook is too vulnerable on a4 to stay there; thus, for example, if 55. … Kh2 56. Qe2+ Kh3 57. Qd3+ g3 58. Qd7+ sets up a fork. Finally, if Black heads for his rook’s ideal square on f3, he gets there too late: 55. … Ra3 56. Qd1! Rf3 57. Qh1+! Kg3 58. Qh4+.
All in all, it seems as if Black should keep the rook on the g-file and just try to push the g-pawn. So a very plausible idea is
Example Line 2: 52. Qf1 Kh2 53. Kf4 g3 54. Kg4 … Seemingly setting up a zugzwang, but Black has a trick. 54. … Rf2 (diagram 8).
Now the obvious 55. Qh3+? is inaccurate because after 55. … Kg1 White cannot take the pawn. 56. Qxg3+? Rg2 draws and 56. Kxg3? Rf3+!! also draws.
Instead White must exercise incredible restraint and play a quiet move. The tablebase likes the fantastic geometric maneuver 55. Qa6 with the idea of 55. … g2 56. Qh6+ Kg1 57. Kg3 Kf1 58. Qc1+ Ke2 59. Qc2+, winning the rook and the game.
This isn’t even an exhaustive analysis, it’s only two example lines. The complexity of this endgame makes one’s head spin: Black has multiple possible defenses, really a whole tree of them, and in almost every line White has to come up with amazing moves to win. Who would have thought that White has to allow the pawn to run all the way to g2 before he can corral the rook at literally the last moment?
Bottom line: 47. … Kg5 would have given Aronian excellent drawing chances, even against Carlsen.
Now let’s see how the actual game ended. I’ll show you the position after move 47 again. Aronian has moved his king to e7, preferring to defend his f-pawn.
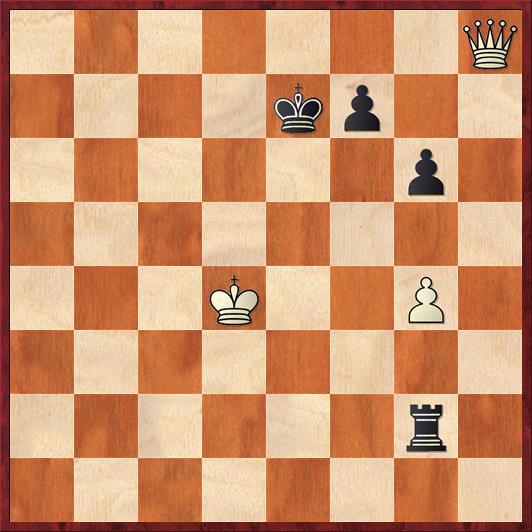
FEN: 7Q/4kp2/6p1/8/3K2P1/8/6r1/8 w – – 0 48
Carlsen continued as follows:
48. Qh3 Rd2+ 49. Ke5 Re2+ 50. Kf4 Re6
Once again achieving the “fortress-that-isn’t-a-fortress.” Take away the g-pawns and it’s a draw. But keep them on the board and White wins.
51. Kg5 Re5+ 52. Kh6 …
Here is where the “traitor pawn” on g6 hurts Black. Because of that pawn White is able to get his king to the square h6 (because it blocks Black’s rook from defending that square). Second, after 52. … Re6 53. Kg7 the traitor pawn prevents Black from playing … Rg6+. For these reasons Black decides to advance it to g5, but it’s too late.
52. … g5 53. Kg7 Re6 54. Qa3+ …
The board is just big enough for Magnus!
54. … Ke8 55. Qa8+ Ke7 56. Qb7+ Black resigns
After f7 falls, the rest should be easy.
If you stuck with me all through this endgame, congratulations! After a while I get discouraged, because it seems as if I have to get the computer’s help in every variation. But I think that if you want to be a 2800 player like Magnus Carlsen, you must at least study Fine’s position in each possible version, with the pawn on e7, f7, g7, etc. Understand not only which ones are naughty or nice, but also understand why. And maybe you need to look at some of the sub-optimal but nevertheless tenacious defenses for Black, like the e-file defense and the g-file defenses shown above.
There’s no easy route to becoming a 2800 player. It’s just a hell of a lot of work. For me, well, it’s way too late.


{ 2 comments… read them below or add one }
Great column, thanks!
Dana, I don’t know if comments are still open, so maybe this is a message in a bottle. But here goes…
In a lesson the other night with a strong player, we reviewed various Q v R scenarios. After we looked at Dlugy-Ivanov from Del La Villa’s excellent 100 Endgame Patterns book (the follow up to his 100 essential endgames book), I thought to myself, didn’t Dana write about this ending some time ago? Sure enough, I found it, and now your excellent breakdown of this ending provides more grist for our endgame mill.
Thanks for keeping this info available!
All the best,
LS