Yesterday Mike Splane hosted his last chess party of 2019. Though somewhat lightly attended (only eight people this time) it gave Eric Steger and me a chance to show our games from the last round of the Kolty Chess Club championship, in which we tied for first. Also, Mike showed his last-round game, which I thought was quite instructive, though not for exactly the same reasons Mike did. I think it’s a great illustration of a concept I just learned a name for: “quiescence.”
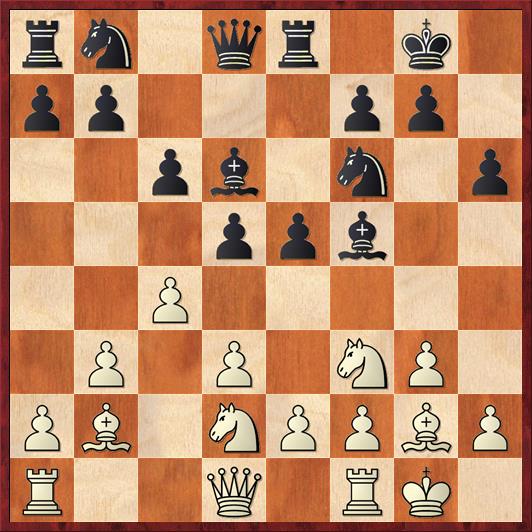
FEN: rn1qr1k1/pp3pp1/2pb1n1p/3ppb2/2P5/1P1P1NP1/PB1NPPBP/R2Q1RK1 w – – 0 10
In this position, Mike startled us by saying, “White wins by force,” and further saying that he had to analyze ten moves deep to find the win. He gave us some time to “find the win,” and this turned into one of the longest and most awkward silences I’ve heard at one of his parties, as nobody could see anything remotely resembling a win for White. Finally Richard Koepcke broke the silence by saying, “Mike, I think you’ll just have to show us.”
In fact, Mike’s first two moves were the same moves that I would have played:
10. cd …
This is useful, as it loosens up Black’s center and moves a step closer to opening the long diagonal.
10. … cd 11. e4! …
While it is a good, thematic move, it’s just not right to say that this move is winning. Richard pointed out that 12. … Bg4 is certainly okay for Black. If 13. h3 Bh4 14. ed Nxd5, 15. g4? would be a bad idea, leaving many weaknesses in White’s position (h4, f4, d3). Instead, the computer recommends 15. a3 (keeping the knight out of b4, and also preparing b3-b4) with a minuscule, 0.1-pawn advantage for White. This seems like a fair evaluation to me; both sides have targets, and after 15. … Nc6 Black has caught up in development.
However, my main purpose isn’t to criticize Mike’s over-optimistic evaluation, but to talk about the very interesting mistake his opponent now made.
11. … de?
Black should have realized that this is exactly what White is hoping for. Now the play gets really tactical for a really long time.
12. de Nxe4?
Pouring oil on the fire. There was still time for Black to cut his losses with 12. … Be6 or 12. … Bh7. By “cut his losses,” I mean that Black has to sacrifice the e-pawn for probably insufficient compensation. The second capture on e4 turns an already risky position into a catastrophe.
After the game Mike asked his opponent (Raymond Fergerson, a class-A player), “Why did you play this move?” Fergerson’s answer was extremely revealing. He said, “I thought you blundered a pawn.”
Just contrast the approaches of these two players. On move 10, Mike spent 20 minutes thinking about the position and analyzed the tactics 10 moves deep. His opponent, on the other hand, analyzes two moves deep and concludes that his opponent blundered a pawn. In a nutshell, that is the difference between a master and an amateur.
A question that people often ask masters is, “How many moves ahead do you calculate?” or “How many moves ahead should I calculate?” There are many answers to this question, some facetious and some serious, but I recently read one answer that I thought really hits the nail on the head. In his book Is Your Move Safe?, Dan Heisman (well-known chess teacher and national master) says that you should calculate until the point where the position becomes quiescent. He defines this as follows: “A quiescent position is one where further checks, captures, and threats either do not exist, or further analysis of them would not change the evaluation of the position.”
“Quiescent” is a great concept that I have struggled to put into words. When I teach my kids in chess club, they have no sense of quiescence. Sometimes they want to keep analyzing way past quiescence, in positions where one player has won a rook or a queen. More often, they want to make a very superficial, snap judgment about a position where there are all sorts of things happening (as Fergerson did here). The first is a waste of time, and the second one is an invitation to blunders.
I don’t want to pretend that quiescence is an easy concept. In fact, I think that many games are won and lost right up to the grandmaster level because one player sees a position as quiescent, while his opponent keeps on analyzing and finds a deeper tactical resource. It’s very often a judgment call, as the last words of Heisman’s definition indicate (“further analysis of them would not change the evaluation”). But Heisman has at least given us a standard that you should aspire to. You should not stop analyzing until the position calms down tactically – unless you are low on time, in which case you might just have to go with your instincts and roll the dice.
But here, on move 12, no one was low on time. And the position is anything but quiescent. There are discovered attacks and loose pieces galore (f5, e4, potentially d6, and finally the little prizes at b7 and a8 that are waiting for White at the end of many variations). Black has to be attuned to that and play a move like 12. … Nxe4 only if he is absolutely sure he has a way to hold everything together.
13. Nh4 …
This move is so obvious that I would probably have hardly looked at anything else. It forces an immediate crisis: Black has two pieces hanging and he cannot defend them both. His only hope is to keep capturing material and hope that he ends up with more in the end.
13. … Nxd2 14. Nxf5 …
Again, really obvious, although I give Mike credit for looking at several other options. The key point to me is that this move turns the knight into a powerful attacker, while any other move leaves it on h4 where it is potentially going to be a bystander.
One key point is that after 14. … Nxf1 the knight is trapped on f1, so White can very comfortably play 15. Nxd6. Although White is down the exchange, quiescence has not been achieved yet. Black has a rook hanging on e8, a knight hanging on f1, a pawn (and then a rook) hanging on b7, and a weak pawn on e5. Therefore we should keep analyzing. The most reasonable moves seems to be 15. … Re6 16. Nxb7 Qxd1 17. Rxd1. Still not quiescent: White still has back-rank threats and discovered-attack threats. After 17. … Nc6 18. Na5 White threatens to win the exchange. Still not quiescent. 18. … e4 stops the threat – but only for a moment, because 19. Nxc6! Rxc6 20. Bxe4 is a lethal skewer. White wins the exchange back and will also win the knight on f1, thus ending a piece ahead. We may now consider the position quiescent. Before playing a move like 12. … Nxe4, this is how deep Black should have analyzed. (And we have to give Mike a lot of credit, because the combination is ten moves deep, just as he said. Actually eleven, if you start with 10. cd.)
Even so, we’re still not done with our analysis, because Black has other variations besides 14. … Nxf1. In fact, he played one of them:
14. … Bc5
Here White could play 15. Bxb7, but Mike has prepared some even stronger medicine.
15. Qg4! …
White gains a free tempo because of the mate threat on g7. This gives him time to save his threatened rook on f1. The only slight worry after that is his sensitive pawn on f2. But Black has a zillion things to worry about, while White has only one.
15. … Qf6 16. Rfd1 g6
Black’s position is so bad that you have to consider really desperate alternatives like 16. … Bxf2+ 17. Kxf2 Qb6+ 18. Ne3 f5. At first it looks as if Black may be getting somewhere, because 19. Qxf5 runs into a skewer with 19. … Rf8. Or does it? We have to keep analyzing to quiescence, and if we do that, we quickly see that 20. Bd5+ turns the tables. But 19. … Nc6 might still leave some room for argument. So I think that White’s most precise move order (after 18. … f5) is 19. Bd5+ Kh8 (or 19. … Kf8 Qxf5+) 20. Qa4. Now all the problems for Black come home to roost: the loose rook on e8, the loose knight on d2, the weak pawn on e5. And don’t forget, Black has already sacrificed a piece to reach this position. I think the most fitting finish is 20. … Nc6 21. Rxd2 f4 22. gf ef 23. Qxf4 Rf8 24. Bf7 Rae8 25. Qxh6 mate! In this variation we never really got a quiescent position until checkmate.
The actual game continued
17. Rxd2 Nc6, and White eventually won.
Finally Black finishes developing, but his 17th move basically puts up the white flag because he is a piece down with no compensation. The last try was 17. … Qxf5, but then White can simply trade queens and take the b-pawn: 18. Qxf5 gf 19. Bxb7. White isn’t just winning the exchange, he’s winning a whole piece because the knight has nowhere safe to move to. Once again, it has taken us ten moves to reach quiescence and a position that is safe to evaluate.
You can legitimately query whether Mike really had to analyze ten moves deep in this game. Maybe he could have stopped somewhere around move five or six: White just had too many threats, so it was extremely unlikely that a miracle move would come along to get Black out of trouble. However, I would warn you that the penalty for stopping your analysis too early is much greater than the penalty for stopping your analysis too late. Black found that out the hard way in this game. Don’t let it happen to you!


{ 3 comments… read them below or add one }
This is a high class lesson on what Heisman later called “Quiescence Errors,” where amateurs too readily stop their analysis at a seemingly concrete result (“he blundered a pawn”) without recognizing that things are far from settled. You can find his old ChessCafe article on the topic here:
https://web.archive.org/web/20060711124504/http://www.chesscafe.com/text/heisman55.pdf
Hi Dana,
I thought this was a little bit unfair.
“While it is a good, thematic move, it’s just not right to say that this move is winning. Richard pointed out that 12. … Bg4 is certainly okay for Black.”
We never even looked at 12…Bg4. It was just an off-the-cuff suggestion by Richard, after at most 30 seconds of “thought.” I do not think it solves Black’s problems.
What is a winning position? Judgment is an individual thing, and I’m sure we would define it differently for different players, based on their skills. The best (funniest) definition I’ve ever seen was ‘”The question of who stands better depends on which color Tal is playing. ”
Even with better play by Black, White has opened the position when he is better developed and is either winning the bishop pair or getting a powerful knight outpost on f5. He has no weaknesses and has all of the pawn breaks. The pawn on h6 provides a “hook” White can focus his attack on. Anybody with extensive experience playing the Black side of the King’s Indian Defense will know that White is clearly better after 12… Bg4 13. h3 Bh5 14. g4 Bg6 15. Nh4 Bh7 16. Nf5.
I agree that taking the sacrificed pawn was suicidal., and I would have strongly considered playing the pawn to e4 even if the ensuing tactics were unclear. They weren’t. I wanted to show that particular position because it was possible to see so deeply. I thought the group would enjoy practicing their visualization skills. Obviously I misjudged my audience/venue and/or did a bad job preparing the group for what I wanted to do.
Aside from that, i enjoyed your column, as I always do.
Mike
This is a somewhat strange variant of a classical position in the Lasker Variation of the Reti Opening. Instead of the queen knight on d7 Black managed to get two moves: Re8 and h7-h6 (by somehow getting e7-e5 in one move). The transposition favors Black: in the classical line White plays indeed the way Mike played, when 11. …Bg4 is met with exd5 and Nd2-c4 which is more or less the refutation of the Lasker’s set up (the dark-squared bishop is nowadays developed on e7 rather than in d6). In this position it’s less forcing, and the black Queen knight may be deployed much more favorably to c6.
After 11. … Bg4 12. h3 Bxf3 13. Bxf3 d4 black seems ok.