Last time I introduced a new series of four posts about a very basic (but very difficult) rook and pawn endgame. It’s the endgame where one side (we’ll say White) is a pawn up, and that pawn is an outside passed pawn (we’ll say an a-pawn). As per the “Tarrasch Rule,” the best defensive position for Black’s rook is behind the passed pawn. If Black can’t get there, then it’s a pretty easy win for White. Conventional wisdom says that the game should be a draw if Black does succeed in getting his rook behind the pawn. But computers have made this evaluation a little bit shakier, as we’ll see in the next couple of posts. The line between drawn and lost positions for Black is sometimes tricky to find, and even in supposedly drawn positions, White has winning possibilities.
In this post I’ll talk about position 367 in Reuben Fine’s Basic Chess Endgames, which he uses as the basis for his argument that such endings are almost always drawn. His analysis is correct but incomplete, and a careful look at the position will introduce us to the main drawing themes (for Black) and winning themes (for White).
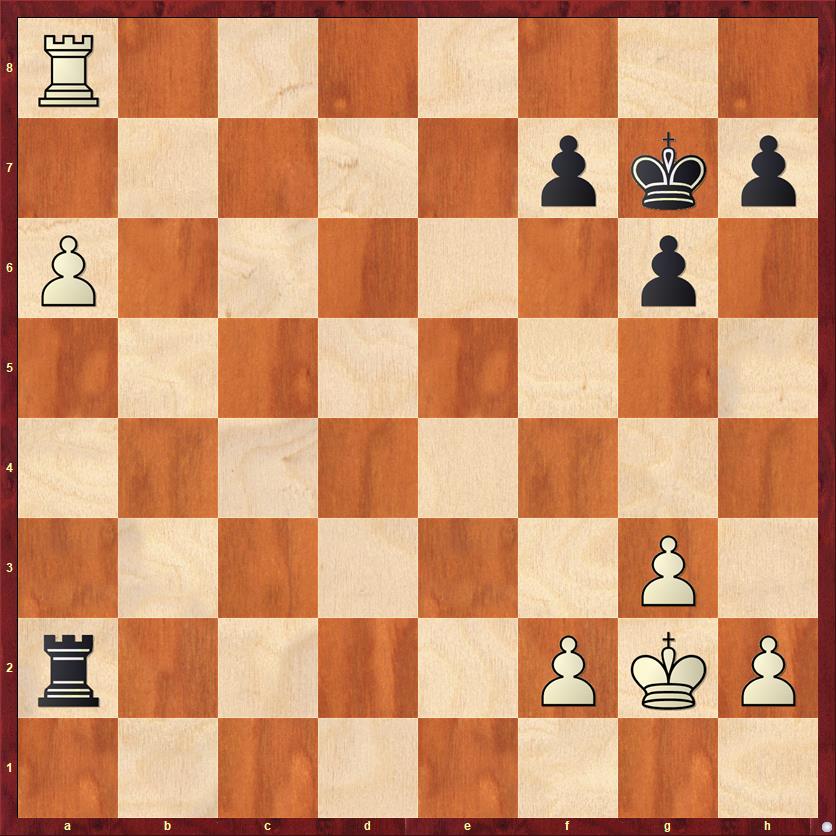
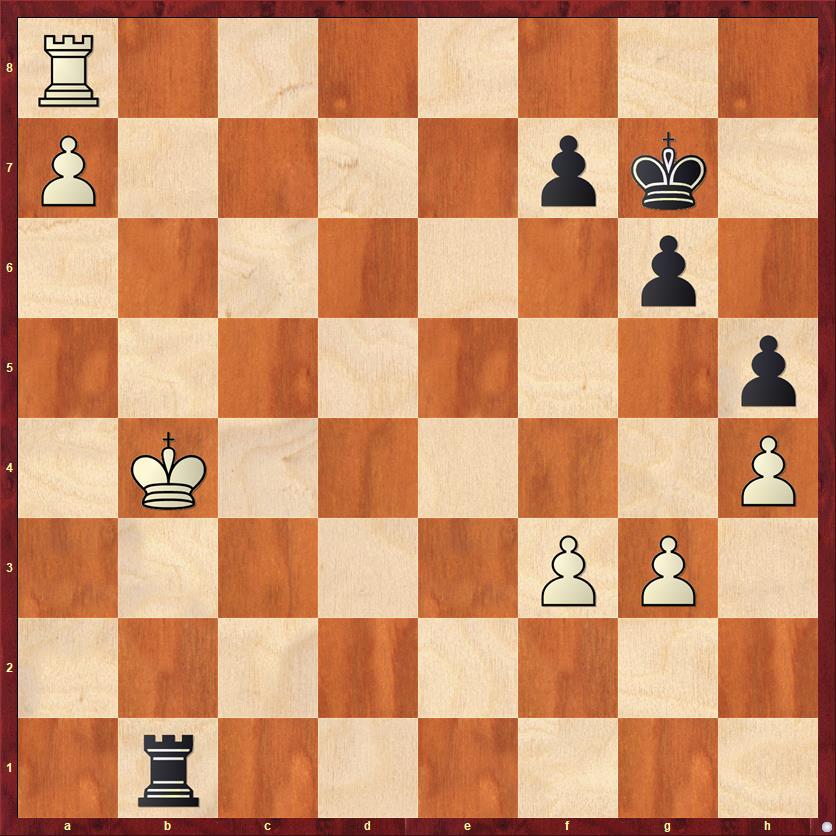
FEN: R7/5pkp/P5p1/8/8/6P1/r4PKP/8 w – – 0 1
First let’s look again at what Fine had to say:
“The idea of the draw is this: In order to win, White will have to keep his pawn at a6, and march his king to the queenside. He will thus expose his kingside and have to lose at least one pawn. Once Black has captured a pawn, [White] will advance his king and will then win Black’s rook for the a-pawn, but White will emerge with a R vs. P ending in which his king is too far away to be able to effect a win.”
Here is Fine’s “model continuation”:
1. Kf3 …
White’s task gets more difficult if Black is allowed to play … Ra3, cutting off the king’s route to the center. I’ll have more to say about this in Part 4.
1. … h5
A move that Fine does not comment on. It’s very advisable for both sides to set up a pawn chain. The reason is that it takes a rook more moves to capture the pawns in a chain than it is to capture pawns that are side by side. (It takes 3 moves versus 2 if there are two pawns; 5 moves versus 3 if there are three pawns.) In rook endgames, every tempo is critical, so it’s a good idea to get your pawns into the best defensive formation. Of course, the chain f2-g3-h4 (f7-g6-h5) is better than the chain h2-g3-f4 (h7-g6-f5) because the king has to protect the base of the pawn chain for as long as he can. If the base is on the f-file, the king can be in the center of the board and still protect the base of the pawn chain.
2. h4 …
Played for the same reason. Fine also analyzes 2. Ke4 to a draw.
2. … Kf6 3. Ke3 Kf5!
An important move that Fine does not comment on. I am convinced that Black would not be able to draw if he didn’t have this move. That is what made me ask the question, “What if White’s rook were on a7?” which I’ll address in Part 3. On f5, Black’s king threatens to march into g4, after which White’s kingside pawn formation will swiftly collapse if he tries to move his king toward the queenside. To keep the king out, White is forced into making a weakening move.
4. f3 …
See my comments above. White’s pawns are now side by side, which makes them easier targets for Black’s rook.
4. … Ra3+
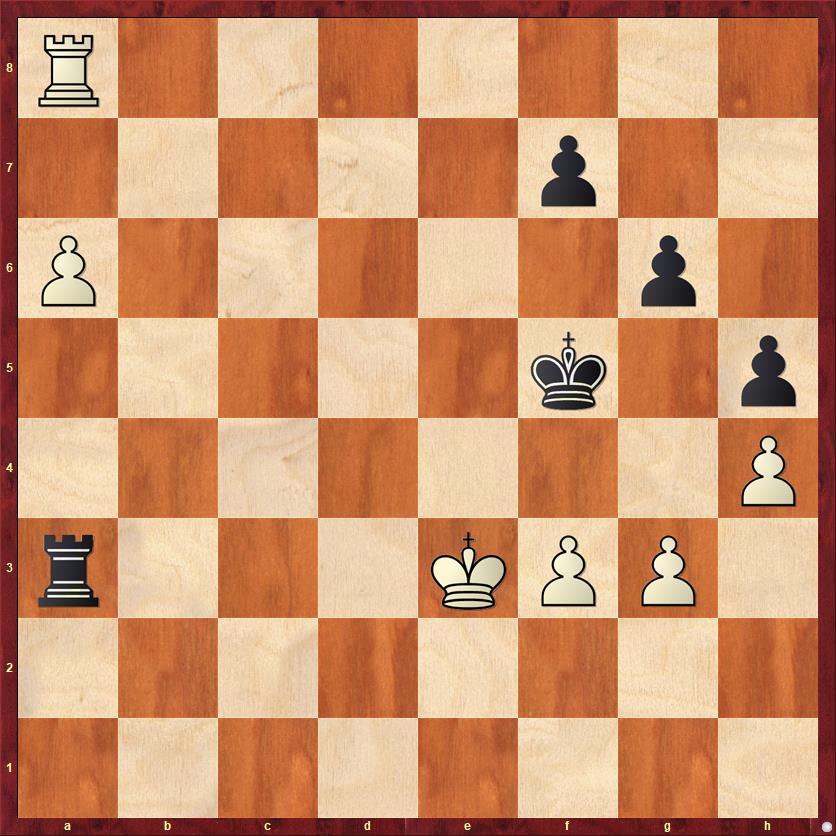
FEN: R7/5p2/P5p1/5k1p/7P/r3KPP1/8/8 w – – 0 5
Here we have another fork in the road that Fine doesn’t even notice. He gives 5. Kd4 as White’s only reasonable try. If you play that move, the computer’s evaluation immediately drops to 0.00 (a draw), in view of the variation 5. … Rxf3 6. Rf8 Ra3 7. Rxf7+ Kg4. Black’s moves are all perfectly timed. The rest of White’s pawn formation will now collapse. 8. Rf6 Kxg3 9. Rxg6+ Kxh4 10. Kc5 Kh3 11. Kg6 h4 12. a7 Kh2 13. Kg7 Rxa7+ 14. Kxa7 h3 and we will either have a draw by stalemate or perpetual check or by White giving up his rook for Black’s pawn. Very convincing, right?
However, in the diagrammed position, the computer (Fritz 17) plays the startling move 5. Ke2!? My first reaction was, “What the hell? It looks as if White isn’t even trying to win.” Yet Fritz 17 rates 5. Ke2 as +1.9 pawns for White!
Is the computer right? No. But it behooves us to take a look at what it is “thinking.” Remember, I’ve said before that it is crucial for Black’s king to be on f5. So the computer says, I’ll just wait for you to move your king away before I start racing my king to the queenside. If you don’t want to move your king, then you’ll have to move the rook. A logical move is
5. … Ra2+. If things weren’t weird before, they are about to get even weirder, because the computer plays
6. Kd1!? …
WHAT THE HELL? Does the computer even know how to play chess?? Once again, a word of explanation: the computer sees quite well that 6. Kd3 Ra3+ 7. Kc4 Rxf3 draws, as in Fine’s variation. The position of White’s king on c4, rather than d4, makes no difference.
This is a great example of how computers find moves that humans would not even consider. I would never play 6. Kd1, voluntarily imprisoning my king on the back rank. But the computer doesn’t care. After the king gets to b1, Black will have to let it out of prison.
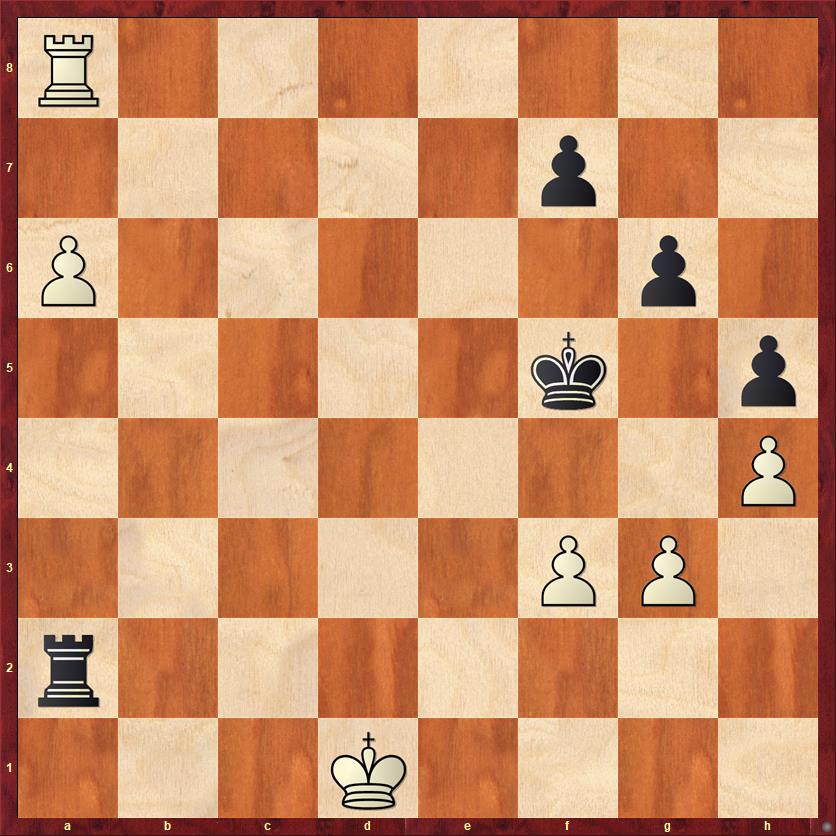
FEN: R7/5p2/P5p1/5k1p/7P/5PP1/r7/3K4 b – – 0 6
Now we have a fork in the road for Black. What is the best way to play for a draw? Bring his king over to the queenside? Attack White’s pawns with his rook? Push his kingside pawns and try to trade off as many as possible? Or perhaps just sit and wait, since White doesn’t seem to be trying to win?
Even if you think that White’s play has been too bizarre to be relevant for human chess, I think that this is still an important position. It can also arise in cases where White’s king was less well-placed initially than in the Fine position, so that White has to crawl across the back rank. (That is, it’s not a matter of choice but a matter of necessity.) We’ll see an example in Part 4. In such a case, I think it’s important to know that with the king on d1 it’s a draw, but if the king were already on c1 (or if it was White’s move), then White would be winning.
I think that there is only one correct plan for Black, and it leads us to our second thematic draw. Black should play
6. … Ra3!
First, let’s look at what is wrong with the other choices.
(a) Running the king to the queenside most likely does not work. Even though Black can win White’s a-pawn, it will result in a trade of rooks, after which White will have a winning K+P endgame with his king closer to the kingside pawns. Sample line (courtesy of Fritz 17): 6. … Ke6 7. Kc1 Kd7 8. Kb1 Ra5 9. Kb2 Kc6 10. Ra7! (It’s useful to have this move in reserve to punish Black for abandoning the kingside.) 10. … Kb5 (Not 10. … Kb6? 11. Rxf7, when Black has a dilemma. 11. … Rxa6 allows a rook trade, but 11. …Kxa6 allows White to win a second pawn.) 11. Kb3 Rxa6 (Black doesn’t have to play this, but why then did he move his king all the way to b5?) 12. Rxa6 Kxa6 13. Kc4 and White wins. He marches his king to f6, forcing Black’s king to e8, and then pushes f3-f4-f5, winning a pawn and the game.
(b) The computer wants to play 6. … g5, forcing a trade of one pair of pawns, but I distrust this because Black’s two remaining pawns are separated and weak.
(c) After reading the above note, Black might want to try 6. … f6, preparing … g5. But now White can get away with a move that seldom works for him: 7. a7! We’ll see below why this is usually a mistake. But in this case, Black has basically put himself into a zugzwang on the kingside. He can’t move his king to the e-file because Re8+ will win. He can’t push his g-pawn because after … g5 and hxg, either recapture is bad: if … fxg Rf8+, and if … Kxg5 Rg8+. For this reason, Black is limited to rook checks — which will eventually run out because White will run with his king all the way to h6! Eventually we will get to a position like this:
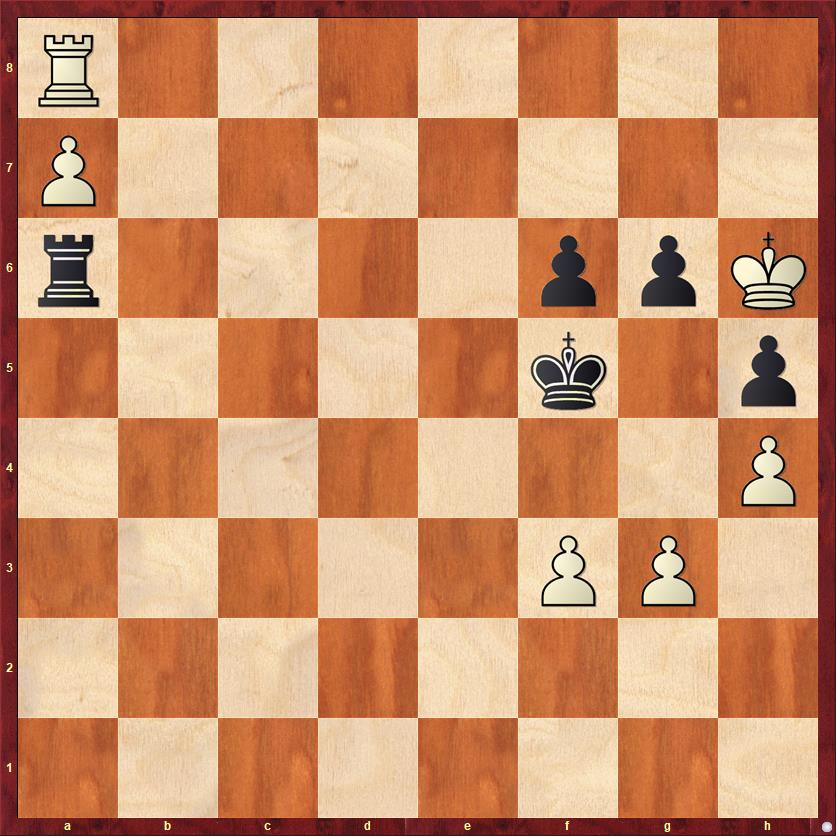
FEN: R7/P7/r4ppK/5k1p/7P/5PP1/8/8 w – – 0 20
Now White wins with 20. Rb8 Rxa7 21. Rb5+ Ke6 22. Kxg6 etc. Keep this variation in mind!
(d) After seeing that 6. … f6 doesn’t work, I thought that maybe the way for Black to draw is just to pass. Keep the rook on a2 and move the king back and forth. But the trouble with this plan is that White does have a way to make progress, and if Black gives away two tempi for free, he will regret it. So, for example, after 6. … Kf6 (“I pass”) 7. Kc1 Kf5? 8. Kb1 Ra5 9. Kb2 White is relentlessly moving toward his goal while Black has made no progress. Black needs to put pressure on f3 more quickly, so a more challenging line is 6. … Kf6 7. Kc1 Rf2. As I’ll explain below, White does not want to play 8. a7, which only draws. Instead, White’s watchword in this ending should be to extricate his rook from in front of the pawn at the first opportunity — because he might never get another opportunity. After 8. Rb8! Ra2 9. Rb6+ Ke5 10. Kb1 the ending enters a very delicate and tricky phase. But the basic idea is that White will inch his king up the b-file unless Black stops him by bringing his king to c5. But in that case, after … Kc5, White will be able to plant his rook on f6. If Black then tries to bring his king back to e5, White plays g3-g4-g5 (if necessary) to cement the rook in place. Fritz’s analysis seems to show that this endgame is winning for White. In any case, White has clearly transformed the ending into a different configuration where he has very serious winning chances.
(e) After going through all the above lines and seeing that nothing seems to lead to a reliable draw for Black, I realized that the problem was that Black was not putting pressure on f3 fast enough. So, going back up to diagram three above, I concluded that the correct response to 6. Kd1 has to be
6. … Ra3!
Not a really hard move to find, but I think the surprising message is that Black is already on the precipice, and nothing else works.
Here is the thinking. Clearly 7. Ke2 would just be an invitation to a draw by repetition after 7. … Ra2+. Sacrificing the f-pawn leads to a draw like Fine’s, where White’s king is on c2 rather than d4 but it doesn’t really make a difference. For example, 7. Kc2 Rxf3 8. Kb2 Rf2+ 9. Kb3 Rf1 10. Rb8 Ra1 and Black’s king is headed for g4 and g3.
Finally, White could answer with the tricky move 7. Ra7, which indirectly defends the f-pawn because 7. … Rxf3?? 8. Rxf7+ Kg4 9. Rxf3 Kxf3 10. a7 leads to the coronation of a new queen. But Black has an even craftier answer! He can now play 7. … f6! But wait, didn’t we conclude that move was bad before? Yes, it was, but only because White was able to push his pawn to a7! But now, with the rook on a7, White doesn’t have that option, and he doesn’t have time to get it back because 8. Ra8 Rxf3 is fine for Black.
Wow! I love all of these schemes and counter-schemes that run 10 or 20 moves deep. Far too deep for humans to figure out in a live chess game, which is why it pays (hopefully) to study them in advance.
The only remaining option for White, after 6. … Ra3, is
7. a7 …
This is the move I’ve told you already that White should nearly always try to avoid. (And it isn’t just me — Fine said so, too.) Now let’s finally see why. After White pushes his pawn to a7, Black has to do only two things to secure the draw: move his king to g7 and then check forever with the rook. So, for example: 7. … Kf6 8. Kc2 Kg7 9. Kb2 Ra5 10. Kb3 Ra1 11. Kb4 Rb1+.
FEN: R7/P4pk1/6p1/7p/1K5P/5PP1/8/1r6 w – – 0 13
White is powerless to escape Black’s checks from behind. The only thing he can do is come back to the second rank, but then Black’s rook goes to a6/a5/a4 and laughs at him from afar. It’s instructive to compare this with diagram 4, where White’s king was able to find shelter on h6. For Black, the point of moving his king to g7 is twofold: (1) it prevents White’s king from finding shelter on the kingside, and (2) if White should ever try to play g4, Black will happily agree to a pawn exchange with … hxg fxg. The only passed pawn that White can create is the h-pawn, but the ending with the pawn on a7 and a passed h-pawn is a book draw even if Black didn’t have the f7 pawn!
It’s very important to be aware of this variation because it is Black’s only reliable drawing motif other than Fine’s variation. Black should (almost) always try to tempt White into playing a6-a7. That is really the point of the move 6. … Ra3! By threatening to take on f3, Black is trying to force White into playing a6-a7 to prevent it. Then the game is an easy draw.
I know this is a lot of analysis! I hope it will be useful to some of you. I’ll try to sum up the main points:
- Fine’s position 367 is a draw with best play, as Fine said.
- Both sides want to arrange their pawns in a chain, as this is the most difficult formation for a rook to chew up.
- White almost always wants to avoid playing his pawn to a7. The only exception is the extremely unusual circumstance where his king can infiltrate Black’s kingside and win a pawn there (for example, the position in diagram 4).
- White’s only serious winning plan is to bring his king to the queenside and march it up the b-file. The reason for leaving his pawn on a6 is so that his king can play Ka7 to escape checks, and his rook can then leave its defensive post on a8.
- Rather surprisingly, White can attempt this plan even if his king is passively placed on the back rank in the beginning. Once it gets to b1, its confinement on the back rank will be over.
- For White, it can be useful to sacrifice the f-pawn in order to extricate his rook from in front of the a-pawn. This needs to be calculated carefully, because Black is also trying to do the same thing: win the f-pawn. In the Fine position, the balance favors Black’s drawing chances, but even the slightest modification to the Fine position can shift it to favor White.
- For Black, getting the king to f5 is key. The threat of … Kg4 virtually forces White to play f3, otherwise White’s intended queenside foray will never even get off the ground.
- Once White has played f3, Black should pressure that pawn and capture it as soon as possible. Even the slightest delay may lose the game.
- For Black, there are two reliable routes to a draw. If White allows … Rxf3, then Black will draw as explained in Fine, by wiping out White’s kingside pawns and sacrificing his rook for White’s a-pawn at the last possible moment. If White plays a6-a7 to prevent … Rxf3, then Black has a thematic draw by moving his king to g7 and putting White’s king in perpetual check.


{ 1 comment… read it below or add one }
A remark:
The position after 6. … f6 7. a7 happened in Unzicker – Lundin, 1954 Olympiad, Amsterdam. 🙂
https://www.chessgames.com/perl/chessgame?gid=1494526