I hope you’re ready for some very, very challenging endgame analysis! Today we’ll have what I think is the most difficult and interesting of my four posts on what I call the “Fine endgame”: rook plus 4 pawns versus rook plus 3 pawns, with the stronger side enjoying an outside passed pawn (usually on the a-file) and with the weaker side enjoying the optimal rook position, behind the a-pawn.
In Part 2 I discussed the position below, which is position 367 in Reuben Fine’s Basic Chess Endings. We saw that it is drawn with best play for both sides, but the issue is considerably more complicated than Fine would have you believe. In brief, the main line goes 1. Kf3 h5 2. h4 Kf6 3. Ke3 and now Black draws with 3. … Kf5! and only with that move. White’s best try is to keep Black’s king out with 4. f3 Ra3+ and then either 5. Kd4 (Fine) or 5. Ke2!? (Fritz 17) lead to a draw but require very precise play.

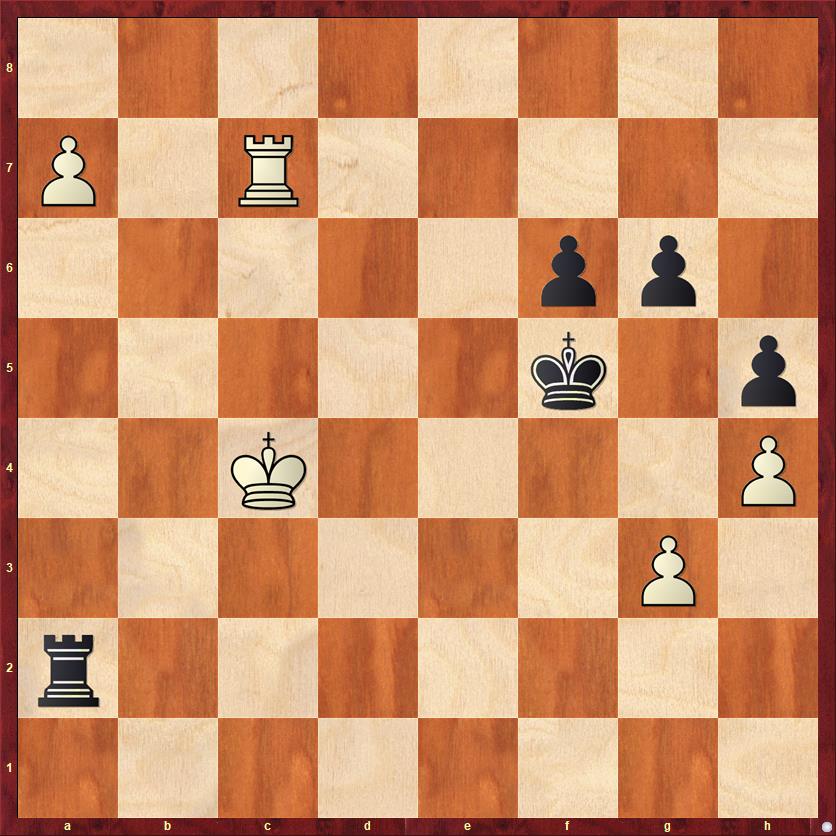
After I saw that the only drawing move for Black is 3. … Kf5! I started wondering, “What if White’s rook were on a7 instead of a8?” Then Black would not be able to play 3. … Kf5 because White would win the f-pawn with check. Is White winning in this position, or does Black have some other way to draw?” When I tried playing the position out against the computer, I found that it was very difficult to draw. In fact, I believe that the modified position, with the rook on a7 on a8, is a win for White! I call this the “Finer position.”
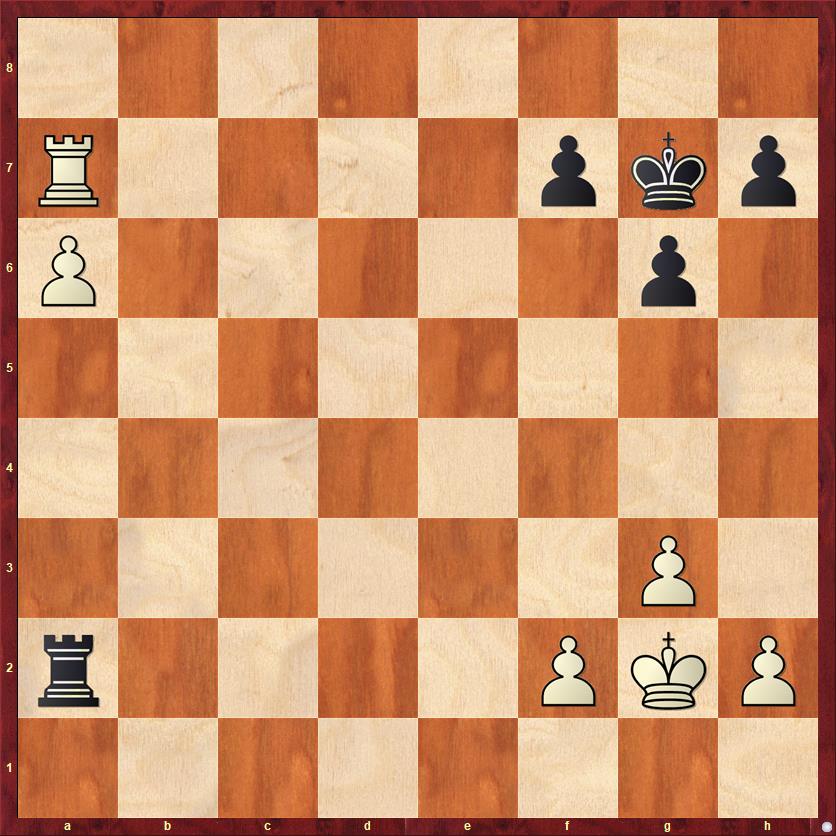
FEN: 8/R4pkp/P5p1/8/8/6P1/r4PKP/8 w – – 0 1
My analysis of this position is very closely connected to a discovery made by the German player J. Steckner in 2003, which I read about on Wikipedia. One of my readers, Gerd Entrup, mentioned this endgame study in a comment to Part 1 of this series. Unfortunately, Steckner’s article appeared in the German chess magazine “Schach,” which I do not have easy access to (and I don’t read German anyway). I believe that the “Finer position” is in some ways more remarkable because it highlights how narrow the margin is between winning and drawing. This study also starts three moves earlier than the Steckner study and builds upon the earlier study. So I have two questions for my readers:
- Is my analysis correct? That is, does White win in the Finer position, with best play for both sides?
- Has anyone — Steckner, or Dvoretsky, or anyone else — pointed out that the Finer position is a win for White?
One final word of warning: like my last post, this post contains tons of computer analysis. One sad result of working on this position with the computer is that I lost any faith in my ability to properly evaluate the position without a computer. Even with the computer there are certain mine fields. For example, as I wrote in Part 2, the endgames with the pawn on a7 and rook on a8 are almost always drawn, but the computer often fails to realize this and gives improper evaluations.
Okay, let’s go! In the Finer position, I’m going to start the same way that Fine does: 1. Kf3 h5 2. h4 Kf6 3. Ke3 … I see no reason to believe that Black’s first two moves can be improved upon, but I’ll leave that as a project for my readers.
Here we have the first major fork in the road for Black. First, Fine’s drawing technique no longer works. That is, if 3. … Kf5? 4. Rxf7+ Kg4 5. Rf6 White is soon going to be three pawns up, with an easy win. So Black needs to find another plan.
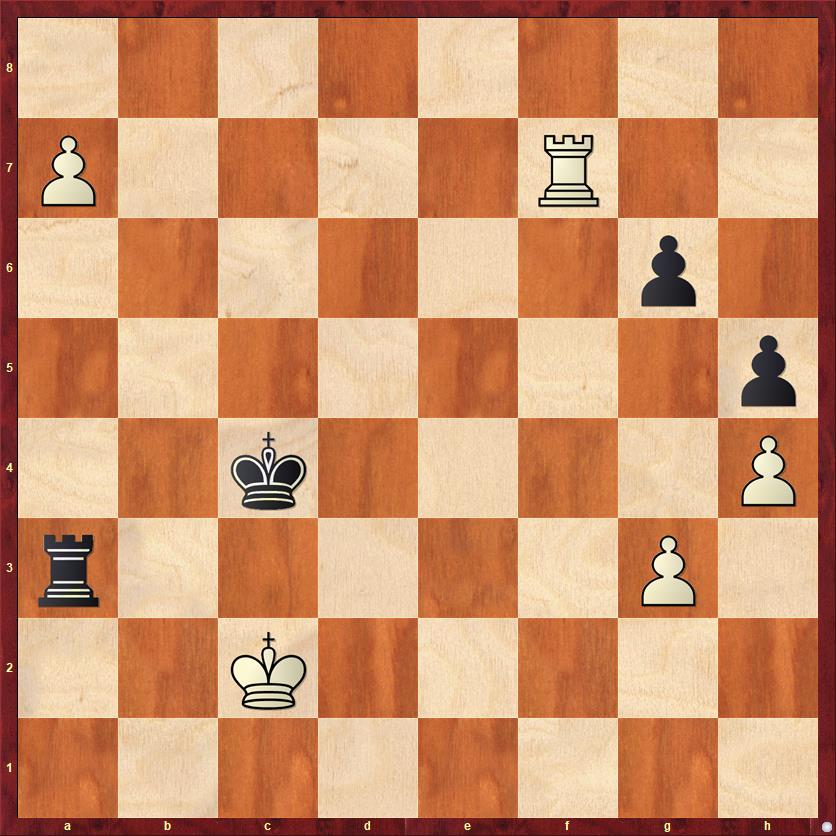
One possibility is 3. … g5!? This move radically changes the pawn structure, and as I said in Part 2, I don’t really trust it. I will not attempt to give a complete analysis (maybe another post?) but here is a sample line with best play for both sides according to Fritz 17: 3. … g5 4. Kd4! (An impressive move, offering a pawn in several different ways in order to activate the king.) 4. … gh 5. gh Ke6 (I’m going with what the computer says is best play here, although I think that most humans would play 5. … Rxf2) 6. Kc5 f6 7. Ra8! (At this point White finally has to deal with the negative consequences of having the rook on a7 instead of a8. If 7. Kb6 Rb2+ White does not have the nice hiding place for his king on a7.) 7. … Kf5 (The race is on.) 8. Kb6 Rb2+ 9. Ka7 Rxf2 10. Rb8 Kg4 11. Rb4+ Kg3 12. Kb6! (One of many places where White has to walk a tightrope. 12. Kb7? Ra2 13. a7 f5 is only a draw. The idea of Kb6 is to try to swing the rook to a5.) `12. … Ra2 13. Rb5 Rxa6+ (Black has to sac his rook before White can play Ra5.) 14. Kxa6 Kxh4 15. Rb7 Kh6 16. Rg7 … (See diagram.)
FEN: 8/6R1/K4p2/7p/8/7k/8/8 b – – 0 16
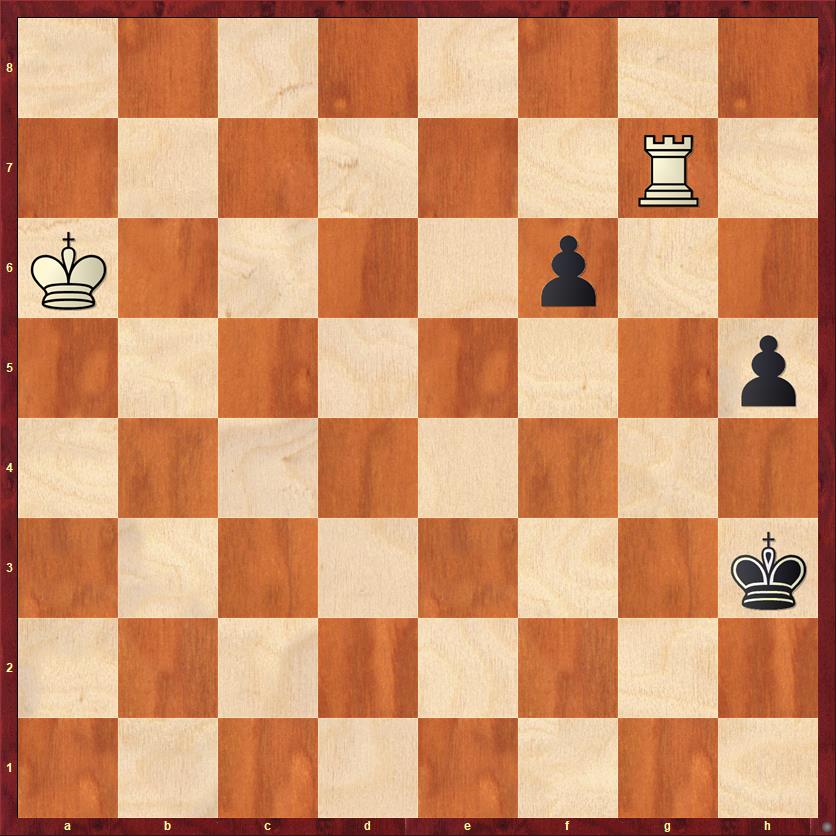
FEN: 8/6R1/K4p2/7p/8/7k/8/8 b – – 0 16
Ironically, the game would be a draw if Black didn’t have the f-pawn! Black would just self-stalemate his king on h1 with the pawn on h2. In the words of Mike Splane, the f-pawn is a “traitor pawn.” But as it is, White wins easily by bringing his king to the kingside. By the way, it would be a different story if White’s king were on a7, outside the square of Black’s f-pawn. That is one reason it was essential for White to force Black to sacrifice his rook on a6, rather than on a7! One of the many extraordinary subtleties in this endgame.
Let us now return to the position after 3. Ke3.
FEN: 8/R4p2/P4kp1/7p/7P/4K1P1/r4P2/8 b – – 0 3
In this position we’ve seen that 3. … Kf5? is bad and 3. … g5?! is dubious. Rook moves are not optimal because White would then get the chance to transfer his king to the queenside without even having to sac the f-pawn. So that leaves two options, 3. … Ke6 or 3. … Ke5. The first option leads to the Steckner position!
(A) 3. … Ke6 4. Kd4! … As usual, this bold pawn sacrifice is the only way for White to play for a win.
4. … Rxf2 Consistent. No other moves need to be considered.
5. Rc7!! … Steckner’s startling discovery, which upends the theory of this endgame. The fact that White moves his rook to the side is not surprising. He should always do this as soon as he gets a chance, in order to make his rook an active piece. But why does the rook go to c7 instead of b7?
FEN: 8/2R2p2/P3k1p1/7p/3K3P/6P1/5r2/8 b – – 0 5
The reason is, as usual, subtle. Basically, White needs to perform a delicate juggling act between two possible winning plans. One plan involves moving the king to b3, playing a check with his rook on the fourth rank, and then moving Ra4. For this plan, it doesn’t matter whether the rook is on the b-file or the c-file. The second plan involves moving the king to b5, playing a check on the fourth rank, and moving Ra4. For this plan, it is essential for White’s rook to be on c7. If it were on b7, then the king at b5 would get in the way of the rook, and Rb4+ would not be possible! White needs to keep both winning plans in play, because his choice of plan depends on what Black does.
Hang on, we’re just getting started!
5. … Ra2 If anybody wants to try to save this position for Black, another desperate option would be 5. … Kd6 6. a7 Kxc7?! 7. a8Q. It’s conceivable to me that Black might be able to reach a fortress position, say with the rook on e6 and the king on g7. We’ll see a couple other places where Black has options to go into a rook-versus-queen endgame. These are very difficult to evaluate, because the computer always evaluates the position at +4 pawns (or more) for White, but the computer has a “blind spot” where fortress positions are concerned. On the other hand, humans have blind spots, too. So I think that all we can say is that the rook-versus-queen endgames offer Black some practical drawing chances.
6. a7 Kf5 Now there would be no point to 6. … Kd6, as after 7. Rxf7 White has a better version of some of the positions we’ll see later.
7. Kc4!! … Only this move wins! As I said before, White is juggling two winning plans, one with Kb5 and one with Kb3, and Kc4 is the only move that makes both continuations possible. Notice that it was essential for White to resist the temptation to take on f7, because after 7. Rxf7+? Kg4 we get the type of drawn position that Fine analyzed in Basic Chess Endings.
Although I have nothing but admiration for Steckner’s ingenious concept, I will just mention that Fritz 17 (or presumably, any modern computer engine) finds the moves 5. Rc7!! and 7. Kc4!! in a second or less. It was only after my computer “discovered” these moves that I started hunting around in Wikipedia to see if this was known, and found out about Steckner’s article. What’s amazing to me is that it was not known before Steckner’s article in 2003. Tradition, and the weight of authorities like Fine, blinded human chess players to the correct plan, and it took the even greater authority of the computer to take the blinders off.
Now there is another fork in the road between two strategies for Black. He can either continue his king invasion with 7. … Kg4, or he can play more slowly with 7. … f6.
(A1) 7. … Kg4 8. Kb3! Ra6 9. Rc4+ Kxg3 10. Ra4 …
White completes his key maneuver. The Wikipedia entry explains it well. “Black is forced to sacrifice his rook for the pawn without White having to move his king all the way to a7. These many extra tempos make the difference between winning and drawing or even losing.”
Actually, even with the “many extra tempos” it’s still unbelievably close.
10. … Rxa7 11. Rxa7 Kxh4

FEN: 8/R4p2/6p1/7p/7k/1K6/8/8 w – – 0 12
Now comes the last twist in this extraordinary endgame.
12. Kc3!! …
Actually, any move of the king to the c-file (c2, c3, or c4) wins. However, 12. Rxf7? only draws! How many of us, facing an armada of three passed pawns against our rook, would have enough courage to not take one of them? But it turns out that the most important thing here is to bring the king to the kingside as quickly as possible. There are too many possible variations for me to go over them all, but here is a sample line that shows you why it is important for White to not take on f7:
12. … Kg3 13. Kd3 h4 14. Ke2 h3 Alternatively, 14. … Kg2 gives White just enough time to play 15. Rxf7 (notice that White has saved this move until he knows he can get away with it) h3 16. Rf2+! (all other moves draw) Kg3 17. Rf6! (all other moves draw) g5 18. Kf1 and White wins.
15. Kf1 h2 Alternatively, 15. … f5 16. Rg7 would lead to the “traitor pawn” endgame we saw above.
16. Ra3+ and White wins. Notice that here White is happy that his rook is still on the a-file (rather than the f-file) and therefore able to give checks from the side.
Wow, what nerves of steel it takes to play this endgame correctly!
Now let’s go back to the position after 7. Kc4!!, because Black had another possibility.
(A2) 7. … f6
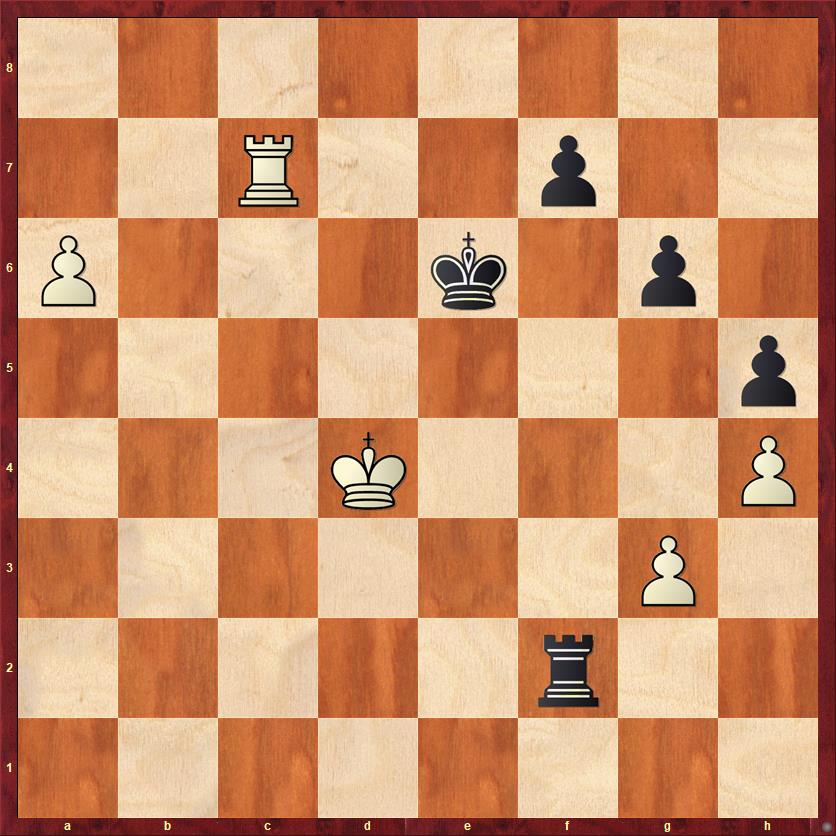
FEN: 8/P1R5/5pp1/5k1p/2K4P/6P1/r7/8 w – – 0 8
Black realizes that 7. … Kg4? only played into White’s hands, so he plays a slower variation designed to liquidate pawns on the kingside. White’s answer is not difficult to find, if you’ve been paying attention so far.
8. Kb5 …
As I said above, here is where the position of the rook on c7 (rather than b7) becomes important. White is poised to answer 8. … Kg4? with 9. Rc4+! followed by Ra4. Instead of getting a rook against three pawns, White gets a queen against three pawns!
8. … Rb2+
Best try, according to the computer. If Black continues his plan with 8. … g5, White plays 9. Rc5+! A cute move! On either 9. … Ke6 or 9. … Kg4, White plays a rook check followed by either Ra4 or Ra6. On 9. … Kg6 White simply plays 10. Kb6. With Black’s king now stuck in a passive position, Black’s kingside pawns cannot accomplish anything.
9. Kc6 Rc2+ 10. Kb7 Rb2+ 11. Kc8 Ra2 12. Rg7! …
One more “only move,” according to the computer. 12. Kb8 is too slow — 12. … Kg4 draws.
12. … g5
Now or never. But Black comes up a tempo too late.
13. Kb8 Kg4 14. a8Q Rxa8 15. Kxa8 Kxg3 16. hg fg 17. Rxg5+ Kh4 18. Rg8 Kh3 19. Kb7 (Can this king really get there in time?) h4 20. Kc6 Kh2 21. Kd5 h3 22. Ke4 Kh1 23. Kf3 h2 24. Ra8 … White releases the stalemate and forces mate next move. Whew!
When I showed the position to two of my friends, Thadeus Frei and Gjon Feinstein, neither one of them was able to find the first key move, 5. Rc7!! However, I give a lot of credit to Gjon because after I showed him this move, he realized that the idea is essentially a “bridge-building” motif as in the Lucena position. I really like this analogy because it places the Steckner endgame into a context of previous endgame knowledge. I especially like variation A2, where we build two bridges at once, or maybe it’s a two-lane bridge, with one lane leading to a4 via c4 and the other lane leading to a6 via c6.
Now let’s go back once again to the position on Black’s third move and consider the final option for Black, which I think is the most pugnacious.
(B) 3. … Ke5!
Black is determined to give no ground, and in particular he tries to prevent White from executing his main plan of Kd4 followed by the king invasion of the queenside, as well as all the sub-plans involving the bridge-building trick. Now we enter virgin territory, unrelated to the Steckner position. But Black’s move does have a cost. When he moves his king to e5 (or any square on that rank) he gives White checking distance behind the king, and that makes it easier for White to activate his rook.
4. Kd3 Rxf7
Black can delay playing this move, but I don’t see any advantage in doing so.
5. Re7+ …
White takes advantage of the extra checking space to free his rook with a tempo.
5. … Kd5
Here is another position where Black’s best practical chance may be to go for a rook-versus-queen ending with 5. … Kd6 6. a7 Kxe7 7. a8Q. I believe that Black could set up a successful fortress if he could get his rook to e6 and his king to g7. Unfortunately, I don’t know if that will ever be possible. White’s back-rank control may prevent it. As for White, I think that g7 is the ultimate perfect destination for his king. If White gets his king to g7 and queen to f8, White wins.
6. a7 Ra2 7. Rxf7 …
Here is the cost of Black’s aggressive king play. The indirect exchange of pawns, with Black winning the f2 pawn while White wins the f7 pawn, favors White. The reason is that a new winning motif has now appeared for White. In many variations, he can give up the a7 pawn for the g6 pawn, and then he will be able to play Rg5+ and collect the h5 pawn as well. Just as in line (A), we will now have a situation where White has two separate winning plans. One involves running the king up the a-and b-files. The other involves giving up the a-pawn, running the king to the kingside, and winning the endgame with R+2P versus R. Black will not be able to stop both of these plans.
7. … Ra3+ 8. Kc2 Kc4
This may be too ambitious, and it’s possible that Black should play more conservatively with 8. … Kc5. But it looks as if he still has problems after 9. Kb2 Ra6 10. Kb3, when 10. … Kb5 11. Rg7 Kc5 or 10. … Ra1 11. Rg7 Kc5 lead to the same critical position (B4) that we’re going to see below. So I’m going to treat 8. … Kc4 as the main line.
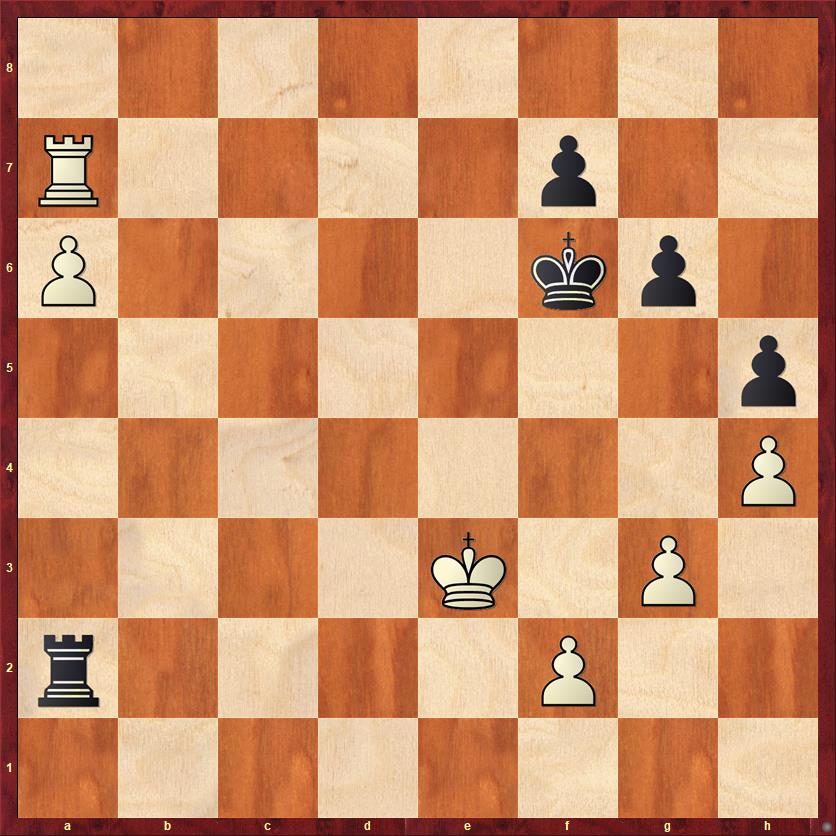
FEN: 8/P4R2/6p1/7p/2k4P/r5P1/2K5/8 w – – 0 9
It looks as if White isn’t making progress at all, as Black’s king and rook frustrate all of his attempts to activate his king. But as often happens in the endgame, the way to make progress is not to commit yourself, but to force your opponent to commit himself.
9. Rc7+! …
This is not particularly hard to find, but it’s subtler than it looks. White’s idea is simply to force Black to choose a plan. Every move has drawbacks. If (B1) 9. … Kb4 or (B2) 9. … Kb5, then the Black king is cut off from the kingside (momentarily), and White can use this time to get a head start in the king race to the kingside with 10. Kd2. If (B3) 9. … Kd4 with the intention of … Ke3, then White can play the double-lane bridge-building idea, with the rook coming to c3 (check) and then either to c4 (check) and a4 or to c2 (check) and a2. Finally, if (B4) 9. … Kd5, the latter played with the intention of 10. … Kd6 followed by 11. … Kc5, then White has enough time to put his rook behind the g-pawn, take on g6, bring his king to e3 (close enough to defend the g-pawn with the king if it is attacked) and then play Rg5+ followed by Rxh5.
Probably the trickiest of these lines is B4, so I’ll just look at that one and leave the others for you to work out.
9. … Kd5 10. Kb2 …
If the Black king goes one way, I go the other.
10. … Ra6 11. Kb3 …
Here 11. Kc3 works too, but White can win even with his king starting on b3.
11. … Kd6 12. Rg7 Kc5
As mentioned earlier, there are several other move sequences that arrive at this position, so it seems like an important one. Black is doing his best to prevent White’s king incursion on both sides of the board. Still, it’s not enough.
13. Kc2! …
The move 13. Rxg6? would be too impatient. According to Fritz, 13. … Rxa7 14. Rg5+ Kd4 15. Rxh5 Rg7 would be a draw. White needs to bring his king closer to the kingside before taking on g6.
13. … Kd5
Nothing else works. If 13. … Ra3 14. Rxg6 wins in the same way as the main line given below. If Black tries to get the jump on White’s king with 13. … Kd4, White doesn’t mind. Then he just switches to his other plan, of going to the queenside and building bridges. Thus, 13. … Kd4 14. Rc7! Ke3 (or 14. … Kd5 15. Kc3 Kd6 16. Rg7 Kc5 17. Rxg6, etc.) 15. Kb3 Kf3 16. Rc3+! Once again we see this beautiful idea of the two-lane bridge. Depending on Black’s move, White will either play Rc4+ followed by Ra4, or Rc2+ followed by Ra2.
14. Kc3 Kc5 15. Rxg6 Rxa7 16. Kd3! …
This is slightly more accurate than 16. Rg5+, although Fritz says that the latter move also wins (with more difficulty). But as we’ve seen before, the principle of this endgame is that it’s more important to gain a tempo with the king than to grab a pawn at the first opportunity.
16. … Kd5 17. Ke3 Ke5 18. Rg5+ …
Now that White’s king is “within reach” of the g-pawn, it’s okay for White to play this check. After 18. … K moves 19. Rxh5 White is winning.
Thanks for your patience in reading all the way through this long post and the long and sometimes confusing analysis! Nevertheless, I hope it will offer a concrete benefit for your ability to play this difficult endgame. As always in rook-and-pawn endgames, we’ve seen some interesting choices of gaining tempi versus gaining material, where the tempi are almost more valuable. We’ve also seen the importance of flexibility: White especially needs to be able to switch from one winning plan to another, based on what Black does. For that reason, I think that the key idea is to understand the winning plans, and not to memorize variations. With that in mind, here are White’s winning plans.
- Steckner’s “bridge-building” plan. Bring the king toward the queenside, giving up the f-pawn. Bring the rook to c7. Continue with king to the b-file (b3 or b5, depending on what Black does) and the “two-lane bridge” maneuver, where the rook either goes to c6, c4, or c2 followed by a6, a4, or a2.
- The old-fashioned plan of moving the king up to b5, extricating the rook from a7, and playing the king to b6 and a7. This plan is too slow to win if Black plays actively with his king, but may still work if Black chooses a different plan (such as pushing his kingside pawns).
- If Black plays actively with the king, then White should be able to capture on f7, creating a position where Black has pawns on g6 and h5 and his king on the fourth rank. This introduces a new winning theme for White: move the rook to g7, give up the a7 pawn in order to capture on g6, play a check on g5 and win the h5-pawn. However, White should not rush to play Rg5+. He should first bring his king to the e-file, so that the g-pawn can be defended by the king after Rxh5.
- Once again, it is important for White to be aware of all three of these winning plans, so that he can shift from one plan to another depending on Black’s moves.


