Yesterday I got together with Gjon Feinstein, Cailen Melville and Thadeus Frei for some skittles chess and analysis. Cailen showed us one of his recent games. As so often happens, we got completely sidetracked by analyzing variations that never happened. It usually begins when Gjon says, “I wonder what happens if…”
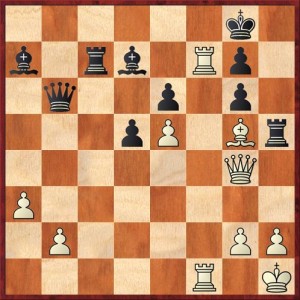
So it happened that he suggested some piece sacrifice for a tremendous attack, and about 15 moves later we got to this amazing position.
The “White to play and win” is completely with hindsight, and with computer analysis. We didn’t find the winning line (there is only one according to the computer) but we did do a pretty good job of analyzing the non-winning lines. The non-winning lines are just as spectacular as the winning one, so you’ll have to be very alert tactically to see which is which.
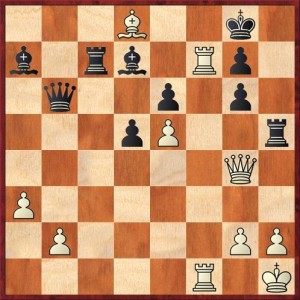
So to all of us, the most obvious move for White was 1. Bd8, which of course threatens to win back the exchange but also has the huge threat of 2. Qxg6, after which it seems Black is beyond hope. But in fact Black has a miracle draw here (and very nearly a win). Can you find it?
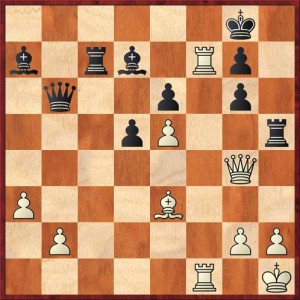
But that’s not all! After we found Black’s killer move, Gjon suggested another very clever idea, 1. Be3? with the idea of speeding up White’s mating attack and not allowing the shot from position 2. But here, too, Black has a draw. Can you find it?
Answers:
Diagram 1. The solution is not for White to try to win back material, but to sacrifice more material! After 1. Rxg7+! Kxg7 2. Qf4 (or 2. Qf3) White’s threats of checking on either f6, f7, or f8 are decisive. I think the prettiest lines is 2. … Rxg5 3. Qf8+ Kh7 4. Rf7 mate, where White wins in spite of being a rook and two pieces behind.
Although we didn’t find this, I’d like to think that it’s just because we gave up too soon.
Diagram 2. The truly magical salvation for Black is 1. … Rf5! The idea is to break the communication between the rooks and to exploit the mating threats on the back rank. If 2. Bxc7? Rxf7!! is the beautiful winning move. I’m happy to say that I found this move, and I said to Gjon, “Go ahead! Take my queen!” Of course 3. Bxb6 Rxf1+ 4. Bg1 Rxg1 would be mate.
So White’s best is to continue with his main plan of 2. Qxg6, threatening mate. But now Black has the truly stunning 2. … Rxf1+ 3. Rxf1 Qf2!! Once again, “Go ahead! Take my queen!” This was so stunning that we thought it was winning for Black. Actually, though, White does have the defense 4. Qb1! (the only move) and after 4. … Qc2 5. Bxc7 Qxc7 6. Qg6 Qc4! White’s best is to accept a draw by repetition after 7. Qf7+.
Diagram 3. Although this line is not quite so lovely, there are still some nice tactics. Black’s best is to take the bishop, 1. … Qxe3, but now after 2. Qxg6 how is Black to keep from getting mated? The answer is a desperado rook sacrifice: 2. … Rxh2+! 3. Kxh2 Qh6+ 4. Qxh6 gh. And now White can get a draw by repetition with his rooks after 5. Rf8+ Kg7 6. R1f7+ Kg6 7. Rf6+ etc. Black does not dare to move forward with his king into a mating net, so he has to acquiesce to a repetition with 7. … Kg7.
There is a real question of whether White can play for a win, and tons of other lines to look at. For instance, we considered 7. Re7 and thought that it was winning for White after 7. … Bc5? 8. Rf6+ (and the computer confirms this). However, 7. … Bc5 is too cooperative. The computer gives 7. … Bd4! as slightly in Black’s favor, for instance 8. Kh3 Bxe5 9. Rg8+ (The immediate 9. Rff7 fails to 9. … Rc1!!) Kf5 10. Rf8+ Ke4 11. Rff7 and White wins a piece, but Black nevertheless gets a winning endgame with 11. … Bxb2 12. Rxd7 Rxd7 13. Rxd7 Bxa3, and the two connected passed pawns should decide.
There are many other tries for White, but the computer says that none of them win.
I love a position like this, where both sides have amazing sacrificial possibilities — queen sacs, rook sacs, pieces sacs. A true tactical orgy!


{ 1 comment… read it below or add one }
Hi Dana,
I notice you haven’t written any new blog entries in awhile. I hope you’re all right.
As you know, I like to sacrifice my opponent’s pieces instead of my own, so I was wondering what defense Black has if White reverses the move order and plays 1. Qf4 first. The threat is 2. Rg7+ Kg7 3. Qf7+ Kh8 4. Bf6 mate.
After 1 … Rg5 2. Rg7+ Kg7 3. Qf8+ Kh7 4. Rf7 mate.
After 1 … Be8 2. Rf8+ Kh7 3. Re8 White has won a piece and is threatening 4. Qf8 and 4. Bd8 and maybe even 4. g4 Rh3 5. Kg2.
After other bishop moves, 1 … Bc8 for example, then 2. g4 Rh3 3 Bd8 seems to win a rook.