One of the questions I get asked fairly often at chess tournaments is: “Have you had any more chances to play that queen sacrifice variation?” In case there’s anyone reading this who doesn’t know the story, see my Chess Life article from March 2007 or my ChessLecture called “Nuke the Sicilian!” or just go to my regular web page. The answer to the question is, unfortunately, no. Out of 9 Sicilians I’ve played in the last two years, one time I played 2. Nf3 instead of 2. f4, opting for mainstream stuff. In the other eight games I played 2. f4, but none of my opponents responded with 2. … d5 (formerly considered the best response for Black).
However, I have gotten e-mails from a couple of other people who have gotten a chance to play the Queen Sac Variation, which (as some people have pointed out) should perhaps be called the Bryntse Gambit, after a Swedish correspondence player who pioneered the idea in the 1960s. Last week I got a great e-mail from Matthew Nicholson, a class-A player and an expert in correspondence chess, who writes:
“When the game started, I knew nothing of your lecture at chesslecture.com. However, immediately after Black gave me the opportunity to play the line, I did some research and found your lecture. I must say it was very interesting and I played the gambit with great zeal. Unfortunately I lost. This game may go down as a ‘refutation’ to the sac. If not, perhaps you have some interesting ideas for this game.”
Thanks, Matthew! I think it is actually very instructive to look at a game where the Queen Sac Variation didn’t work, because it gives us a chance to re-examine the main ideas for White and see what the price is for not paying attention to those ideas. It also gives us a chance to look at a line for Black that I didn’t talk about in my ChessLecture. By the way, let me reassure everybody that this game is not even close to being a “refutation” of the Queen Sac Variation! Matthew actually handled the opening pretty well, if not perfectly, and could have completely equalized.
He didn’t say in the e-mail who his opponent was, so I will use the traditional moniker “NN.” The game started as follows:
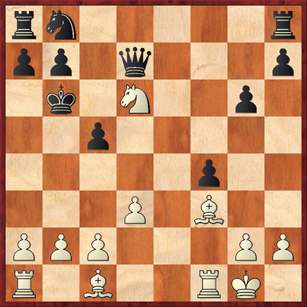
1. e4 c5 2. f4 d5 3. Nf3!? de 4. Ng5 Nf6 5. Bc4 Bg4?! 6. Qxg4 Nxg4 7. Bxf7+ Kd7 8. Be6+ Kc6 9. Bxg4 g6 (diagram)
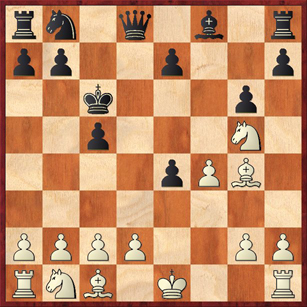
This is a very reasonable development for Black, and the game now diverges from the stem game Mackenzie-Pruess, covered in my ChessLecture. However, in the larger scheme of things the change in no way affects White’s overall strategy. As I explained in my lecture, there are five key points to White’s strategy:
- Aim for active piece play. This is is by far the most important ingredient. With only two pieces for the queen, White needs to get such good coordination between his pieces that the whole is greater than the sum of the parts.
- Restrain Black’s queen. The queen must not be allowed to invade White’s position, and all potential points of entry must be covered.
- Keep files closed. This is the most counterintuitive point; having sacrificed material, White would normally want to open the position. But open files tend to work to the advantage of Black’s rooks and queen, because Black has three “vertical” pieces to White’s two. White is glad, on the other hand, to open up diagonals because he has three diagonal pieces to Black’s two. Eventually White can open up some files, but only when he is sure that he can control them and use them for attack on Black’s king.
- Don’t cash in too early. White should resist the urge to chase an exchange or a pawn, if it will cost him tempi. If White plays correctly, Black will eventually beg him to take an exchange in order to relieve the bind.
- Try to exchange your knight for Black’s bishop. This will leave White’s two bishops completely unopposed. The two bishops with no Black bishop to oppose them (or in some positions, no Black minor pieces of any kind) are sometimes as strong as Black’s two rooks.
If you apply these principles, you can see immediately, without calculating any variations, what White’s best move is here. First, it is clear that White should not be suckered into 10. Nf7?, which violates the rule “Don’t cash in too early.” The choice between 10. Nc3, a good developing move, and 10. Ne6 is less clear, but on balance 10. Ne6! seems just slightly more accurate. This move should be high on White’s agenda for several reasons. Number one is keeping the position closed. White does not want to allow … e5, which frees Black’s game to a considerable extent. Number two is that this move restrains Black’s queen a little bit more effectively. As we’ll see, it forces the queen to decide on a square before it’s quite ready. Number three, it prevents Black from even getting his bishop to g7. Thus it keeps Black’s army divided into two camps that cannot communicate with each other.
Another e-mail correspondent, Richard Sivertsen, sent me a game over a year ago that he won against a Fritz-based chessbot online. The game continued
10. Ne6! Qa5 (Fritz likes active play, but does the queen belong here?) 11. b4! (A sensational find.) cb (If 11. … Qxb4 White can either play for an immediate draw with 12. Nd8+ Kc7 13. Ne6+ Kc6, or he can play for a win with 12. Ba3 Qa5 13. Bb2. The point of White’s sacrifice was to enable his bishop to deploy rapidly to b2, keeping Black in a bind.) 12. Bb2 h5 13. Bh3 (Notice that White does not race to win the exchange, following the principle “Don’t cash in too early.”)Â Rg8 14. a3 e3 15. ab Qxb4 (diagram)
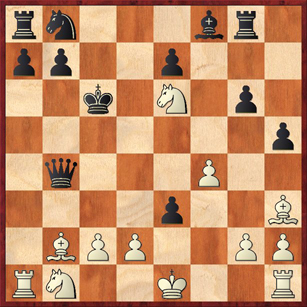
White got a clear advantage after 15. Bc3. This is exactly the kind of position White is hoping for. His pieces are working together, Black’s king is exposed, Black’s queen is his only developed piece, and even though the queen seems to have a lot of activity, it still can’t really create any serious threats.
So I slightly prefer 10. Ne6, but the move Matthew played was 10. Nc3, which cannot be a mistake. NN continued 10. … Bb7, of course, and now Matthew played a move I disagree with a little more strongly.
11. Ncxe4?! In my opinion, it is definitely time for White to clamp down with 11. Ne6. However, I can’t find an advantage for White after 11. … Qg8 12. Nxe4 Nd7 (with the idea of … Nf6, which exchanges some pieces and helps relieve Black’s misery) 13. O-O and now Black can play either 13. … Bd4+ (Fritz’s recommendation, which it claims is =/+ or about a half-pawn advantage for Black) or 13. … Nf6. Comparing this line with the 10. Ne6 lines, we see that Black has been able to develop his KB, he has better communication between the two sides of the board, and his queen is actually not that badly placed on the funny square g8. It puts pressure on e6 from there, which is very important.
Now Black played 11. … e5!, a very thematic move. As a general rule, this break must help Black, because it opens lines for the rooks and the queen. White has missed his chance to Keep Files Closed (the third part of the strategy).
Why this emphasis on keeping lines closed? Think of it by analogy with baseball. White’s pieces are smaller than Black’s, so if he is going to win, it will be by playing “small ball.” His pieces work best by endlessly harrassing Black with threats. By contrast, Black has a lineup full of home-run hitters, the queen and the rooks. It will be harder for White to keep up with them in an open position.
Still, let me reiterate that White is not busted yet after 11. … e5. It just means that White has to be more careful, and his goal of Restraint (part two of the strategy) is more difficult to achieve. But the news is not all bad for White; the opening of the position will make Black’s king on c6 more vulnerable (for example, to a White rook coming to f6 or f7).
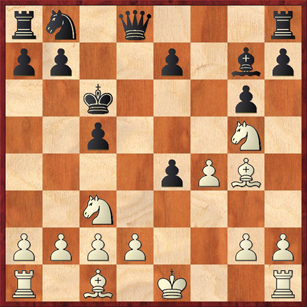
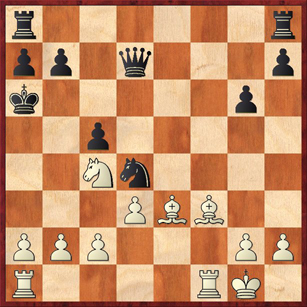
The game continued 12. d3 ef (I’m not so sure about this move; 12. … h6 might be better) 13. O-O Be5 14. Nf7 Qe8, reaching this position:
Now White definitely makes a mistake: 15. Bf3? Remember part five of White’s strategy: exchange a knight for a bishop if possible! White should be eager to play 15. Nxe5! here. After 15. … Qxe5 16. Rxf4 (this is a bit of a computer move; also very playable is 16. Bxf4) Nd7 17. Nc3 Rhf8 18. Bf3+ Kc7 19. Re4 Fritz calls it equal, which means that the practical chances must favor White. White has the two bishops, they have good diagonals, and he has so far succeeded very nicely at keeping the position closed and restraining Black’s queen and rooks.
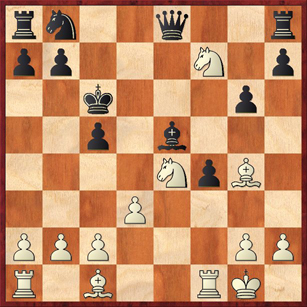
After 15. Bf3, NNÂ stepped aside with his king, 15. … Kb6. I thought when I went over this game without a computer that 15. … Kc7 looked a bit better. White’s 15. Bf3 is looking especially foolish now because White does not have any tricks with Nxe5 followed by Bxf4. However, Fritz comes up with an amazing idea that at least equalizes for White: 15. … Kc7 16. Ned6!! Bxd6 17. Nxd6 Kxd6 18. Bxf4+ Kd7 19. Rae1 (diagram)

Position after 19. Rae1 (analysis)
Even though White now has only one piece for a queen, it seems scarcely likely that Black can survive without giving the queen back. After 19. … Nc6 20. Rxe8 Raxe8 White clearly has compensation for the exchange.
Wow! Only in my wildest dreams would I ever find a move like 16. Ned6!
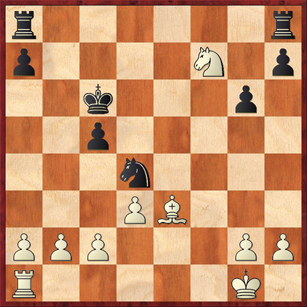
Now, back to the game. After 15. … Kb6, White played 16. Ned6 (still thematic, and now it doesn’t involve a piece sacrifice) Bxd6 17. Nxd6 (more progress; now White has achieved his desired N-for-B trade) Qd7, reaching the following position.
In spite of the fact that White has played several moves that I considered less than optimal, he still has a perfectly playable position! White should continue 18. Bxf4. Because of the pressure on b7, Black will probably reply 18. … Nc6 and I would play 19. c3. Black’s king is still out in the open, White has his two beautiful bishops, and White has ideas like Rd1 and d4, or Be3 and Ne4, that will keep Black busy. Fritz calls the position equal.
Instead Matthew makes his final mistake, 18. Nc4+?, and after this his position goes downhill. Why is 18. Nc4+ worse than 18. Bxf4? The reason is that 18. Bxf4 is more flexible. The knight reserves the options of going to either c4 or e4, or even staying right where it is on d6. On d6 it does a terrific job of restraining Black’s pieces, and in fact I think there is a pretty good chance that a practically-minded player of the Black pieces would play … Re8 at some point. As I said earlier, in this variation your opponent will often beg you to take the exchange.
After 18. Nc4+ the game continued 18. … Ka6 19. Bxf4 Nc6 20. Be3. Matthew may have thought that this prevented 20. … Nd4, but Black played 20. … Nd4! anyway. Now Matthew plays a clever trick that, unfortunately, comes up just short.
White to play and lose in entertaining fashion.
21. Bxb7+ (not a mistake, but it just doesn’t work) Kxb7! (If 21. …. Qxb7? 22. Bxd4 cd?? 23. Rf6+ and wins) 22. Rf7 Qxf7 23. Nd6+ Kc6 24. Nxf7 …
Finally, for just an instant, White has gotten back to material equality, but unfortunately Black has a move that ruins everything …
24. … Nxc2 25. Nxh8 Nxa1 26. Nf7 Nc2 27. Bd2 Nb4 28. White resigns
White could have played on a little bit longer, but obviously the writing is on the wall.
A great game! Matthew’s opponent played very well. Still, as I said earlier, I don’t see this line as being in any way a serious threat to the Bryntse Gambit/Queen Sac Variation. What do you all think?


{ 4 trackbacks }