Note: In the first draft of this post I got an important name wrong, and I have corrected it throughout. My apologies. — DM
I’m back home from my second trip to Oslo. In my last entry, IÂ promised some analysis of Roar Elseth Nikolas Mellem’s upset victory over grandmaster Leif Johannessen. It took me a little longer than expected, because I found this in some ways a very confusing game. But first, just for fun, here are some more pictures from the chess club.
First, here is Johannessen before the game. In this picture he seems rather serious, but in person he was friendly and easy to talk to.

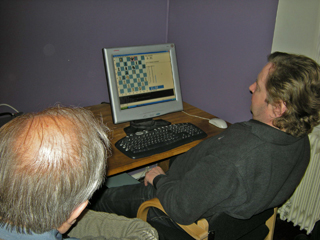
As I mentioned in my last entry, for those who weren’t playing in the club championship, one of the most interesting things was the chance to watch Magnus Carlsen playing in the Amber tournament in France against Aronian:
Want a closer look? Here is the position on the screen. Kind of fuzzy, but I think you can probably make it out. This was an amazing battle. The position shown is after move 38 of what turned out to be a 98-move game.
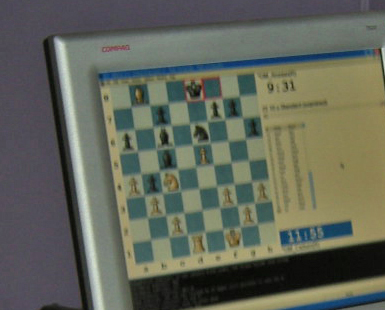
Looking at the position, you can see that Carlsen has won the exchange for a pawn, but the bishop on b8 is in trouble. Aronian eventually won it, but not before giving Carlsen a couple pawns, and in fact at one point Carlsen had a rook and four pawns (!) against Aronian’s two bishops. Nevertheless, Aronian won it somehow.
By the way, the Amber tournament is still going on, and Aronian and Carlsen are tied for first. It will be interesting if this game turns out to be the decisive one for the tournament!
Meanwhile, the most interesting game going on in Oslo was Mellem-Johannessen. There was some very interesting stuff that went on earlier in the game, but I’m going to start with the position on White’s 33rd move:

White to play and win? Draw? Or just put up a good fight?
In this position it looks as if White might be in trouble: he has lost a pawn and the d3 pawn is on life support. However, White has a shot that turns the game around in a hurry. Do you see it?
The funny thing about this move is that during the game I thought that White was only trying to salvage a draw. But when I analyzed the position later, I became more and more convinced that White is in fact winning!
The answer is, as you have probably guessed, 33. Rxe6! That brings up the following position:

Can Black save the game? If so, how?
Okay, first let’s look at what happens if Black accepts the sacrifice: 33. … fe 34. Qxg6+ Kf8 35. Qf6+ Kg8. Here’s when we see for the first time that Black is in more trouble than we thought. The king cannot escape to the queenside with 35. … Ke8 because White mates in two with 36. Rxe6+. This is an ongoing theme in the position: If White can activate his rook, he wins, even though he’s a rook down. Black’s pieces on the queenside are too far away to help him defend. 36. Qxe6+ Kg7 37. Qe7+ Kg8 38. Qg5+ Kf8 39. Re7 and wins.
So the rook is taboo. Does Black have a good way of declining the sacrifice? At first the move 33. … Qd4 presents itself. The queen is well centralized, and prepared to come to the king’s defense. Nevertheless, White is able to insinuate his way into Black’s position after 34. Re8+ Rxe8 35. Rxe8+ Kh7 (35. … Kg7 also fails to 36. Qe7!) 36. Qe7! Qg7 37. Qh4+! Qh6 38. Rh8+ and wins. It’s pretty amazing that Black’s queen and rook are unable to create meaningful threats against White’s king, while White’s queen and rook seem to be in just the right places to leave Black defenseless.
Another crazy idea I thought of was 33. … Rc1, trying to paralyze the e1 rook and lure White’s queen away from the kingside. The trouble is that White can snatch a couple of pawns first: 34. Rg6+ fg 35. Qxg6+ Kf8 36. Qf6+ Kg8 37. Qg5+ followed by winning the rook on c1. The ensuing queen endgame is not trivial, but White should win.
So I wasn’t able to find a way for Black to save himself, in over a half hour of analysis. Johannessen, with only one minute, wasn’t able to do it either. He played 33. … Qd7? 34. Re7 Qc6, reaching the position shown below.

White to play and win (definitely this time).
This one shouldn’t be too hard: after all, White has already played the key move once already! The answer is 35. R1e6! and now Black has to give up the queen, because otherwise Rxg6+ will be the end. The players blitzed out the following nine moves until both flags were down:
35. … Rc1+ 36. Kg2 Qxe6 37. Rxe6 fe 38. Qxg6+ (all of Black’s pawns will now fall) Kh8 39. Qh6+ Kg8 40. Qxe6+ Kh7 41. Qf5+ Kg7 42. Qxd5 R1c2 43. Qg5 Kh7 44. Qf5+ Kg7. With both flags down, the players went to another board to reconstruct their scoresheets. By the way, I have seen this sort of thing before — both players blitzing out their moves well past move 40 — but I am convinced that it is a mistake. You will lose more games than you will win this way. In my opinion, in a time scramble you should keep track of what move you are on (using check marks), and you should have absolute faith that when your scoresheet says you are on move 41, you really are. I have played too many games where I played the 41st move quickly, just to “make sure” I was really past the time control, and it turned out to be the losing blunder. So I have sworn never again to do that.
Anyway, after they finished catching up their scoresheets, the players returned to the board, and Mellem played 45. d4.

At this point I left because I was virtually certain that White was going to win. Neither of Black’s rooks can leave the c-file, and I don’t think they will be able to rearrange themselves in time to stop White’s d-pawn (let alone the other two pawns).
So where, then, did Johannessen go wrong?
As it turns out, there WAS a way Black could save the game in the second diagram. And I almost found it, but I didn’t analyze carefully enough. I only found it with Fritz. The saving idea is 33. … Qd4! (a variation we looked at before) 34. Re8+ Kg7! Remember, in my analysis above I only looked at 34. … Rxe8. This seemed sensible to me — if Black is trying to draw, you would think he would want to trade rooks. But computers are good at finding the unintuitive move. The point is that now if White plays his key move 35. Qe7, which worked so well in the other line, Black can defuse the attack with 35. … Rxe8! It’s a very tricky interference idea: Black sees that Qe7 is White’s main threat, but it interferes with the protection of the e8 rook by the e1 rook. And therefore by delaying the rook trade, he makes it impossible for White to play the followup move that he wanted to. The computer confirms that nothing else works any better for White either; for example, 35. Rxc8 Rxc8 just leads to sterile equality.
In some ways I find this position to be a little bit depressing. How can a human ever find an idea like this, which seems so counter-intuitive? It almost seems as if you have to play like the computer — you have to analyze all the counter-intuitive moves as well as the intuitive ones. And that means you are left with analyzing everything, which is beyond human abilities!
I guess that’s what makes chess so hard. And perhaps the answer is to look at counter-intuitive moves selectively. In most positions you can get away with playing by intuition, but in such a sharp position, with the game in the balance and where the smallest subtleties can change the outcome one way or another, you really have to be on the lookout for false assumptions (both by you and your opponent). My false assumption was that Black is fighting for a draw, so he of course wants to trade rooks. And that’s true, he does — but not necessarily at the first opportunity!
But how can you find this kind of defense with just one minute left on your clock? You can’t. And that is probably the real reason that Johannessen lost this game.


{ 1 trackback }