Ordinarily we think of the endgame as a time when our kings are safe from checkmate, and they can roam with impunity around the board. But in complex endgames (where each side has two or more pieces, or a queen) it isn’t necessarily so. There are three ways in which mate can come into the picture:
- Checkmate as the endpoint of a combination or attack, just as in the middlegame. The attack may have started in the middlegame and just kept going, albeit with reduced material, into the endgame. However, this is fairly uncommon. Usually you can’t win an endgame with a mating attack; instead the endpoint is queening a pawn, winning decisive material, or trading down to a known “book” win. What happens much more often is…
- Checkmate as the endpoint of a trap or a blunder. This happens over and over again in real games. It would be hard to write a book about it, because in retrospect the mistakes are always obvious. But maybe we need a book of cautionary tales, like children’s stories: “Watch out, this might happen to you.”
- Checkmate as a strategic device. This is the most interesting way in which checkmate affects endgames, and one that typically only appears in games by very strong players – and it only appears in the footnotes, not over the board. I first noticed this when I read Daniel Naroditsky’s book, Mastering Complex Endgames, and was amazed by how often checkmates came up in the side variations. Typically there will be a threat that can’t be defended in a “normal” way because the defender would get checkmated. So instead, he is forced to waste a tempo, or compromise the position of one of his pieces, and that in turn leads to a decisive strategic advantage for the first player. Often it’s the unexpectedness of the mate threat that makes it so powerful.
The third type of example is the most substantive and interesting one, and I really wished that Daniel had collected them into a chapter instead of having them scattered randomly through the book. But this blog post is about type two: the cautionary tale. Don’t let this happen to you!
Amazingly, in the PRO Chess League, Andrew Hong (a 2300 player) had three games in two weeks that ended in checkmates of this type. Two were in games he lost, and one was in a game that he won. This should show you that even top-level players overlook this sort of tactic.
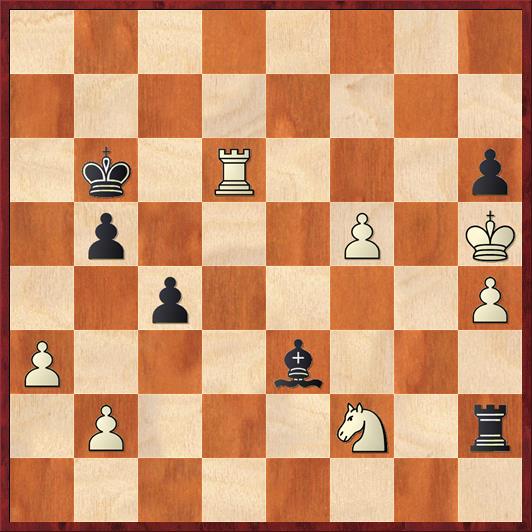
FEN: 8/8/1k1R3p/1p3P1K/2p4P/P3b3/1P3N1r/8 b – – 0 1
In our first example, Andrew is playing Black against Cameron Wheeler. Earlier in the endgame he had really good winning chances, but went astray somewhere. However, he should at least be able to draw with 1. … Kc7. This forces White to defend the rook with 2. Ne4. (If 2. Ng4? Black wins with 2. … Kxd6 3. Nxh2 Bc8.) Then 2. … Bg5 is a super solid way of forcing a draw. (Unless White blunders with 3. Rg6?? Rxh4 mate! Welcome to today’s theme!)
Instead, Andrew carelessly advanced his king with 1. … Kc5?? And the game ended on the spot with the shocking 2. Ne4 mate!
I think that the universal reaction to such a checkmate is shock. How can a king get mated in the middle of the board, with so few pieces around? That’s why these checkmates are soooo sneaky. You’ve got to be aware that the possibility exists. Especially in speed chess or time scramble situations!
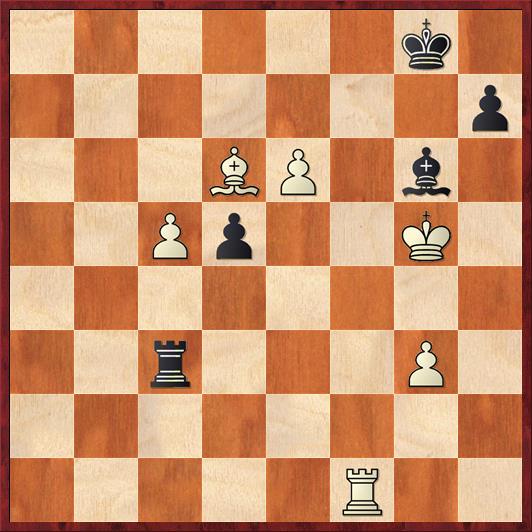
FEN: 6k1/7p/3BP1b1/2Pp2K1/8/2r3P1/8/5R2 w – – 0 1
Our second example came a week later, and in this game our hero is playing White against Grandmaster Nikola Mitkov. I wish I had copied down the position a move or two earlier, so we could see what Mitkov’s mistake was.
Clearly Black is in a difficult position because of White’s far-advanced passed pawns. It’s possible that Mitkov was focused too much on them and forgot about his king. But Andrew noticed that Black’s pieces are all in uniquely bad places. The black rook on c3 is hemmed in by two white pawns, both defended by White’s bishop. The black king is trapped in the corner. This combination of circumstances gives White the chance to close the mating net with 1. Kh6!, and suddenly a difficult endgame becomes very easy. Black resigned.
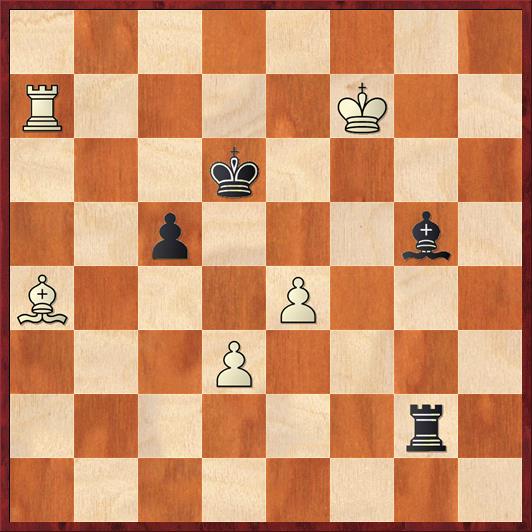
FEN: 8/R4K2/3k4/2p3b1/B3P3/3P4/6r1/8 b – – 0 1
In his very next game, Andrew had the most tragic finish of all. He was Black against Brandon Jacobson, and once again got to the infamous endgame of R+B versus R+B with opposite colored bishops. Earlier in the endgame he had a slight (though not winning) advantage. However, his position has gone south and he now has to be a little bit careful. For example, 1. … Bh6 would lose the bishop to 2. Ra6+, or 1. … Be8 would lose to 2. Rd7+. But who would ever think that Black needs to worry about being checkmated? Andrew certainly didn’t think so, and he played 1. … Bf4??
A uniquely horrible move that takes away a critical flight square from Black’s king. Jacobson played 2. Rd7+ and Black resigned, in view of 2. … Ke5 3. Rd5 mate.
In the original position, I think that Black’s best move was to play 1. … Rf2+. This does a number of useful things. It forces White’s king to choose between 2. Ke8 and 2. Kg6. Either way, Black is going to play 2. … Be3 next, but Black’s king has gained a little bit more breathing room and (as we now know) that is extremely important. Also, it’s just good in principle when you’re defending an opposite-color bishop endgame to put your pieces and pawns on the color of your bishop. With the bishop on e3 protecting both the rook and the pawn, it reduces the chances of unfortunate accidents to near zero. Finally, the bishop is planning to come to d4, and Black is hoping to establish a blockade of White’s pawns.
So the lesson for today is simple: DON’T GET MATED! It’s simple, but it constantly needs to be reinforced by doing puzzles (even not very puzzling ones like these).


