I wrote in yesterday’s post that Fabiano Caruana should be very pleased with the results of round one of the FIDE Candidates Tournament, which will determine who will challenge Magnus Carlsen for the world chess championship later this year. If so, he should be even happier today. Caruana scored his first win in convincing fashion over Kirill Alekseenko, while Ding Liren (seen before the tournament as Caruana’s most likely rival) lost his second game in a row, this time against Maxime Vachier-Lagrave.
The day’s other two games were drawn. Wang Hao very nearly made it a 2-0 start, as for a long time he seemed to have a winning endgame against Anish Giri. (GM Daniel Naroditsky, commenting on chess.com, said that he estimated that Hao had an 80% probability of winning.) However, Giri hung in there and managed to save a draw. In the other game, Alexander Grischuk played his second consecutive draw against a fellow Russian, this time Ian Nepomniachtchi. The standings are:
1-4. Wang Hao, Fabiano Caruana, Maxime Vachier-Lagrave, Ian Nepomniachtchi, 1.5-0.5.
5. Alexander Grischuk, 1-1.
6-7. Anish Giri, Kirill Alekseenko, 0.5-1.5.
8. Ding Liren, 0-2.
Here’s a look at a couple key moments in the Caruana-Alekseenko game.

FEN: 2rq1bk1/1pNn1ppp/p2P1n2/2p4b/2P1r1P1/P4N1P/1P2B2B/R2Q1RK1 b – – 0 19
Caruana, as White, played very aggressively with 4. f3 in the Nimzo-Indian, and followed up with a pawn push to d6 that was equal parts aggressive and risky. I think, frankly, that Caruana looked at the rating difference (he is rated 2842, the highest in the tournament; Alekseenko is rated 2698, the lowest) and felt that he could get away with not-completely-clear moves because Alekseenko would eventually go wrong.
In this position Alekseenko faces a major decision. At first it seems as if 19. … Bg6 is the obvious answer, but then after 19. … Bd3 the rook on e4 has a good chance of being trapped in the middle of the board. Then Alekseenko would face a second choice: should he try to save the rook with 20. … Re3, or sacrifice the exchange in order to disentangle his pieces with a move like 20. … Nb6?
But looking deeper into the position, Alekseenko saw the possibility of sacrificing a piece in order to wipe out all of White’s kingside pawns and also win the pawn on d6. So he played 19. … Bxg4 20. hg Nxg4 21. Bf3 Nxh2 (the point), 22. Bxe4 Nxf1 23. Qxf1 Bxd6 24. Nd5.
With hindsight, it’s easy to criticize Alekseenko’s decision, but in fact it’s very hard to say which of the three forks in the road was best. The computer doesn’t help; it evaluates all three of them as roughly a 0.8-pawn advantage for White. But they are very different options, so it really boils down to your taste as a chess player.
After 24. … g6 (trying to reduce the pressure of White’s bishop on h7) 25. Qh3, here is the position.
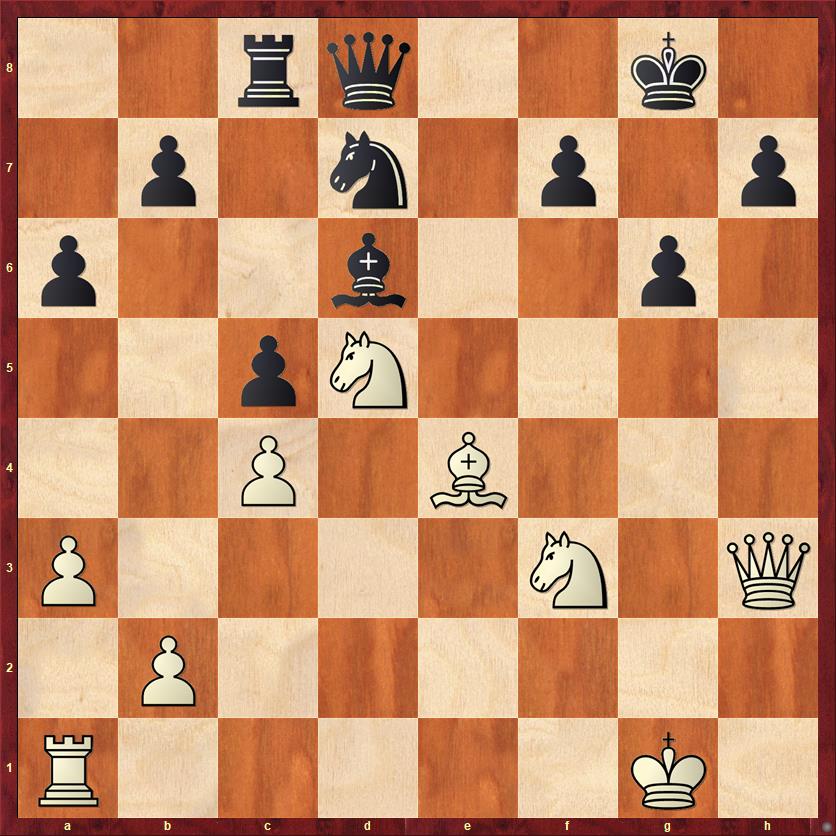
If you showed this position to a beginner, or even a mid-level amateur, they might think that Black is perfectly fine. Material is “even,” three pawns for a piece, and the three pawns are as healthy as they could possibly be, three connected passed pawns. If Black could magically trade all the pieces so that we had an endgame with those three pawns against a bishop or knight, he would be in no danger and might even be able to win.
So why does White have a significant advantage here? It’s partly because he has an extra piece, of course, and an extra piece always means you have more firepower for an attack. But more importantly, Black’s pieces are extremely ineffective. They are all huddled in a lump on the queenside, and to make things worse, both the knight and rook are targets of White’s queen. In fact, White has an immediate threat to win a piece with 26. Qxd7! Qxd7 Nf6+, a pretty standard trap.
What makes it tricky, though, is that White has no way to improve his position with pawn moves. Usually, when you’re attacking on the kingside, you would like to have some pawn levers to loosen up your opponent’s pawn structure. White obviously has no levers here. So in order to win this position, he will have to find a good piece sacrifice. And he has a limited amount of time to work with. If Black were allowed to transfer all his pieces over to the kingside, White’s advantage would melt away.
If I were Black, the move I would want to play is 25. … f5, trying to push the bishop back to a less dangerous diagonal and open the seventh rank up to defend with … Rc7. This kind of horizontal defense is often a key way to solidify a shaky kingside. In fact, after 25. … f5 26. Bc2, I think that Black would have a playable game.
But in the real world, if your opponent is Fabiano Caruana, he’s not going to meekly retreat with 26. Bc2. He’s going to sacrifice the bishop: 26. Bxf5! gf 27. Qxf5. Black’s king is caught in a merciless crossfire of four White pieces. There is no way that Black can survive an attack with four pieces against a naked king.
So that’s the problem, in a nutshell, for Black. He wants to advance his pawns, to make them more dangerous and to take space away from White’s army — but the moment he moves the pawns, they become more vulnerable to piece sacrifices. We’ll see that play out in a more subtle way in the game.
In the above position, Alekseenko played the sensible 25. … Kg7, and Caruana continued to bring his pieces into the attack (“invite everyone to the party”) with 26. Kh1 Ne5 27. Nh4! (of course it’s very important not to allow trades). Now Alekseenko played the fatal mistake, 27. … h5?
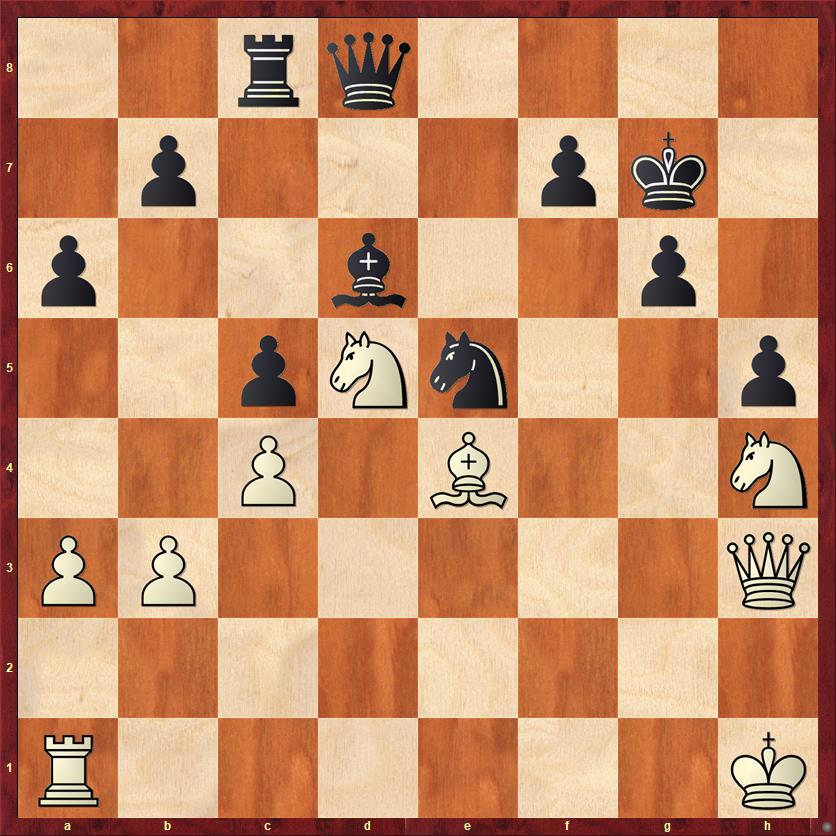
FEN: 2rq4/1p3pk1/p2b2p1/2pNn2p/2P1B2N/PP5Q/8/R6K b – – 0 28
I can see why Black wanted to play this move. Black has a plan, and as I wrote a few days ago, “without a plan you are lost.” Black would like to play … Ng4 and maybe eventually … f5, trying to create a granite wall that White will not be able to break down.
But the reality is that any weakening of the pawn formation makes it that much easier for White to sacrifice a piece. The computer thinks Black has to make a stand to defend the g6 pawn with 27. … Rc6 28. Rg1 Bf8. The question is: How does White break through? Where can he sacrifice a piece? The square g6 seems too well defended, so the breakthrough will probably have to happen on f7 or h7. Meanwhile, Black will probably try to redeploy with … Kg8 and … Bg7. Maybe, far in the future, he can dream of playing … f5. The one thing that Black can feel good about is that the clock is ticking against White. Black can improve his position, but White has limited possibilities for improving his.
After 27. … h5, I think that Black’s position cannot be saved.
28. Rg1 Bf8 29. Nf4! …
Attacking so many sensitive points at once: e6, g6, h5, f5. There’s no way for Black to cover them all. Alekseenko continues with his plan but it doesn’t work.
29. … Ng4 30. Nxh5+! …
It was inevitable.
30. … gh 31. Bf5 Be7 32. Bxg4 hg 33. Qxg4+ Bg5 34. Qh5 Black resigns
The only reasonable attempt for Black is 34. … f6, but then 35. Nf5+ Kf8 36. Qh8+ Kf7 37. Qh7+ Kf8 38. Qg7+ Ke8 39. Re1+ is the end.