I’m glad that I got a couple of comments on my last post, “What’s the Best Move?”, saying that my readers found the positions just as hard as I did. It makes me feel better, because most of them were positions where I was playing against the computer and messed up. So now I feel as if I have company — a lot of my readers would have messed up, too!
Here’s a position that takes this theme to an absolutely berserk extreme. I’m White, and the computer has just played 42. … Bc5. What would you play here if you had White? By the way, the time control has passed (at move 40), so I have lots of time to decide.
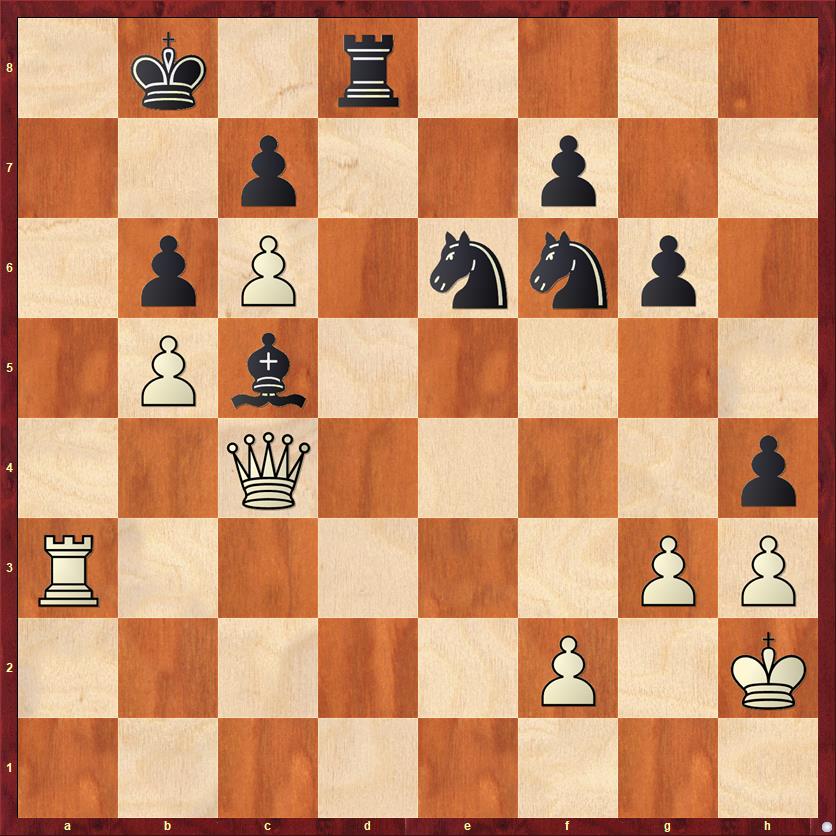
FEN: 1k1r4/2p2p2/1pP1nnp1/1Pb5/2Q4p/R5PP/5P1K/8 w – – 0 43
Okay, I’ll bet you noticed the same thing I did. Actually for the past several moves I’ve been trying to double on the a-file so that I can checkmate Black, and the computer has managed to prevent me from doing so. But with its last move, it seems to have walked into one of the oldest mate patterns in the book.
I looked and looked. Why can’t I just sacrifice on a8, bring my queen to the a-file and checkmate on b7? Would the computer really just walk into this combination? Its last move was really fishy, because Black moved his bishop right to the square that his knight needs (c5) to defend the mate on b7.
This last point raises a bit of an alarm. After 43. Ra8+ Kxa8 44. Qa4+ Kb8 45. Qa6 hg+, I have to avoid moving my king to a dark square, because that would allow the bishop to move away from c5 with a tempo. So 46. Kxg3? Bd6+ is off the table. Likewise, 46. fg? Rd2+ is off the table, because the rook move vacates d8 for the knight. However, after 46. Kg2! neither the rook nor the bishop can play a check, so I thought I was just winning. So that’s what I played.
Do you see what I missed?
First, Fritz played 46. … Nf4+! I mean, in one sense it’s obvious that it would play this move, because it’s the only way to delay the checkmate. I really thought this knight move was just a spite check. The thing is that Fritz can no longer move its knight to c5 or d8 to defend checkmate, and this means that I no longer have to worry about allowing bishop or rook checks. I can now move my king wherever I want, including taking the pawn on g3. Which is what I did: 47. Kxg3. (If you’re curious about the alternatives, after 47. Kf3 Black wins with 47. … Rd3+ 48. Kxf4 Bd6+ 49. Kg5 Ne4+ and the other knight comes to c5. And moving back to the first rank is not an option because 47. … Rd1 is checkmate.)
Of course Fritz played 47. … Rd3+, because again, what else is it going to do? I was still under the impression that it was simply playing spite checks. However, as I tried to figure out how I was going to escape the checks, I started to become a little bit worried. On the obvious move, 48. Kxf4, Black is able to defend in the same way as the parenthetical note above. Except it’s even worse this time, because I get checkmated! Here’s how: 48. Kxf4? Bd6+ 49. Kg5 Ne4+ 50. Kh6 (the other two possibilities also walk into mating nets) Bf8+ 51. Kh7 Nf6+ 52. Kh8 Rxh3 mate. Truly a picturesque finish! I like it so much that I’ll show the diagram here.
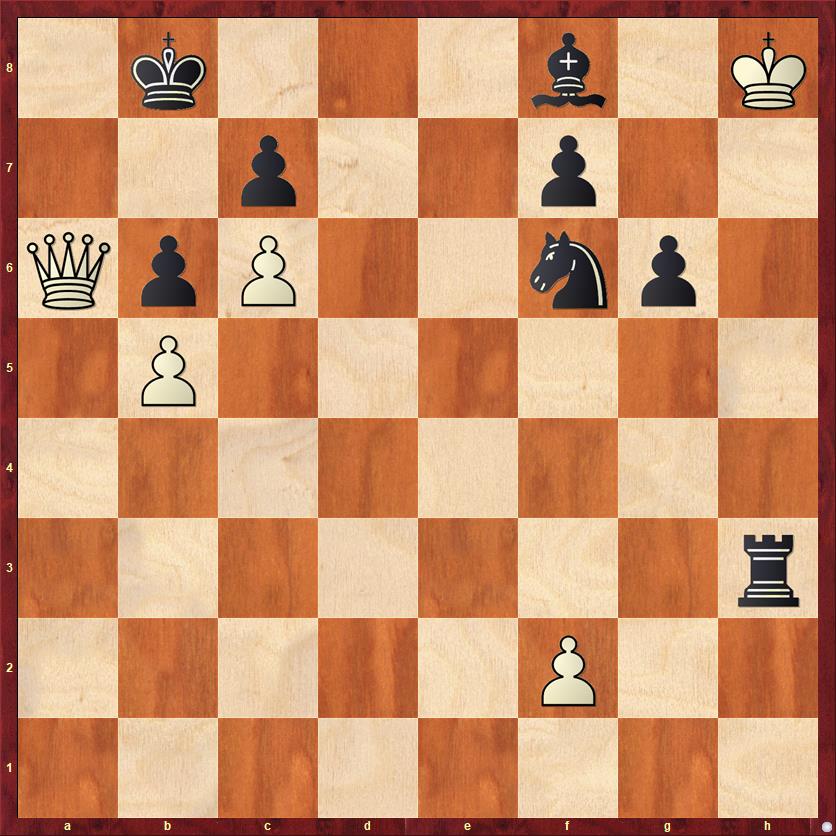
FEN: 1k3b1K/2p2p2/QpP2np1/1P6/8/7r/5P2/8 w – – 0 53
I can’t say that I saw this amazing variation, but even if it weren’t for the mate, Black could defend perfectly well with 50. … Nc5. So I had an uneasy feeling about taking the knight and decided I couldn’t do it. Besides, I had another option that I still totally believed was winning, which was 48. Kh2. Yes, it’s a bit scary to face those four rampaging Black pieces with my nearly naked king, but I still didn’t see how the computer was going to prevent checkmate on b7. Do you see what I missed?
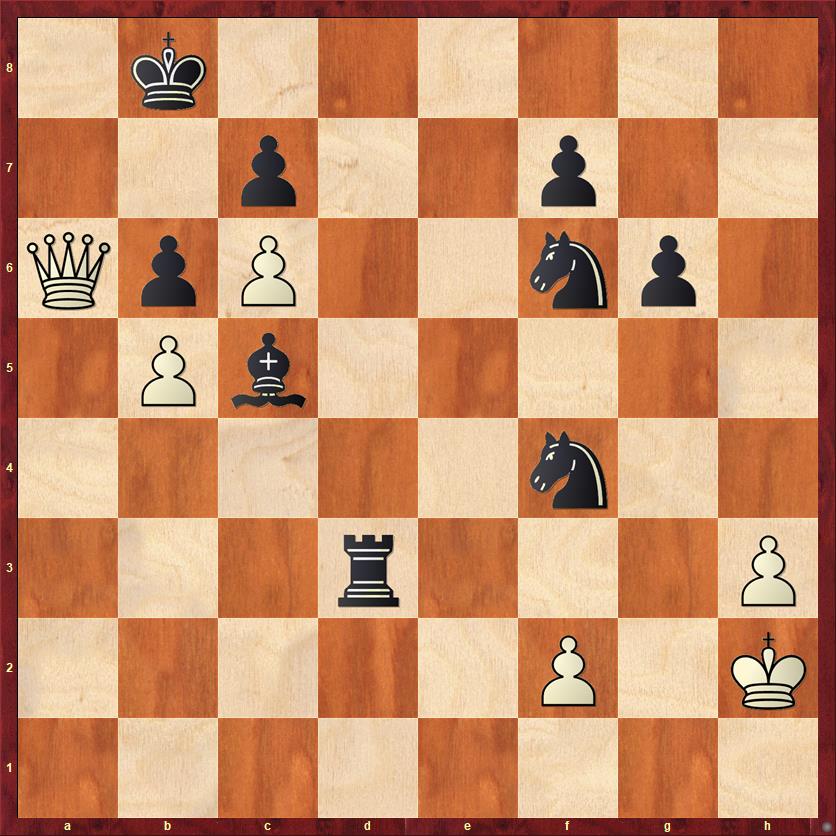
FEN: 1k6/2p2p2/QpP2np1/1Pb5/5n2/3r3P/5P1K/8 b – – 0 48
In some ways the solution is obvious. Black just has to keep playing checks until either he doesn’t have any more checks, or until he can move a knight to c5. For a computer this is all just a piece of cake. For a human, it’s completely bewildering.
So the computer plays 48. … Rxh3+ and I play the forced 49. Kg1. And now it has to keep playing checks, so of course it plays 49. … Bxf2+!
It would be nice if I could decline it with 50. Kf1, but Black would insist with 50. … Rh1+ 51. Kxf2 Ne4+, etc. Instead, I reluctantly accepted with 50. Kxf2 Ne4+. Now I have to be careful, because on 51. Kf1 or 51. Ke1, Rh1+ would be mate! So I have to play 51. Kg1. Black can now play … Nc5, with a won position, any time it wants, but the remaining moves are a clinic on how to win with a rook and two knights against a king. The game concluded 51. … Rg3+ 52. Kf1 Rf3+ 53. Ke1 Ng2+ 54. Ke2 Rf2+. This allows my king to break towards freedom with 55. Kd3, but it will cost my queen after 55. … Nc5+. So I retreated with 55. Kd1 Ne3+ 56. Ke1 Nc2+ 57. Kd1 Nc5 and … holy crap … my queen is trapped! The only safe square, a2, isn’t safe because of 58. Qa2 Ne3+. So White resigned.
What an amazing finish! Obviously, in retrospect, the “brilliant” 43. Ra8+ was in fact the losing move. Obviously it leads to White being checkmated or losing his queen after 16 moves. Obvious, that is, if you are a computer. In analyzing the position, Fritz never for a second doubts that Black has a winning advantage. Right there you see the enormous gulf between a human and a computer, because I thought that I was winning and Fritz was just playing spite checks.
What should White have done instead in the original position? According to Fritz, White should have just played the simple, quiet retreat 43. Ra2!! White’s idea is to play Qa4 followed by checkmate on a8. Black has only one way to stop this, 43. … Rd4. Now White plays 44. Qc3! Again, the threat is simple: White wants to play Qa1 followed by checkmate on a8. Again, Black has only one way to stop this: 44. … Bb4. Now, instead of 45. Qa1?, which Fritz says is only equal, White has to find 45. Qf3! This variation is starting to become reminiscent of the game, only with the roles reversed. Now it is White who is tormenting Black with annoying little threats, equivalent to “spite checks.” Again, Black seems to have a perfectly okay defense with 45. … Be7. And now comes the truly sick winning move, 46. Kg2!!
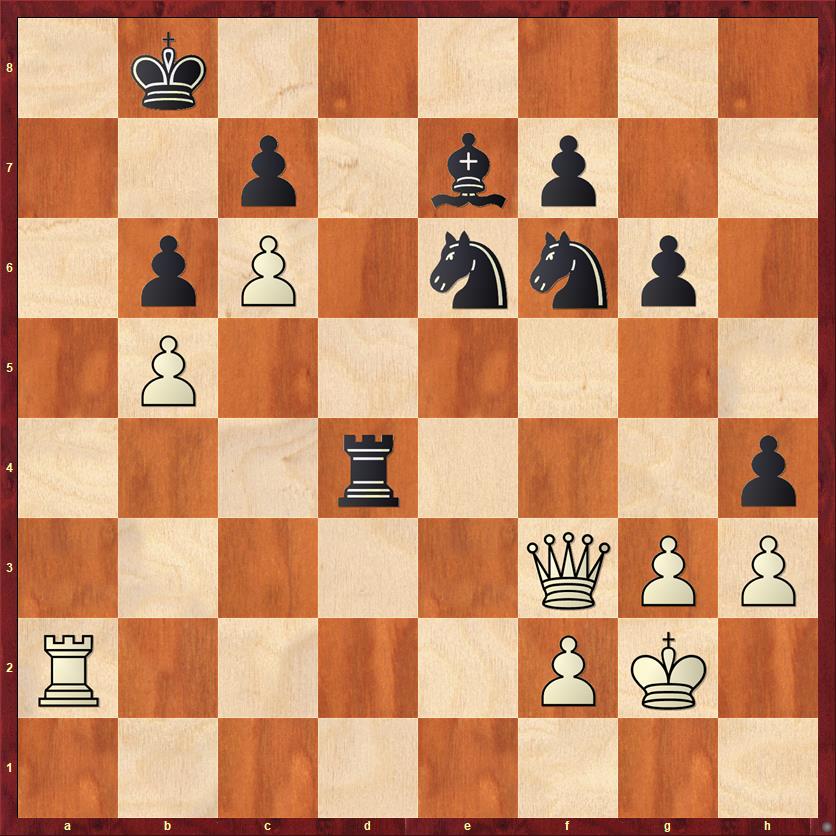
FEN: 1k6/2p1bp2/1pP1nnp1/1P6/3r3p/5QPP/R4PK1/8 b – – 0 46
The point of this move (which, by the way, is the only correct move according to the computer) is to take away spite checks. If Black tries to sit on the position with 46. … Rd5, White will play 47. Qb3 Rd4 48. Qb1 Bb4 49. Qa1 Ba5. This arrives at the same position we could have had four moves earlier, but now White’s king is on g2 and that makes all the difference. After 50. Re2! White threatens Rxe6 and there is no defense for Black. If White’s king were on h2, Black could play 50. … hg+ (“spite check”) 51. fg Ne8! 52. Rxe6? Rd2+ (“spite check”) and Black wins. With the king on g2, though, 50. … hg is simply answered by 51. Rxe6! Another interesting line from the above position is 46. … Nc5 47. Qc3 (same idea) Ra4 48. Rxa4 Nxa4. Black has almost thwarted White’s attack, but unfortunately his pieces are too scattered and disorganized, and he will lose one of them after 49. Qe5! Bd8 50. Qd4!
I don’t think that even one human player out of 1000 would have played this position correctly. A timid player might have played 43. Ra2 for the wrong reasons, because he couldn’t work out whether 43. Ra8+ led to mate. But the rest of the line requires not timidity but an incredible in-depth understanding of where the pieces want to be. The rest of us can only watch and marvel at the way a tiny, gentle gust of wind (46. Kg2!!) causes Black’s position to collapse.
Lessons???
- In theory, as Dan Heisman says, you should analyze a position until “quiescence.” That is, White should not really play the sacrifice 43. Ra8+ until he has worked out how to escape from Black’s checks. The trouble with Heisman’s advice here is that it takes so long — 10 moves or more, many of them not obvious — to see clearly that there is no way out.
- If you can’t work the position out to quiescence, you might just have to guess. In this position where Black has four attacking pieces, the odds really are in Black’s favor to either checkmate White or maneuver a knight to c5 somehow.
- The hardest thing to do when you are trying to checkmate your opponent is to play a quiet rearranging move, or prophylaxis. Your heart is pounding, your adrenaline is racing… but sometimes you’ve just got to channel Aron Nimzovich, slow down and play the simplest, calmest moves.
- As a general rule, it is better for you to be playing the “spite checks” and the “annoying little threats,” rather than your opponent. Compare the variations after 43. Ra8+, where White had to find some way to handle all of Black’s annoying little threats, to the variations after 43. Ra2, where it was Black who had to keep defending against White’s annoying little threats.
- Sometimes chess really is too hard for humans. When that happens, just accept it and go out for a walk.


