In the past I’ve mentioned the “Four Endgames of the Apocalypse,” the four supposedly “elementary” yet ferociously difficult endgames that even grandmasters screw up sometimes: K+Q versus K+R; K+B+N versus K; K+R+B versus K+R; and K+Q+RP versus K+Q. I’ve encountered each of these in my chess career, some of them more than once.
But there are some good candidates for the Fifth Endgame of the Apocalypse, and perhaps the best candidate is K+R+BP+RP versus K+R. According to Reuben Fine, “this ending has been notorious ever since the famous game Marshall-Rubinstein, San Sebastian, 1911.” This is a rare case of an endgame that is usually a theoretical draw, even though one side has two extra pawns. I’ve never really studied it and never had to play in a tournament.
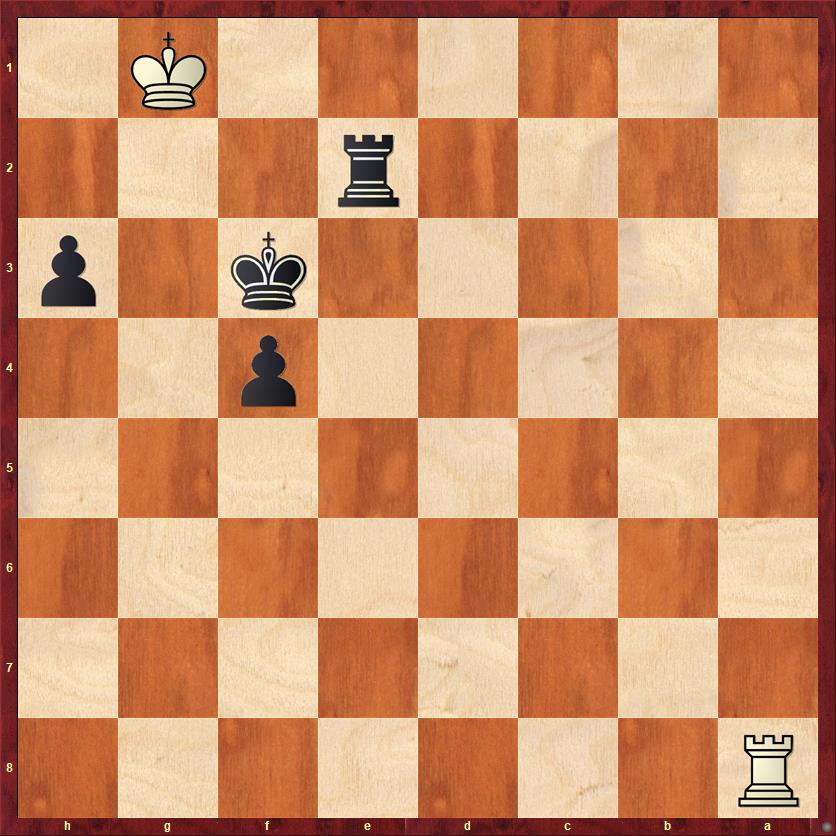
A few weeks ago, when I was still bingeing on computer chess, I finally got my feet wet in this ending. Let’s strap on our wading boots and get started! I was playing Black, so I’ll show the position from Black’s point of view. Fritz was playing White, and had its rating set to 2025.
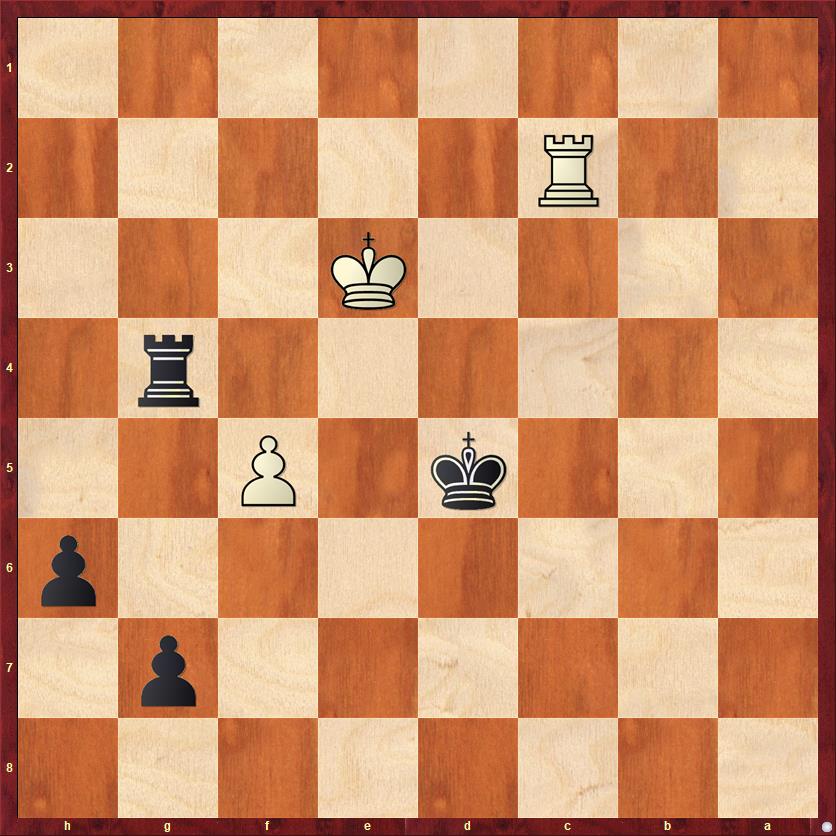
FEN: 8/6p1/7p/3k1P2/6r1/4K3/2R5/8 w – – 0 45
Here Fritz really surprised me, by sacrificing its remaining pawn. Usually the computer is not so great at conceptual play. It usually can’t recognize something like “This is a very hard endgame for Black to win.” But here it plays like a human, and I mean that in a positive way.
45. f6! gf
Declining the pawn would be a disaster: after 45. … g5?? 46. Rf2 I can’t stop the f-pawn.
At first I have to work pretty hard just to hold onto my two pawns. Then I try to march them up the board, step by step.
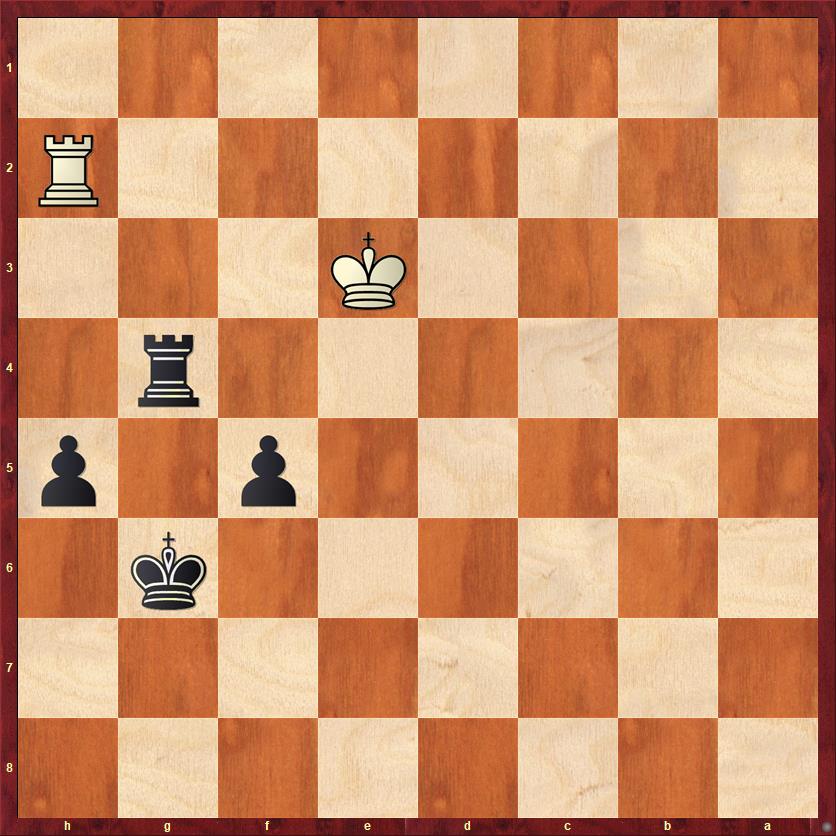
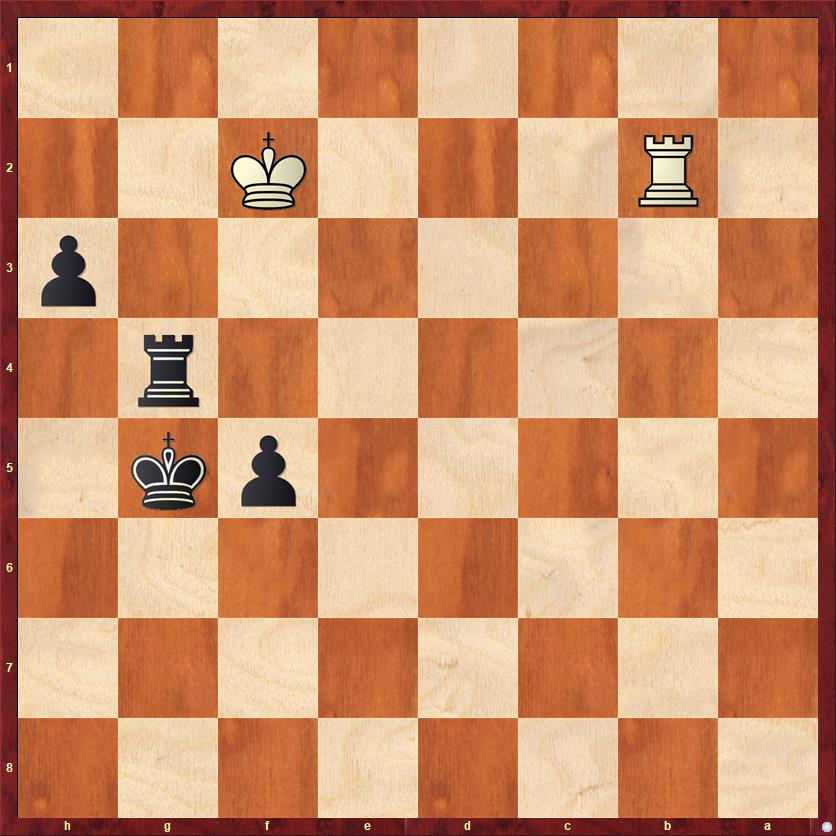
46. Rh2 Rg6 47. Kf4 Ke6 48. Rh5 Kf7 49. Rh4 Kg7
Everything is protected, and we’re now ready to advance. Compare this position with the one on move 61.
50. Ke3 Rg5 51. Kf4 Kg6 52. Kf3 h5 53. Ra4 Rg1 54. Kf2 Rg4 55. Ra8 Kg5 56. Rg8+ Kf4 57. Re8 Rg5 58. Rc8 f5 59. Rc4+ Ke5 60. Rh4 Kf6 61. Rh1 Kg6
I’ve gotten the same formation as twelve moves ago, but one step farther up the board. This is progress.
I’ve said before that I didn’t know much about this endgame. But I do remember an article in Chess Life, long ago, probably Pal Benko’s endgame column, that said the defender’s ideal setup is to get his king to g2 (in this case). So my main goal was to keep my rook on the g-file and thus deny him the best defensive square. I didn’t know whether this would be good enough to win.
It turns out that my strategy was flawed. Benko is right that g2 is an important square, but I took him a little bit too literally. In certain cases it is essential for Black to allow White to play Kg2, provided that I can chase the king away at the right moment. Principally, this means that I need to be able to play … Kg4 and then either check him on the second rank, forcing him back to the first rank; or, if he defends the second rank with his rook, I need to play f3+, forcing the king to f2. After that, I can play h3, forcing his king back go g1 and then h2.
If this is confusing, we’ll see some concrete examples below.
I’m going to make very heavy use of the online endgame tablebases, which tell us how to play the endgame perfectly if there are six or fewer pieces (as there are here). It’s a little bit odd that Fritz 17 doesn’t seem to have the tablebases programmed into it, so it actually plays a couple of not-perfect moves. From the tablebase point of view, neither player has made any mistakes yet: it’s been a draw all along. However, that is about to change!
62. Rh2 Rg4 63. Ke3? …
FEN: 8/8/6k1/5p1p/6r1/4K3/7R/8 b – – 0 63
From the tablebase point of view, White’s last move was a blunder that changes the game from a draw to a mate-in-37 for black.
From the human point of view it’s a little bit more complicated, because we can’t compute checkmates in 37 moves. But 63. Ke3 is clearly suspicious because White moves away from his ideal defensive square on g2.
How can Black take advantage of this? Well, there are two obvious moves to think about: … Kg5 and … h4, in some order. I didn’t think that the order matters. Turns out that it does.
Just as the computer messed up by playing too much like a computer, I messed up by playing too much like a human. I have learned a general rule in endgames: It’s better to advance your king together with the pawns than to move the pawns out ahead. This is how humans learn: we look for patterns and we generalize from our experience. But it led me wrong here. In this specific position, I should have moved the pawn first. Instead I played
63. … Kg5?
Which, according to the tablebase, is a blunder that makes the position a draw again!
Why is 63. … h4 the correct move here? (The only correct move, according to the tablebase.) I believe that the point is that by moving … h4 first, I prevent White from transferring his rook to the queenside, where it can defend either from the side or from behind the passed pawns.
So, if 63. … h4! 64. Ra2, Black plays 64. … h3! and threatens to put the rook behind the h-pawn. White doesn’t get time to activate his rook. I tried this a move later and it didn’t work, for reasons that I still find hard to understand.
64. Rb2 …
Freeing the rook. As noted before, White could not have done this after 63. … h4.
64. … h4
Interestingly, when I analyzed the game on Fritz without the tablebase, Fritz was very keen on 64. … Rg3+ and thought Black was winning.
The tablebase says no, and the reason is kind of interesting even if it is somewhat long-winded. After 64. … Rg3+ the more-or-less best line for both players goes 65. Kf2 Ra3! 66. Rb8 Kg4 67. Rg8+ Kf4 68. Kg2 Ra2+ 69. Kh3 Kf3 70. Rg3+ Ke4 71. Rg5 f4 72. Rxh5 Kf3 73. Rg5 Rf2 74. Re5 Re2 75. Rf5 Re4 76. h2 Kf2 77. Ra5 f3 78. Kh3 Re2 79. Kh2 Kf1+ 80. Kg3 f2 81. Kf3! (diagram)
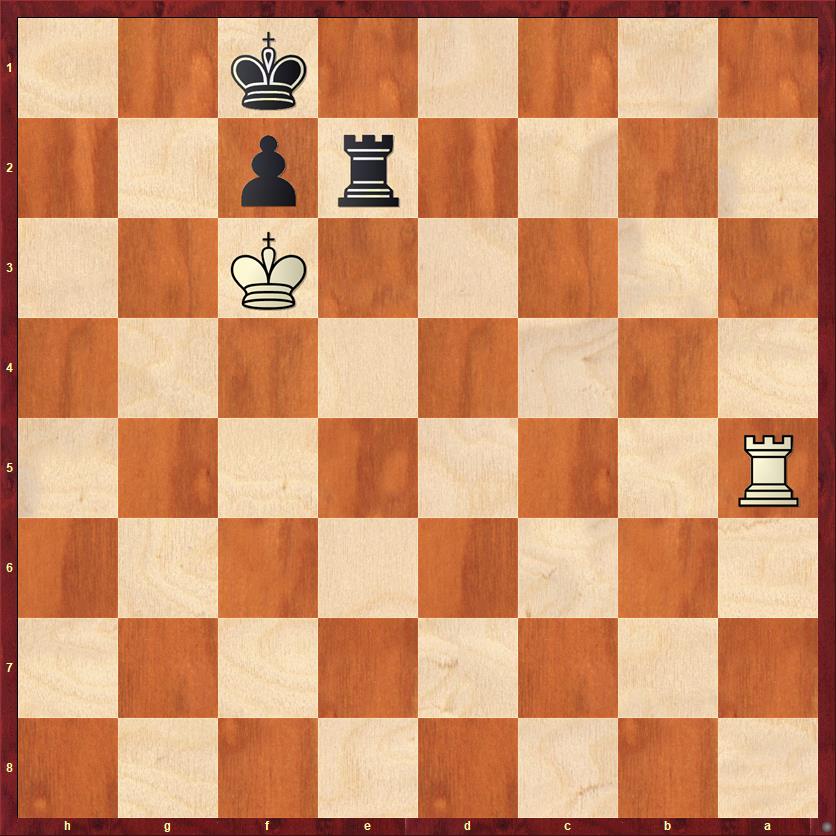
FEN: 8/8/8/R7/8/5K2/4rp2/5k2 b – – 0 81
This turns out to be a very thematic way for White to save the position. Black has tried his hardest to reach the Lucena position, but if White can get his king to f3 Black has no way to get his king out of the way of the f-pawn. Note that on 81. … Kg1, White should not take the rook but play 82. Rg5+, chasing the king back in front of the pawn.
Back to the game:
65. Kf2? …
Fritz makes a move-order mistake, too! The options were this or 65. Rb8, and Fritz chooses the wrong one. Now, according to the tablebase, I’m winning again. Mate in 45!
FEN: 8/8/8/5pk1/6rp/8/1R3K2/8 b – – 0 65
How can Black win this position? I’ll give you a hint: 65. … h3 won’t work. We’ll see why below, because that is the move I played.
This is where my comment about allowing White’s king to g2, in order to chase it away later, comes into play. The key thing is to get my king to g4, which I can’t do as long as the rook is there. Ergo, I should have played 65. … Rf4+! 66. Kg2 Kg4.
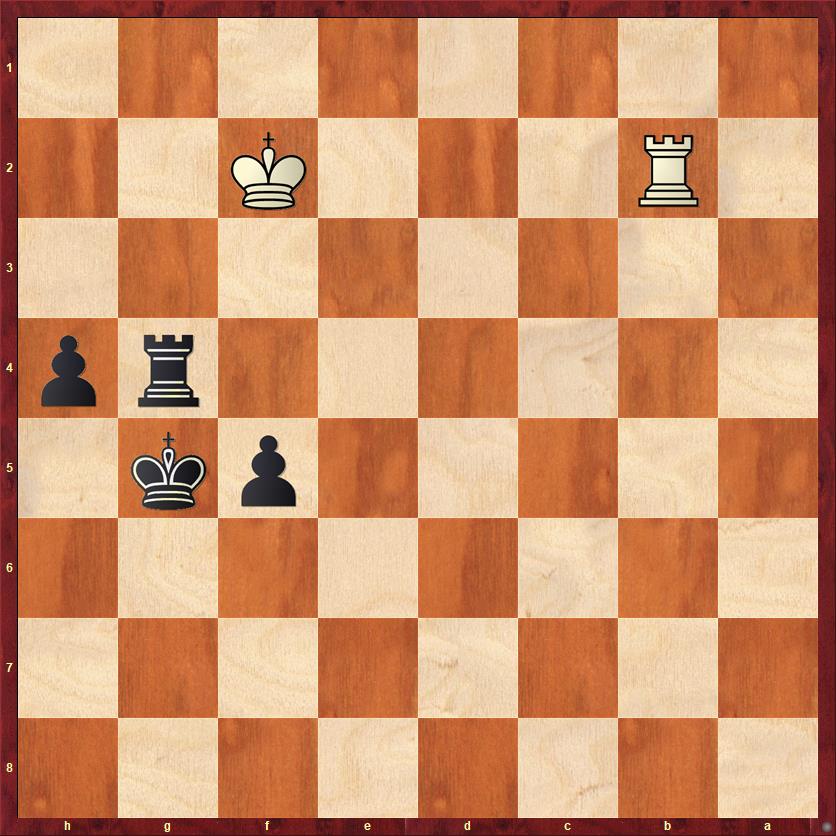
The winning line is extremely technical, so it is highly unlikely that I would have played correctly. But to satisfy the curiosity of any of you who want to see perfect play, here is how the winning line goes: 65. … Rf4+ 66. Kg2 Kg4 67. Rb8. (This is the best try according to the tablebase. If you wonder what would happen if White keeps his rook on the second rank, here is a sample: 67. Ra2 Re4 68. Rb2 f4 69. Ra2 f3+ 70. Kf2 h3 and White is forced out of his second-rank blockade, and his king will be chased back, e.g. 71. Ra8 Re2+ 72. Kg1 Re1+ 73. Kf2 h2 or 72. Kf1 Re5! building a bridge.) Back to the main line: 67. … h3+ 68. Kh2 Rf2+ 69. Kg1 Rg2+ 70. Kh1 Re2 71. Rg8+ Kf3 72. Ra8 f4 73. Kg1 (diagram)
FEN: R7/8/8/8/5p2/5k1p/4r3/6K1 b – – 0 73
This is a critical position, where I would never have played the right move in a million years. I would have played 73. … Rd2? or 73. … Re3?, which either draw or fail to make progress. The only winning move is 73. … Ke4!!
What sense does this make? Why are we backing our king up and moving it away from the queening squares? The idea is that if White checks from behind, I am going to run my king to d3, e3, d2, and e1. If White checks from the side, I am going to run my king to f5 and g4. It is kind of a zugzwang; White has to pick his poison. (For purists, it’s probably not a true zugzwang because Black does have a winning plan if White “passes”: … f3, … h2+, and … f2.)
We still aren’t even close to the end; we still have to see how this works. I’ll continue to follow the line that the tablebase gives as the toughest defense for White. After 73. … Ke4!! the next few moves are somewhat straightforward: 74. Re8+ Kd3 75. Rd8+ Ke3 76. Re8+ Kd2 77. Rd8+ Ke1 78. Rf8 Re4! It seems as if every time Black takes two steps forward in this endgame, he has to take one step back. Now his idea is to play … Ke2 and start pushing the f-pawn. According to the tablebase, White’s best is 79. Kh2 Kf2 80. Ra8, but I want to look at the more thematic move 80. Kxh3. Here Black wins with a nice little idea: 80. … Re3+! 81. Kh2. (White’s king is forced backward, because 81. Kg4? would be met with 81. … Rg3+!) After this Black plays 81. … f3 and White plays 82. Ra8. There is no point any more for White to have the rook behind the f-pawn. Instead White is trying the “long side” defense, checking the king from the long side of the pawn. Often this works, but it doesn’t work here because my rook is on the third rank, which keeps White from achieving the thematic draw that I showed in the third diagram. After 82. … Kf1 83. Ra2 (a nice little trick, hoping for 83. … Re2+ 84. Kh1 Rxa2, stalemate) f2 84. Ra1+ Re1 85. Ra2 Rd1! If White plays 86. Ra8, Black’s king will escape the checks via e2-d2-c2-b3-c4-b5, etc.
Deep breath. Wow. Our analysis has taken us 20 moves deep past the point where I missed my last chance to win. Ordinarily I never like to look at analysis beyond 10 moves deep; to me it’s “fairy chess.” But in this case I think it’s worth it just to see some of the winning and drawing themes in this ultra-tricky endgame.
Let’s go back now to the fourth diagram, after White’s move 65. Kf2. The point of our long-winded analysis is that Black should have played 65. … Rf4+. But I didn’t. Instead I played
65. … h3?
FEN: 8/8/8/5pk1/6r1/7p/1R3K2/8 w – – 0 66
I’ll be honest, I thought I was completely winning here because I thought that I could get my rook behind the h-pawn. But I overlooked something.
66. Rb8 h2
Amazingly, my original plan does not work. If 66. … Rh4 67. Kg1! draws for reasons that can be summed up thusly: Black has insufficient long-side checking protection. For example, if 67. … Kf4 (the natural-looking move), White can check from the side forever after 68. Rb4+. There is no way for Black to make progress. The lesson behind this failed plan is that Black’s rook does not belong behind the h-pawn unless White’s rook is in front of the h-pawn. In the winning lines that we saw earlier, my rook was always in the middle of the board, able to provide useful cover from checks.
I thought that 66. … h2 moving the h-pawn first, might still win for me, but here is one case where the general rule about not getting the passed pawn too far in front of your pieces comes into play.
67. Rg8+!
Not 67. Rh8?, when 67. … Rh4 would win.
67. … Kf6
You’ll see shortly why I chose this move instead of the more obvious … Kf4. They’re both drawn.
68. Rh8 …
This endgame has many ironies. One of the first things you’ll read in Fine’s Basic Chess Endings is that Black wants to use the h-pawn as a decoy, to queen the f-pawn. But you don’t want to make it too easy for White to win the pawn, because then it’s not being a good decoy.
68. … Ra4!
A good try. I’m hoping to sucker White into 69. Rxh2? Ra2+ 70. Kg3 Rxh2 71. Kxh2, which would be a win for me. That’s why I moved my king to f6 instead of f4, so that I could set up this shot.
Unfortunately, the computer outsmarted me.
69. Kg2! Ra2+ 70. Kh1!

FEN: 7R/8/5k2/5p2/8/8/r6p/7K b – – 0 70
A new and ghastly theme emerges: White now might be able to sacrifice his rook for my f-pawn, with a stalemate. This is the other reason you don’t want to push your pawn to h2 too soon.
Not having anything better, I played
70. … Ke5,
after which the simplest way for White to draw is 71. Rf8. The only way for Black to prevent the kamikaze rook sacrifice is to give up the h-pawn with 71. … Ra1+ 72. Kxh2, which is easily drawn for White.
However, the computer does not know the difference between an easy draw and a hard draw, so it played the unnecessary risky
71. Rd8?! Ke4 72. Rd2 Ra1+ 73. Kxa2 Ke3 74. Rb2 f4
It looks as if I’m really getting somewhere, but it’s an illusion.
75. Rb3+ Kf2 76. Rb4 f3 77. Rb2+ …
There’s no way for me to win because I don’t have control of the third rank as I did in the winning line we saw above. After 77. … Kf1 or 77. … Kg1, 78. Kg3 stops my f-pawn. Instead I played 77. … Ke3 and drew by repetition after Rb3-b4-b3-b4 etc.
Here are some ideas that I’ll try to remember, in case this ever comes up in a tournament game. I’m assuming we are talking about an f- and h-pawn (the rules are similar on the other side of the board, of course) and I’m assuming that the player with the two pawns is Black.
- The best square for White’s king is g2, just as Benko said.
- If Black can put his rook on the g-file, that may be helpful for a while, but eventually it will have to leave in order to make room for the king.
- If Black can gain the opposition with his king on g4 and White’s king on g2, and if in the resulting position White cannot immediately check Black’s king away from g4, then Black’s winning chances go up significantly.
- In the situation of point 3, Black’s next step is to either check White’s king on the second rank (which takes us to point 5) or to check him with the pawn on f3.
- After Black has gotten his rook on the second rank, and White’s king is on g1, then a good plan for Black is to try to penetrate with his king to e1. But the attacker needs to be flexible and adapt his plan to the opponent’s defense. White has many options and there is no one-size-fits-all rule that works against all of them, so it’s helpful to know several motifs.
- In general it is not a good plan for Black to put his rook behind the h-pawn, unless White’s rook is passively placed in front of the h-pawn. If White’s rook is active, then Black’s rook on the h-file is unable to provide sufficient cover from horizontal checks.
- The h-pawn is often used as a decoy to draw the defender’s king to the h-file and promote the f-pawn.
- However, Black must be very careful not to push the pawn to h2 too soon, creating stalemate possibilities if White puts his king on h1.
- If the decoy (sacrifice of the h-pawn) is properly executed, the attacker aims to get his king to f1, his pawn to f2, and his rook to the third rank (where it traps the defender’s king on h2).
- If the decoy is executed improperly (or the position was drawn to begin with), the defender can hold a draw with horizontal checks on the “long side” of the f-pawn. Or in some cases he may be able to put his king on g3 and his rook on the second rank, preventing … f2 in the first place, or he may be able to get to the thematic drawn position in diagram 3.
Finally, please send me corrections! This is my first crack at this endgame, so I’m sure that there is stuff I missed.
Followup, posted 6/18/2020: Because the commenting function on my blog is not working properly at the moment, I’m going to manually cut-and-paste two comments that I received. First, from Larry Smith:
First, when you write “the only way for Black to prevent the kamikaze rook sacrifice is to give up the h-pawn with 71. … Ra1+ 72. Kxh2, which is easily drawn for White,” can’t Black at least try 71 … Ke4? 72 Rxf5? is no longer check, so Ra1+! relieves the stalemate. Of course, this probably doesn’t change anything overall.
Second, I recall Fischer and Geller playing this ending, possibly in 1970. May or may not be relevant to your studying of this endgame. And, doubtless there are many other examples.
Third, and last, the Four Endgames of the Apocalypse is a great article idea! And if you could add more endings (this one, Troitsky’s line, or possibly Vancura, which I don’t think is as difficult but seems to be little-known below a certain level), then maybe there’s a book in it! However, at the same time, I’m not sure who the audience would be for such a book.”
Second, from Ernest Hong:
I won one of these a while back against a human. See http://soapstonesstudio.blogspot.com/2016/09/practical-rook-endgames-16-sack-waterboy.html for comparisons. I think my goal was to place pawns on h6 and f5 and try to get my king in a menacing position. My rook ended up at f6 with pleasant options, but the tablebase says it was drawish up until the end. Maneuvers with the king headed to f8 or f6 with my rook at f6, e6, or d6 are full of poison for the defense. Watching the evaluations and the appearance of counterintuitive only moves in the tablebases on Shredder.com is quite fun. There are some interesting lines where the aggressor gets his king to f6, allows Kxh6, and still wins. For example, like my game: 8/7k/3KR2P/5P2/8/8/8/r7 b – – 0 1, what if Rf1= Ke5 Re1+ Kf6? Rf1! is an only move and even then, Rd6 invites Kxh6? losing. And if instead Rf2= and Ke6 and now Black only saves with Ra2 or Rb2 preparing for long-side checking?


{ 1 comment… read it below or add one }
A great post! I can only imagine how much time went into putting this together.
Here are several comments:
First, when you write “the only way for Black to prevent the kamikaze rook sacrifice is to give up the h-pawn with 71. … Ra1+ 72. Kxh2, which is easily drawn for White,” can’t Black at least try 71 … Ke4? 72 Rxf5? is no longer check, so Ra1+! relieves the stalemate. Of course, this probably doesn’t change anything overall.
Second, I recall Fischer and Geller playing this ending, possibly in 1970. May or may not be relevant to your studying of this endgame. And, doubtless there are many other examples.
Third, and last, the Four Endgames of the Apocalypse is a great article idea! And if you could add more endings (this one, Troitsky’s line, or possibly Vancura, which I don’t think is as difficult but seems to be little-known below a certain level), then maybe there’s a book in it! However, at the same time, I’m not sure who the audience would be for such a book.