“In my mind I’m going to Carolina…” For anyone who has lived in North Carolina, James Taylor’s song is a little bit of an anthem. Perhaps like “Sweet Home Alabama” for people who live in that state.
When you drive down I-95, the length of the East Coast, you start in New England, which has a very distinctive New England-y look. But once you hit Boston, for the next 500 miles everything looks the same: an urban concrete jungle. Then you turn off I-95 at Petersburg, Virginia, just south of Richmond, and get onto I-85 bound for Durham, the scenery suddenly changes. The highway feels like your own private driveway, with no big cities and no traffic. At about the Carolina state line, the Carolina pines begin: miles and miles of luxurious green. North Carolina is the first place in 500 miles that feels different.
For a transplanted northerner, like me, the Triangle area is a good place to get introduced to the south. You have barbecue and hush puppies (a round, seasoned fried bread dish I had never heard of before moving to N.C.). You have tobacco warehouses. You have a large and vibrant Black community. But it’s not too southern. You have universities, three of them in close proximity (Duke, UNC, NC State). Politically, the climate is more liberal than the rest of the state. On the Duke campus I almost felt as if I was back in Princeton. The architecture is exactly the same; someone once told me, “Duke copied Princeton’s idea of copying Oxford.”
In my last post I described the chess scene in the Triangle (Raleigh-Durham-Chapel Hill) area, which was very competitive with lots of players at the expert level and not so many, but a few, at the master level. Thanks to the indefatigable TD Robert Singletary, we had quads twice a month: three games in one day, played at what was for me a relatively quick time control of 40 moves in 80 minutes, followed by game in 60.
The first game I’ll show you from North Carolina was played in one of these quads. My opponent was a future state champion, Matt Noble. The game is interesting for two reasons. First, it’s a good example of Black’s queenside attack in the Saemisch Variation of the King’s Indian. This variation is a little disorienting for King’s Indian players because the roles are often reversed from normal, with the players castling on opposite wings and with White attacking on the kingside and Black attacking on the queenside. In that sense it’s more reminiscent of a Dragon than a King’s Indian. Second, the game is interesting because I was wrong about it! In my notes, I wrote, “Although the final combination is unsound, I like this game. Black played in aggressive, risk-taking style throughout and created his own opportunities.” The second sentence is correct. But the first sentence is not! The computer says that the final combination is sound and winning for Black.
So this wasn’t a case where I bamboozled my opponent in time pressure. I actually played good moves, although it’s obvious from my notes that I didn’t fully understand what was going on.
Matt Noble — Dana Mackenzie, 8/25/1984
1. d4 Nf6 2. c4 g6 3. Nc3 Bg7 4. e4 d6 5. f3 …
I played the King’s Indian as Black for maybe three or four or even five years in the mid-1980s. I gave up on it because I didn’t feel as if I was getting good results. You’ll see from this game that one reason was that I didn’t know any of the theory. After this game I did study the Saemisch a little bit, but I’m not sure if I ever had another tournament game in this variation.
5. … O-O 6. Be3 a6
The most popular move here is 6. … c5, sometimes called the Saemisch Gambit, which came out of nowhere in the 1980s and, according to many people, is the main reason that 5. f3 lost popularity. I wish I had known about it — I think I would have enjoyed playing it!
The inventor of 6. … c5 was Valery Chekhov, the world junior champion in 1975 (who just barely beat Larry Christiansen). Curiously, Chekhov himself never had much success with it! According to ChessBase, he only played four games with it, three in 1975, with a record of one win, two losses, and a draw. That may be because after 7. dc dc 8. Qxd8 Rxd8 9. Bxc5 Nc6 10. Nd5 he played 10. … e6?! Theory these days says that Black should play the more ambitious 10. … Nd7!, to get his counterplay on the long diagonal started faster. It seems to be the general consensus that Black’s compensation for the pawn is pretty good.
For that reason, White usually doesn’t accept the gambit these days. Instead he can say, “Why should I get sucked down that rabbit hole, when I can just play 7. d5 or 7. Nge2 and play a Benoni?” Some White players, notably my friend from Santa Cruz (formerly from Colorado) Eric Montany, go back even one more step. They ask, “Since 6. Be3 doesn’t actually prevent 6. … c5, why should I play that move? Why not play 6. Bg5 instead?” He actually wrote a whole book about it, which you can get at Amazon if you’re into arcane opening theory.
See how I did that? You thought I was writing about my chess game, and I snuck in an advertisement for my friend’s book. I’m a sly one… Okay, let’s proceed. 6. … a6 is not a bad move, but I had no idea how to play it, as you’ll soon see.
7. Qd2 Bd7?!
King’s Indian players normally decide where to put their knight first, a6 or c6 or d7. Usually there is no rush to develop this bishop. This move isn’t totally bad, as I am working toward the … b5 pawn break, but … c6 is a more common way to do that.
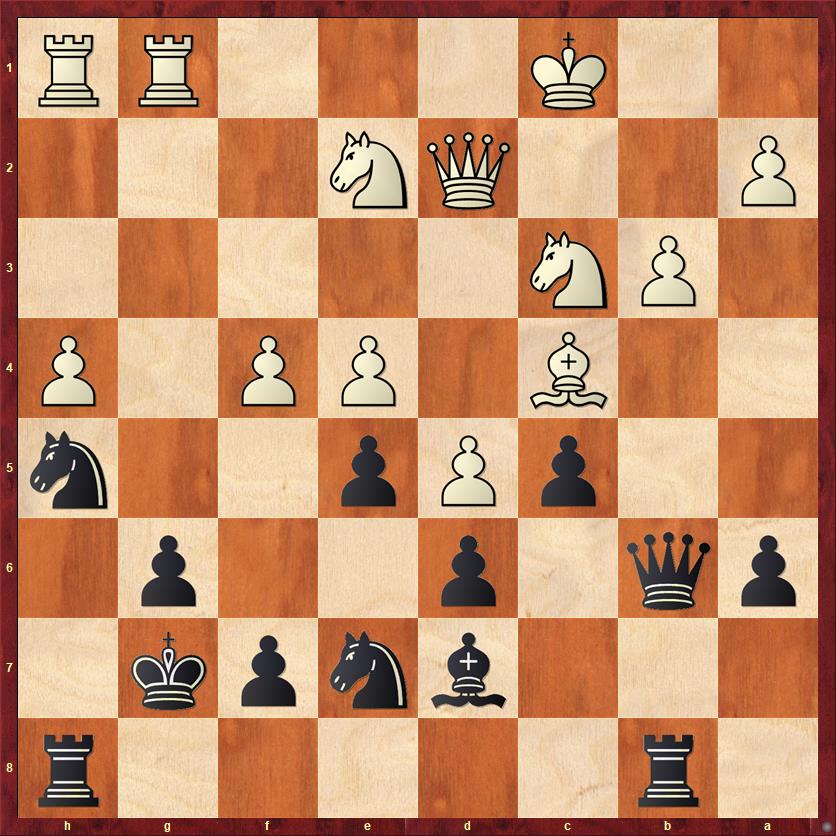
8. Bd3 Nc6 9. Nge2 e5 10. d5 Ne7 11. g4 Rb8 12. h4 h5 13. gh Nxh5 14. O-O-O b5 16. Rdg1 …

FEN: 1r1q1rk1/2pbnpb1/p2p2p1/1p1Pp2n/2P1P2P/2NBBP2/PP1QN3/2K3RR b – – 0 15
I’ve gone through the opening quickly because I don’t think either side has made any significant mistakes. Fritz evaluates the position at +0.54 for White, which is perhaps reasonable: a slight edge but Black’s position is playable. However, here I make a pretty significant mistake:
15. … bc?
On the surface this looks reasonable. I’m trying to attack on the queenside, so of course I want to open the b-file, right?
But what I didn’t do here is think schematically. How is Black going to continue the attack? Well, obviously he is going to want to bring his queen to c7 or b6 or a5. And this means that Black is surely going to want to play … c6 or … c5 at some point. Now the question is: when?
If you play … bc first and then … c5, as I did, you are giving White a beautiful, gift-wrapped diagonal for his bishop. You are putting his bishop on c4 and then helping him move his d-pawn out of the way, so that the bishop will be bearing down on f7 and pinning that pawn, and Rxg6 will be in the offing. Why should I be so generous to my opponent?
On the other hand, there is absolutely no harm in delaying … bc. That trade will continue to be available for Black to initiate at the right time. For example, if Black plays 15. … c5 and White doesn’t take en passant, then Black can legitimately play 16. … bc because now the pawn on d5 will permanently block White’s bishop on c4. But for now, Black should leave the b-pawn on b5, where it hems in White’s bishop.
The timing of pawn trades is something I don’t think I understood well then, and probably still don’t. And it’s not just me. I think that many players at C, B, A, even expert levels are uncomfortable with pawn tension, when two pawns are staring at each other and you’re waiting for one of them to blink.
Chess isn’t checkers. Captures are always optional. Very often trading pawns is not to either player’s advantage, and that is part of the fun of chess! You have to wait for the right moment to trade, or perhaps find a way to force your opponent into trading. We’re going to see another case in just a few moves where I made the same mistake, rushing into a pawn trade that I didn’t need to play.
16. Bxc4 c5?!
This is one of those “aggressive, risk-taking” moves I wrote about earlier. I offer a pawn on a6, hoping to distract White from his kingside attack. Here psychology helped me a bit; I knew Matt was an attacking player and unlikely to take the bait. As I wrote just above, White should instead play 17. dc, when 17. … Bxc6 18. Bg5! is starting to look catastrophic. Black has weaknesses everywhere you look: f7, g6, h5, d6, e7, a6. I was very lucky that Matt was more interested in attacking my king than in attacking everything else in my position. So he played
17. Bh6? …
Ordinarily a good attacking move, but in this case he “forgives” my mistakes on moves 15 and 16 and we are now back into a more or less equal position.
17. … Qb6 18. Bxg7 Kxg7 19. b3 …
Better safe than sorry. I think that very few people would be tempted to play 19. Qg5?, even though it forks Black’s two knights. And indeed, Black comes out ahead after 19. … Qxb2+ 20. Kd1 f6! 21. Qxh5 Rh8, trapping the queen.
19. … Rh8
Here I wrote “=” in my annotations. Fritz agrees, giving White a 0.12-pawn advantage. But I mess it up on my very next move.
20. f4 …
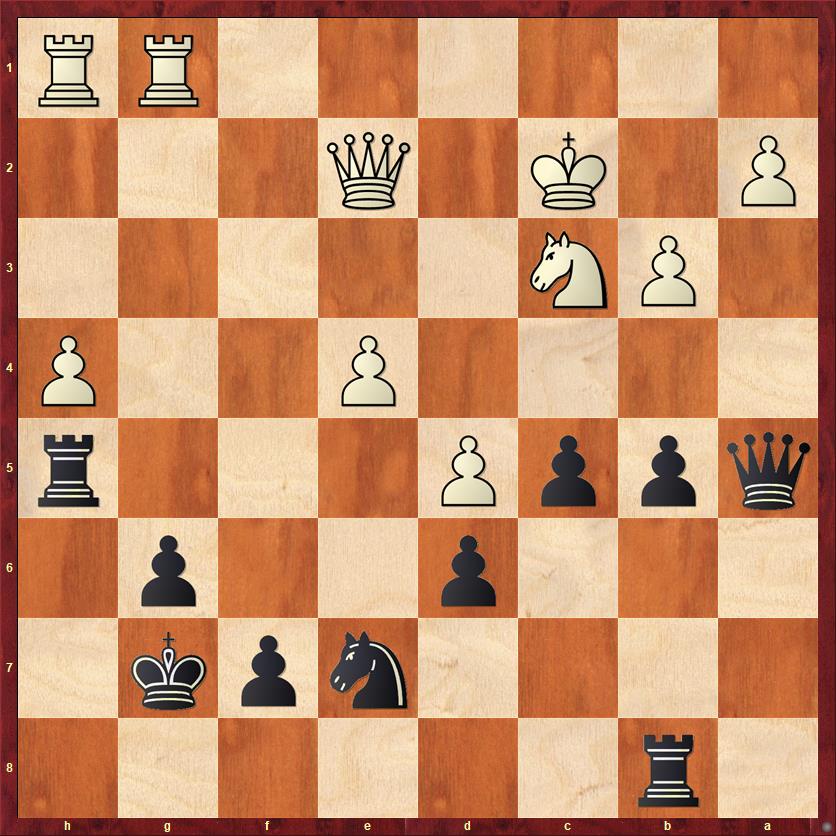
FEN: 1r5r/3bnpk1/pq1p2p1/2pPp2n/2B1PP1P/1PN5/P2QN3/2K3RR b – – 0 20
20. … ef?
Another unnecessary pawn capture, and I didn’t even say one word about it in my annotations — so even after the game, I thought that this move was “automatic.”
There are no automatic trades (or at least there are few). Every trade needs to be evaluated carefully based on how it will change the position of the other pieces.
First I should start with one of Mike Splane’s favorite questions: What side of the board should I be playing on? In positions with kings castled on opposite sides, the answer is extremely easy: you want to play as much as possible on the side where your opponent’s king is. You should only play on the other side if you’re forced to, or if you have a move (like 19. … Rh8) that dramatically improves your king’s life expectancy on the other side.
First observation: 20. … ef? does not improve my king’s life expectancy. It makes it worse. It brings one of his pieces closer to my king — for free! — and it starts to make my previously strong knight on h5 into a target.
Second observation: I think I panicked a little because I was afraid of either 21. f5 or 21. fe. But there’s no need to panic. These are not overwhelmingly strong threats. I just need to answer them with stronger threats of my own.
Third observation: Do I have a stronger threat? Yes, I do! I can play 20. … Bb5! with the threat of trading bishops and opening the b-file. This is not something that White can ignore.
Actually, this is a position for careful analysis, because White can do three things: (1) ignore my threat and play 21. fe; (2) ignore my threat and play 21. f4, or (3) not ignore my threat and trade bishops.
In case (1), after 21. fe Bxc4! 22. bc (22. ed is an interesting piece sac, but Fritz says Black is better) de, it’s not clear how White is going to improve his position. Black, meanwhile, has gained a great blockading square for a knight on d6, which will transform his one inactive piece (the knight on e7) into a good attacker.
In case (2), after 21. f5 Bxc4 22. bc Qb4 Black is making serious inroads, with the threat of … Qa3+ and … Rb2. And White’s most obvious attacking move, 23. Qg5, is rebuffed once again by 23. … f6. Black’s attack in this line is clearly much stronger than White’s.
In case (3), 21. Bxb5 ab, Fritz evaluates the position at 0.00 but it’s clear that Black has made progress. His b- and c-pawns are just as scary as White’s f-pawn, and he has the symbolic gain that he has forced White to play defense rather than offense.
The basic lesson here is: Don’t make trades that improve your opponent’s pieces, do make trades that improve your pieces, and don’t be scared of threats that aren’t there.
Although I’ve leaned a little bit on computer analysis here, in this phase of the game it’s striking how much you can determine the best and not-best moves on general strategic principles. Later in the game we’ll get to some positions where I have to lean on the computer a lot, and you really need to be a computer or a GM to see your way clear to victory. Those positions are interesting too, but maybe not quite as instructive.
21. Nxf4 Qa5 22. Kc2?! …
Now it’s Matt’s turn to get too defensive! He’s worrying about threats that don’t exist. After the simple 22. Nxh5+ Rxh5 23. Be2 Rh6 24. h5, White’s attack is already reaching paydirt.
22. … Bb5
Finally stumbling on the right plan!
23. Bxb5? …
Again, White is playing on the wrong side of the board! Fritz still says that 23. Nxh5+ is good, close to winning for White. For example, 23. Nxh5+ Rxh5 24. Qf4 Bxc4 25. bc Qa3 26. Rb1. Black doesn’t have any visible breakthroughs, and he has a lot of problems.
23. … ab 24. Nxh5+ Rxh5 25. Qe2 …
FEN: 1r6/4npk1/3p2p1/qppP3r/4P2P/1PN5/P1K1Q3/6RR b – – 0 25
Now is when it gets really fun!
25. … b4!
This is another of the “aggressive risk-taking moves” that I wrote about in my notes. You have to remember that this game is played at a 40/80 time control. In all likelihood, both players were down to 20 or 30 minutes for the rest of the game. It’s very hard to calculate this sac all the way to the end, so both players are going on intuition and guts. It’s only in hindsight, with computer analysis, that I can say the sacrifice is completely sound and wins for Black if White accepts it.
26. Qxh5!? …
The losing move. But I can’t possibly give it a question mark. I’m giving it an exclamation point for bravery, and a question mark because it doesn’t work.
26. … bc 27. Qd1! …
A nice move, indirectly defending b3. I’m sure that Matt thought he was doing fine here.
27. … Qxa2+ 28. Kxc3 …
Now comes the second shocker.
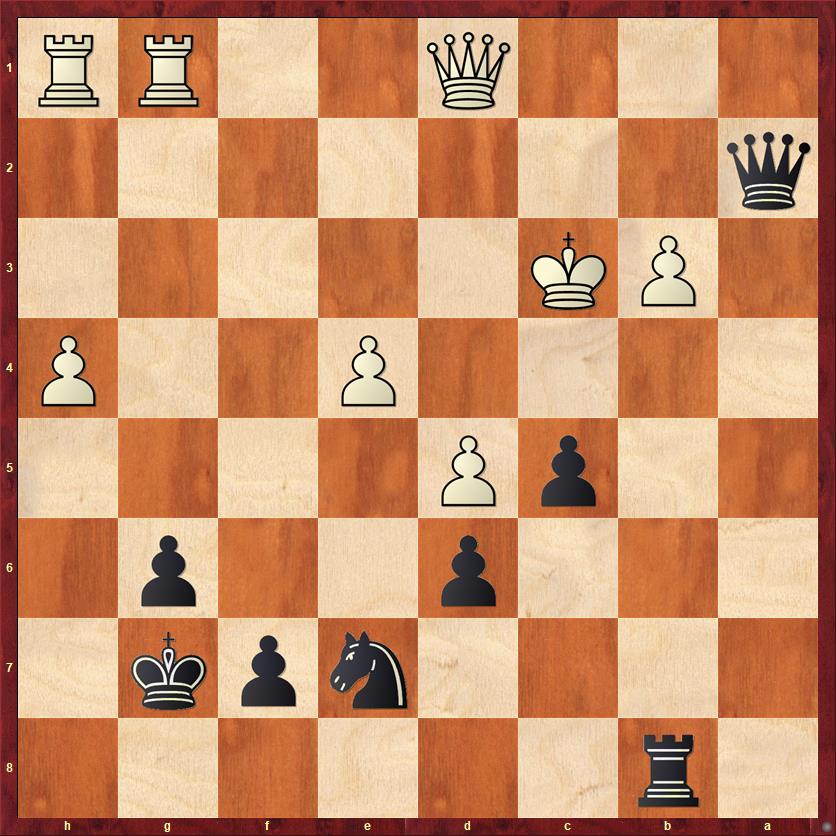
FEN: 1r6/4npk1/3p2p1/2pP4/4P2P/1PK5/q7/3Q2RR b – – 0 28
The next move shows that I have completely lost my senses.
28. … c4!!?
Let me unpack this. Two exclamation points because, like, it wins. A question mark because I didn’t know that it won. Also a question mark because I had a perfectly good drawing line: 28. … Qa5+ 29. Kb2 Ra8, when White has nothing better than 30. h5 Qa2+ 31. Kc3 Qa5+, etc. This is what any sane person would play. On the other hand, to play this very dubious-looking pawn sacrifice is either insane or genius. I know I’m not a genius, so I’ll take “insane” for $200, Alex.
(Moment of silence for Alex Trebek.)
29. Kc4? …
This definitely makes it easier for me. The real question is what happens after 29. Qd4+ — a resource that I may have simply overlooked. Of course I have to play 29. … Kg8. Now it’s obvious that 30. Qxc4? Rc8 is bad for White. The best option seems to be 30. Rb1 cb 31. Rhc1. In spite of the fact that all of White’s pieces are now hovering protectively around the king, it’s not enough. Black wins with 31. … Rc8+ 32. (Kb4 or Kd3) Rxc1 33. Rxc1 b2! The pawn promotes, and the game is over.
I just want to give a shout out to Black’s knight on e7, which has been rooted to that spot since move 10. Even though it had no role as an attacker, it’s the only thing that keeps White from having a back-rank checkmate.
Another very reasonable try is 29. Qa1, when Black of course has to avoid trading queens, with 29. … Qe2. The amazing thing here is that any king move would give White a discovered check, but he doesn’t have any legal king moves! So the attack continues. 30. bc seems best for White, and then Fritz says 30. … Qe3+ 31. Kc2+ (White finally gets his discovered check) Kg8. Even though it’s White’s move, and he has a queen and two rooks against a queen and one rook, White apparently cannot organize a defense. I can’t even go over all the variations, but according to Fritz the position is +3.06 pawns in favor of Black. (If I were White, I would bring one rook to b1 and another rook to c1, to shut Black’s rook out. But it appears that in those variations Black takes the e-pawn with check and then can finally bring his knight into the attack, either via f5 or d5.)
There is no way, just no way that all of this could have been calculated. I was just lucky. But as they say: No guts, no glory!
After the text move, 29. Kxc4?, Black gets a free tempo and another beautiful file for his rook.
29. … Rc8+ 30. Kd3 …
After the game I thought White should have played 30. Kb4, and I wrote “A draw by repetition after 30. … Rb8+ 31. Kc4 Rc8+ is forced.”
Wrong! Fritz finds one more sensational quiet move: 30. Kb4 Qf2! with the threat of … Qc5+. For example, 31. Qa1+ f6 32. Qa5 fails to 32. … Qd2+ 33. Ka4 Qa2+ 34. Kb4 Rb8+.
It’s just amazing that this all works. I really don’t deserve any credit, since it’s obvious that I would have gone for the perpetual check.
30. … Qb2! 31. Qe1 Qxb3+ 32. Ke2 Rc2+ 33. Qd2 Qc4+ White resigns
This was an incredibly hard middlegame where both players were probably low on time. In such a situation it is always better to be the player who is attacking. So for that reason only, my crazy sacrifices on moves 25 and 28 were justified even if I couldn’t calculate them all the way.
Lessons learned:
- Ask yourself, what side should I be playing on? In positions with attacks on opposite sides, you should make as few “defensive” moves as possible, and only those moves that clearly prolong your king’s life expectancy.
- Don’t make trades that improve your opponent’s pieces.
- Do make trades that improve your own pieces.
- Be comfortable with pawn tension and use it as a weapon. Time the pawn trades so that they work in your favor.
- Don’t defend threats that you don’t have to. (This needs to be phrased carefully. Grandmasters often defend threats before they become a problem; this is called prophylaxis or over-protecting. The real point here is that you should be in charge, and you should not let your opponent convince you that a threat is dangerous when it’s not.)
- No guts, no glory. In a situation where both players are low on time, it is a huge advantage to be the one who is attacking, and sacrifices (or “aggressive, risk-taking moves”) may be in order even if you can’t calculate them all the way. If the computer later says that your sac was no good, you can laugh all the way to the bank. If the computer says that your sac was good, you can tell everyone that you knew it all along!


{ 4 comments… read them below or add one }
In my comment to your previous blog post I mentioned “tunnel vision” being one of your weaknesses. Your 25th move is a great example. I’ll bet a thousand internet dollars that during the game you focused on playing 25 … b4?? and didn’t even think about alternatives.
Take a look at 25. … Re5 and tell me how White stops the dual threats of b4 and Nd5.
If 26. Rg5 Nd5! 27. Nd5 Qa2+ 28. Kd3 (or Kd1) Qb3+ gives you three pawns for the piece and a raging attack, or an ending with 4 passed pawns for a knight.
If you don’t like that line, what’s wrong with 25 …. Rbh8?
I also disagree with your assessment of 15 … bc4. I think it is a very good move.
After 16. Bc4 Rb4 White has no good move with the bishop.
If 17. Ba6 Qa8 18. Bd3 Rfb8 you have all the attacking potential you could ever want. Just swing the d7 knight to a4.
and 17. b3 or 17 . Bb3 can both be met with 17 …a5 and 18 ….a4 so the bishop can’t stay on the c4 f7 diagonal.
and if 17. Bd3 c5 threatens 18…. c4 and forces Black to take en passant, opening another file for your rooks and bringing your e7 knight into the game.
I liked your comment about unnecessary and ill-timed pawn moves. That’s one of my major weaknesses. I gave a lecture at the Kolty Club on this topic, which I called “To Take is a Mistake.”
On 15. … bc 16 Bc4 Rb4 17. b3 a5 18. a4 it looks as if White is setting up a fairly good fortress on the queenside — I don’t see a breakthrough for Black, and the rook on b4 is going to get harassed pretty soon. However, there’s no question that this is better than 15. … bc 16. Bc4 c5? So you can argue that the biggest culprit was not my 15th move but my 16th.
On move 25, I think that 25. … Re5! is a great find. There are so many good things about it. First, it gives my knight, which was a passive bystander for the whole game, a way to get into the attack. It’s always a good question to ask, “How can I make my worst piece better?” and this would have been a great answer. Another good question to ask is, “How can I make my existing threats stronger?” You’re right, I was in a big rush to play 25. … b4, but really it’s a bit premature. If my opponent had been a more cautious player, he could have just played 26. Na4 and I haven’t gained all that much. By contrast, 25. … Re5 turns … b4 into a monster threat.
Although 25. … b4 turned out well after 26. Qxh5, it required superhuman calculating abilities (or a lot of luck). By contrast, 25. … Re5! is logical and doesn’t require me to find superhuman moves.
I’m not so impressed with 25. … Rbh8. I’m sure I considered this move, but it seems to just lose a pawn after 26. Qxb5 Qxb5 27. Nxb5 Rxh4 28. Rxh4 Rxh4 29. Nxd6, which protects e4 just in the nick of time. Not only is White a pawn up, that pawn (the a-pawn) is going to be hard to stop.
You seem to have a dichotomy with sacrifices: either you can calculate them out all the way, or they are “luck.” I strongly disagree. Mikhail Tal, who knew his way around a sack, said that some sacrifices cannot be calculated and you simply have to trust your evaluation of the position.
This thinking issue can be made worse by computer analysis, which suggests that there is a factual answer to almost every sacrifice’s correctness and you should be able to figure it out. But we’re not computers and that’s not how we work. Especially with a clock running!
This is a great point of view. Analyzing with a computer does encourage the illusion that you are getting a definitive answer. And even if the computer’s analysis is definitive, it can’t be duplicated during a game.
I emphasized the computer analysis a lot in this post, in part because it was so surprising to me. The computer analysis was very helpful in identifying the two times when I resolved the pawn tension in a way that was favorable to my opponent. That taught me a good lesson because I was able to assimilate the knowledge in human terms.
On the other hand, the computer analysis of my exchange sac was less useful. The position still looks to me like one where Black has excellent practical chances but probably not a win. The computer says it *is* a win, but I can’t explain why. I’m not able to translate the computer evaluation into a lesson.
Actually, let me amend that. Even here there is a lesson, because the computer analysis identifies some excellent “quiet moves” like … Qe2 and … Qf2 that I might not have found in a game. This is a chronic weakness and difficulty for me: it’s very hard for me to sacrifice material and then play a quiet move. I feel a lot of pressure to keep making direct threats. So to the extent that the computer analysis reminds me to look for quiet moves as well as checks and captures, even in the midst of hand-to-hand combat, it is a useful lesson.