Two posts ago I wrote about the Santa Cruz chess “scene” as it was when I first moved here, in the late 1990s. I didn’t mention that Monterey also had a little bit of a chess scene. A forty-five minute drive away, on the other end of the Monterey Bay from Santa Cruz, it had the one thing that Santa Cruz lacked: a permanent home for its chess club.
I wrote once before about Ted Yudacufski’s little chess emporium on Alvarado Street, and I strongly encourage readers to read that post and the comments that followed it. By the way, I think “emporium” is the perfect description — it captures the quaint, slightly shabby, bygone-era feel of the place. He kept the Monterey Chess Center going for years and years, until the building was sold underneath him, and then I guess he had to pack it up. But before then, during the early 2000’s, the chess club had once-a-month rated tournaments that were worth making a day trip from Santa Cruz.
The game I’ve chosen to show you for the year 2000 was a 17-move miniature that I played in one of Ted’s tournaments. My opponent, Reuben Lenz, was a class-A player who liked to play Bird’s Opening (1. f4). That was unfortunate for him because there was also a player in Santa Cruz, Gerhard Ringel, who regularly played 1. f4, and I had worked out a prepared variation for use against him. For me, it was fortunate because I got to kill two birds (or should I say Birds?) with one stone!
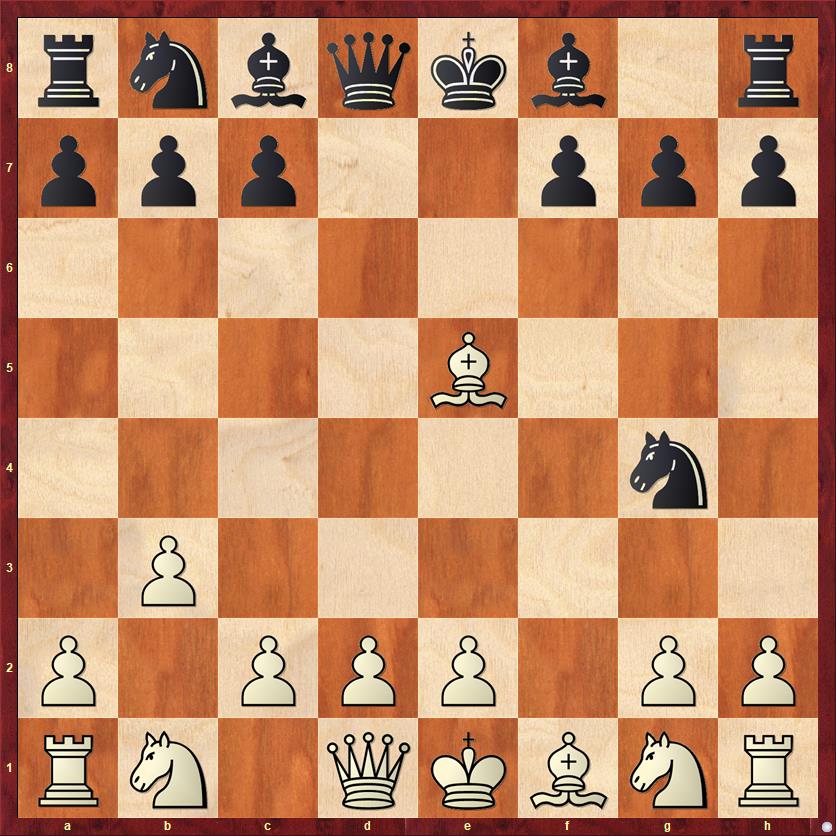
Reuben Lenz — Dana Mackenzie, 9/24/2000
1. f4 Nf6 2. b3 d6 3. Bb2 e5!
After three moves, Black has completely equalized.
This move could perhaps be called a “From’s Gambit Deferred,” because it’s a similar idea to the regular From’s Gambit, 1. f4 e5. However, I don’t really like the regular From’s Gambit because in the main line, both sides have to play some weird, anti-chess moves (… g5 and … g4 for Black, Nh4 for White). By comparison, in the From’s Gambit Deferred, Black plays 100 percent natural moves and gets a won game if White chooses to accept the gambit. For that reason I would prefer to call this variation “From’s Gambit Improved,” and I strongly recommend it for any player of the Black pieces at any level.
By the way, this move also answers a question that has always been a little bit perplexing to me. Why is the Dutch Defense (1. d4 f5) considered more or less playable for Black, good enough that even elite grandmasters sometimes play it, but its counterpart the Bird’s Opening (1. f4) is almost never played by grandmasters? One reason is that in the Dutch Defense, the opponent has already committed himself to moving the d-pawn two squares. If Black were required to reply to 1. f4 with 1. … d5, I would perhaps be willing to play 1. f4. But the From’s Gambit Deferred shows that White’s whole conception is strategically wrong. With 1. f4, especially followed by the queenside fianchetto, White is trying to do one thing: control the dark squares in the center, especially e5. By playing … d6 and … e5, Black completely defeats this plan.
Finally, let me say that 3. … e5 is a great example of Mackenzie chess. Whenever my opponent thinks he has prevented a move, I always ask whether I can play it anyway.
Lenz, of course, had never seen this variation before and he does what anyone would do: accept the gambit.
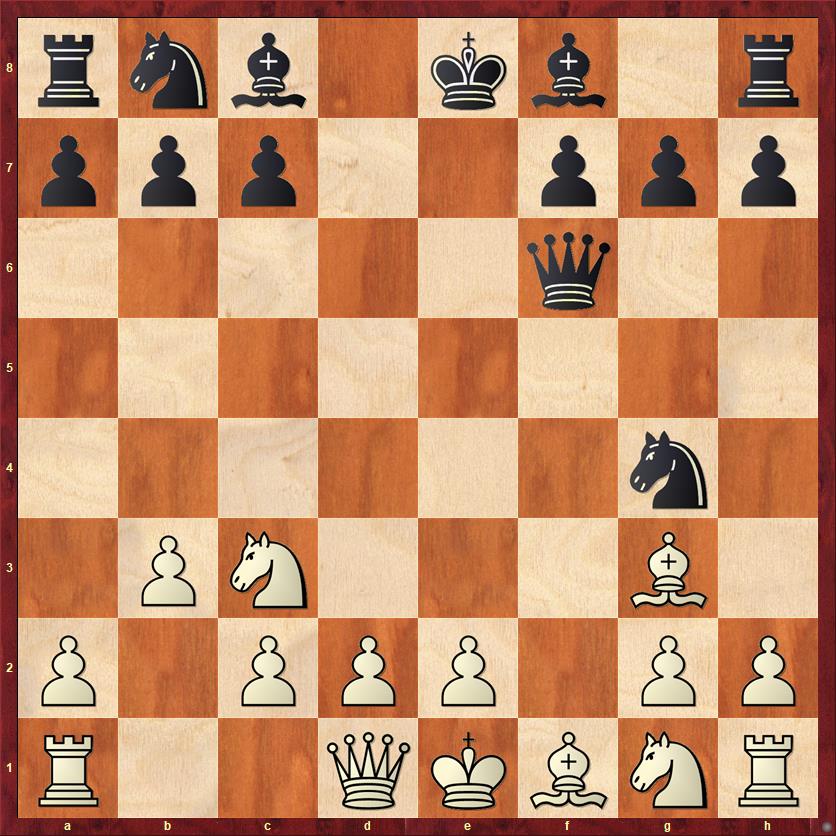
4. fe de 5. Bxe5?? …
In my opinion this move simply loses. If he wants to stay in the game, White has to continue developing with a move like 5. e3. And probably he’ll be fine, but it does sort of appear as if the two players have traded colors: White is now playing a Black-like position and vice versa.
5. … Ng4
FEN: rnbqkb1r/ppp2ppp/8/4B3/6n1/1P6/P1PPP1PP/RN1QKBNR w KQkq – 0 6
Let’s consider the possibilities for White, from worst to best. All of them, though, are pretty horrible.
(A) Defending the bishop with 6. Nf3?? doesn’t work because of 6. … Nxe5 7. Nxe5 Qd4, winning a piece.
(B) Defending the bishop with 6. d4? is unappealing if Black plays the simple 6. … Nxe5 7. de Qxd1+ 8. Kxd1. However, the computer shows that Black does even better to increase the pressure rather than trading on e5 right away. After 6. d4? Nc6! 7. Nf3 now Black can play 7. … Nxe5 8. Nxe5 Nxe5 9. de and instead of trading queens, Black wins big-time material with 9. … Qh4+! 10. g3 Qe4.
So from variations (A) and (B) we conclude that White has to move the bishop. He has two choices: move it to the queenside and abandon the kingside (which happened in the game) or move it to the kingside and abandon the queenside. That is the computer’s preferred variation:
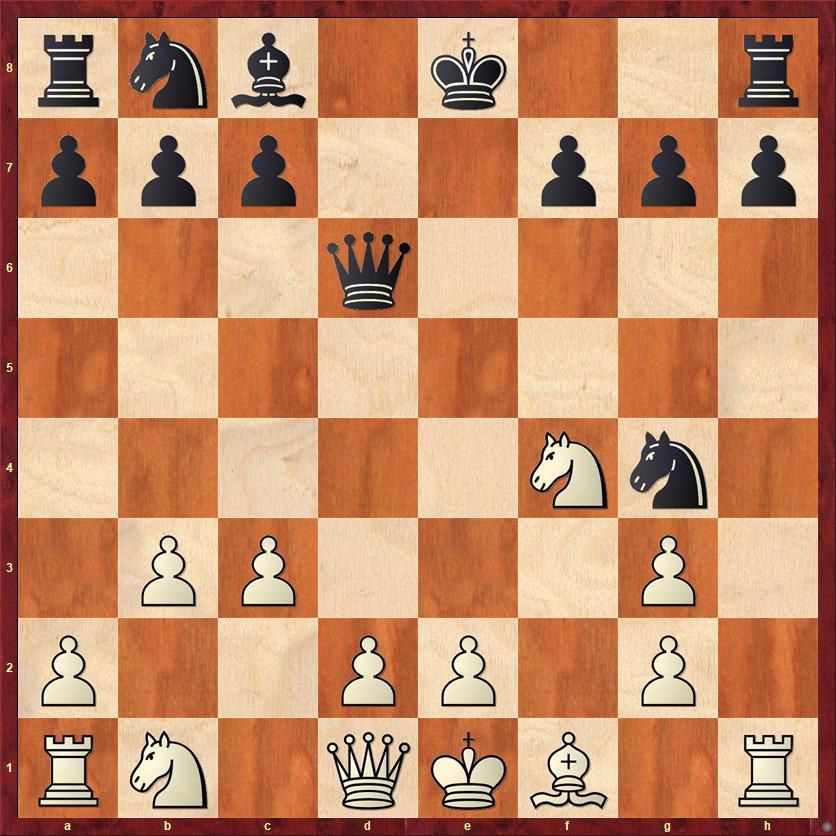
(C) 6. Bg3. Now Black follows up with the simple, powerful move 6. … Qf6! The point is revealed after White plays the seemingly natural response 7. Nc3. Can you find Black’s winning shot?
FEN: rnb1kb1r/ppp2ppp/5q2/8/6n1/1PN3B1/P1PPP1PP/R2QKBNR b KQkq – 0 7
Congratulations if you spotted 7. … Ne3!! This threatens both White’s queen and a stunning checkmate on f1 — a theme I don’t think I have ever seen in any other opening. So White has to play 8. de and after 8. … Qxc3+ (8. … Bb4 is also good) 9. Kf2 Bc5, Fritz gives Black a 4-pawn advantage, while Stockfish give him a 6-pawn advantage.
For this reason, after 6. Bg3 Qf6, 7. Nc3? is impossible and White is forced to play yet another anti-positional, anti-developmental move, 7. c3. I think that any player alive would rather be Black here, but I’ll go a few more moves because there’s more fun stuff, courtesy of Fritz, after 7. … Bd6 8. Nh3 (White’s best try; of course 8. Bxd6 runs into 8. … Qf2 mate) 8. … Bxg3+ 9. hg Qd6 10. Nf4. Like Horatio at the bridge, White’s knight tries to hold off Black’s attack single-handedly, and indeed after 10. … g5? 11. Nh5 he would succeed. But Black has a powerful, master-level response that I probably would not have found.
FEN: rnb1k2r/ppp2ppp/3q4/8/5Nn1/1PP3P1/P2PP1P1/RN1QKB1R b KQkq – 0 10
The ingenious move found by Fritz is 10. … h5!! The point of this move is to take away the h5 square, so that Black now threatens to play 11. … g5. You might say, but wait a minute, why can’t White just take the pawn? Go right ahead! If you play 11. Nxh5 Rxh5! you lose a piece immediately — you can’t play 12. Rxh5 because of 12. … Qxg3 mate. Or if you play 11. Rxh5 Rxh5 12. Nxh5 Qh6 13. Nf4, in spite of your best efforts Black’s queen worms her way into the position with 13. … Qh2, winning. After, say, 14. e3 Qxg3+ 15. Ke2 Nf2 both threatens the queen and … Bg4 checkmate. The least-worst variation for White after 10. … h5!!, according to Fritz, is just to give away the knight with 11. d4 g5 12. Nxh5 Qg6, but even in this variation the computer has a super-cool trick in mind: 13. Nf4! Rxh1!! 14. Nxg6 Rxf1+! 15. Kxf1 Ne3+ and Black emerges a piece ahead. I love this reprise of the theme of the lethal check on f1 and the knight move to e3, played in the opposite order this time.
Sorry to go on so long with all of this analysis, but the lines are beautiful and absolutely crushing. To be honest, in my home analysis I had not discovered all of this. I was still living in the dark ages, with no strong chess program on my computer. (I think I got my first copy of Fritz around 2002 or 2003.) So I was not actually certain that Black was winning after 6. Bg3. However, I think the computer analysis leaves little doubt.
The only move left to talk about is the one that Lenz actually played. (Go back to our very first diagram.)
6. Bb2? …
Question mark because it’s a little bit easier for Black to find the right moves in this line than it is in the 6. Bg3 line.
6. … Bd6 7. Nf3 …
Forced. 7. g3 Nxh2! 8. Rxh2 Bxg3+ 9. Rf2 Qh4 would be a very sad way to go.
7. … Nxh2?!
Even though I had analyzed this position at home, I took the pawn the wrong way. The move 7. … Bxh2! is more accurate because it forces White to sac the exchange right away; otherwise 8. … Bg3+ followed by 9. … Nf2 will win a whole rook. In essence, 7. … Nxh2 loses a tempo because the knight has to come back to g4 rather than just staying there.
To put it another way, 7. … Bxh2 would be like a mercy killing. After 7. … Nxh2 White is left staggering around in a zombie-like state, where his pieces are all in completely ridiculous places but he can’t actually resign yet.
8. Kf2 Ng4+ 9. Kg1 Bg3 10. Rh5 Nf2 11. Qc1 …
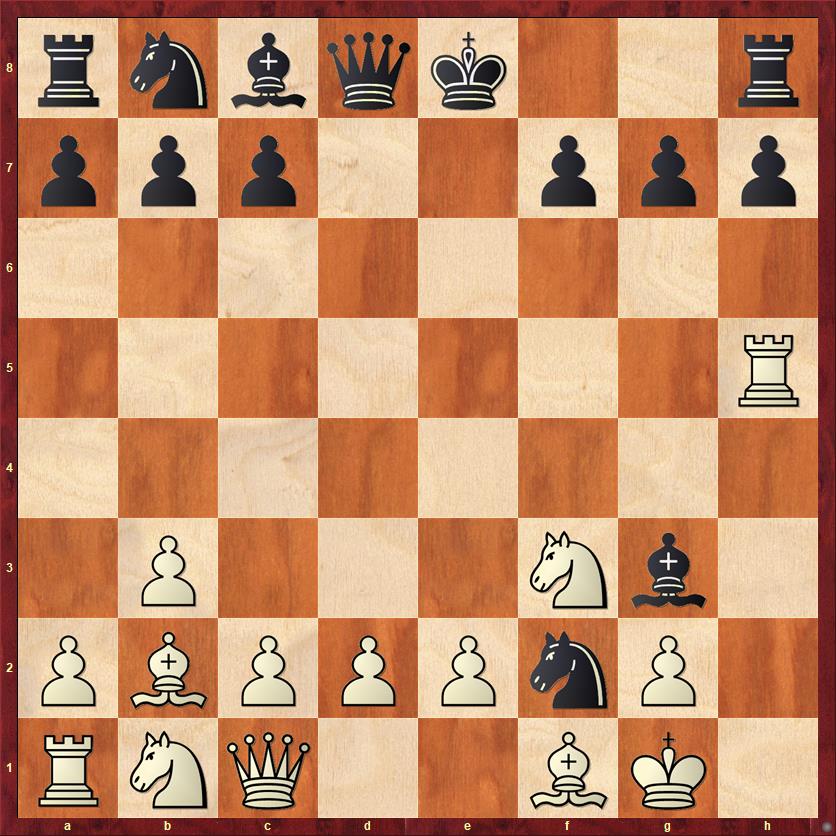
FEN: rnbqk2r/ppp2ppp/8/7R/8/1P3Nb1/PBPPPnP1/RNQ2BK1 b kq – 0 11
I feel sorry for White. He has one of the most discombobulated positions I’ve ever seen. Nothing makes any sense. The rook on h5, detached from the rest of White’s army, has no idea of where it wants to be. The king on g1 has as many enemy pieces in his face as defenders. The bishop on f1 has not woken up yet. The remaining pieces cluster in a frightened clump on the queenside. Gaaack!
As Black in such a position, you just try to keep a level head and not give your opponent any chance to make trouble. So I played a quiet, defensive move, my only one of the game.
11. … f6 12. e3 Bg4 13. Rb5 a6!
Black’s main objective here is to get his queen to h5. So I was happy to offer my b7 pawn as bait — anything to get White’s rook off the fifth rank.
14. Rxb7 …
Might as well. 14. Rb4 would also be met by 14. … Qd5.
14. … Qd5 15. Rxb8+ Rxb8 16. Ne5 fe 17. Bc4 Qd6 White resigns
From move 6 on, this game was really kind of a slaughter. However, I still think it’s a cute game because of the opening and the wonderful way in which Black’s pieces work together. I consider the “From’s Gambit Improved” to be my second-best homebrewed opening ever. Its only downside is that, because there are so few people who play 1. f4 as White, you will have to wait a long time to get a chance to spring the trap.
Lessons:
- If you insist on playing 1. f4, you should only play 2. b3 and 3. Bb2 if Black answers 1. … d5. Even then I’d be inclined to play Nf3 and e3 first, just to get my kingside developed more quickly.
- If your opponent thinks he has prevented you from playing a certain move, always ask whether you can play that move anyway. [Black, move 3]
- If your opponent is relying completely on one piece to hold his position together, it is very often worth sacrificing material to “decoy” that piece away from its best defensive location. [See Black’s decoy sacrifices in diagram 3, and in the game after White’s move 13.]


{ 2 comments… read them below or add one }
1. f4 e5 2. fxe5 Nc6 3. Nf3 d6 4. exd6 Bxd6 5. d4 Nf6
I play something similar with good results
I am a Bird/Dutch player, and in recent years I am slowly and painfully coming to agree that lines where Black refrains from …d5 (or, in the Dutch, White refrains from d4) are a big problem. It’s not wise to play 1. c4 f5, for example, much as I’d like to, and 1. Nf3 f5 is also not a good idea. In both cases it is too easy for White to force e4 before Black is ready for it.
I think one’s chances of getting away with this are better in Bird’s because of the extra tempo, but it has to be used for 2. Nf3 to stop shenanigans of the kind seen in this game.
I haven’t lost to anything as cute as the lines you show, but I did manage to play a Dutch against a lower-rated kid where I dropped FIVE pawns in the opening. I learned that, while this does yield some open lines for your pieces, after you drop five pawns it is impossible to put your king anywhere; of course I got mated.