Step right up for round two of the Emory Tate versus Dana Mackenzie show! If you didn’t catch round one, you can go back and read it in my Year 31 post. Technically, today’s game is round four, because we had played three games before this one, with two wins for Tate and one draw. This was the game where I finally got my revenge.
It was the fifth round of the 2004 Far West Open in Reno, and until this point I had played a very typical Dana Mackenzie tournament. Round one: I was outplayed positionally by a grandmaster (Gregory Serper). Never had a chance. Round two: I played an unsound piece sacrifice against an expert and won. Round three: I lost to Michael Aigner. I always lost to Michael Aigner. Round four: I played an unclear piece sacrifice against an expert, he declined it, and I won.
Even in my wins, as I wrote in my notebook, I played with “more bravado than insight.” And that was certainly true in my game against Tate. He really outplayed me in this game. What’s interesting is that he outplayed me strategically, and the reason he lost the game was tactics. That’s a little bit surprising, considering that he’s the guy whose biography (by Daaim Shabazz, apparently out of print) is called Triple Exclam!!! He missed a very clear and crushing piece sacrifice that would have won the game for him, and he also missed the tactic that won the game for me.
I’ve written previously that “Tactics follow Strategy.” Which is true, in a perfect chess world. But in chess games played by humans, Tactics is like a wild and undisciplined fairy. Sometimes she follows Strategy, and sometimes she goes off in a completely different direction of her own. For people who like their Tactics wild and undisciplined, I submit to you the following game.
Dana Mackenzie — Emory Tate, 4/11/2004
1. e4 c5 2. f4 e6 3. Nf3 Qc7 4. g3 …
Nowadays I would probably play 4. d3, but either move should be fine.
4. … d5 5. d3 Nf6 6. Nbd2 b6 7. Bg2 de 8. Nxe4 Nxe4 9. d3 Ba6
We come to the first turning point in the game.
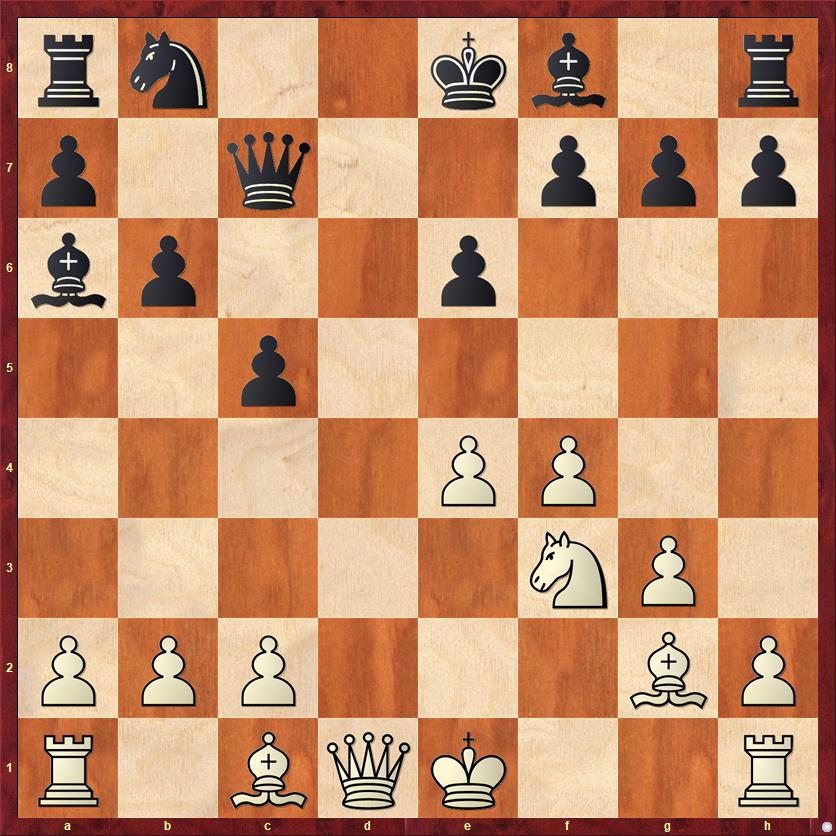
FEN: rn2kb1r/p1q2ppp/bp2p3/2p5/4PP2/5NP1/PPP3BP/R1BQK2R w KQkq – 0 10
One of my chess friends whom I had not yet met, Juande Perea, likes to say, “How bad can it be?” I think that the question would have been appropriate here. Okay, Black has stopped me from castling, at least for the moment. But how bad can it be? The bishop is strangely posted on a6, and not defended. It would have made a lot of sense to continue 10. c3, with the idea of 10. … Nc6 11. e5 Rd8 12. Qa4! Now Black really starts to feel the weakness of his light squares. For example, he can’t play 12. … Bd3 13. Nd4! Instead, he will have to retreat with 13. … Bb7, and then I can castle quite calmly. Alternatively, after 10. c3 Black might play for quick kingside development with 10. … Be7, but it’s not quick enough: I play 11. Qa4+ b5 12. Qc2 and the b5 pawn blocks Black’s bishop, so I can castle next move. If he plays 12. … b4 to reopen the diagonal, I play 13. c4 to re-close it.
So what I overlooked was that by playing ordinary developing moves and making threats, I could force him to either retreat his bishop or block the bishop’s diagonal. Instead I was considering unpleasant options like 10. Kf2, and not liking them. Finally, I decided that against Emory Tate, I would rather be the attacker than the attackee, and I decided on a dubious pawn sacrifice.
10. c4!? …
In my notebook I wrote, “an excellent dynamic move.” But it kind of wilts under computer analysis. It would be great if the pawn sac created some sort of weakness in Black’s position, but actually his a7-b6-c5 pawn formation is quite strong. At best, the pawn sac gains me two tempi, and it’s doubtful that that is enough.
10. … Bxc4 11. Ne5 Ba6 12. Be3 Be7
It’s worth noting that 12. … Bd6, the move that Black would probably like to play, is met by 13. Nxf7! Kxf7 14. e5, winning back the sacrificed material. So Black does have to be a little bit careful.
A really interesting variation is 12. … Nc6, when I probably would have played 13. Qa4 Bb7 14. O-O-O Bd6 15. Rxd6!? Qxd6 16. Rd1 Qc7 17. Rd7 Qxd7! 18. Nxd7 Kxd7. With two rooks and a pawn for the queen, Black has the material advantage, but he has to be at least a little bit uneasy because his king is in the center of the board and White’s two bishops have some nice diagonals. This is a position I would be willing to play as White, on the grounds I just mentioned: against Emory Tate, I’d rather be the attacker than the attackee.
All in all, 12. … Be7 was a good, solid, sane developing move.
13. Qc2?! …
The computer says I should interpolate 13. Qa4+, inducing 13. … b5, and then play 14. Qc2. “What’s the difference?” you might wonder. The key point is that White actually would prefer to castle kingside. I’m asking Black, “Just how far will you go to keep me from castling kingside? Is it so important to you that you’ll play … Kf8?” (Probably not.) And a subsidiary point is that Black’s queenside pawns become looser after 13. … b5.
Little strategical misses like this can turn an okay position into a bad one.
13. … O-O 14. O-O-O b5
This is not the computer’s top choice, but it’s a very principled move. From the strategic point of view, it’s exactly right. Now that White has castled queenside, Black’s queenside pawn majority is not a weakness but a formidable strength. Tate is getting ready to march those pawns right down the board.
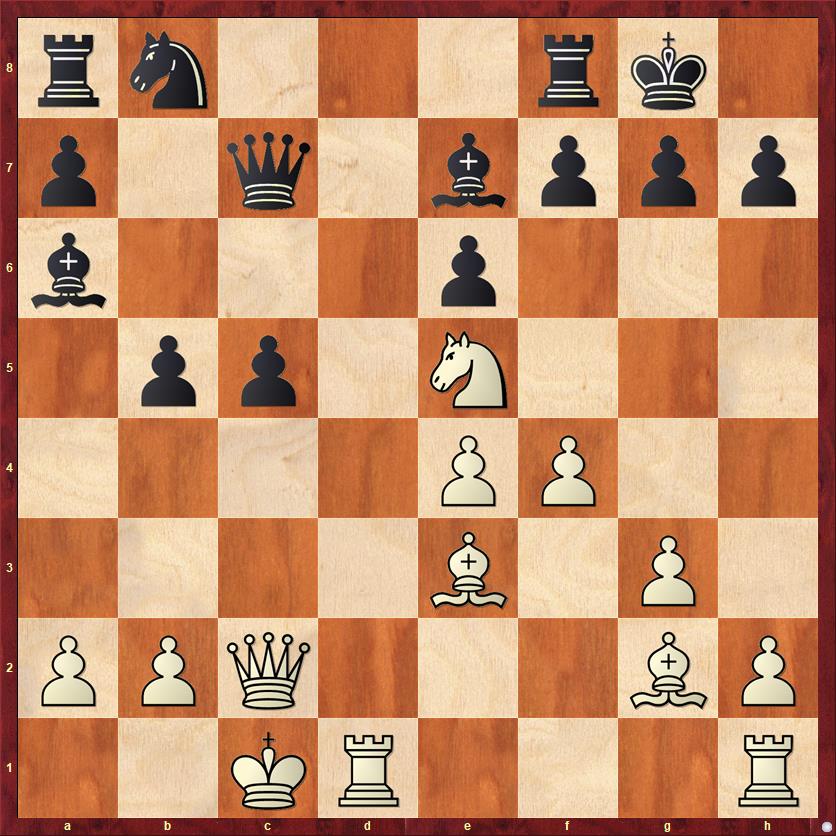
FEN: rn3rk1/p1q1bppp/b3p3/1pp1N3/4PP2/4B1P1/PPQ3BP/2KR3R w – – 0 15
15. f5! …
I loved this move, following up my pawn sac with a piece sac that, of course, cannot be taken: 15. … Qxe5? 16. Bf4 Qf6 17. e5 Qxf5 18. Qxf5 ef 19. Bxa8. In my postgame notes, I wrote, “15. f5! — my favorite move of the game — shows that White is still in control.”
What a laugh! The next few moves show that it is Black who is in control. My comment is just like my play: combining suicidal bravado with delusional innocence about what is actually happening in the position.
15. … c4!
Not distracted by my “brilliant” piece sacrifice, Tate continues his own pawn march.
16. Bf4 f6!
I love this move, too. Tate pulls out his playbook from our game in Year 31. In that game, too, he sacrificed an exchange to shut down my counterplay and take the initiative. It worked then, and it should have worked in this game.
17. Ng6 e5 18. Nxf8 Kxf8 19. Be3 …
White’s initiative is over, and the retreating begins.
19. … Nc6 20. Kb1 Nb4 21. Qc3? …

FEN: r4k2/p1q1b1pp/b4p2/1p2pP2/1np1P3/2Q1B1P1/PP4BP/1K1R3R b – – 0 21
White is ready to meet 21. … Qa5 with 22. a3, and of course he’s ready to meet 21. … Nd3 with 22. Rxd3. But there is one threat that White is not at all ready to meet. Do you see what it is?
The answer — and one that I think an attacking player with Tate’s prowess should have found — is 21. … Nxa2! After 22. Kxa2 b4, the march of the queenside pawns is just overwhelming. For example, 23. Qe1 Qa5+ 24. Kb1 c3 and it’s hard to even suggest a good move for White. If 25. Kc2 b3+. If 25. Rd5 Qa4 26. Qf2 Bc4 27. bc bc. Notice that it’s not just the pawns driving this attack — it’s the bishops and the rook too, after the pawns have loosened up the target.
You might wonder why, with an extra rook, White is so powerless to stop the onslaught. The reason is that White’s extra rook, sitting on h1, is the least relevant thing about this position. All that matters is that Black has more material in the relevant sector of the board, and he has enough open lines (or is able to open up enough lines) to use that material effectively.
Now another good question is: Why did Tate miss this? I think that for a moment he had the same problem that I sometimes do: tunnel vision. I don’t think he seriously thought about … Nxa2. The square that he is aiming for with his knight is d3, and so he plays a move that prepares to sink the knight on that square. I can’t argue, it’s a nice square. But it’s not overwhelming in the way that Black’s attack would have been after … Nxa2.
21. … Qb7?
According to Fritz, this move drops Black’s advantage from 5 pawns to 0.3 pawns. That’s a pretty hefty drop!
But still, the game isn’t over. In some ways, the game is just beginning. Few chess games are perfect. White has made some mistakes, now Black has made a mistake. I didn’t even know that I had dodged a bullet, but even if I had known, it wouldn’t have mattered. All that matters now is who is going to play better for the rest of the game.
22. a3 Nd3 23. b4! …
An important move, which slows down Black’s attack on the queenside and denies the c5 square to Black’s knight.
23. … Qd7 24. Rd2 …
Indecisive. 24. Rxd3! is already competely playable. After 24. … Qxd3+ 25. Qxd3 cd 26. Rd1 Black can defend his d-pawn with 26. … Rd8, but then he loses the a-pawn to 27. Bxa7.
24. … Bb7 25. R1d1 Rd8?!
Tate wants to prevent the exchange sacrifice on d3 that is obviously coming, and he would also like to pressure the e-pawn with … Bc6 and … Qb7. So he is playing with a plan. An alternative plan would be 25. … a5 26. Rxd3 cd 27. Rxd3 Qc6, which looks likely to lead to a draw. Obviously, he wanted to play for more than a draw.
The trouble with this move is that it leaves the a7 pawn undefended. I have a feeling that Tate thought that this wouldn’t matter; he would gladly trade the a7 pawn for the e4 pawn.
26. Bxa7 …
It’s not just the win of a pawn that helps my position, it’s also the fact that I can now drive his rook away from d8.
26. … Bc6 27. Bb6 Rb8 28. Rxd3 cd 29. Rxd3 Qb7
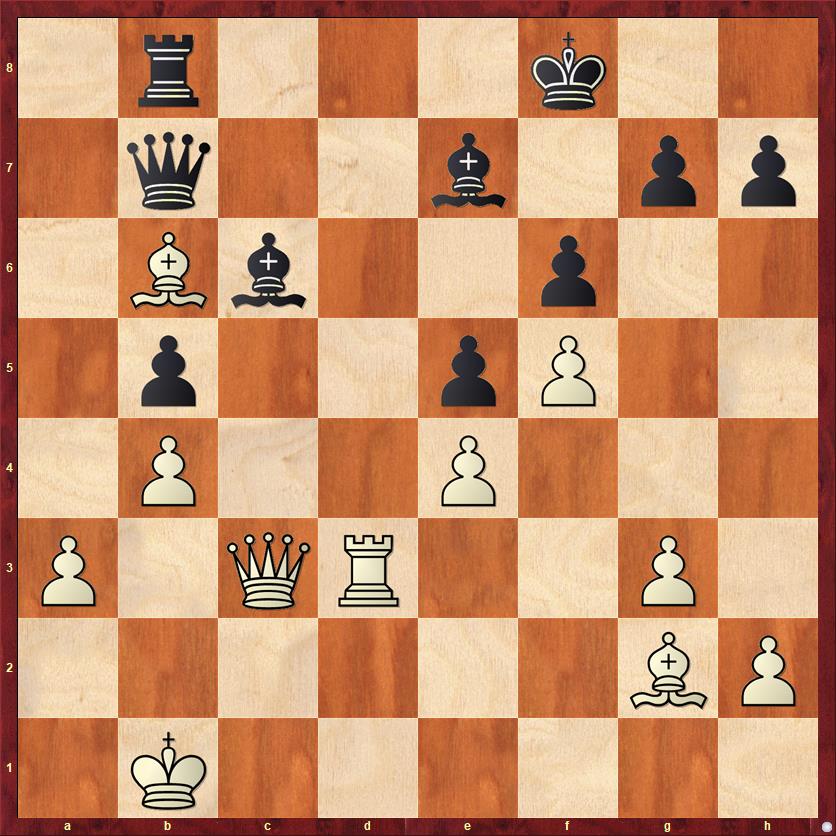
FEN: 1r3k2/1q2b1pp/1Bb2p2/1p2pP2/1P2P3/P1QR2P1/6BP/1K6 w – – 0 30
I’m certain that Tate had gotten to this position in his analysis on move 25, if not earlier, and thought that he was winning. I move my dark-squared bishop back somewhere, he takes on e4 and has a much better endgame.
There’s just one little thing he didn’t see — that fickle fairy Tactics, flittering in and messing up even the finest plans of stodgy old Strategy.
30. Bc5! Bxe4??
There was still time for Black to back off with 30. … Bxc5 or 30. … Rc8. But then White is a pawn ahead, will have no trouble defending his weak pawn on e4, and has every reason to be optimistic about winning the endgame. The text move, however, is much worse for Black — it loses immediately.
31. Bxe7+ Kxe7 32. Bxe4 Qxe4 33. Qc7+ Black resigns
My diary comments are interesting. “One spectator who was watching said that I had a look of disbelief on my face when Tate resigned. That shows how my confidence has eroded in recent years. I really couldn’t imagine beating a player of Tate’s caliber — a draw, maybe, but a win seemed too good to be true. Tate was pretty surprised, too. He told me after the game, ‘I got overconfident. I deserved it.'”
A sign of his overconfidence was the speed of the last few moves. We were both playing at rapid tempo. I was playing quickly because, as usual, I was in time trouble. But he had plenty of time left. Either he was trying to “blitz” me into making a mistake — a very bad idea, you should never try to blitz someone who is in time pressure — or else, as I think likely, he had worked out the whole variation in advance and didn’t see the need to stop and check for blunders.
Lessons:
- Often your opponent’s threats aren’t as serious as they seem to be. Ask yourself, “How bad can it be?” Maybe you don’t need to defend his threat; maybe normal aggressive moves will make the threat go away by itself. [White move 10.]
- Keep an eye open for “two-steps.” You want to move your piece to square a, but sometimes you should move it to square b first, force your opponent to make a response that improves your position in some way, and then move it to square a. [White move 13.]
- Study defensive exchange sacrifices. There are two good ones in this game, on Black’s move 16 and White’s move 28.
- When evaluating an attack, the most important thing is not the overall material count but the material count in the relevant part of the board. Also it’s important to ask whether the side with the extra material can create enough open lines to achieve a breakthrough. [Black move 21.]
- Don’t rush when your opponent is in time pressure. If you do, you’re letting his problem become your problem! [Black moves 25-30, possibly.]
- Beware of overconfidence. “It is not enough to be a good player, you must also play well.” — Siegbert Tarrasch [Black moves 25-30, definitely.]


{ 2 comments… read them below or add one }
Hello Dana,
Can I include this game in my forthcoming chess book, “The Chess Mechanic”, as an example (by your opponent) of how not to play the opening? The combination you played is quite nice.
Mike
Hi Mike,
Sure! Go for it!