As the finish line of my retrospective approaches, we’re going to put on a “finishing kick” and cover three years in one post. The reason is that I have almost no games to show you from the years 2016 to 2018. I played in only one tournament, with 5 games, in 2016; no tournaments in 2017; and two tournaments, with 13 total games, in 2018. I didn’t play a single tournament game for more than two years, from March 2016 to June 2018.
There was a reason, of course. The only other time I ever went two years without playing was when I was in graduate school (1980-1982), when I had to temporarily give up chess because I didn’t have time for it. Likewise, in 2016 and 2017 chess took a back seat to the book I was writing with Judea Pearl: The Book of Why. I have zero regrets about this, because that book was the most important thing I have done in my career as a writer.
By 2018, the book was finished, and it was published that May. It was the end of a long journey, but every step was worth it. Our book was a critical success and managed to hit Amazon’s Top 100 list, for one day. (It never managed to dent any “real” bestseller lists; that would be the equivalent of being in the Amazon Top 100 for a week.) I was especially happy when our book was reviewed in the New York Times and selected as one of the top books of 2018 by NPR’s Science Friday.
Another piece of good news came along that spring: I was offered a chance to be “journalist in residence” at the Simons Institute for the Theory of Computing in Berkeley for eight-week summer session. I learned a lot about quantum computing that summer, probably just enough to realize how much I don’t know.
The eight weeks of my internship coincided exactly with the eight weeks of the summer Tuesday Night Marathon (chess tournament) at the Mechanics Institute. I had always wanted to play in a Tuesday Night Marathon, but it had never been practical because it’s such a long drive from Santa Cruz to San Francisco. But if you’re in Berkeley, it’s an easy subway ride! So this was my perfect opportunity to kill two birds with one stone: to return to tournament chess and play in one of the country’s most historic chess venues.
Alas, the things we look forward to don’t always work out as well as we had hoped. I struggled in that tournament, going 5-3 against mostly class-A level opponents. In retrospect, it’s scarcely surprising. I had not played in two years and had my mind on other things, like book reviews and book readings and quantum computing and, oh by the way, did I mention that my nephew got married and I took a quick trip to Newport, Rhode Island, for his wedding? Yeah, that happened too.
I did have one outstanding win in the seventh round, where I sacrificed two pawns and the exchange for a winning kingside attack. However, I blogged about that game in great detail and I really have nothing to add to what I wrote before. Feel free to check that game out, especially if you’re interested in sacrificial attacks against the French Defense.
But since I don’t want to just repeat myself, I’ll have go to plan B and annotate a different game, which I played in round five. It is another wild and exciting game. Although it ends in a draw, I’m sure you will enjoy it. I did blog about it at the time, but only about one crucial position; I’ve never showed the entire game. One reason I’m selecting this one is that it also gave rise to one of the best online post-mortems I’ve ever had on this blog. Larry Smith, Mike Splane, and Juande Perea all sent really great comments, and this will give me the opportunity to add their discoveries to my own analysis.
Greg Sarafian — Dana Mackenzie, 6/27/2018
My opponent was an expert who hit his lifetime peak rating (2014) in this tournament.
1. d4 Nf6 2. Nf3 d5 3. Bg5 Ne4 4. Bf4 e6 5. c3 Nd7 6. Nbd2 Ndf6 7. h3 Be7 8. e3 O-O 9. Bd3 b6 10. O-O Bb7 11. Ne5 c5
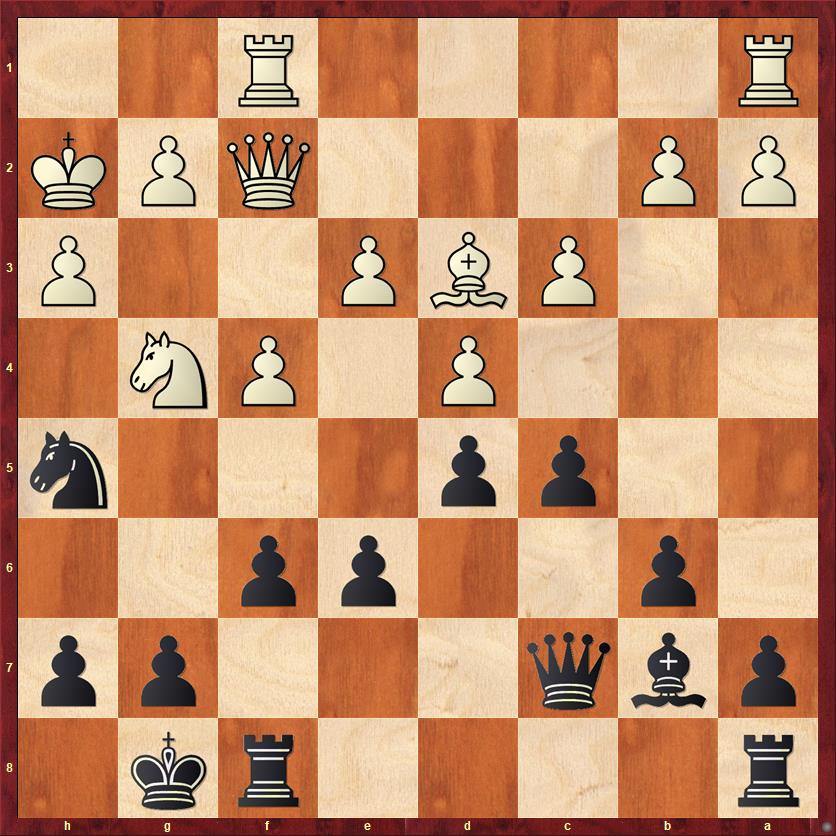
Both sides have completed their development normally and now the action is starting to heat up, so perhaps it’s time for a diagram.

FEN: r2q1rk1/pb2bppp/1p2pn2/2ppN3/3PnB2/2PBP2P/PP1N1PP1/R2Q1RK1 w – – 0 12
The two big questions in this position are: 1) If White drives my knight away with f2-f3, will it create weaknesses in his position that I can take advantage of? And 2) Will my bishop on b7 ever find any kind of purpose in life? I did not find satisfactory answers to either of these questions in the game.
12. f3 Nxd2 13. Qxd2 Nh5
Trying to create some air for my kingside pieces before White has the chance to play g2-g4.
14. Bh2 f6?!
A little bit too impatient. Another option might be 14. … Bh4, trying to put pressure on White’s weakened dark squares. After 15. g4 Nf6 the bishop looks a little bit exposed, but it’s not clear if White can actually take advantage of it. A more flexible idea is 14. … g6 15. g4 Ng7, with the threat of … f6 trapping White’s knight. Both of these variations are evaluated by the computer as completely equal. Basically, I should not be scared of White’s space advantage because my pieces are still mobile enough.
15. Ng4 …
Either overlooking or rejecting the idea of 15. Ng6! hg 16. Bxg6 winning a pawn for White. I think that Black would still have pretty good chances to hold a draw. After 16. … f5 17. Bxh5 Kh7 18. f4 (forced, to keep the bishop from being trapped) I already have the makings of a pretty good white-square blockade. Of course this means I will have to play 50 moves of patient defense, not exactly my idea of a fun game.
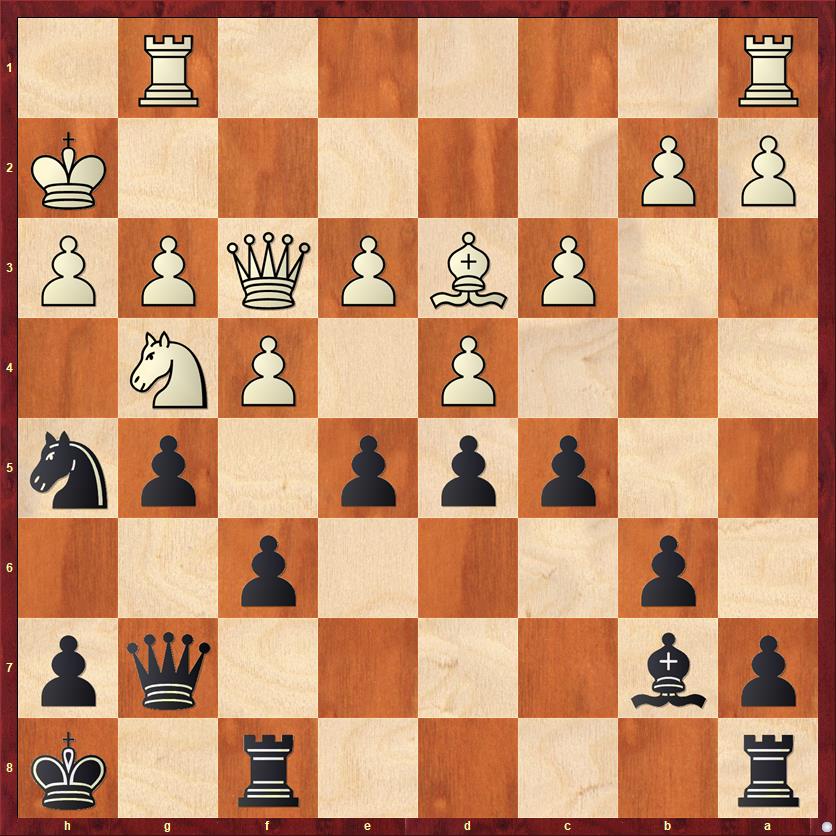
15. … Bd6 16. Qf2 Bxh2+ 17. Kxh2 Qc7+ 18. f4 …
r4rk1/pbq3pp/1p2pp2/2pp3n/3P1PN1/2PBP2P/PP3QPK/R4R2 b – – 0 18
Now I lashed out with a very impatient move.
18. … g5?
This move creates multiple weaknesses, on h6, f6, f5, and the g-pawn itself. I was thinking more with my heart than my head here. I wanted to shake White’s position up and do anything to create counterplay. I’m sure that the ratings and the clock situation also entered my mind; I want to speed the game up and put pressure on a lower-rated player.
But is this the type of position where we should be looking for a tactical solution? In general, you should go for tactics when there are good strategic reasons for thinking they will work in your favor. Here, that is not the case. Black’s pieces are no better posted, and in fact worse posted, than White’s. The QB and QR are out of action, and the knight on h5 is kind of in no man’s land. The only thing working in Black’s favor is the b8-h2 diagonal, where Black’s queen eyes White’s king, but that is a very small foundation to build an attack on. I’m really playing hope chess here — I’ll just try to put pressure on f4 and hope something good happens.
To approach the position more strategically, Black should ask, “What is my worst piece and how can I improve it?” That’s really easy. Both sides have very strangely posted knights that have no moves at the moment. Where would I like to see my knight go to? Well, the outpost on e4 beckons. And it’s not that hard to get to. It takes only four moves: g7, e8, d6, e4. But of course, to even get started I need to play 18. … g6. I think I was wary of letting White’s knight go to h6, but the move 18. … g5, which I actually played, has the same “defect” and more.
19. Qf3 Qg7 20. g3 Kh8 21. Rg1 e5!?
Burning all the bridges behind me. This move isn’t sound, but at least there is something to be said for the fact that it’s consistent. Damn the torpedoes, and full speed ahead. Now the game gets really, really crazy.
FEN: r4r1k/pb4qp/1p3p2/2ppp1pn/3P1PN1/2PBPQPP/PP5K/R5R1 w – – 0 22
22. Nxe5! Nxf4!
Both knights sacrifice themselves in desperado fashion.
23. gf fe 24. Qh5! …
A very calm and strong move by White. I was hoping for 24. de, when my bishop can finally get into the game with 24. … d4. Actually, White is probably doing well in that line too, but I totally agree with Sarafian’s decision to keep the genie (the Black bishop) in the bottle.
24. … ef 25. Rxg5 Qc7 26. Re5? …
For the first time White’s resolve starts to weaken. The problem with this move is that it turns White’s best attacker into a defender, and you have to ask whether this is really necessary. The computer, with its nerves of steel (or copper, or semiconductor), says that 26. Rag1! is completely winning. The point is that after either 26. … fe+ or 26. … f3+ White can simply play 27. Kh1. There is no need to use any of White’s attacking pieces for defense, because Black does not have enough attackers to create real threats! Plus, White has a really sneaky threat that Sarafian perhaps didn’t see. After, say, 26. Rag1 fe+ 27. Kh1 White threatens 28. Bxh7!! Qxh7 29. Qxh7+ Kxh7 30. Rh5 mate. The two-rook checkmate is not a mating pattern you see very often this early in the game. Black’s only real defense is to play 27. … Rf7, but now 28. Qg4 sets up Alekhine’s gun and threatens mate on g8, and Black is forced into full-fledged defense with 28. … Qc8 etc. The lesson here is that White’s threats are simply stronger than Black’s, so White has no need to play any defensive moves.
This is all really easy to say because I have a computer. It’s much harder to make this kind of assessment over the board, with your clock ticking. White’s move plays it safe, but it gives Black a little more time and a little more hope.
26. … fe 27. Re1? …
I have to give this move a question mark because technically this is where White loses his advantage. The computer says that 27. Rg1 is still absolutely winning for White, +3.70 pawns. The main reason is that it once again sets up the “sneaky threat” of 28. Bxh7!
But in the real world, this move follows completely logically from the previous one. If White had seen the idea of Rg1 followed by Bxh7, he would have played it last move. White did not see that threat, and instead he does the normal human thing, which is to defend and try to shut down Black’s counterplay.
I really have trouble criticizing any of Sarafian’s moves. The only thing he did wrong was that he didn’t play like a computer.
27. … cd 28. cd Rf2+ 29. Kh1 …
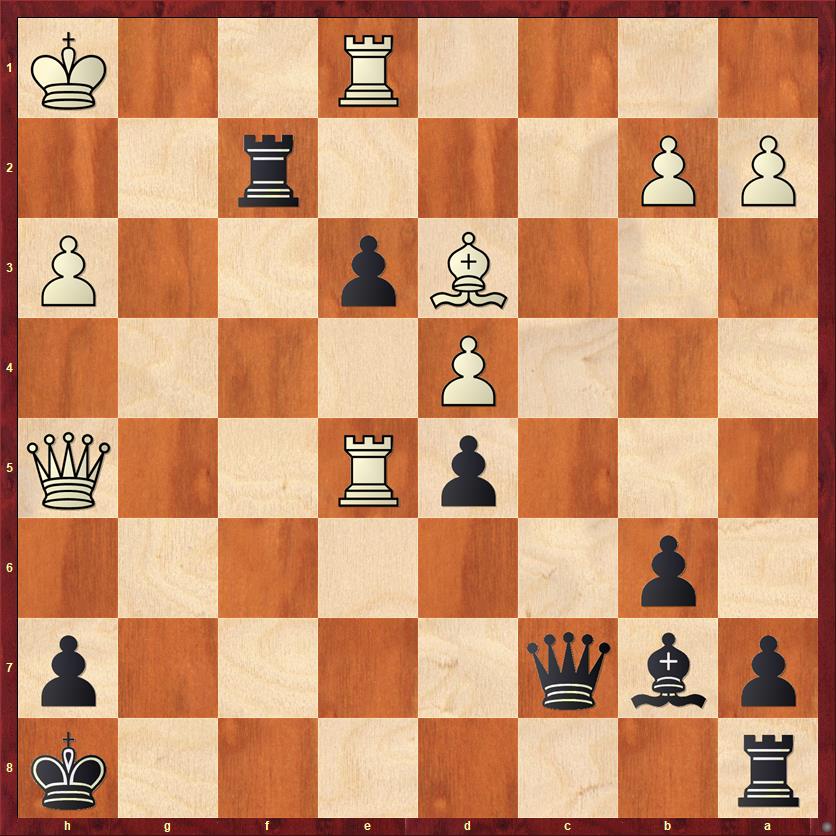
FEN: r6k/pbq4p/1p6/3pR2Q/3P4/3Bp2P/PP3r2/4R2K b – – 0 29
The last couple moves for Black were more or less automatic, but now we have arrived at a crucial moment. Black’s prospects have definitely improved, but the position is exceedingly dangerous for both sides. This is the position where I started my previous blog post about this game. A key thing to realize, by the way, is that I have 17 minutes left for the rest of the game. No time control, no extra infusion of time to look forward to. I used 12 of my 17 minutes on this move — very poor clock management — and still didn’t play the best move.
In a complicated position, with little time left, I think it’s important to start with the things you know about the position. As I wrote in my earlier post, one thing that I thought I knew was that White’s rook on e5 is pinned. He moves it, he gets checkmated. But that’s not quite correct! What I overlooked is that if he moves it with check (i.e., Re8+) then he doesn’t get checkmated and in fact he takes over the initiative.
Once you realize this, it makes Black’s decision very easy. The most important thing for Black is to keep that e5 rook pinned. Therefore there are only two moves that are even worth considering: 29. … R8f8 and 29. … Rg8. Both of those moves prevent Re8+. Of the two, 29. … Rg8 is much more promising because it closes the mating net around White’s king so that he can’t escape. After this, 29. … Rfg2 becomes a real possibility, and both White rooks are stuck! One can’t leave the first rank, the other can’t leave the fifth rank.
So in thirty seconds or less, with no calculation of variations, we have already arrived at Black’s best move, 29. … Rg8. Now is where the fun stuff begins. Several readers of my previous post came up with some great tactics for both sides. It’s likely that White will take the opportunity to grab the e-pawn, 30. R1xe3. First Larry Smith suggested that I could continue 30. … Qg7, which looks extremely strong because it threatens two checkmates at once, but then he noted that 31. Rg5! is a strong response. I saw this during the game, and it’s the reason that I didn’t play 29. … Rg8. I can’t take the rook because I would get mated on h7. Larry did point out, though, that I could play 31. … Rf1+!, a neat deflection idea. After 32. Bxf1 Qxg5 33. Qxg5 Rxg5 34. Bg2 I am alive, but there is no question that White has all the winning chances in the endgame because of his active rook and his better bishop.
Then Mike Splane chimed in and suggested a different and even more amazing way to deflect White’s bishop: 30. R1xe3 Ba6! His original idea after 31. Bxa6 was to play 31. … Qc2, but then Juande Perea pointed out that an even more crushing variation for Black is 31. … Qc1+ 32. Re1 Qf4!, and mate is unstoppable! Wow!
Then Larry Smith joined in again and said that after 30. R1xe3 Ba6! White has to play 31. Qh4! “hitting the rook on f2 and eyeing f6.” That last fact becomes crucial after 31. … Rfg2, when White miraculously saves the game with 32. Qf6+ Qg7 33. Re7!! This sweet queen sac was discovered by Juande Perea. Of course, if 33. … Qxf6 then 34. Rxh7 is mate, so Black has to acquiesce to a draw with 33. … Rg1+ 34. Kh2 Rg2+. Sadly, … Qg2 mate is impossible because the queen is pinned.
What an incredible variation! And I love the old-fashioned way we found it. Nobody turned on their computers, they just looked at their boards at home and found one key idea after another in collaborative fashion.
The bottom line is that 29. … Rg8 30. R1xe3 Ba6 is “only a draw,” but White would have had to earn that draw with some sensational moves. There is still a possibility that Black could play for a win with 29. … Rg8 30. R1xe3 Rfg2 immediately. Fritz evaluates this at +1 pawn for Black.
I didn’t see any of this, and after letting my clock tick down to 5 minutes I played more “hope chess.”
29. … e2?? 30. Re8+ …
You can imagine my reaction: Oh, s***! That rook isn’t pinned?
30. … Rxe8 31. Qxe8+ Kg7 32. Rg1+ Kf6 33. Qf8+ Qf7

FEN: 5Q2/pb3q1p/1p3k2/3p4/3P4/3B3P/PP2pr2/6RK w – – 0 34
There is one more twist in this amazing game! Three years ago I wrote, “Amazingly Black does seem to be surviving” — but I was wrong! White wins by force in this position. Do you see how?
First of all, let me say that my opponent did not find the win. In fact, I think he was hugely relieved to bail out to a draw with 34. Qd6+ Qe6 35. Qf8+ 1/2 – 1/2. Let’s not forget that a draw was a good result for him, as the lower-rated player.
Nevertheless, White is completely winning after 34. Qh8+! This little two-step, Qf8+ followed by Qh8+, is a nice example of what I call “moving your opponent’s pieces.” First he lures my queen to f7, where it is more exposed. Then after 34. Qh8+! Ke6 35. Qe5+ Kd7 my queen and king are lined up awkwardly. Of course, 36. Rg7? would be a mistake, as 36. … e1Q+ draws. But if White plays 36. Bxe2!, Black’s position collapses faster than a house of cards. White’s main threat is still to win the queen with Rg7, and there is just no good defense. For example, if 36. … Qe7 37. Rg7 Rf7 38. Bg4+ (or 38. Bb5+), Black can resign.
All in all, I think that both players were probably glad to escape with a draw!
Lessons:
- Before plunging into tactical complications, ask whether there is any strategic reason for thinking the complications will work out in your favor. Is this a position for tactics or strategy?
- On the other hand, once you have committed yourself to a tactical solution, don’t go halfway. Against human opponents, relentless tactical pressure will often save or win positions that are objectively “losing” (according to the computer).
- In a complicated position, try to simplify it by identifying the things you know about the position.
- In highly tactical positions, mate threats rule. In fact, having a bona fide mate threat is sometimes almost like having an extra attacker. There are so many examples in this game. In the notes to moves 26 and 27, White’s “sneaky threat” of Bxh7 Qxh7 Qxh7+ Kxh7 Rh5 mate completely changes the evaluation of the position. Black has no attack because he has to stop this threat immediately. And in the note to move 29, we saw mate threats galore: White’s mate threat of Qxh7 mate. Black’s threats of … Qh2 mate or … Qg2 mate in various variations. Finally, White’s threat of Rxh7 mate after Juande’s sensational queen sacrifice 33. Re7!!
- Sometimes you can win by moving your opponent’s pieces to squares where they don’t want to be.


{ 5 comments… read them below or add one }
In a similar position Dvoretsky (or, to be more precise, Yussupow in a session with Dvoretzky) suggested 12. Nb1!?!?
You can find a reference to it in John Watson’s “Modern Chess Strategy”.
BTW, did you receive the book I sent you?
Hi Roman, yes, I did get the book! Thank you. I also found the reference to 13. Nb1 in Watson’s book. I will have to study that chapter on superfluous knights. In this particular game, I don’t think that Nb1 followed by f3 (around the time of diagram 1) would have worked out so well for White because my knight can go to d6, where it isn’t superfluous any more, and also White’s knight has a harder time repositioning to c3 because there’s a pawn there at the moment. But I do think the general topic looks interesting. I have often gotten positions with knights on f6 and e4 and thought I was doing well, and then I was mystified why nothing good ever came of it.
Thanks for this walk down memory lane. I had completely forgotten about this game, and felt a slight out-of-body experience seeing my name in reference to it.
That “old-fashioned” way of analyzing without computers… ain’t nothing like the real thing!
Hi Larry, doing this retrospective has made me realize how many things I’ve forgotten. Not only old games but also old blog posts I’ve written — in many cases slaved over and written beautifully — now completely forgotten. I don’t know whether to be depressed about forgetting them or happy to rediscover them.
But anyway, thanks for your comments three years ago!
I was reading your article and wondered if you had considered creating a book on this subject. Your writing would sell it fast. You have a lot of writing talent.
Boardroom table Bolton
{ 1 trackback }