What is the hardest “normal” endgame in chess? I think the answer is probably K+Q+RP vs. K+Q. A few years ago no less an authority than Vassily Smyslov wrote a series of columns on this endgame for “64” magazine (in Russian), and you could tell that he was exasperated by the end of it. There are some positions that just can’t be understood logically — we’ll see one below.
However, I should also point out that there are a couple of general principles for these endgames, one of them obvious and one highly counterintuitive. The obvious one is that the winning chances of the side with the pawn go up as the pawn advances. If the pawn is back on the third or fourth rank, the ending should usually be a draw. The second, surprising rule, is that the defending king does best to run away from the pawn. This is unlike every other endgame. One reason is that the defending queen needs maximum mobility for checks, so she doesn’t want to stumble over her own king. Another reason is that you want to avoid situations where the opponent can stop a series of checks by interposing with check.
I’ve had this endgame only once in my career — as the defender — and, sure enough, I botched it. The event was the U.S. Amateur Team Championship East in 1982. I was playing for the Princeton University team, and we began the round at 8 PM. My opponent was Herb Hickman, an expert who, if I remember correctly, was a master at correspondence chess. We reached the infamous endgame at move 67, and I resigned 39 moves later, on move 106. By then, it was 4 AM. This was in the long-ago days when there were no sudden-death time controls, so we just kept going on and on, into the wee hours. One of my teammates caught a ride back to Princeton with someone else, but the other two were stuck waiting for my game to end, because I had the car! I got to bed around 5 AM, and then had to get up at 9 to make it to my next game. Amazingly, I won that game in 17 moves, and got a chance to make up for my lost sleep. But that’s another story …
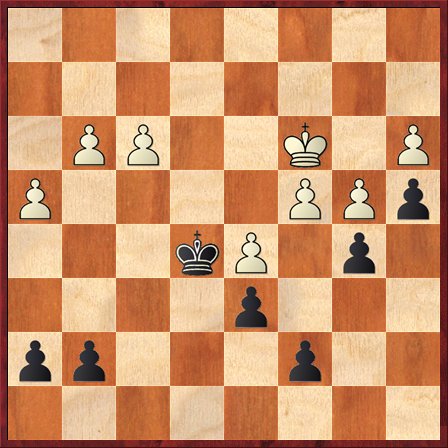
Long before the queen and pawn madness began, we actually had quite an interesting king and pawn endgame, which you can learn a lot from. I’m Black, and it’s White to play his 45th move.
Do you think White is winning? What is his best move?
At first sight you might think that White is obviously winning. He’s a pawn up, after all. However, the extreme fragility of White’s queenside pawns is a serious problem. He can’t really stray from c3 and d3 with his king. His best bet seems to be to play tempo moves until Black is forced to play … Kf5, and then capture on b5. Alternatively, if Black takes on c4 first, then White hopes that he can win the tempo battle and force Black to play … Kf5, then sneak in with his king to b5 and c6, after which he is winning.
But how can White win the tempo battle? I think that the way to begin is with 45. h5! Then 45. … h6? would lose as per the above comments. 45. … g6 is a little bit tougher, but I think that White is still probably winning after 46. h6. Even if you can’t work it out to a win, though, 45. h5 is clearly the move that has to be played in this sort of position. It claims space without weakening White’s all important pawn duo at f3 and g3. It does “weaken” the h-pawn, but not really, because it takes Black so many tempi to bring his king to h5 that White will have time to break through on the queenside.
Instead White played 45. Kd3, allowing 45. … h5!, and now I think the position is a draw! A few moves later we see one of the main reasons why.
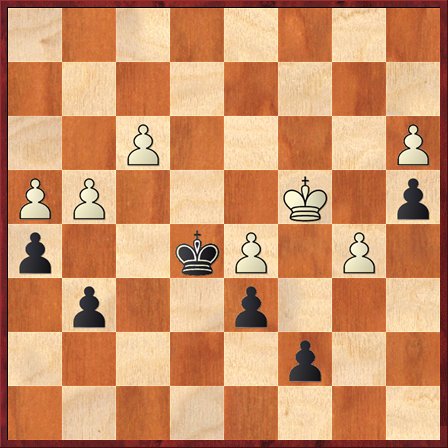
Black to move. What is the best way to draw?
White has just played 50. g4, for lack of anything better to do, but this is an ultra-risky move. I played 50. … Kf4, which is a very reasonable move and in fact turns out to be good enough to draw. However, when I went over this game today, I could hardly believe my eyes. “Oh my god, I could have won!” I thought. ChessLecture subscribers might remember my lecture “Four Pawns in a Box,” where I mentioned gave an example of this endgame trap: 50. … g5!!
The point is that on any White move, Black will get a passed pawn on h4. Then Black’s king is “in the square” to defend White’s passed pawns, but White’s king is not able to defend against Black’s.
Alas, in this case 50. … g5! doesn’t quite work, because after 51. hg! h4! White has the counter-sacrifice 52. f4+! (Sorry about the Brian Wall-esque awarding of exclamation points to every move, but this is really amazing.) Black’s king is lured forward with 52. … Kxf4, and then on 53. g6 White’s pawn will promote. Still, after 53. … h3 54. g7 h2 55. g8Q h1Q it should be a draw.
To answer the above question, I would say 50. … g5 is the “best” way to draw because it actually gives Black a chance to win. Nowadays I would play that move in a heartbeat. But at the time, I was too busy trying to draw and it never even occurred to me to play for a win.
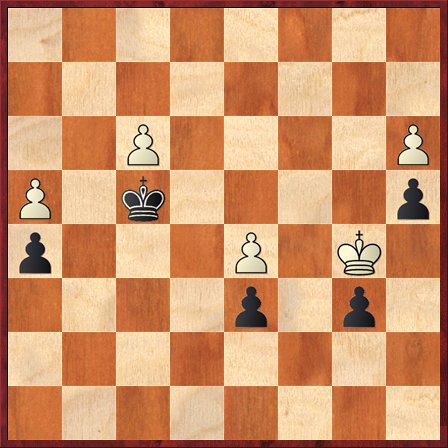
After 50. … Kf4 51. gh gh 52. b6 cb 53. Kb5, all of which was best play, we arrived at the following ultra-critical position.
Black to play and draw.
There’s only one way to draw here, and I didn’t find it. The first thing to see is that Black does not have enough time to capture on f3, because 53. … Kxf3? 54. Kc6!! wins. 54. … Kg4 is a tempo too slow (work it out and see) and 54. … b5 55. Kxb5 Ke4 56. Kxa4 Kxd5 57. Kb5 is also hopeless (work it out and see). My next move was intended to improve on the line I just showed, but it has one flaw in it. The correct idea was 53. … Kg3! 54. Kc6! (Isn’t it amazing to see the kings avoiding taking the pawns, as if they were diseased?) 54. … b5! And now White’s king has to go “the wrong way” with 55. Kxb5, and Black can draw after 55. … Kxh4. Whew!
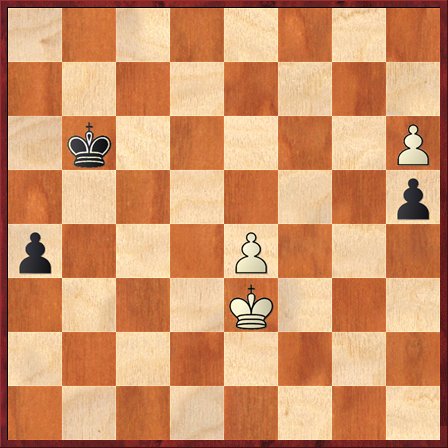
The move I played was 53. … Ke5? 54. Kc6 b5 — same idea as before, but now White has a kamikaze pawn, too: 55. f4+! Kxf4 56. Kxb5 and White should be winning. After 56. … Kg4 57. Kc6 Kxh4 58. Kxd6 Kg3 we arrive at the next critical position.
Which way should White’s king go?
The move that my opponent played was 59. Kc5?, which gives away his hard-earned victory. His reasoning was probably something like this: We’re both going to queen our pawns, and I need to move my king to the queenside so that I can win the a-pawn and try to promote it. However, what he missed is that after 59. Ke5! he is able to force a queen trade after the two pawns promote. That is, after the obvious 59. … h4 60. d6 h3 61. d7 h2 62. d8Q h1Q, he can play 63. Qg5+! and after either 63. … Kf2 64. Qd2+ or 63. … Kf3 64. Qf4+ White forces a trade of queens.
It’s easy to see why White missed this. Ordinarily in a king and pawn endgame, with only rook pawns left, you would think it would be a dead draw. But in this case Black’s king will be too far away (by one tempo) to defend against the a-pawn. Also, even working out the forced queen-trade sequence was not so easy. But I did figure this out after the game without a computer, so it’s do-able.
In the game, after both sides promoted, White did win the a-pawn. However, the position is a theoretical draw.
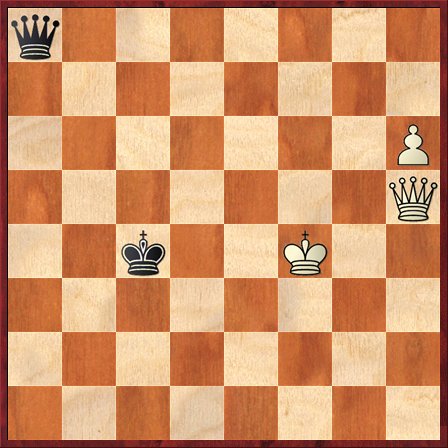
Position after 67. Qxa4. How can Black hold a draw?
The most important principle, which I absolutely had no clue of at the time, is that Black’s king does not want to go anywhere near the a-file. He should get as far away as possible — a square like f2 would be ideal. Of course this violates every sensible endgame principle — usually if your opponent has a passed pawn, you want to try to stop it. But here the only principle is perpetual check.
It’s sad to watch the next few moves, as I naively tried to bring my king over to the queenside, which only made it easier for my opponent to avoid perpetual check and push his a-pawn. Nevertheless, according to the tablebases, my position was still drawable until the following critical moment.
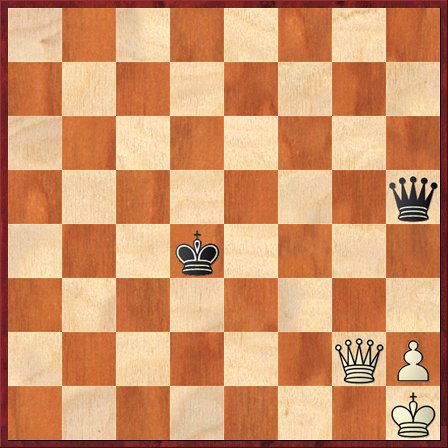
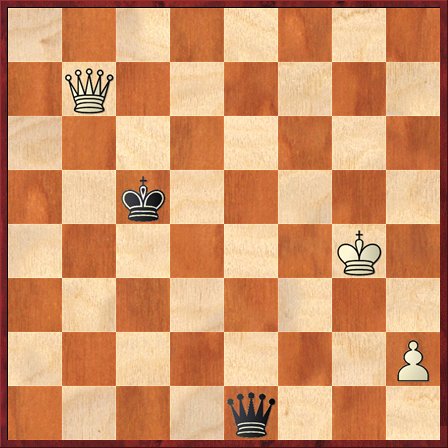
Black to play and draw.
Well, you can see how terribly I’ve botched it. The a-pawn is now one square from promoting. White should never have been able to play a7, but I have put my king on exactly the wrong square, e5. Thus my attempt at setting up a perpetual check with 82. … Qe8+ is squelched by 83. Qb8+. This is what I meant at the beginning when I said that you have to watch out for White answering a check with a check. If Black’s king were nice and far away, say on c2, this couldn’t happen.
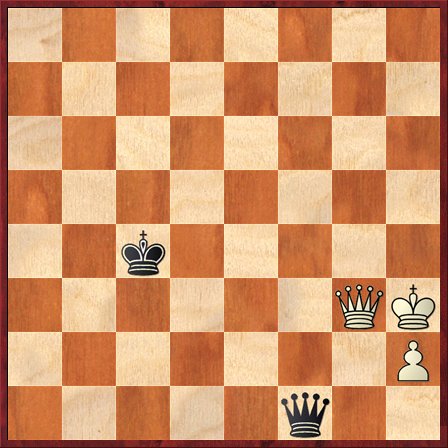
Nevertheless, Black has one move that draws. What is it? Well, you might say 82. … Kf4, on the principle that the king needs to get as far away from the queenside as possible. But alas, it’s too late! On f4 the king is not far enough away. According to the tablebases, White has a mate in 54 moves after 82. … Kf4, beginning with 83. Qf7+. More important than the fact that it’s mate in 54 is the fact that White is able to move his pawn after 40 moves. With absolutely perfect play by both sides, this is the position after 121. … Kc5.
White plays 122. a8Q, thereby avoiding a draw by the 50-move rule.
I’d show you the whole winning line, but there’s no point. The position above (after 82. … Kf4) is just one of those irrational positions that drove Smyslov crazy. In order to win, White has to bring his king out into the open. It is a miracle that he can somehow avoid perpetual check as he wanders from a8 to b7-c8-d8-e8-f8-f7-g7-g6-h6-h7-g7-f8-f7-e6-e7-d6-c6-b5-c4-c3-b2-a3-b4-a5-b6-b5, ending up in the position shown. To see the full line, enter the above position into the Nalimov tablebase at this URL.
So how does Black draw, then, if 82. … Kf4 doesn’t work? The answer, ironically, is 82. … Kd6! After I’ve just told you that Black wants his king as far away from the a-file as possible, now I’m telling you the exact opposite! The point of … Kd6 is that White can never free his king from the corner. Perhaps White’s best try is 83. Qc8, but this is met by 83. … Qa5! stopping any checks and preparing to hit White’s king with perpetual as soon as he sticks his head out of his hole at a8.
To me this is reminiscent of the card game hearts, where you ordinarily try to avoid winning any hearts — except that if you can take all the hearts, which is called “shooting the moon,” then you win. What we have here is the “shoot the moon” defense, where Black has played wrong for so many moves that it suddenly becomes right.
Somewhere, up in heaven, poor Vassily Smyslov is tearing his hair out.
Well, of course I failed to find the “shoot the moon” defense, and instead I played 82. … Kf6, which loses by force. But there was one more insult that had to be added to my injury.
White to play and win.
This was the position that we reached after 85. … Qc8+, sometime around 3 AM. My opponent incorrectly played 86. Ka5?, after which I played 86. … Qc3+, and the game went on… and on… and on… Finally on move 100, we got back to exactly the same position. It was now close to 4 AM. And this time, my opponent found the right move: 101. Kb5! After 101. … Qd7+ 102. Ka5 Qd2+ 103. Ka6! And with this neat little trangulation, White wins. After either 103. … Qa2+ or 103. … Qe2+, White interposes with check. (Once again we see why the king is so badly posted on the fourth rank!) I had to play 103. … Qg2, but now I am unable to prevent White’s queen from reaching the back rank with check: 104. Qc5+ Kg6 105. Qd6+ Kh5 106. Qe5+, resigns.
What a marathon!


{ 1 comment… read it below or add one }
Hi Dana
Thanks for the article with a very good analysis of your endgame. I was wondering if you have the PGN for the full game available for download somewhere? Maybe even with comments included in the PGN? I’d like to load it into Fritz, and then replay for the children I teach.
Best wishes
Bo.