I could write about my own recent games, but it’s so much more fun and interesting to write about Cailen’s adventures in the Class A section of the Golden State Open. First, I’d like to show you just the beginning of his last-round game. He went into the round with 4½ points out of 6 and needing a win to get a decent money prize.
So if you’re Black and you need a win, and your opponent plays 1. d4, what do you play? For Cailen the answer was clear: a Dutch! He answered 1. … e6 2. Nf3 f5. (As a French player he wouldn’t mind facing 2. e4, although lately he has been playing the Franco-Benoni, 2. … c5, rather than 2. … d5.)
The Dutch is a funny opening because I think it has more potential for blowing up in an amateur’s face than just about any other mainstream opening. The reason is that Black is really living on the edge of feasibility, and if he’s not careful he will go over the edge. But at the same time, it’s a good way to play for a win for just the same reason: White will often be provoked into overestimating his attack. This game provides a good lesson in both tendencies.
White played 3. Nc3 and Cailen somewhat too casually played 3. … Be7. I didn’t like this move. 3. … Nf6 makes more sense, but he was worried about a possible 4. Bg5. I think that this is nothing to worry about! Instead, the delay in developing the king knight starts leading to problems for Black.
The game continued 4. e4 fe 5. Nxe4 and Black still didn’t develop his king knight but continued playing as if he didn’t have a care in the world with 5. … b6?! After 6. Ne5, now all of a sudden Cailen started panicking over the threat of Qh5+ and played 6. … Bf6?! This move looked very suspicious to me because f6 is the square for Black’s knight, and I don’t understand what a bishop can do on that square.
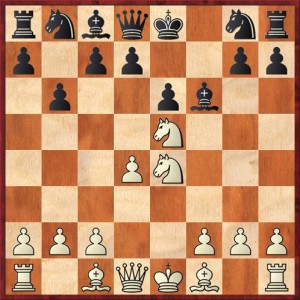
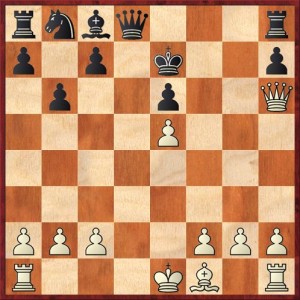
But that’s all kind of abstract. Can you find a concrete way for White to put Black in deep trouble?
FEN: rnbqk1nr/p1pp2pp/1p2pb2/4N3/3PN3/8/PPP2PPP/R1BQKB1R w KQkq – 0 7
The one thing I sort of regret is that when we went over the game on Wednesday, Gjon Feinstein right away found the critical move. I would have liked to ponder the position a little bit more.
Actually, either piece to g5 is a good move for White. Rybka likes 7. Bg5! best, and gives White a two-pawn advantage. This move poses huge problems for Black. Qh5+is in the offing, and also it’s not at all clear how Black can ever get his kingside untangled. If Black takes the bishop, then Qh5+ and Qf3 pose similar problems to the game.
However, Gjon suggested 7. Ng5!, and this is an excellent move too, and in my opinion psychologically stronger than 7. Bg5. White makes an immediate threat, N(either)f7, and this limits Black’s options if he wants to avoid a loss of material.
Also, 7. Ng5, unlike 7. Bg5, is not a business-as-usual move. It announces to Black, “I think you’ve botched this opening and now you’re going to pay.” Ordinarily one would criticize White for making so many moves with his knights. But White is saying that Black has created so weaknesses that it doesn’t matter.
After 7. Ng5 Black has three options. He can take a knight, either knight, with his bishop, or he can play 7. … Nh6.
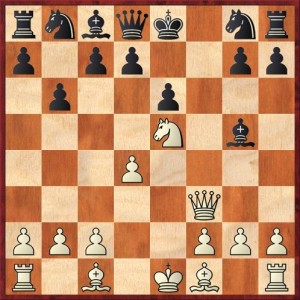
(I) 7. … Bxg5?! 8. Qf3!
FEN: rnbqk1nr/p1pp2pp/1p2p3/4N1b1/3P4/5Q2/PPP2PPP/R1B1KB1R b KQkq – 0 8
In this position we can really see that all of the problems with Black’s position are self-inflicted. White threatens mate on f7, something that never should have happened if Black had developed his knight to f6. And White also threatens the rook on a8, which would not have been possible without the careless move 5. … b6?!
After, say, 8. … Nh6 9. Qxa8 Bxc1 9. Rxc1 White is up an exchange and Black also has problems, ironically, developing the queenside. Rybka prefers 8. … Bf6 9. Qxa8 Bxe5 10. de Nc6, which at least lets Black get his knight out, but White is still doing very well after 11. Bb5, with some nasty threats because of the incipient pin on Black’s d-pawn.
(II) Next is 7. … Bxe5. This is a little bit more interesting than the last line. We get some similar play after 8. Qf3 Bf6 9. Qxa8 Bxg5 10. Bxg5 Qxg5 11. Qxb8 Kd8, but I think Black has more play for the exchange here than he did in line (II). White’s queen is out of play and this leaves the board dangerously open for Black’s queen and rook. I would not blame White if he instead plays the simple 8. de, with an advantage because of the two bishops, Black’s kingside weaknesses, and White’s greater space.
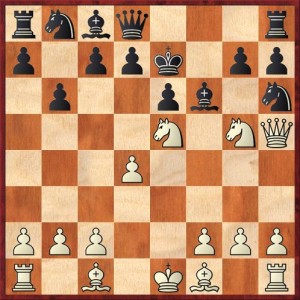
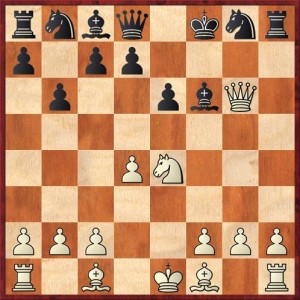
(III) The most interesting line, I thought, is 7. … Nh6 8. Qh5+ Ke7. How does White realize his advantage?
Here again there is a disagreement between human and computer analysis. Rybka prefers 9. Ne4, which I agree is a butt-kicking move, but White has another idea that I liked better.
Clearly White wants to move his g5 knight out of the way of the bishop, so that he can take on h6 and penetrate with his queen to f7. But 9. Ngf7 doesn’t do the trick. In fact, after 9. … Qe8 the knight on f7 is in trouble because of the pin. We need something more forceful.
So I thought, well, what could be more forceful than 9. Nxe6!?? If Black takes with the king he walks into 9. … Kxe6 10. Bxh6 gh 11. Bc4+! (useful because it takes a flight square away from Black’s king) 11. … d5 12. Qf7+ Kf5 13. Bd3+ Kg5 14. h4+ Kf4 15. g3 mate.
So that leaves 9. … de. Now after 10. Bxh6 Bxe5 11. de gh 12. Qxh6 I think White is winning, even with only two pawns for the piece. Both Qg7+ and Qf6+ are threatened, and if Black defends these with 12. … Qf8 then 13. Qh4+ followed by Be2 looks really strong.
Alternatively, if (after 9. … de 10. Bxh6) Black plays 10. … gh, then the king hunt is on with 11. Qf7+ Kd6 12. Bb5! (It’s very important to take away the flight squares) and the computer belatedly wakes up and starts giving White a 1.7-pawn advantage.
What fun! Except for Cailen. But fortunately for him, none of that is what happened in the game. Instead, way back in diagram 1, White played the “wrong” piece sacrifice with 7. Qh5+ g6 8. Nxg6 hg 9. Qxg6+ Kf8.
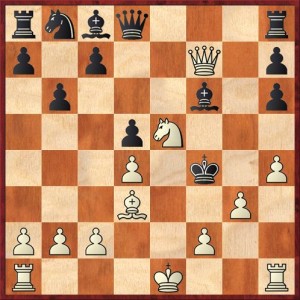
And now we see the upside of the Dutch Defense. White is lured into trying too hard for a brilliancy. On f8 the Black king lacks pawn cover, but he does have a lot of other friends. If White could lift a rook with h4 followed by Rh3-Rf3 … or if he could get his dark-squared bishop to h6… or if he could make any threats at all with his light-squared bishop… then sure, White would have compensation for his material. But none of these things are possible. Basically White is trying to play an attack with only two pieces, and Black has plenty of defenders. And the move … Qe8 is coming very soon, to start chasing one of the attackers back.
I like White’s bravery in playing the piece sac, but bravery has to be supplemented by cold-blooded, hard-headed, objective analysis.
Of course the position was still complicated, but Cailen definitely got the better of it. He eventually did let White win a third pawn for the piece, the pawn on c7, in order to lure White’s queen away from the kingside. And then, ironically, Cailen ended up getting a kingside attack of his own thanks to all the open lines over there, and he won in something like 30 moves.
So… How do you win with Black against 1. d4? Simple. Get into a lost position by move 7, and then watch your opponent make mistakes!


{ 1 trackback }