At Mike Splane’s last chess party, the question came up: “Is one bad move enough to lose a game?” Of course the answer is yes, if the move is really, really bad, like hanging a rook or a queen. But in games between more or less experienced players, say above a 1500 rating, outright blunders like that are relatively rare. In the great majority of games it takes more than one mistake to lose. I think that it’s only at the high master level, 2500 or beyond, where one mistake might again become enough to lose.
On the other hand, a wrong conception can easily be fatal, and Craig Mar gave us a great example of that. It was a game he played in 1986, in Los Angeles, against an “almost-master” (2198) named Sid Rubin. Craig’s rating at the time was 2420.
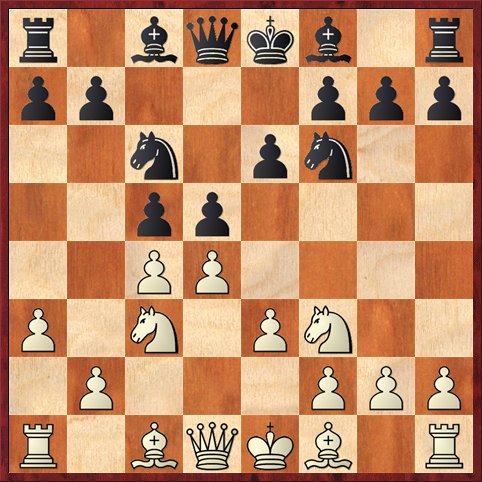
The game started 1. d4 d5 2. c4 e6 3. Nc3 c5 4. e3 Nf6 5. Nf3 Nc6 6. a3 (diagram).
 FEN: r1bqkb1r/pp3ppp/2n1pn2/2pp4/2PP4/P1N1PN2/1P3PPP/R1BQKB1R b KQkq – 0 6
Position after 6. a3. Black to move.
I discussed this position once before, in a post called The Art of Doing Nothing. This position is very well known to theory, and can arise via many move orders. Nevertheless, it is a position that many amateur players have misconceptions about.
Misconception #1: The position is not dangerous for Black.
It’s understandable why you would think this. The game has started symmetrically, and Black can keep the symmetry going if he wants with 6. … a6. White has not played any particularly aggressive moves, and his last move (6. a3) does not develop a piece and only indirectly affects the battle for the center.
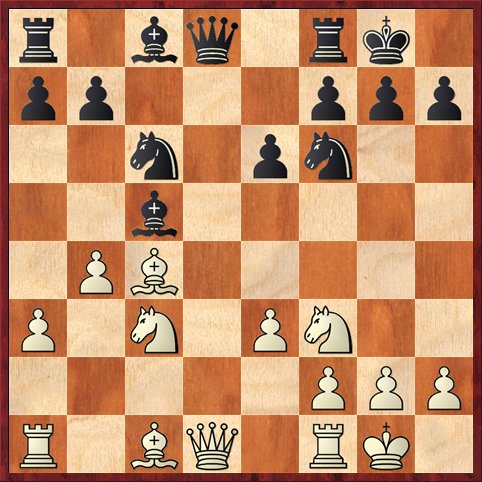
Nevertheless, Black has many ways to go wrong. One of them — which I also mentioned in my previous post — is 6. … cd 7. ed dc 8. Bxc4, “saddling” White with the isolated queen pawn. (See diagram 2.)
 FEN: r1bqkb1r/pp3ppp/2n1pn2/8/2BP4/P1N2N2/1P3PPP/R1BQK2R b KQkq – 0 8
Position after 8. Bxc4 (analysis). Black to move.
Misconception #2: Black’s play is perfectly reasonable. Normally, when playing against the Tarrasch Defense, White gives Black an isolated queen pawn. So why shouldn’t Black do it to White, given the opportunity?
The reason is that Black has handed White a victory in the “tempo game.” White has been able to bring his bishop to c4 in one move, instead of two. Not only that, the innocent a3 move will turn out to be very useful for White, as it gives the bishop a nice square (a2) to retreat to.
In the Tarrasch Defense, Black gets counterplay for his isolated queen pawn in the form of active pieces. In this position, where White is in effect two tempi ahead of a normal Tarrasch (one by virtue of being White, and one by virtue of developing his bishop in one move), the advantage in development is not merely compensation for a pawn weakness, it is the most important factor in the position.
I kind of hinted at this in my earlier post, but Craig said it much more bluntly. He said, “I think White is almost winning here. This will get you lots of nice wins against lower-rated players.”
That’s one reason that Craig got to 2500 and I’m nowhere near that point. He has a better understanding of fundamental opening positions, called “tabiyas.” He talked about this at the party, and said that he had learned the importance of tabiyas by watching the games of IM Cris Ramayrat, who was active in southern California chess at the same time.
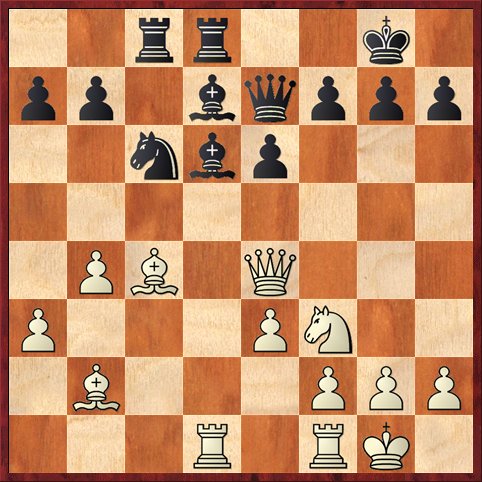
Anyway, Craig’s opponent did not fall into this mistaken conception. He fell into a different one. The game continued 6. … dc 7. Bxc4 Be7 8. O-O O-O 9. dc Bxc5 10. b4 (diagram).
 FEN: r1bq1rk1/pp3ppp/2n1pn2/2b5/1PB5/P1N1PN2/5PPP/R1BQ1RK1 b – – 0 10
Position after 10. b4. Black to move.
This was, in Mar’s opinion, the key position of the game. Black has three reasonable places to put his bishop, and he can throw in a queen trade first if he wants. What should he do?
The move that Black played, 10. … Bd6?, again looks completely reasonable. It is the most “active” square for the bishop, and it gives Black the illusion of making progress, rather than returning the bishop to e7 where it came from. In fact, 10. … Be7 was best, and Craig once again said that he considered 10. … Bd6 to be a nearly losing move.
Misconception #3: When in doubt, develop your pieces to the “most active” squares.
This is a misconception that I fall into a lot, and I have some painful losses to show for it. Active squares are also, in many cases, vulnerable squares. So to properly evaluate the position you need to ask yourself: Realistically, who is going to have the initiative? Will it be Black, with his still vague threats of playing … e5 and somehow getting an attack on the kingside? Or will it be White, who is already ahead in development and is now guaranteed to gain more tempi by placing a rook on the d-file? Black has committed one bishop to d6 and is more or less committed to putting the other one on d7. On these squares the bishops cannot be defended by pawns and they are targets.
In spite of this, 10. … Bd6 is the most popular move in this position according to ChessBase: it has been played 27 times in 49 games, while 10. … Be7 has been played 16 times in 49 games. Clearly there are a lot of people suffering from Misconception #3, and some of them have pretty high ratings. (For example, grandmaster Nikolai Krogius in 1958, against Efim Geller.)
Now to be fair, I don’t think that 10. … Bd6 is quite as terrible as Craig was suggesting. To be more precise: I think the move is okay, but it’s the conception that is bad. According to Rybka, after 10. … Bd6 White’s advantage is 0.59 pawns. That’s not a winning advantage, but it is definitely more than White’s “normal opening advantage.” It’s a sign that Black has done something wrong — namely, lose the tempo battle and misplace his pieces. Black will have to play carefully to survive.
Craig’s opponent didn’t play carefully. The game continued 11. Bb2 Qe7. Here I think 11. … Ne5 was better. Black has to realize he’s in trouble and take urgent action to trade off some of White’s attacking pieces. Instead, Black plays this whole game as if he were in no trouble at all.
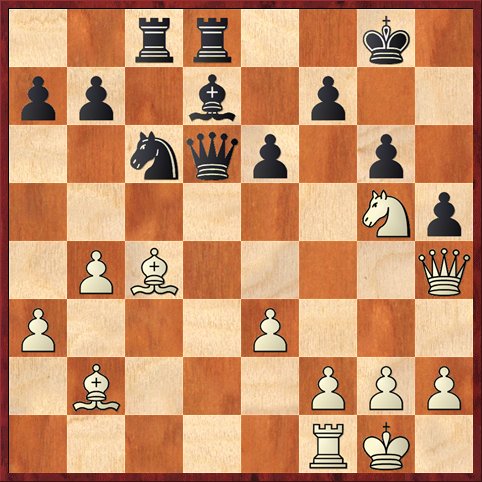
Craig then played 12. Qc2 Bd7 13. Rad1 Rfd8 14. Ne4 Nxe4 15. Qxe4 Rac8. Let’s pause for another diagram, because this is a truly comic and instructive position.
 FEN: 2rr2k1/pp1bqppp/2nbp3/6N1/1PB1Q3/P3P3/1B3PPP/3R1RK1 b – – 0 16
Position after 15. … Rac8. White to move.
Misconception #4. “Development” means (1) Dump your minor pieces on any squares beyond the first rank. (2) Castle. (3) Centralize your rooks.
This position is the logical culmination of Black’s whole misguided approach to the opening. Reuben probably thought he hadn’t made any mistakes yet. He has just dumped all of his pieces in a little knot in the middle of the board, where they all get in each other’s way and none of them defend his king! Meanwhile, five of Craig’s pieces are poised and ready to pounce on Black’s undefended kingside. No wonder the game was over in just a few more moves.
16. Ng5! g6
Obvi0usly Black would like to play … f5, but he can’t because White would just take the pawn.
17. Rxd6! …
Deflecting the queen away from the kingside.
17. … Qxd6 18. Qh4 h5 (diagram)
 FEN: 2rr2k1/pp1b1p2/2nqp1p1/6Np/1PB4Q/P3P3/1B3PPP/5RK1 w – – 0 19
Position after 18. … h5. White to play and win.
At this point we had a very lively discussion at Mike’s chess party. Many in the audience, myself included, wanted to play 19. Nxf7!, and in fact this does win. If Black takes, 19. … Kxf7, then 20. Qf6+ Ke8 21. Qxg6+ Kf8 22. Qg7+ Ke8 23. Be2! is curtains.
However, Craig didn’t see 23. Be2, and instead he chose a very simple and practical move that doesn’t sacrifice material and leads to mate or a huge win of material: 19. Ne4! Qe7 20. Nf6+ Kf8 21. Qf4! g5 (only move) 22. Qxg5 Qd6 23. Ne4. Threatening the queen as well as mate in two. Black resigned.
There’s an interesting little lesson in this finish, which is that super-strong players do not necessarily play showy sacrifices at every opportunity. In fact, it’s just the reverse. They only play a sacrifice (like 17. Rxd6) if it’s the only means or the most efficient means to their goal. If there is a perfectly solid non-sacrificing move that wins (like 19. Ne4), they will almost always pick that move rather than a risky sacrifice like 19. Nxf7, which only works if you see the finesse 23. Be2 several moves later.
I definitely learned some things from Craig’s game, and I hope you did too.
Followup (11/13)… Thanks to Hal Bogner for pointing out a couple of typos, which I have corrected. Also, he points out that Sid Rubin was a long-time Los Angeles master who was getting on in years by 1986. So referring to him as an “almost-master” was not really correct … as I should know very well, because I’m also a National Master whose rating doesn’t currently show it. Also, Mike Splane points out a likely move-transposition error in the comments, but I’m showing the game the way that Craig presented it.


{ 1 comment… read it below or add one }
Hi Dana,
I strongly suspect Craig actually played 16 Rd6 Qd6 17 Ng5 but during the chess party he showed the moves in the order you give. If Ng5 came first then 16 … Bh2+ 17. Kh2 Qg5 looks good for Black.
There is a new video posted on chess.com this week which discusses studying tabiyahs to improve. http://www.chess.com/video/player/how-to-improve-your-strategy—part-1
And another new video tells you what to do when you don’t have knowledge of a tabiyah and must find your own plan,
http://www.chess.com/video/player/the-3-must-know-rules-of-middlegames
Mike