In my last post I wrote about the amazing 2N versus P endgame that Hans Niemann won recently at the Chicago Open. In that post, with help from the computer and especially the Nalimov tablebase, I wrote about the “Niemann maneuver” and generally gave the appearance of understanding what was going on.
In this post we get to the fine print, where I have to admit I don’t understand this endgame, at least not well enough to play it. I’m not sure that any human really can.
As you might remember, the two players got to this position, where Black made his fateful blunder.
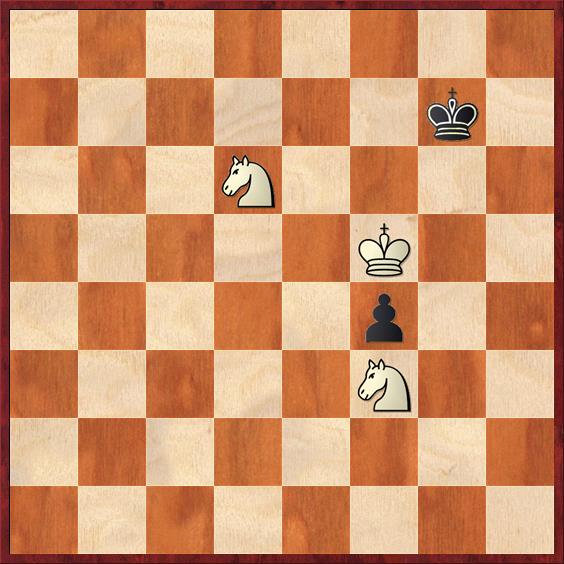 Position after 95. Kf5. Black to move.
FEN: 8/6k1/3N4/5K2/5p2/5N2/8/8 b – – 0 95
This is where Black played 95. … Kh6? It’s easy to see in retrospect why this was wrong. It reaches the “Niemann position,” which I had showed twice earlier in the post. But even more basically, Black did not fight for the opposition. In this endgame, as in a pure K+P endgame, the opposition turns out to be very important. White occasionally has the luxury of giving up the opposition because he can use his knight to help out the king. Black does not have that luxury, and as far as I can tell, whenever he has an opportunity to take the opposition he should.
So the big question is how White wins if Black plays the best move instead,95. … Kh7. According to the Nalimov tablebase White can force mate in 23 moves with best play. Can we figure out how?
First, it’s important to realize that the Niemann maneuver no longer works. If White tries to bring his knight to g7, the timing is all wrong: 96. Ne8? Kh6 97. Kf6 (obviously the knight can’t go to g7 without this move) Kh5 and now there isn’t time for 98. Ng7 because the king runs free. White has to play 98. Kf5 and has made no progress.
So White has to play 96. Kf6 first, and then Black plays 96. … Kh6. Black still has the opposition, and 97. Ne8? would transpose to the above line. What can White do? I couldn’t figure it out; I had to look at the Nalimov tablebase.
The computer starts with 97. Nf7+ Kh5 (… Kh7 would be no better) 98. N7e5 Kh6. We’ll see the point of the knight maneuver in a second. For now, here is a diagram:
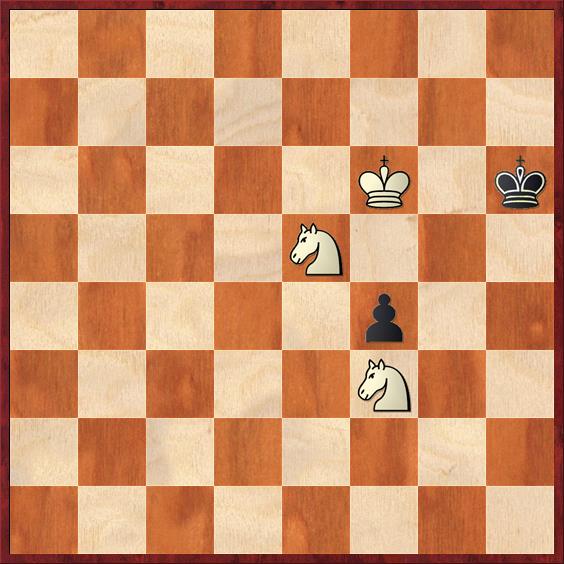 Position after 98. … Kh6. White to move.
FEN: 8/8/5K1k/4N3/5p2/5N2/8/8 w – – 0 99
Black still has the opposition, and it’s not clear how White has made progress. He’ll never get the opposition just by making knight moves; at some point he has to move the king.
Here is where the computer comes up with a brilliant idea: 99. Kf7!! White triangulates! This means he moves his king in a triangle, f7-e6-f6, while Black has only two squares for his king and has to go h6-h5-h6. This is an extremely common endgame motif, but it’s amazing to see it pulled off in this position with almost nothing left on the board. Note, also, that Black has to go along with this plan because if he replies 99. … Kh7??, trying to keep the opposition, then 100. Ng4! locks his king in the corner and it will be mate in three.
So Black has to play 99. … Kh5 100. Ke6 and now we see why White put his knight on e5. The two knights combine to control all four squares, g6, g5, g4, and h4, thus creating a cul-de-sac for Black’s king. This is really incredibly neat.
Thus black is forced to continue 100. … Kh6 101. Kf6 and we are back to the diagram above, except that it is Black to move instead of White!
Okay, so far so good. I’m sort of understanding the computer’s moves. But my understanding is only skin deep, because there is one question I can’t answer for you: What was the point in gaining the opposition for White? If we were back in the original position I could tell you — the point is that we’re trying to force Black into the Niemann position. But here, we’re a mile away from the Niemann position! We need to get our knight to g7, but now it’s on e5, which is four tempi away from g7!
Still, g7 is the key square, and the computer’s idea is to get the knight there eventually, via the route e5-d7-f8-e6-g7 (or, alternatively, the cute zigzag route e5-d7-f6-e8-g7). You won’t understand the rest of the endgame if you don’t realize that is the ultimate goal.
After 101. … Kh5 102. Kf5 Kh6, therefore, the computer plays the paradoxical move 103. Nd7!! Diagram, please.
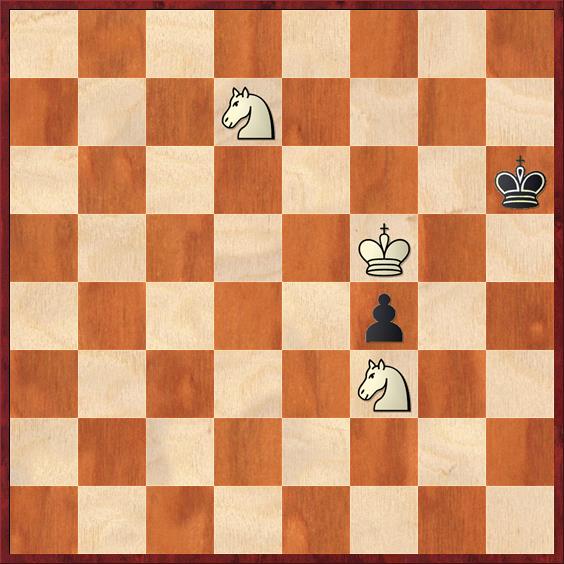 Position after 103. Nd7. Black to move.
FEN: 8/3N4/7k/5K2/5p2/5N2/8/8 b – – 0 103
This is precisely the moment where my feeble human brain gives up in despair. Notice that after 103. … Kg7 we have reached a position identical to the starting position, except that the knight is on d7 instead of d6 (and it’s White to move). So we have spent the last eight moves just moving the knight from d6 to d7? Why??
And we have even undone the brilliant triangulation maneuver from a few moves ago. Usually the point of using triangulation to gain the opposition is that the opponent’s king is forced to retreat. Instead, by allowing him to go to g7, we are giving him more room to operate! It just makes no sense in any human-intelligible terms. The only justification we are left with is: “It works.”
Continuing, after 103. … Kg7 White’s best move is obvious: 104. Ke6, to keep Black’s king from running any further. Now any human would play either 104. … Kg6 or 104. … Kh6, but both of those moves lose faster because they allow White to continue his plan with 105. Nf8. Instead, the Nalimov tablebase says Black’s best move (i.e., prolonging the game the longest) is 104. … Kg8!, preventing Nf8 for one more move). White should then reply 105. Ke7! No credit for Kf6. If you play that, after the maneuver Nf8-e6-g7 you’ll find yourself right back where you began, with the knight reaching g7 on the wrong tempo. In fact, I think that the maneuver Ke6-Ke7-Kf6 may be another case of triangulation, although I’m too bewildered to be sure.
Then the computer oracle says 105. … Kg7 106. Nf8 Kh6 107. Kf6 Kh5 108. Kf5 Kh6 and we have finally reached a position where White can play the Niemann maneuver: 109. Ne6! The knight reaches the coveted g7 square after either 109. … Kh5 110. Ng7+ or 109. … Kh7 110. Kf6 Kh6 111. Ng7, and the rest is easy.
So to sum up, White’s strategy after 95. … Kh7! was ultimately to get the knight to g7, but it has to arrive at that square at just the right time. The maneuvers needed to ensure that happens included a neat triangulation or two, but they also involved a temporary liberation of Black’s king from moves 103-105 that I find downright mystifying. It is somewhat reminiscent of the K+B+N versus K endgame, where the winning procedure also involves allowing the king briefly to the second rank. However, the reason that it works in this case is unintelligible to me; it is sheer calculation to a depth that I’m not sure I could ever manage with any amount of time on my clock. A disappointing end, I’m afraid, to the saga of the Niemann endgame.


{ 1 comment… read it below or add one }
Thanks for the interesting essay. You’ve convinced me to stick with my opening study.