Last night I won a game against Shredder in very amusing but also instructive fashion. The computer’s rating was set to 2124. (I’ve found that this rating gives me the best blend of success and challenge; setting the machine to 2300 or 2400 makes me get too accustomed to losing.)
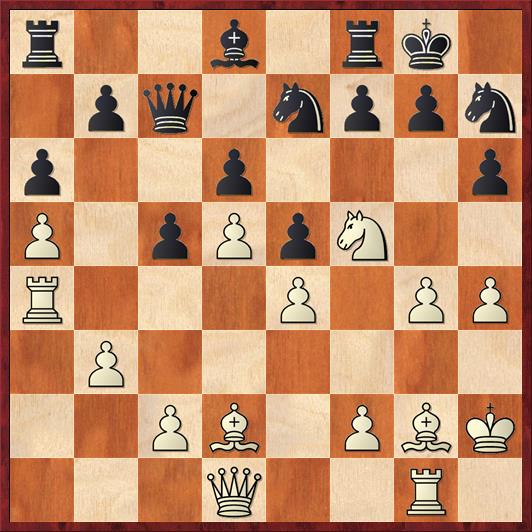 Position after 27. … Nh7. White to move.
FEN: r2b1rk1/1pq1nppn/p2p3p/P1pPpN2/R3P1PP/1P6/2PB1PBK/3Q2R1 w – – 0 28
As White here, I was very happy with my position. White has a space advantage on both sides of the board and Black has almost no counterplay. I was pretty sure that the idea behind Black’s last move was to try to win my h-pawn with … Nxf5 followed by … Bxh4, or at least to try to induce White to play h5. Black would then gain the square g5 for his pieces and it would become very difficult for White to open lines on the kingside.
I had the feeling this was a crucial position, so I took my one time-out here. What do you think White’s plan should be in this position? More precisely, what do you see as White’s greatest problem, and how can White address it?
To be even more specific, the two moves that I analyzed most seriously in this position were 28. Bh3 and 28. g5. Which one is better, and why?
The first move I looked at was 28. Bh3. (Actually, I thought a bit about 28. Bf3 first, but realized that I wanted to keep the d1-h5 diagonal open for the queen.) At first it seemed promising. If Black goes for the pawn with 28. … Nxf5 29. gf Bxh4? my attack is overwhelming after 30. Bxh6 Bf6 (30. … Bxf2 31. Rxg7+ Kh8 32. Rxh7+! also wins for White) 31. Qg4.
Looks great, right? But then I looked at the simple defensive move 28. … Nxf5 29. gf Kh8! and I couldn’t find a clear way for White to break through. The natural followup seemed to be 30. Qg4, which forces Black to play the really awkward-looking 30. … Bf6. But what does White do next? How does he build the pressure? The problem for White is that he has two pieces that are doing nothing: the bishop on h3 and the rook on a4. In the time it takes him to bring those pieces to relevant positions, Black will have time to play … Rg8, … Be7, maybe … Nf6, … Bf8 or … Nf8, and set up a really solid Maginot Line defense.
By contrast, the move 28. g5! immediately addresses White’s two biggest problems, the bishop on g2 and the rook on a4. White is telling Black, “Okay, you can win a pawn, but to do it you have to exchange on f5, which will free my rook to come to the kingside and free my bishop to do… Well, you’ll see what.” With 28. g5 I am getting all of my pieces into the attack; with 28. Bh3 I only got some pieces involved.
I think these arguments are so strong that one could almost play 28. g5 without analysis, but that wouldn’t be a very productive use of my time-out, so of course I did more analysis. First of all, it’s really hard for Black to decline the pawn because White’s threats rapidly become overwhelming. Shredder played 28. … Nxf5 first. If 28. … hg I would have played 29. Bh3!, very much like the game. Note that I do not want to exchange pawns on g5, because that would allow Black’s pieces to mobilize.
I played 29. ef, of course, and Shredder took the sacrifice with 29. … hg. Now comes the second most important move of the attack (which, unfortunately, I just gave away with my last note.)
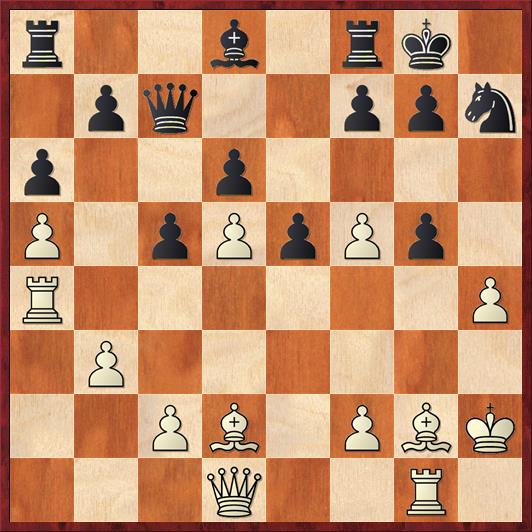 Position after 29. … hg. White to move.
FEN: r2b1rk1/1pq2ppn/p2p4/P1pPpPp1/R6P/1P6/2PB1PBK/3Q2R1 w – – 0 30
30. Bh3! …
I think I might have played the wrong move here if I had not taken my time-out. So many of us would play the “automatic recapture” 30. hg? But this would be a mistake because it allows Black to play 30. … Bxg5 and start trading defenders for attackers. Another way to look at is that I solve Black’s two worst problems for him — I let his bishop on d8 and knight on h7 get into the game.
With the text move I more or less force Black to play … f6, hemming in both the knight and the bishop. The alternatives look even worse; 30. … gh allows 31. Bh6!, while on other moves, White regains his pawn with hg and gets a decisive attack on the h-file with Qh5 and Rh4.
30. … f6
Now I once again had two tempting options. The most swashbuckling idea is 31. hg fg 32. f6!?, sacrificing a second pawn to open up the bishop’s path to e6.
But before you start swashing and buckling, ask yourself if it really makes sense. Do I have to sacrifice a second pawn to activate my bishop? Are there other ways? Also, this idea starts to allow Black’s bishop and knight to have a purpose in life again.
There is another way to activate the bishop, and that brings us to the title of this post: checkers, anyone? I am going to move my bishop right up the board as if it were a checker: g2-h3-g4-h5-g6! And there is not a thing that Black can do about it.
31. Bg4! Qf7 32. Be3?! …
It turns out that this was unnecessarily cautious: the move 32. Bh5! wins by force. After 32. … Qxd5 33. Bg6 Rf7 (Black’s best try, according to the computer) 34. Qh5!! has two beautiful points. First, if Black takes the bishop with 34. … Qxd2, then 35. Bxf7+ forces mate. A key point is that Black cannot achieve a perpetual after an eventual … Qxf2+ Rg2, because White’s rook on a4 controls both checking square, h4 and f4. Isn’t that neat? The second beautiful point is that 34. … Nf8 is answered by 35. c4! Black’s queen has nowhere to go that would defend f7!
Unfortunately I missed both of these tactical tricks, and I couldn’t convince myself that the bishop sacrifice was actually justified. So I calmly defended my weaknesses.
32. … gh??
After this it’s an easy win for White. Black should have played 32. … g6, fighting for the light squares. I think White is still much better after 33. fg Qxg6 34. Be6+ Kh8 35. f4! and a blizzard of White pieces will descend on Black’s kingside. But there would still be work to be done, and a computer might be able to defend Black’s position. (It’s very unlikely that a human would.)
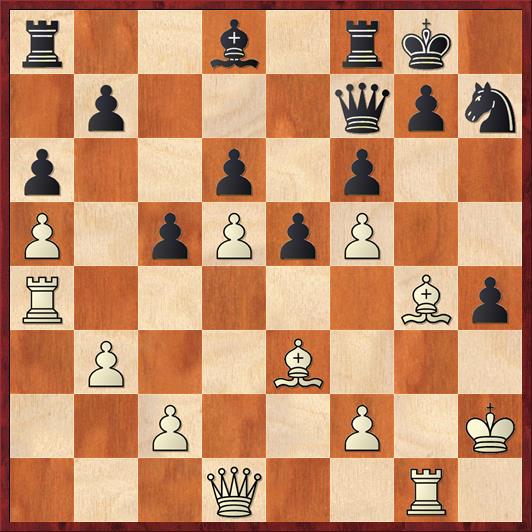 Position after 32. … gh. White to move.
FEN: r2b1rk1/1p3qpn/p2p1p2/P1pPpP2/R5Bp/1P2B3/2P2P1K/3Q2R1 w – – 0 33
Now back to the game. Even with two extra pawns, Black is powerless to resist White’s slow-motion “checkers attack.”
33. Bh5! Qe7 34. Bg6 e4 35. Qh5 Ng5 36. Bxg5 Qe5+ 37. Kh1 Black resigns.
This game shows really clearly the importance of asking yourself, “What are my worst pieces?” and also, “What are my opponent’s worst pieces?” White’s whole strategy revolves around making his problem pieces (the rook on a4 and the light-squared bishop) useful, while hemming in Black’s problem pieces (the dark-squared bishop and the knight on h7). Even when White had chances to open lines on the kingside — something one usually wants to do when attacking — I refrained from doing so because the strategic value of keeping Black’s problem pieces out of action was paramount.


