In my last post, I looked at the K and Q versus K and R endgames, one of the four endgames of the Apocalypse, which occurred in both of the semifinal matches of the World Cup, and I introduced a couple of new ideas or at least new terminology, the “seesaw maneuver” and the “back-against-the-wall maneuver.” I received some great comments from Todd Bryant and Yamil Duba, who mentioned the “third-rank defense” as the defender’s best try. In particular, Todd mentioned the following position, which is an especially tough nut to crack:
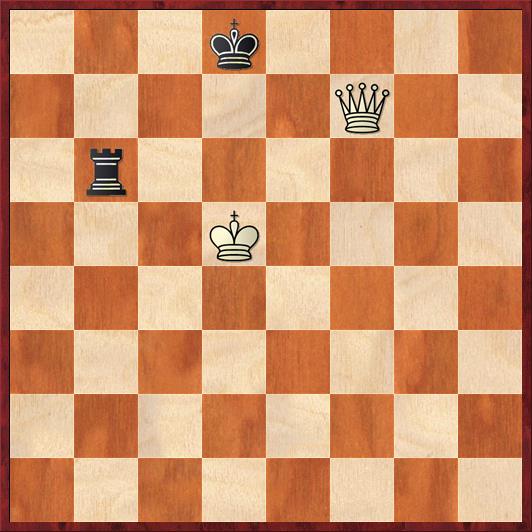 White to move.
FEN: 3k4/5Q2/1r6/3K4/8/8/8/8 w – – 0 1
If you haven’t seen this position before, it’s definitely worth taking an hour of your time to figure out White’s winning plan.
I was very excited to get Todd’s comment because I was curious whether the two maneuvers I discussed in my last post were sufficient to win (or at least make progress in) any position. Regretfully, I have to say that the answer is no. The “natural” move here seemed to be 1. Kc5?, but after 1. … Ra6 I could not see any way to set up either of the aforementioned maneuvers. There are many lines that almost work, but Black always seemed to have at least one resource to keep my plans from working.
I was determined, though, to find the solution without looking it up either in a tablebase or a book. And I succeeded! However, I am still struggling to frame the move in terms of a general concept. To me, at this point, it just seems like a “magic move.”
Have you found it yet? The answer is 1. Qf4!! This move is so subtle that it deserves another diagram.
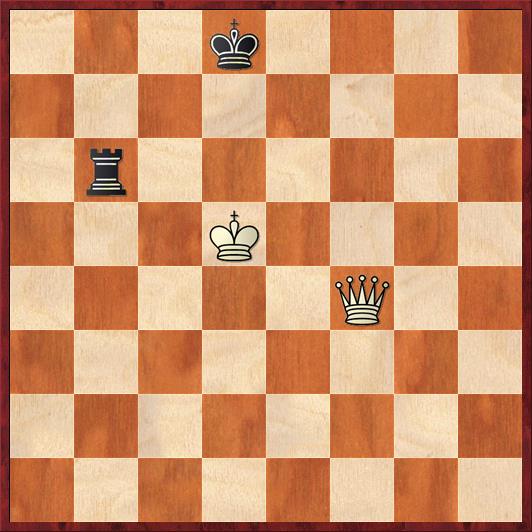 Position after 1. Qf4. Black to move.
FEN: 3k4/8/1r6/3K4/5Q2/8/8/8 b – – 0 1
What is the thinking behind this move? Well, in one word, it’s zugzwang. Any Black move will make the position worse, and rather speedily.
I often tell my students that a move that does two things at once (for example, a fork or a discovered attack) is usually a great move. A move that does three things is fantastic. Well, this move is quite possibly the all-time champion, because it does eight things at once! I’ll list them in approximate order of importance.
- It threatens check on b8 in case Black should play 1. … Ra6.
- It threatens check on f8 in case Black should move his rook to the kingside. Also it’s important to realize that Qf8+ becomes a mate threat if Black should play 1. … Rb5+ 2. Kc6, so Black would lose his rook immediately.
- It controls c7 and therefore prevents 1. … Kc7, which otherwise would be Black’s best move. (All things being equal, Black would like to maintain contact between his king and rook.)
- It controls c1, a key checking square, so that 1. … Rb1 2. Kc6 would win on the spot. (This was one theme I did mention in my previous post.)
- It threatens check on e3 in case Black should move his king to the e-file.
- It threatens check on f6 in case Black should play 1. … Rb2.
- It threatens check on h4 in case Black should play 1. … Rb3. (This is somewhat less important because White has an alternate way to win with 2. Kc6, but nevertheless 2. Qh4+ followed by a fork on a4 or c4 is cutest and quickest.)
- Finally, it threatens check on a4 in case Black should play 1. … Kd7. This last line is less immediately decisive than the others, but it is clear that after 1. … Kd7 2. Qa4+ Kc7 3. Qa7+ Rb7 4. Qc5+ White has made huge progress — he has broken the “third rank defense.” Although the game is not over yet, this is enough to consider the problem theoretically solved.
There is only possibility for Black that I haven’t covered yet:
1. … Kc8 2. Kc5! (Now this move works like a charm) Ra6 (It’s easy to see that other moves do not work. For example, 2. … Kb7 3. Qe4+ breaks the third-rank defense.)
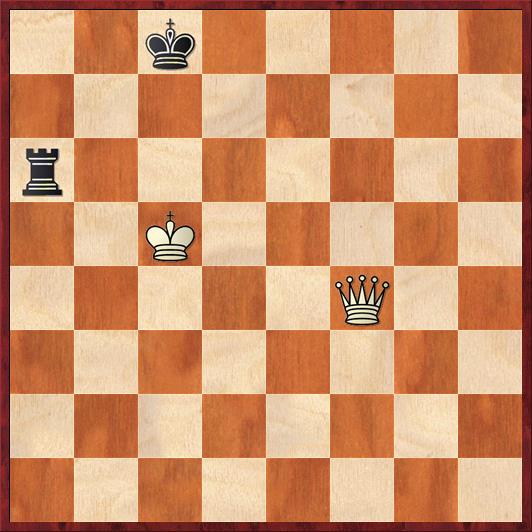 Position after 2. … Ra6. White to move.
FEN: 2k5/8/r7/2K5/5Q2/8/8/8 w – – 0 3
Now can you find White’s coup de grace?
The answer will make you smack your head, if you haven’t found it. White plays 3. Qe4!! — setting up the same position as diagram 2, only moved one file to the left! This time Black will run out of room. For example, if 3. … Kc7 4. Qe7+ K-any 5. Kb5 the rook has no safe squares on the third rank to run to; there is no square to the left of a6 (z6?). Or if 3. … Kb8 4. Kb5 there is again no z6 square.
So that’s how you win this position; now, how do you find 1. Qf4 over the board? To be honest, I don’t think that any human player could figure all of this out in a time pressure situation, with only a few seconds or even a few minutes to think. This is why you have to study the position in advance and at least roughly know the idea. I think that points 1-3 above would be especially useful to you in looking for this move. That is, it’s very helpful to have checks on both sides of the defending king (points 1-2) and also, once you realize you can’t force a win directly by a series of checks, you have to start thinking prophylactically. Therefore, preventing the move 1. … Kc7 becomes a high priority. Clearly, 1. Qf4 is the only move that accomplishes these three goals. The fact that it also leads to this wonderful variation where every piece moves one step to the left until Black runs out of room — that is just a miraculous accident.
By the way, let me say also that it’s clear that Black has really good practical chances to hold this endgame if White is not absolutely on top of his theory. So if you ever get to a KQ versus KR endgame and you have the rook, you should not give up. Two excellent practical ideas are (1) try to set up a third-rank defense, with the rook cutting off your opponent’s king from your king; and (2) if you get to a situation where you have a choice between retreating or separating your K and R, you should choose separating over passive retreat, unless you can clearly see that your opponent has a checking sequence that leads to a fork. If you can’t see it, probably your opponent won’t either, and he will spend valuable time trying to do so. Also, (2a) if you decide you must separate king and rook, move the rook as far away as possible. I haven’t seen a single position where this isn’t good advice.


{ 9 comments… read them below or add one }
Nice work Dana, with both this post and the previous one. I’ve never had this endgame and would not have known how to win it.
I already knew the standard winning position is BKa7 BRb7 WKc6 WQd8, (or mirror images in other corners) with either side to move, but I didn’t know the technique for forcing the defender’s king into the corner.
Yes, the “standard win” was all that I knew, and then I tried playing the endgame against the computer a few years ago and I could never even get close to that position.
I’ve had the KQ vs KR endgame once in a tournament, with the rook, and I drew. My opponent was an expert, and I was class A. It was a pretty amusing story. This was back in the day of adjournments (around 1980 or s0), and we adjourned in this ending. During the adjournment he had a chance to look up how to win in a book, but OTB he still couldn’t do it. Basically my whole strategy was just to stay away from the “standard” position.
I think that these “extreme” endgames (KQ vs. KR, KRB vs. KR, etc.) occur more often in GM and super-GM games than they do in amateur games, because grandmasters are so much better than amateurs at defending. They’ll fight to the bitter end and they know every trick for making the win as difficult as possible for their opponents.
I looked at this position this morning with the intent to understand how to make things difficult as the defender against Fritz8. I know that the tablebases are gospel, including the shortest distances to mate making 1.Qf4! the best move, but Fritz8 chose 1.Kc5 in 10-minute blitz time control. Now, Black’s best is 1…Ra6 leading to 2.Qd5+. 2…Kc7 is not prevented, but 3.Qe4 transposes back to the original setup shifted over one column with no loss of move. Of course if you can see 3.Qe4, then you had the ability of seeing 1.Qf4. The only way, tablebase-wise, for Black to take advantage of 1.Kc5 is to go 1…Ra6 2.Qd5+ Kc8 when White still breaks the third rank defense starting with 3.Kb5. After that, the tablebase says 3…Ra7, but the resistance is pretty much broken. Probably 2…Kc7 is still the best practical defense to test whether White can find the 3.Qe4 analogy to 1.Qf4. These endgame mazes are full of fun dead ends, trippy transpositions, and miraculous moves.
Never mind. I got my transpositions wrong. After 1.Kc5 Ra6 2.Qd5+ Kc7 3.Qe4 is NOT analogous because the Black King should be on c8. Still, the third rank defense can be broken even after 3…Ra5+ 4.Kb4 Ra6 starting with 5.Qe7+.
I looked at lines like this (1. Kc5 Ra6 2. Qd5+ Kc7 3. Qe4) and the trouble I kept running into was 3. … Ra3. Yes, Black has gone away from the third-rank defense, but it was unclear to me how to proceed. Remember, my main objective was to win with a limited set of concepts — the seesaw and back-against-the-wall ideas from my last post. But after 3. … Ra3 the seesaw just doesn’t work because White’s own king gets in the way of some of the checks. So White will have to improvise or thrash around — which is no good because I want a system.
I would say that 1. Qf4 is the only move that shows you know what you’re doing, and not just because the tablebases say it’s fastest.
Actually I’m overstating the difficulty of 3. … Ra3. In this line, 4. Qe7+ Kc8 5. Kb6 Rb3+ 6. Ka7! is an easy win where the rook gets forked anywhere it goes. There were some other lines where 3. … Ra3 seemed like a tough defense, but not this one. So your solution with 3. Qe4 is also good. As you said, it’s quite similar in spirit to 1. Qf4, it’s just a matter of when White is going to see that he needs to play a subtle queen move.
Incidentally, do Black’s tablebase best rook moves after 1.Kc5 Ra6 2.Qd5+ Kc8 3.Kb5 Ra7! and 1.Kc5 Ra6 2.Qd5+ Kc7 3.Qe4 Ra5+ 4.Kb4 Ra6! violate your separate as far as possible rule?
No, because if there is only one empty square between K + R I don’t consider them to be separated. (E.g. the original position, which is very good for Black.) The reason is that on any check, Black can still defend the rook. When K + R are separated by two squares or more, I consider them separated because in such cases they are “vulnerable” to a fork. You can see the difference in a line like 1. Qf4 Ra6 2. Qb8+, where the queen is able to get between the king and rook.
So my rule would be, either keep them close together (separated by no more than one square) or else as far apart as you can.
Good job, Dana! I definitely didn’t solve this position for myself–I learned it from John Nunn’s book. If you play this ending against the computer, as I’ve done endless times on ChessTempo, you will reach this position again and again.
I didn’t know this Qe4 detail; that is really pretty.