Recently I had a kibitzer for one of my chess games against the computer.
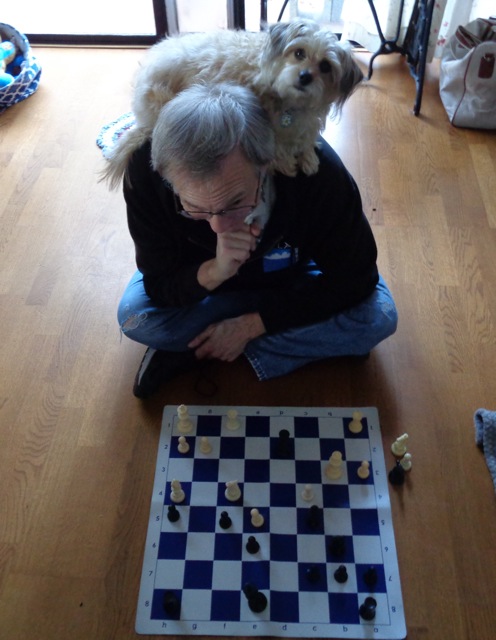
As we all know, man versus computer is an uneven battle. But a little bit of canine assistance can even up the odds!
Daisy and Dana — Shredder (2220)
1. e4 Nf6 2. e5 Nd5 d4 3. d4 d6 4. f4 Bf5 5. Bd3! …
This is my home preparation against Alekhine’s Defense. I call it the “three pawns” variation: White pushes the f-pawn but not the c-pawn. It sets a really fascinating trap, which I used once to defeat IM Jake Kleiman. (I gave a ChessLecture on that game a few years ago.) What makes this trap so effective against a high-rated player is that it’s several moves deep. The higher-rated player will think that he is being really clever, playing a four-move combination to win a pawn, little realizing that this is exactly what the lower-rated player wants him to do.
5. … Bxd3 6. Qxd3 de 7. fe Nb4 8. Qe2 …
Also very interesting is 8. Qe4, “falling into Black’s trap.” After 8. … Qxd4! White of course does not play 9. Qxd4?? Nc2+ but instead plays 9. Qxb7! However, the insanity that follows is difficult to calculate. I prefer the text move because it has a clear strategic plan behind it: sacrificing a pawn for rapid development and pressure on Black’s kingside.
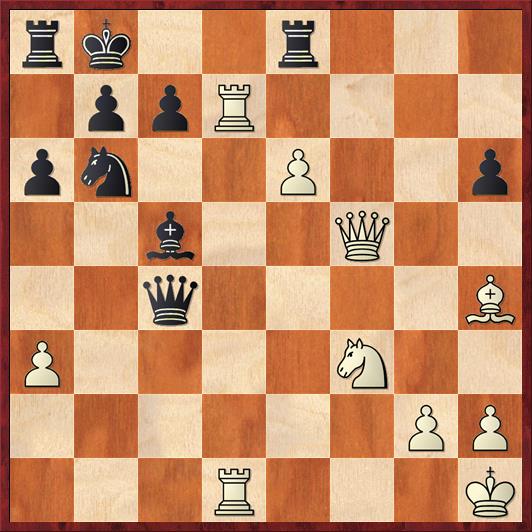
 Position after 8. Qe2. Black to move.
FEN: rn1qkb1r/ppp1pppp/8/4P3/1n1P4/8/PPP1Q1PP/RNB1K1NR b KQkq – 0 8
8. … Qxd4
Black is morally obliged to take the pawn; otherwise he would have to admit that the knight sortie to b4 was just a waste of time.
9. Nf3 Qc5
This is where Kleiman played 9. … Qg4?! against me and went down to a rapid defeat. The text move seems like the most principled answer, putting pressure on c2 and preventing me from castling.
The trap initiated with 5. Bd3 doesn’t lead to a forced win or even a forced advantage; it simply forces Black to make a lot of difficult decisions, while White has an easy initiative. In practical chess, playing against a human, I would take White’s position any day of the week. Against a computer, of course, it’s not quite so easy.
10. Nc3 e6 11. a3 Nd5 12. Ne4 …
One of the first decision points for White. Rybka slightly prefers 12. Nxd5, with two points: 12. … Qxd5 will allow White to castle easily, while 12. … ed will allow 13. e6! with quick pressure against Black’s king.
Nevertheless, 12. Ne4 is also a very playable move, and I think that for a human player it’s a little bit more intuitive; as the attacker, White would prefer to avoid exchanges.
12. … Qc6 13. c4 Nb6 14. b3 Na6 15. Bg5? …
Rybka says 15. Nd4 Qd7 16. Bb2 with full compensation for the pawn. The text move attempts to prevent Black from castling queenside, but the trouble is that the bishop can be chased away.
15. … h6 16. Bh4 Nc5 17. Ned2 Qd7 18. O-O Qd3?
Because Shredder’s rating is set at 2220, not full strength (2600), it will make an occasional inaccuracy. This move is a very human-like mistake. Black has two key moves, … Qd3 and … g5, but Shredder makes them in the wrong order. After 18. … g5! Black would stand better, because sacrificing on g5 would be unsound for White.
19. Qf2 g5 20. Nxg5! …
Now the sacrifice is completely sound: 20. … hg? 21. Qxf7+ leads to mate very quickly. But Shredder came up with a remarkable resource:
20. … f5!
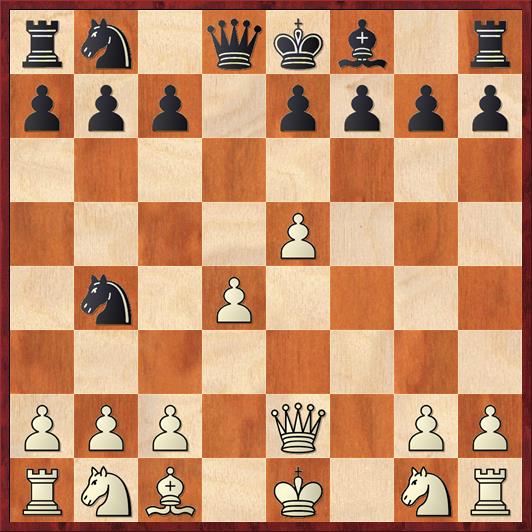
 Position after 20. … f5. White to move.
FEN: r3kb1r/ppp5/1n2p2p/2n1PpN1/2P4B/PP1q4/3N1QPP/R4RK1 w kq f6 0 21
This is computer chess at its best (or worst): It comes up with moves that most humans would not even look at. At this point, it was time to call in the canine reinforcements!
Actually, what I did was take a time-out. I’ve written about this before: when I play the computer, I allow myself one chance per game to stop the clock and analyze the position on a board. I call it “Matrix chess,” because I’m like Neo in the Matrix movies, who can stop time to defeat his computer adversaries. But I can only do it once a game; that makes it a challenge to find the right high-leverage moment.
So I stopped my clock and set up a chessboard. When Daisy saw me hunched over the chessboard, she seized her opportunity to jump up on her favorite spot: my back!
So what would you play in the position above: A) exf6 (yes, it’s legal!), B) Nf3, or C) Nh3?
I was very pleased that Daisy and I not only found a good move, but we predicted the actual game variation up to move 29. Truly a successful collaboration!
First, (A) is bad. After 21. ef? now Black can take the knight without getting checkmated. After 21. … hg! 22. f7+ Kd7! (not 22. … Kd8 or … Ke7, when 23. Qf6+ wins) I was exceedingly surprised to find out that White has no good way to take advantage of Black’s seemingly exposed king. For instance, if 23. Bxg5 Bd6 24. Nf3 Qf5 and what next? Black’s pieces are all active and there are no obvious breakthroughs for White — and Black’s B and R are eyeing the h2 pawn with hostile intent.
(B) is the move I played, and you’ll see my analysis shortly.
(C) is actually the move that Rybka thinks is best! I very nearly played it. For instance, Daisy and I liked White’s position in lines such as 21. Nh3 Nxb3 22. Nf4 Qxd2? 23. Qf3! h5 24. Qxb3 Bc5+ 25. Kh1. This is the position that you see in the photograph! Black can finally castle if he wants, but he’s not likely to live very long.
Unfortunately, Black had a resource that Daisy and I couldn’t find any good answer to: 21. Nh3 Nxb3 22. Nf4 Bc5! Amazingly, Black comes out ahead in all variations, for instance 23. Nxd3 Bxf2+ 24. Rxf2 Nxa1. White can trap the knight in the corner with 25. Ne1, but it takes too long to bring the rook to a square where it can attack the knight, and meanwhile Black can rescue it with … a5, … a4, … Nb3.
This was such a bummer that Daisy and I gave up on 21. Nh3 altogether. But in fact, Rybka says that White gets a comfortable advantage after 21. Nh3! Nxb3 22. Nxb3 Qxb3 23. Nf4 Qxc4. I think that we underestimated this because we saw White sacrificing two pawns for nebulous counterplay. But actually, Rybka says it’s overwhelming after 24. Rc1 Qb3 25. Qe2!, threatening Qh5+. There are too many leaks in Black’s position, he can’t cover them all.
There’s a great lesson here, which is that if you’ve sacrificed a pawn for some counterplay, you can often get overwhelming counterplay by sacrificing a second pawn. Daisy and I were not quite ambitious enough.
However, in variation (B) we found a really nice, concrete line that leads to advantage for White, so I don’t consider our move to be a mistake.
21. Ngf3 Nxb3?
Too greedy. According to Rybka, Black should hold White to a slight advantage with 21. … Rg8.
22. Nxb3 Qxb3 23. Qg3! …
Now Black cannot stop the queen from invading the heart of the Black position.
23. … Bc5+ 24. Kh1 Kd7 25. Rad1+ Kc8
A key point that Daisy and I had to foresee is that 25. … Kc6? would allow White to win a queen with 26. Nd4+. Loose pieces drop off!
26. Qg7 Re8 27. Qf7 Qa4
Black’s moves are all forced.
28. Qxe6+! …
Once Daisy and I found this move, we were sold on 21. Ngf3. Of course Black cannot accept the queen sacrifice because 28. … Rxe6? 29. Rd8 is mate.
28. … Kb8 29. Qxf5 …
At this point Daisy and I stopped our analysis because we thought White’s advantage was clear. True, but winning this position is by no means routine or easy! In fact, the thing I’m proudest of in this game is that I continued to find strong moves without help from my faithful canine companion (and without time-outs).
29. … Nxc4 30. Rd7 Nb6
I was quite surprised here that Black didn’t continue to press forward with the knight fork, 30. … Ne3, and instead played the purely defensive retreat 30. … Nb6. Usually Shredder prefers sharp, aggressive play even when it shouldn’t. But here I think that it realized White’s attack is just too strong after 30. … Ne3 31. Qf7 Rc8 32. Bd8! For example, if 32. … Nxf1 33. Rxc7! is the coup de grace. Nice stuff! I’m not sure if I would have found this last move.
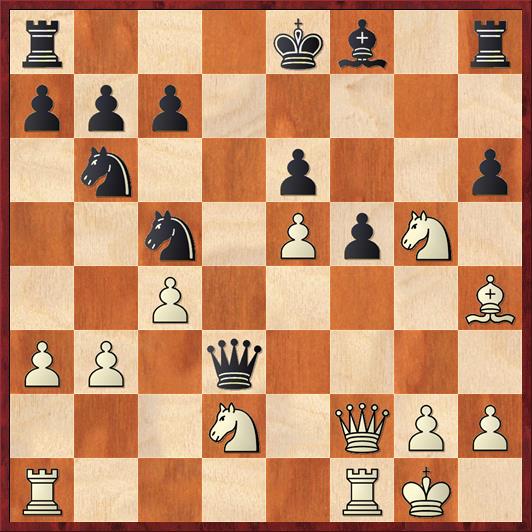
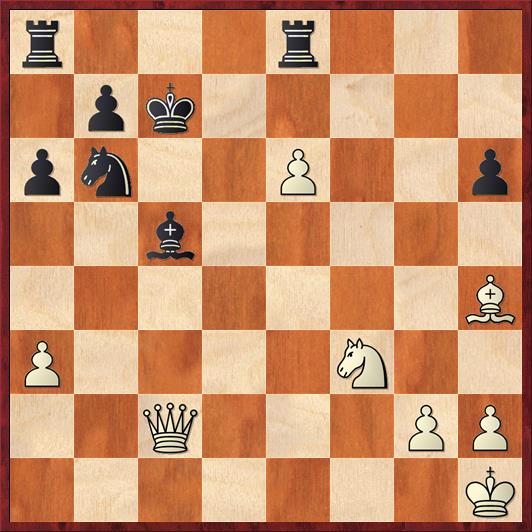
 Position after 30. … Nb6. White to move.
FEN: rk2r3/pppR4/1n5p/2b1PQ2/q6B/P4N2/6PP/5R1K w – – 0 31
Having forced Shredder into a rare passive move, I thought it was time to press my advantage.
31. e6! …
Again a sac that Shredder can’t take, because after 31. … Nxd7 32. ed the pawn will queen. Probably 31. Rh7 would have been okay too, but I thought it was important to put maximum pressure on Black in order to keep Shredder’s defenses disorganized.
31. … Qc4 32. Rfd1! …
Should I go to d1 or e1? It was a choice that I made on intuitive grounds. After 32. Re1 I was uneasy about the pin on the e-pawn. It turned out that I was right: 32. Re1? Nxd7! 33. ed Rxe1+ 34. Nxe1 Qxh4! (a move I didn’t see!) miraculously stops the pawn from queening and threatens mate. I’m glad that I trusted my gut and put the rook on d1 instead.
32. … a6
 Position after 32. … a6. White to move.
FEN: rk2r3/1ppR4/pn2P2p/2b2Q2/2q4B/P4N2/6PP/3R3K w – – 0 33
Now on Rd8+ Black’s king can escape to a7, and after that White’s advantage may start to evaporate. How can we keep that from happening?
(Space in case you want to think about it.)
33. Rxc7! …
This is what you’re looking for on a chessboard, a sense of flow. One move naturally leading to another: Rd7, e6, Rxc7. The main point is that 33. … Kxc7 34. Bg3+ gives Black a disastrous choice between 34. … Kc6 Ne5+ losing the queen and 34. … Kc8 35. e7+ losing the king.
Even so, the computer isn’t done yet. It’s tough to outplay a tactical monster in a tactical position, and Shredder makes me work for the point.
33. … Qb3 34. Rb1 …
Even though this means giving up the attack, I thought that the choice was justified because I would have a winning endgame. I can’t let the position stay tactical forever — if I do, eventually the machine will find something that I’ll miss.
There were only two flaws with my thinking. One is that the endgame was not as routine as I hoped. The second is that the position does stay tactical forever!
34. … Qxb1+ 35. Qxb1 Kxc7 36. Qc2! …
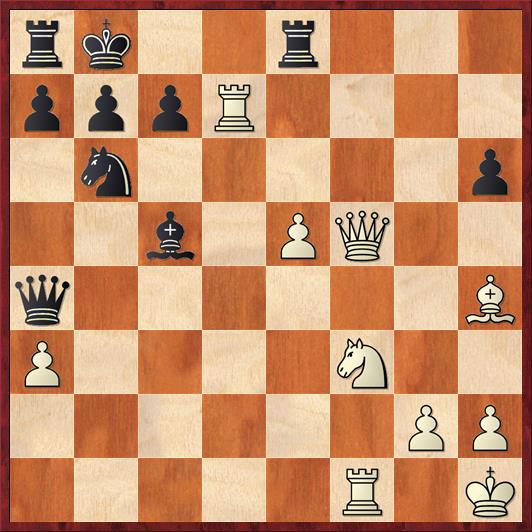
 Position after 36. Qc2. Black to move.
FEN: r3r3/1pk5/pn2P2p/2b5/7B/P4N2/2Q3PP/7K b – – 0 36
This was the move that sold me on 34. Rb1. Amazingly, the only Black piece that can defend the bishop is the king, and I felt certain that with enough checks I could pry the king away. Again, my gut was correct, although the machine as usual made it harder than I thought it would be.
36. … Kd6 37. Bg3+ Kd5 38. Qf5+ Kc4 39. Ne5+ Kb3 40. Qd3+ Kb2 41. Qd2+ Kb3 42. Qd1+ …
Finally! Every king move allows a fork that wins the bishop. However, Shredder does manage to snag two pawns as compensation.
42. … Kxa3 43. Qc1+ Kb3 44. Qxc5 Rxe6
Yes, White is completely winning — Rybka gives me a +5-pawn advantage. However, over the board I didn’t know this, and the win was still looking anything but routine. With all my pawns gone except the forgotten soldiers at g2 and h2, I’m not going to win any pawn races. Basically I have to play for either a checkmate or a major win of material. Fortunately, the queen, bishop and knight are an extremely effective attacking force and Black’s king is far from the rest of his army. For those reasons the position more or less played itself from here.
45. Nd3 a5 46. Be5 Rc6 47. Qb5+ Kc2 48. Ne1+ Black resigns.
The cutest finish is 48. … Kd2 (or d1) 49. Qd3+ Kxe1 50. Bg3 mate. If Black plays 49. … Kc1 instead, either 50. Bc3 (my move) or 50. Bd6 (Rybka’s move) force Black to shed material to avoid checkmate.
What a fun game this was! We had an innovative opening; an exciting middlegame with a pawn sac, a knight sac, an exchange sac, a rook sac, and a queen sac (although Black had to decline most of the sacrifices); and a complex endgame culminating in a king hunt and a checkmate. I hope you enjoyed it as much as Daisy did!


