This week I played a game against the computer that featured two of my favorite strategic themes. The unbreakable pin is, of course, well known.
The second concept, the Long March, is one that I named but of course didn’t invent. It’s simply the plan of marching the king from one side of the board to the other. I once gave a Chess Lecture on it, inspired by watching a game of Hikaru Nakamura in Las Vegas. To pull it off you need rock-solid control over the position, so that you can “waste” six or seven tempi with no ill effect. The point usually is that you anticipate opening the game on the side of the board where your king is, and you want to move your king to a safer location. A second point, which can be quite significant in a speed game or if you don’t have much time on your clock, is that it enables you to play six or seven moves quite quickly.
I’ve never gotten to play a Long March in a tournament game, and this was probably my first time playing it against the computer.
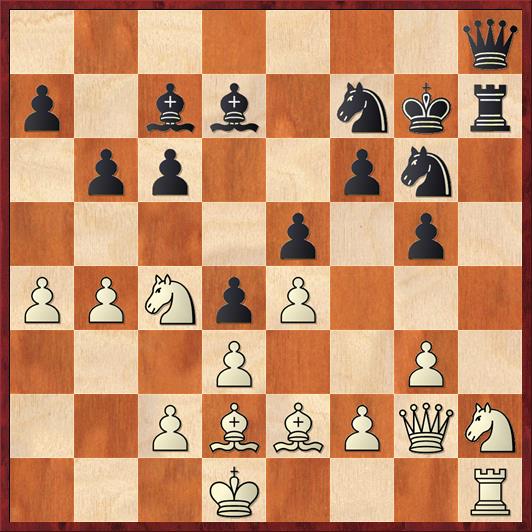
FEN: 7q/p1bb1nkr/1pp2pn1/4p1p1/PPNpP3/3P2P1/2PBBPQN/3K3R b – – 0 40
Here Shredder, playing White, has just defended its knight with 40. Rh1?, a move that surprised me because it walks into a pin on the h-file that is next to impossible for White to break. To break the pin, White would have to maneuver a knight to f3 or g4, but that is easy for Black to discourage with a timely … g5-g4. Or White could bring his king to g1, but the problem is that he would have to pass though f1 first, allowing a nasty pin with … Bh3.
But as I looked at this position, it was very far from clear to me how I can actually make use of the pin. Usually the strategy is “pin it to win it” – you just need to keep piling attackers on the pinned piece. But how can I find another way to attack the knight on h2? Aside from a very low-probability-of-success idea like … g4, … Ng5, and … Nf3, there is no way. And this is probably why the computer didn’t see any harm in allowing the pin.
However, what I realized (only intuitively at first; I didn’t verbalize it until after the game) is that the pin paralyzes three White pieces (Q, R, and N) while requiring Black to invest only two pieces to maintain it (the Q and R). Therefore, I am essentially a piece up on the other side of the board! It makes sense that I would prefer to have my king on the opposite side of the board, where I have a force majority. Therefore, this is an ideal time for a Long March! I gain time on the clock, I don’t lose any positional advantages, and I get a chance to wait and see what my opponent might come up with.
My execution of the Long March was perhaps not perfect, but I think it was the right idea.
40. … Kf8 41. Bc1 Ke7 42. Ba3 Kd8 43. Bb2 Nf8 44. c3 Ne6
I don’t think my last two moves were really necessary, but at least they didn’t hurt anything.
45. Bg4 dc 46. Bxc3 Nh6 47. Bh4 Ng8 48. Bg4 …
If 48. Bg6 Rh6 49. Bf5 Ne7 50. Bg4 we would get to a position essentially like the game.
48. … Ne7 49. a5 Kc8
I didn’t think that White’s pawn demonstration on the queenside could amount to anything. After all, I have more material on that side, so in principle it can only help me.
50. ab ab 51. f3 Kb7 52. Ke2 …
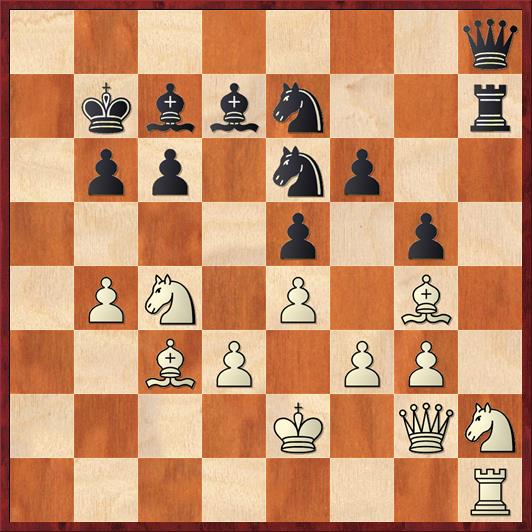
FEN: 7q/1kbbn2r/1pp1np2/4p1p1/1PN1P1B1/2BP1PP1/4K1QN/7R b – – 0 52
At this point, I made a very disappointing mistake. With the Long March complete, I had to realize that a new phase of the game has begun. With my king in relative safety and far from the kingside, it is time for me to take energetic measures there and expose white’s king to attack. In other words, it is time for the move 52. … f5!
Of course White has to take, because otherwise his bishop is trapped. The best line for White seems to be 53. ef Nd4+ 54. Bxd4 (otherwise Black will recapture on f5 and have very nice-looking piece play) 54. … ed 55. f6 Bxg4 56. fe Rxe7+ 57. Kd2. (If 57. Kf2? White would lose the d-pawn to 57. … Bf5.) Although I can’t see a coup de grace for Black, I have many threats and open lines and White’s king is caught in no man’s land. My other computer engine, Rybka, gives Black a 1.5-pawn edge.
This would be the thematic way for Black to play, and it would have shown that I truly understood the concept behind the Long March. However, I played instead
52. … Nf8?
Though it’s not an out-and-out blunder, this knight is going the wrong direction; it should be headed for d4.
Why did I miss my opportunity? In part it’s the psychology of a human playing the computer. I loved having an absolute clamp on the kingside, preventing White from doing anything aggressive. And I was correspondingly wary of any moves that would loosen my position up a bit and make the game more tactical. As we know, computers are incredibly good at tactics. To some extent, the question is this: would you rather have a 1.5-pawn advantage over the computer in a tactical position, or a 0.5-pawn advantage in a position with no tactics.
This is why playing the computer is such a bad training technique. The ultimate goal in chess is to beat humans, not to beat computers. Against a human opponent, I would always go for the 1.5-pawn advantage. But against the computer, I’m scared to even try a move like 52. … f5 for fear that it will blow up in my face. I didn’t even seriously analyze it, and that was a serious failure.
Fortunately, the computer gave me a reprieve, because it made a mistake of its own. The game continued:
53. Bxd7 Nxd7 54. b5? …
A terrible move that solves Black’s biggest problem: How to make progress?
To understand why Shredder made this move, you have to understand the computer’s “psychology.” Of course, computers don’t have psychology, but from years of playing Shredder I know that this particular program has a strong bias towards active, aggressive, initiative-seizing chess. It’s one reason that the program is so fun (and sometimes frustrating) to play against. It never gets discouraged and constantly tries to find ways to attack.
The move 54. b5 would actually be a great idea if this were a “normal” position where White could follow up by bringing its rook and queen over to the queenside. But here the strategic power of the unbreakable pin really reveals itself. White’s attack gets absolutely nowhere because the rook and queen are shackled to defending the knight on h7. White had to sit and wait passively, maybe with 54. Ne3, intending to plan Neg4 and finally liberate his pieces on the kingside. But waiting passively is not Shredder’s style.
54. … cb 55. Na3 Kc6 56. Bb4 Nc5 57. Qf2 Bd6 58. Qg2 Ng6 59. Nc2 Ne6!
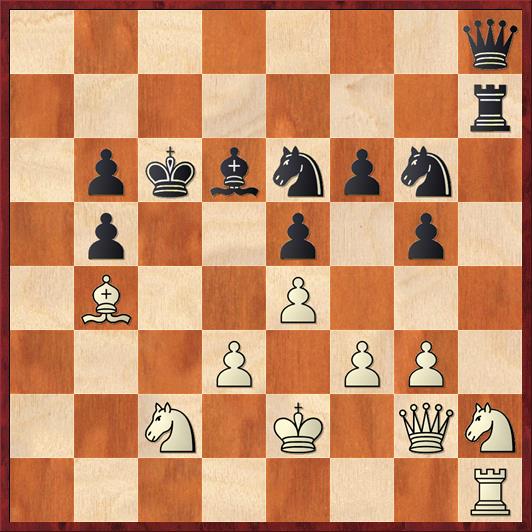
FEN: 7q/7r/1pkbnpn1/1p2p1p1/1B2P3/3P1PP1/2N1K1QN/7R w – – 0 60
A nice case of tactics serving a strategic objective. White can’t play 60. Bxd6 because of 61. Nef4+ forking the king and queen. This allows me to reposition my bishop to c5, the first time all game that it has had an active square.
60. Qf2 Bc5 61. Bxc5 bc
With a solid extra pawn, a protected passer, and with the eternal pin on the h-file still in place, Black’s game is strategically won. Now the only question is: Am I going to screw it up?
62. Ke1 b4?!
This is exactly the kind of move that could have screwed it up. It creates a lot of white-square weaknesses around Black’s king.
63. Ne3 Nd4 64. Nc2 …
Whew! I was surprised the computer didn’t play 64. Qa2. Although Black can win a piece with 64. … Rxh2 or 64. … Nxf3+, it seems likely that White would have a perpetual check. I think that the right response to 64. Qa2 would be 64. … b3! “In for a penny, in for a pound.” After 65. Qa4+ Kb7 White has no followup, and after 65. Qa6+ Kd7 66. Nd5 Nc6 it looks to me as if Black is completely safe. If 67. Qb7+ Kd6 68. Qxb3 Rxh2.
White’s last move does set a trap: if Black tries to win brilliantly with 64. … Rxh2? to set up a fork on f3, then White gets the last laugh with the intermezzo, 65. Nxd4+.
64. … Qd8
I like this move. I’m saying forget about all the tactics on f3 and h2. I just want to trade queens and beat you in the endgame. Or I want to get my queen to a5, when you’re going to face an attack on two flanks. 64. … Ra7 would also have been very effective, for similar reasons.
65. Ne3 b3 66.Kf1 Qa5 67. Kg2 Qa2 68. Nd1 Nc2
Probably trading queens would have been fine, but I thought I could get more out of the position.
69. Rf1 …
After 29 moves, the “unbreakable pin” is finally broken. But I don’t mind, because the center of action has moved elsewhere.
69. … Rd7!
White has no way to defend the d-pawn. If 70. Qe2 Rxd3! 71. Qxd3 Ne1+. If 70. Nc3 Ne3+ 71. Kg1 Qxf2 72. Rxf2 Rxd3.
70. Ng4 Rxd3 71. Rh1 …

And now, after a long, arduous battle, I finally get my reward: a nifty little three-move combination. Or six moves depending on how you count.
71 … Rd2! 72. Qxd2 Ne3+ 73. Ngxe3 Qxd2+ 74. Kh3 b2! White resigns.
The cutest point (unplanned by me, but I’ll take credit anyway) is that 75. Nc4, which seems to win a pawn, actually loses a piece after 75. … b1Q 76. Nxd2 Qc2, when White is unable to protect both knights.
A really interesting strategic battle, even if it was not perfectly played. To me, the most interesting points were, first, the unusual way of exploiting the unbreakable pin. Instead of “pin it to win it,” the idea is to create a force imbalance on another part of the board.
The second interesting point was something I call the pace of play. From moves 40-51 I played a very slow plan, and then on move 52 I should have metaphorically hit the accelerator. I missed that opportunity but was saved when Shredder hit the accelerator instead. Recognizing when to “Play fast” and when to “Play slow” (not in the sense of actual time, but in the chess sense) is a very challenging thing. Do any of my readers know any writers who have discussed this aspect of chess? Also, does anyone know any other good examples of the Long March?


