The next year in my retrospective, 1985, was my busiest year ever, with 60 tournament games, so there are lots of games to choose from. And it was the year that I won the title of North Carolina state champion for the first time, which of course I consider to be one of the high points of my entire life in chess.
Prior to 1985 I had two aspirations in chess, both of which I expected to take years to achieve: earn a National Master rating (2200) and win a state championship. Any sensible person would expect the master title to come first, but in fact they happened in the reverse order. I became state champion in spite of having huge flaws in my game. My rating at the end of the year was 2144, but ratings don’t tell the whole story. I was doing my damnedest to play with the bravado of Kasparov (the new world champion!) but without his positional understanding. The result was that I did pretty well against lower-rated players, but against strong and positionally well-grounded players I would lose and I wouldn’t know why.
You might think that in today’s post I would show you one of my games from the state championship, but I won’t. One reason is that I already blogged about all six of them, long long ago. You can look at all of those games in this series of posts: Winning the State (part 1) (part 2) (part 3) (part 4). There is no point in my writing about them again.
I think it would be much more illuminating, instead, to show you a game against one of those masters whom I just couldn’t beat: Greg Samsa. He had been North Carolina champion in 1982 and 1983. I think his rating might have been around 2300, but whatever it was, he was underrated. He had a wonderful, effortless approach. He moved quickly and never got into time trouble, and when I asked him once about it, he said, “There isn’t that much to think about in chess.”
Not much to think about?!
To me at that time, and even today, “thinking” meant calculating variations. If that’s what you mean by thinking, then there is a hell of a lot to think about. But that isn’t what Greg meant. For him, “thinking” meant putting his pieces in good places and letting the game come to him. Not that he couldn’t calculate tactics, but he saved his energy for the moments when he needed it.
I do think that, like Capablanca, he was a little bit lazy and sometimes he would let me calculate my way into a superior position. But I never was able to turn those advantages into wins, at least in a tournament game. (In 1988-9 we played a series of unrated training games, and I won a couple of those. But that’s like Yuri Averbakh saying that he beat Mikhail Botvinnik in a couple of their training games. Shhh. Secret. Didn’t happen.)
So I’d like to show you not one, but three games played in 1985 that show Greg at his best: two wins for him, one draw for me. One extra-special treat for you is the fact that these games were played in an opening variation that was highly topical at the time, in which Kasparov played a major theoretical novelty to win against Karpov in game 16 of their match. As you’ll see, Greg Samsa had a similar idea six months before Kasparov did.
If that doesn’t get you interested, I don’t know what will!
Dana Mackenzie — Greg Samsa, 3/23/85, 4/27/85, and 11/2/85
All three games began
1. e4 c5 2. Nf3 e6 3. d4 cd 4. Nxd4 Nc6 5. Nb5 d6 6. c4 …
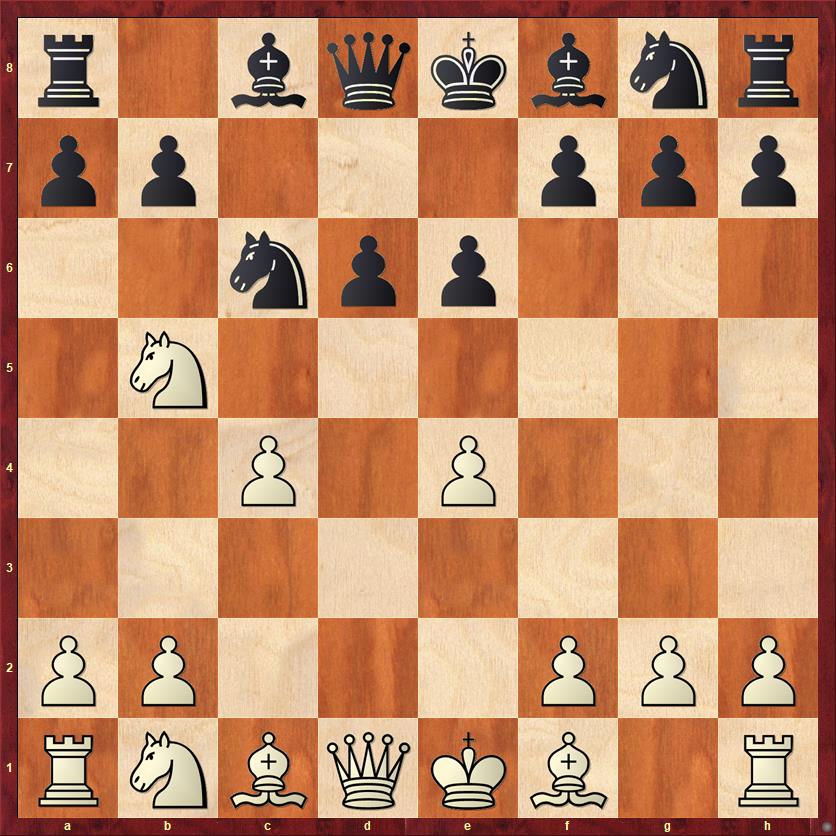
FEN: r1bqkbnr/pp3ppp/2npp3/1N6/2P1P3/8/PP3PPP/RNBQKB1R b KQkq – 0 6
A favorite of Karpov’s, this variation attempts to exert Maroczy Bind-style control over the center, depriving Black of freeing moves like … b5 and … d5. However, it may be just a bit too ambitious; White seems to have to spend a lot of time plugging the potential leaks in his position. And it’s not even clear that White has prevented the break … d5, as we’ll see!
I used to play this regularly as White, and my repeated failures against Greg were one thing that convinced me that I just didn’t “get” the Open Sicilian.
Games 1 and 2 against Greg continued as follows:
6. … Nf6
This seems like the more precise move order to me; for 6. … a6 see Game 3.
7. N1c3 a6 8. Na3 …
And here Garry Kasparov, in his second world championship match against Anatoly Karpov, shocked the chess world with 8. … d5!? His win in game 16 of the match is a thing of beauty. He did not even attempt to win back the pawn; instead he created a murderous bind. That game, played in October 1985 (six months after Games 1 and 2, one month before Game 3), continued 9. cd ed 10. ed Nb4 11. Be2 Bc5 12. O-O. But a year later, against John van der Wiel, Karpov came up with the improvement 12. Be3! (which is of course found immediately by computers) with the idea of 12. … Bxe3 13. Qa4+! and taking the knight next move. This is now considered a “refutation” of the Kasparov gambit, even though Karpov only drew that game! Perhaps it would be more correct to say that Black’s compensation for the pawn is not as strong as in Karpov-Kasparov. White has succeeded in getting rid of Black’s knight, which in the K-K game eventually landed on d3 and single-handedly paralyzed the whole White army.
Because Games 1 and 2 came before the K-K match, Greg understandably didn’t play 8. … d5. Both games continued
8. … Be7 9. Be2 O-O 10. O-O b6 11. Be3 Bb7 12. f4?! …
“Book” at the time was 12. Qb3. This move seemed more natural to me; why put the queen on a square that it will be chased away from? But what I didn’t quite grasp was that 12. f4 creates huge new weaknesses in White’s position. Just like 6. c4, it’s a little bit too ambitious.
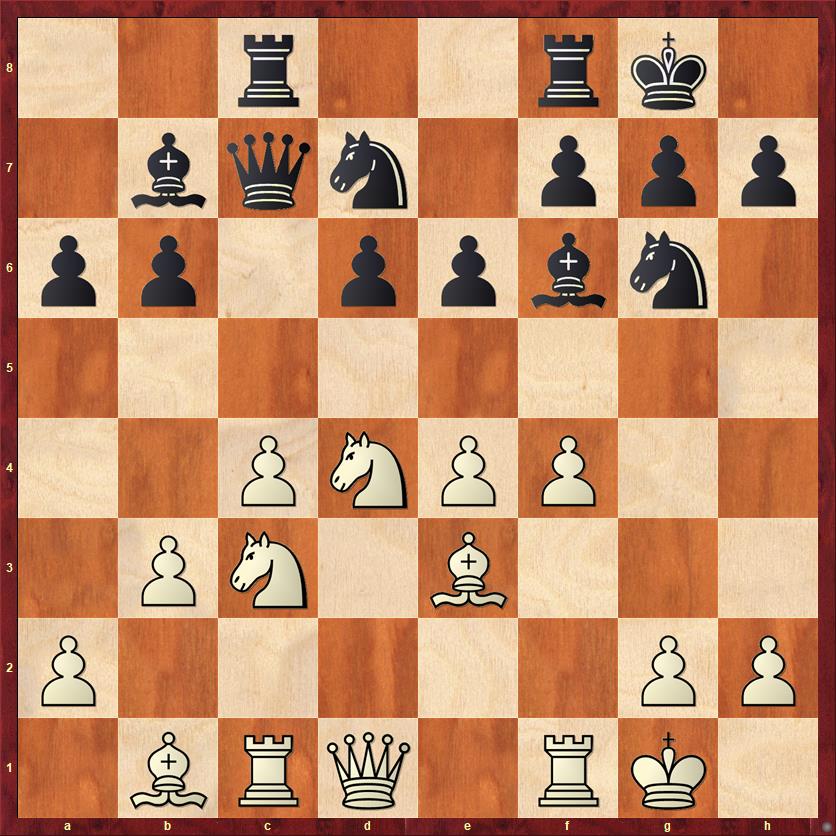
In Game 1, Greg continued in “lazy” fashion with 12. … Re8. I’ll show a few more moves, just to show you why he deviated from this in Game 2. Game 1 continued 13. Bf3 Nd7 14. Qd2 Qc7 15. Rad1 Rad8 16. Nc2 Ba8 17. b3 Na7 18. Qf2 Nc8 19. Bd4 Bf8 (diagram)
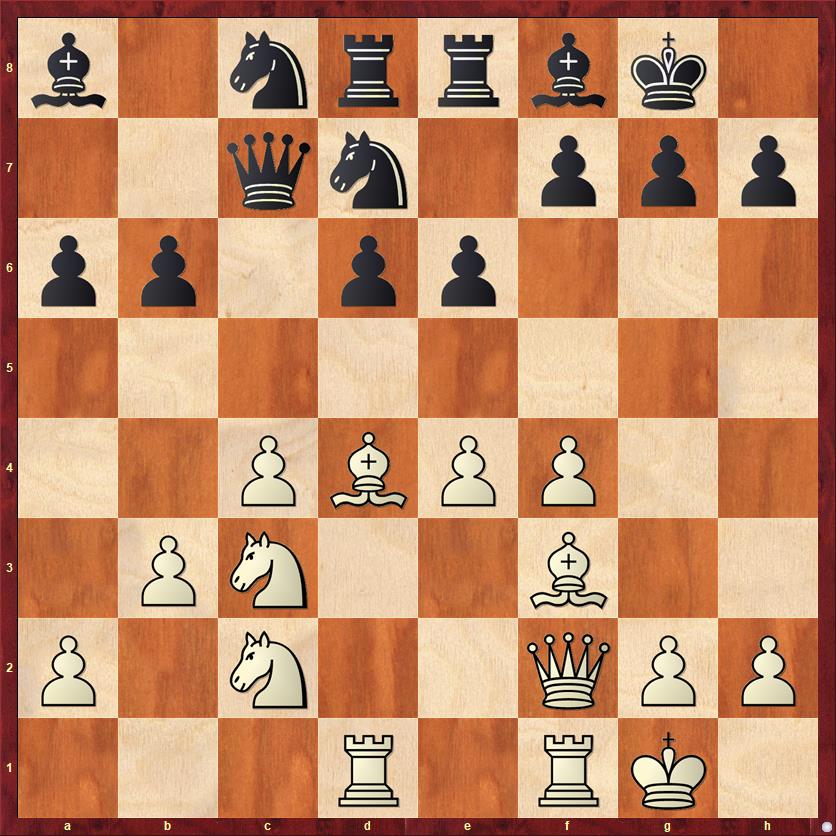
FEN: b1nrrbk1/2qn1ppp/pp1pp3/8/2PBPP2/1PN2B2/P1N2QPP/3R1RK1 w – – 0 20
Black’s play to this point has been a little bit comical, putting all of his pieces on the back rank. I seriously think that if I had done nothing in particular, his next move would have been … Qb8, so that he would have seven pieces on the back rank. We’ll never know, but anyway, I do think that he was playing a game of cat and mouse. He knows that if I’m seriously playing for a win, eventually I’m going to lash out with a pawn break, e5 or f5. I decided that all of my pieces were now in place, and now was the time to strike.
But which is better, 20. e5 or 20. f5? The computer thinks f5, but it seems to me that in every game where I’ve seen a GM blow up Black’s Hedgehog-type setup, the key move has been e5. So I played 20. e5. After 20. … Bxf3 21. Qxf3 Greg played 21. … Nb8? — like I said, he was fixated on putting his pieces on the back rank. And here I missed my chance. I could have played 22. Ne4!, with the point that 22. … d5 23. cd Qxc2? 24. Rc1 Qxa2 25. Ra1 Qc2 26. Rfc1 traps Black’s queen. Of course it is not necessary for Black to fall into this cheapo, but then we get to the positional point of 22. Ne4: White is bringing his queenside pieces over to the kingside, where they can do more damage. Also he is turning up the pressure on d6.
Instead I played 22. Qb3? and Greg played the excellent, insightful move 22. … Qb7!, taking away that e4 square. It was the turning point in the game. Even though White still has the advantage here (according to the computer), I played increasingly wild moves to try to make something of my “attack” and Greg made sure to control with his pieces every line that I opened for him, especially the e-file and the a7-g1 diagonal. If you want to see the remaining moves of this debacle, here they are: 23. Ne3 de 24. Bxe5 Ne7 25. f5? Rxd1 26. Ncxd1 ef 27. Nc3 Ng6! 28. Rxf5 Nc6 29. Ng4 Qd7! This is such a great, Greg-style move. Everything in White’s position is stretched to the breaking point, and this tiny shift of the Black queen makes everything fall apart. I resigned 11 moves later.
You can learn a great deal from Greg’s subtle queen moves in this game, 22. … Qb7 and 29. … Qd7. They compare very nicely with his subtle (and winning) queen move in Game 2, to which we will now proceed.
A reminder, this is the position after 12. f4.

FEN: r2q1rk1/1b2bppp/ppnppn2/8/2P1PP2/N1N1B3/PP2B1PP/R2Q1RK1 b – – 0 12
Greg had surely gone over Game 1 and knew that his “put all the pieces on the back rank” approach was not going to work again. So in Game 2 he came up with the much more enterprising move
12. … d5!?
Playing a Kasparov-style gambit, six months before Kasparov! If Black can play this move, he absolutely should, because it blows apart White’s entire strategy of restraining this central advance.
The first point to notice is that 13. e5? is bad because of 13. … d4! 14. ef Bxf6, winning back the piece and putting huge pressure on White’s queenside.
The only other way for White to try for an advantage is, of course, to take the sacrifice.
13. cd ed 14. ed?! …
On principle, White should probably trade off more pieces before playing the pawn capture: either 14. Nxd5 Nxd5 15. ed or 14. Nxd5 Nxd5 15. Qxd5 Qxd5 16. ed. I’m not sure that the upside for White is any better in these variations, but the downside is less bad. To put it more bluntly: the more pieces White leaves on the board, the more danger that he will lose.
14. … Nb4 15. Qb3? …
Once again, too ambitious. White should settle for a minuscule advantage after 15. d6 Bxd6 16. Nc4 Bc5 17. Bxc5 bc, when at least Black’s pawn formation has been disrupted.
The way that Greg exploits my mistake is exquisite.
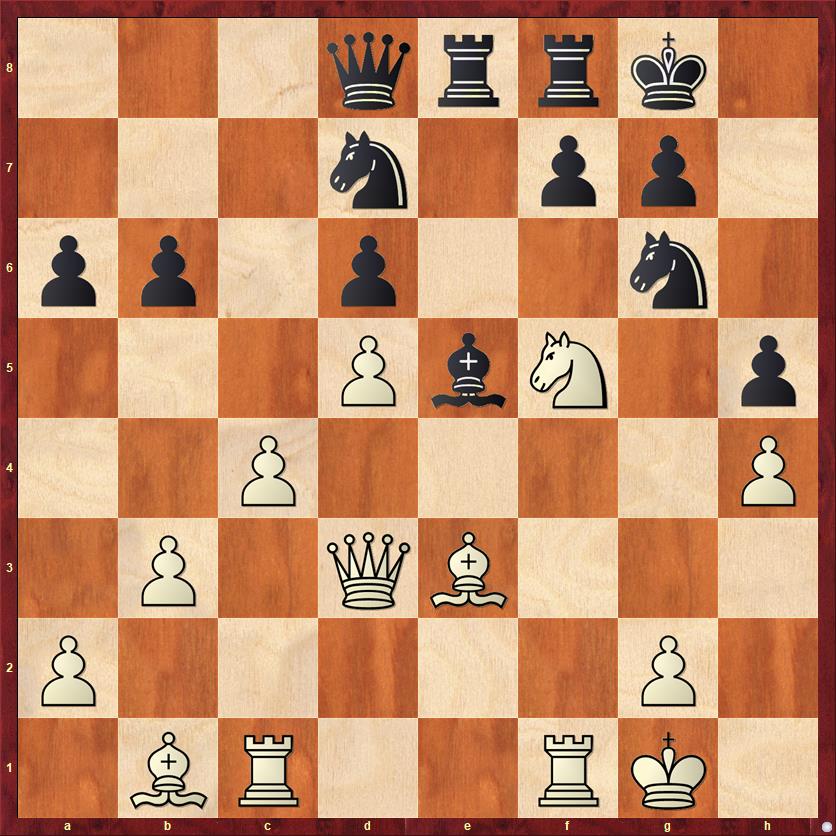
15. … Nfxd5 16. Rfd1 …
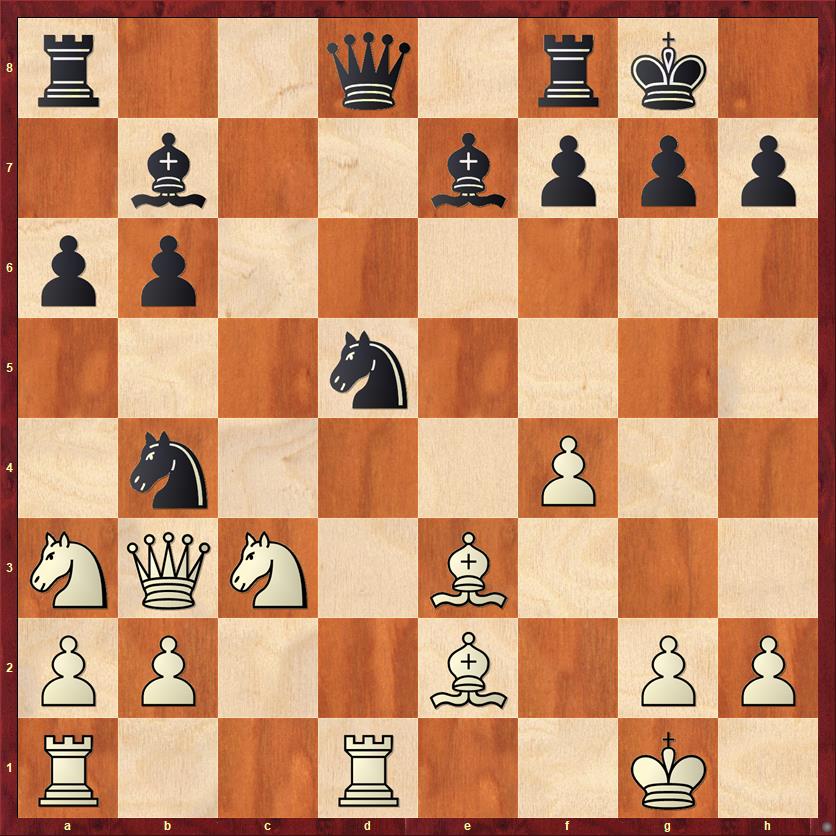
FEN: r2q1rk1/1b2bppp/pp6/3n4/1n3P2/NQN1B3/PP2B1PP/R2R2K1 b – – 0 16
Black’s move is probably not that hard to find. Obviously he wants to move his queen to break the pin on the d-file. But it’s all the other things it does that make it such a star move.
16. … Qe8!
Once again, a simple, modest sideways move of the queen utterly wrecks my position. I cannot defend all of the weaknesses on e2, e3, and f4. Not only that, even the weakness on g2 comes into play! Here are a couple of sample variations: (a) 17. Nxd5 Nxd5 18. Bxb6 Bxa3 wins a piece. (b) 17. Bf2 Nxf4 18. Bf1 Qc6! murders my kingside. (c) 17. Nc4 Nxe3 18. Nxe3 Bc5 wins a piece. We could go on and on, but I’m busted. Black controls every important line. I finally decided that the least-worst variation was 17. Nxd5 Nxd5 18. Rxd5 Bxd5 19. Qxd5 Bxa3 20. Kf2, but I’m down an exchange for absolutely nothing. Greg finished me off speedily with 20. … Bc5 21. Bxc5 bc 22. Re1 Qb8! — yet another sideways queen move! You’ve got to like his sense of humor. White has a choice between trading queens with 23. Qe5 or losing a pawn. I chose losing a pawn, and resigned after 23. Bc4 Qxf4+ 24. Kg1 Rfd8 25. Rf1 Qe3+. I can sum up my play in this game with one word: bewildered.
After showing you these two utterly discouraging defeats, I now get to show you my semi-victory in Game 3. Literally a semi-victory. It was a draw, but even that was disappointing because I threw away a chance at something better.
For Game 3, go back to the first diagram and play instead
6. … a6
I’m not sure why Greg changed move orders, but perhaps he thought I would have something prepared if he kept with the same variation. Ironically, by avoiding my home preparation in the 6. … Nf6 line, he walked into my home preparation in the 6. … a6 line.
7. N5c3! …
This avoids the ugly configuration with the knights on a3 and c3; now they will be on c3 and d2 instead.
I was really serious about studying this line. In those pre-Internet days, I had actually bought a copy of Chess Informant (the first time ever) and found a game Gufeld-Hort, 1983, where White played this way and won.
7. … Nf6 8. Be2 Be7
Note that Black cannot play in Kasparov style with 8. … d5? because of 9. ed ed 10. Nxd5 Nxd5 11. cd Nb4 12. Nc3. White’s pieces are much better coordinated here than in Karpov-Kasparov, and a3 is threatened. If 12. … Bf5 13. O-O Nc2? 14. Bd3! wins.
So already I’ve scored a victory of sorts: Black will have to play the same sort of cat-and-mouse defense that he did in Game 1. This time I played the cat’s role a little bit better.
9. O-O O-O 10. Be3 b6 11. Nd2 Bb7 12. Rc1 …
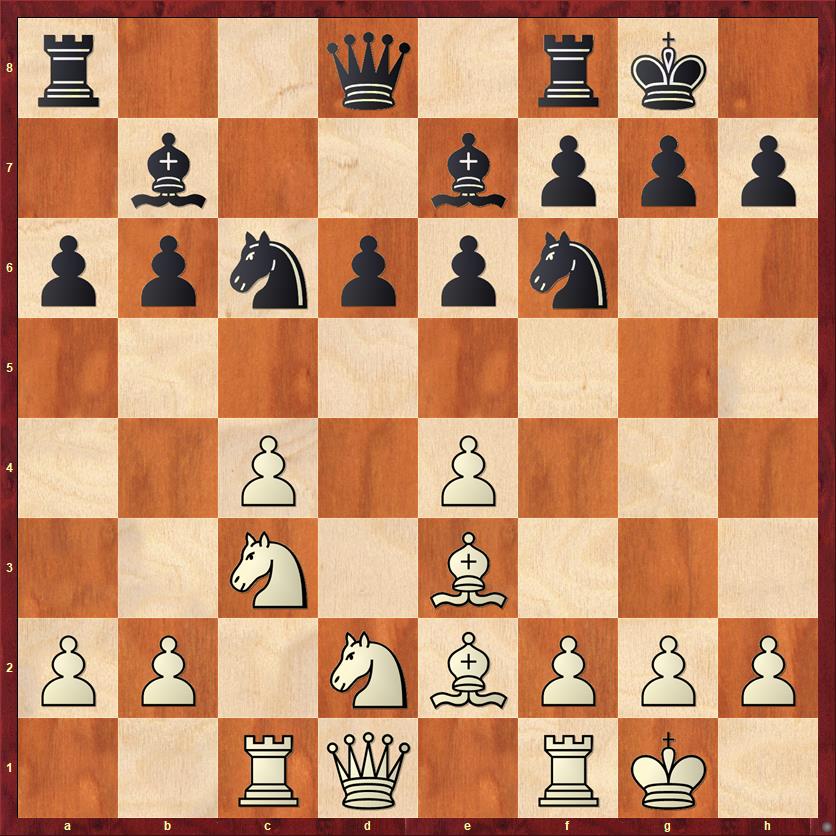
FEN: r2q1rk1/1b2bppp/ppnppn2/8/2P1P3/2N1B3/PP1NBPPP/2RQ1RK1 b – – 0 12
If we compare this position to diagram 3 above, we see three differences: White’s knight is on d2 instead of a3, his rook is on c1 instead of a1, and his pawn is on f2 instead of f4. Every one of these three changes is an improvement for White. Now 12. … d5?! would be a mistake. After 13. ed ed 14. cd Nb4 15. d6 Bxd6 16. Nc4 Bc5 17. Qxd8 Raxd8 18. Bxc5 bc, for instance, White now has the move 19. Na5 that is awkward for Black to meet. The bishop is running out of squares, and the weak pawns on a6 and c5 are coming under immediate attack.
12. … Nd7 13. Bd3 Bf6 14. Bb1 Rc8 15. b3 Ne5 16. f4 Ng6 17. Nf3 Qc7 18. Nd4 …
Here Greg plays the sort of cat-and-mouse move that worked out well for him in Game 1. It only works half as well in this game.
18. … Qb8?!
The computer thinks that Black should play the “fork trick” with 18. … Nxf4, which it sees as equalizing. I’m not quite so sure, because White can play 19. Ndb5 (both sides have desperado knights!) Ne2+ 20. Qxe2 ab 21. Nxb5. The computer may see this as equal, but I see it as a dynamic position that would be fun to play.
Greg’s move is prophylactic, moving his queen away from the square c7 where it can be harassed by White’s knights. However, it can be argued (and my next move does argue) that White had even more pressing threats.
19. f5! …
I like this move, and I think that White now has a very pleasant position. My knights get wonderful squares on d5 and f5 and there are no serious weaknesses in my position.
19. … ef 20. Nxf5 Be5 21. Nd5 Rce8 22. h4 Bxd5 23. ed Qd8 24. Qd3 …
Definitely starting to get the “spidey sense” that good things are happening. Of course Black can’t grab a pawn with 24. … Nxh4? because of 25. Nh6+ followed by mate. Unfortunately, his next move only puts off the hour of reckoning by one move.
24. … h5
FEN: 3qrrk1/3n1pp1/pp1p2n1/3PbN1p/2P4P/1P1QB3/P5P1/1BR2RK1 w – – 0 25
25. Bg5? …
There are two challenges here. One is to see what I should have played. The other is to see what is wrong with 25. Bg5.
The move I should have played — basically the winning move, or as close as I ever got to one against Greg — was 25. g4! It’s galling that I missed this move because it is just the logical continuation of the attack begun with 22. h4. The one thing that Black absolutely, positively cannot allow is a White pawn on h5, because it will either win Black’s knight or lead to checkmate. With 25. g4! White announces his attention to put a pawn on h5 either by hook or by crook or by brute force. By hook: 25. … hg 26. h5! By crook: 25. … anything 26. gh. By brute force: 25. … Nf6 26. Bg5. (Notice that Bg5 becomes a lot stronger here because it actually does something — it pins the knight that Black needs to defend h6.)
One lesson here is to follow your ideas to their logical conclusions. When your opponent has a fatal weakness, don’t get distracted by other things. Hammer at that weakness until he submits. A second lesson, which I failed to learn in 1985, is the importance of pawn breaks. So often the critical move to change the position in your favor is a pawn break. These moves open up key lines and close others, and the loss (often temporary) of a pawn is of very little importance.
I discovered when playing against the computer this winter, many dozens of games, that I am chronically overlooking pawn breaks. This game shows I’ve been overlooking them since at least 1985. It’s a major failure that I hope to address if and when I ever get back into tournament play.
Question two was: What’s wrong with 25. Bg5? Greg’s next move once again shows his tremendous calm under fire and his ability to capitalize on small mistakes.
25. … Bf6!
This was unexpected, as I thought that Black needed the bishop to defend d6. But it turns out that the bishop has more aggressive intentions. If 26. Nxd6? Bxg5 turns the tables. If 27. hg Nde5 follows, attacking the queen and knight simultaneously.
I was caught flat-footed by this change of fortune and did not find a very effective answer.
26. Bxf6 Nxf6 27. Nd4
Still hoping to sucker him into 27. … Nxh4? 28. Rxf6! But he’s not going to fall into anything that obvious.
27. … Qe7 Draw agreed.
A very abrupt end! While the computer confirms that White has blown most of his advantage — from 2.4 pawns in the last diagrammed position to 0.4 pawns now — the game was certainly still worth playing. But psychologically I was very discouraged. Just three moves ago I thought I had a very promising game, but now the situation has changed radically and I no longer had confidence in my position. And I had the weight of my previous losses to Greg on my shoulders. Was the same thing going to happen here as in Games 1 and 2? Was my position going to keep spiraling downhill? And finally, the time situation was very bad for me. We were playing 50 moves in 2 hours, so I now had 12 minutes to make 23 moves. This greatly increased the chance of a screwup.
Under the circumstances, Greg’s draw offer was perfectly timed. I could not possibly decline it.
I hope you’ve enjoyed the chance in this post to see the play of someone who had a much better understanding of chess than me!
Lessons:
- According to Greg Samsa, there isn’t that much to think about in chess. Perhaps a better way to say it is this: A little bit of thinking can save you a lot of calculation.
- Playing White against a Hedgehog setup demands a great deal of patience and finesse. Usually the key pawn break is e5 or f5, but at the same time these moves can create huge weaknesses that blow up in White’s face.
- I’m not even sure any more whether it’s worth playing 5. Nb5 and 6. c4 against the Taimanov.
- If you’re Greg Samsa, you can put all your pieces on the back rank and win. I don’t recommend it for most people.
- Carry your thoughts to their logical conclusions. If you have a very strong threat and your opponent manages to block it for one move, don’t just take their word for it! Ask yourself: Is this truly a roadblock or just a speed bump? Do I have a way to re-establish the same threat? If it’s a speed bump, hit the gas and power your way through it. If it’s a roadblock, maybe there is still some way around it.
- Do not forget the transformative power of pawn breaks. Often, for the mere cost of a pawn, they completely change the activity of all the rest of your pieces.


{ 2 comments… read them below or add one }
Hallo Dana.
The gambit 8. …d5 wasn`t played first by Kasparov.
To be true he re-invented it without knowing the predecessor.
The first time it was played was in 1965 between Károly Honfi and Péter Dely, Hungarian Championship, but was quite unnoticed as the game ended with a draw after 93 moves in a rook vs rook and bishop endgame.
As Dely had the idea of sacrificing the pawn first while tavelling in a tram the gambit was also called ‘tram gambit’ for some time.
Here the game:
1.e4 c5 2.Nf3 e6 3.d4 cxd4 4.Nxd4 Nc6 5.Nb5 d6 6.c4 Nf6 7.N1c3 a6 8.Na3 d5 9.cxd5 exd5 10.exd5 Nb4 11.Qa4+ Bd7 12.Qb3 Be7 13.Bf4 Bg4 14.f3 Nfxd5 15.Nxd5 Nxd5 16.fxg4 Nxf4 17.Qa4+ b5 18.Qxf4 O-O 19.Qd2 Re8 20.Kd1 Bg5 21.Qxd8 Raxd8+ 22.Kc2 Rd2+ 23.Kc3 Rc8+ 24.Kb3 Bf6 25.Rb1 Rc1 26.Bxb5 Rxh1 27.Rxh1 Rxb2+ 28.Kc4 axb5+ 29.Nxb5 Rxg2 30.h3 Rxa2 31.Re1 h5 32.gxh5 Ra4+ 33.Kd5 Rh4 34.Re3 Rxh5+ 35.Kc6 Bh4 36.Nd6 f5 37.Rf3 g6 38.Kd7 Rh7+ 39.Ke6 Re7+ 40.Kd5 Kh8 41.Nxf5 gxf5 42.Rxf5 Kg7 43.Rf3 Kg6 44.Kd4 Kg5 45.Kd3 Re1 46.Kd2 Rg1 47.Ke2 Bg3 48.Rf8 Re1+ 49.Kd2 Rh1 50.Ke3 Rxh3 51.Ke4 Rh7 52.Rg8+ Kh4 53.Kf3 Rf7+ 54.Ke4 Kh3 55.Kd5 Rf6 56.Ke4 Kg2 57.Ra8 Rf4+ 58.Kd5 Kf3 59.Ra3+ Kg4 60.Ra8 Rf5+ 61.Ke4 Re5+ 62.Kd4 Bf4 63.Rg8+ Kf3 64.Ra8 Re6 65.Ra3+ Kg4 66.Ra8 Re1 67.Kd5 Bh6 68.Ra7 Kf5 69.Rf7+ Kg6 70.Rf2 Bg7 71.Rg2+ Kf7 72.Rg4 Re5+ 73.Kc4 Bf6 74.Kd3 Ra5 75.Re4 Be5 76.Rb4 Ke6 77.Ke4 Bd6 78.Rc4 Bc5 79.Kf4 Kd5 80.Re4 Bd6+ 81.Kf5 Ra3 82.Re2 Rf3+ 83.Kg4 Rf4+ 84.Kg5 Rf8 85.Kg4 Bf4 86.Re1 Kd4 87.Re2 Be3 88.Ra2 Ke4 89.Ra4+ Bd4 90.Rb4 Rg8+ 91.Kh4 Ke5 92.Kh3 Ke4 93.Kh4 ½-½
It can be found at http://www.365chess.com, but it´s until now not on chessgames.com!