In my last post, I gave up on trying to pick a “best game” from 1992 because there are three high-quality, or at least high-interest games that I wanted to show you. Today, I’ll show you my favorite single move ever. A few years ago, I picked it as “My Best Move” for the Chess Life column of the same name. In 2012 I wrote in this blog, “perhaps I will write a post here about it some day … but not now.” After eight years, I think it’s time for me finally to live up to that promise!
In my Chess Life column I didn’t show the whole game, but in fact the whole thing is just as fun as the surprise twist at the end. My opponent in this game was John Hayes, one of the most creative players in central Ohio. Hayes gets things off to an unconventional start with his moves 1. … Nc6 (which actually was his bread and butter) and the even more outlandish 6. … Kf7. Then I did something you should never do against someone who plays eccentric moves in the opening — I started throwing the crazy right back at him. The game continued to be full of wild complications and questionable decisions right up to move 20, when out of the blue something happened that made everything crystal clear. Enjoy playing over a chess game from another planet!
Dana Mackenzie — John Hayes, 1992 Columbus Invitational Championship
1. d4 Nc6
At the time I thought that this was a “crazy” opening that no serious player would venture. However, with time I have changed my mind, mostly because I have played against several computer programs that liked this move and I have never been able to get a serious advantage against them. I now think that it is a perfectly respectable and playable move.
2. e4 d5 3. e5 f6!?
Again, I probably had too emotional a reaction to this move. It’s almost as if Black is taunting me: “Come and get me!” But according to the computer, which has no emotions, this move is every bit as good as the move I expected, 3. … Bf5. If White tries to take advantage of the weakened kingside with 4. Bd3, it could blow up in his face: 4. … Nxd4 5. Qh5+ g6 6. Bxg6 hg 7. Qxh8 Nxc2+ 8. Kd1 Qd7!! This is the stunning move found by Fritz, which evaluates the position at +2 pawns for Black. The more obvious 8. … Nxa8 is not as good. After 8. … Qd7!! 9. Kxc2 Qg4! Black gets both his queen and bishop into the attack, with murderous effect.
I don’t know whether this is established theory or whether Hayes knew about this move 8. … Qd7. I certainly think he must have had a prepared line, because 1. … Nc6 was his regular opening, and that’s why I avoided 4. Bd3.
4. Bb5 Bf5 5. Ne2 e6 6. Nf4 Kf7!?
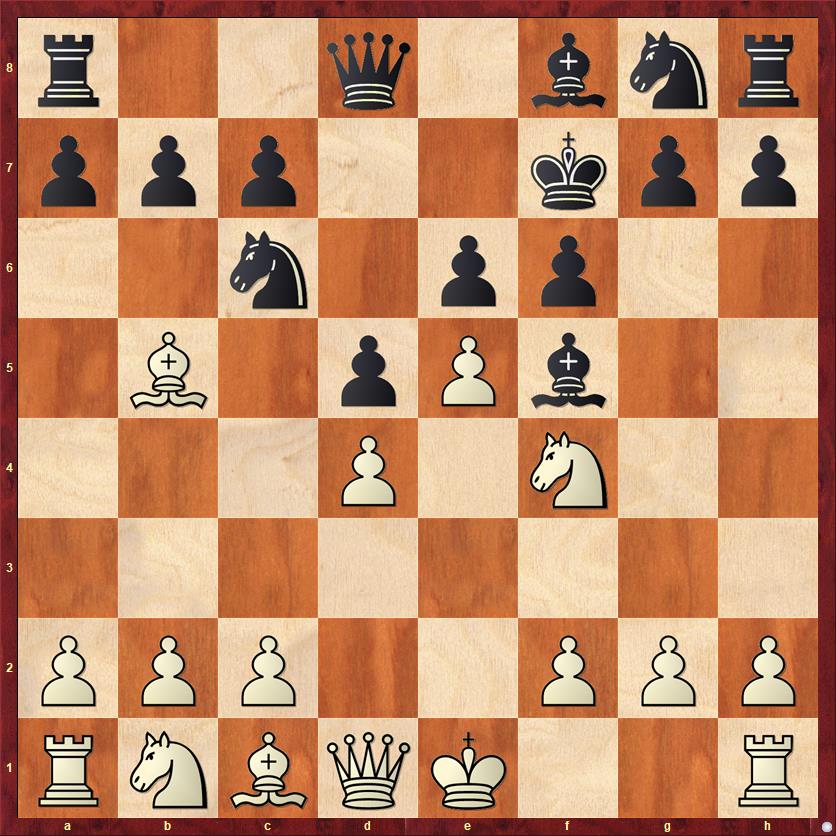
FEN: r2q1bnr/ppp2kpp/2n1pp2/1B1pPb2/3P1N2/8/PPP2PPP/RNBQK2R w KQ – 0 7
Black defends e6 and unpins his knight. Quite logical, if you don’t care about king safety! A calm alternative would have been 6. … Qd7.
7. Bxc6 bc 8. g4!? …
Wow, what can I say about this move? First of all, it is the computer’s top choice, so it can’t be too bad. But I think it was the product of a flawed thinking process, and that is bad.
First, I think that my move was impulsive. I thought that Black’s sixth move had “gone too far,” and so I should release my attack dogs in the direction of his king. But I failed to consider adequately how much this move would expose my own king.
Second, my move was based on a tactical misconception. My original plan was to answer 8. … Be4 with 9. f3? Only after making this move did I realize that 9. f3 fxe5 10. exf4? is pretty bad for White after 10. … Qh4+! Typically, I had forgotten to consider this in-between move. If White plays 10. h4 instead to keep the queen out, then 10. … Bxc2! is a nice desperado move, where Black gives up the bishop for the knight on f4 but does it in such a way that the f-file remains closed.
Third, my move was strategically questionable. I’ve written before about the need to stay flexible in the opening. Black has made some very committing moves. The best way to take advantage of this is not to make premature, committing moves myself, but to play flexibly. With a simple developing move like 8. Nd2 I would retain the threat of playing g2-g4 when it is a little bit stronger. And if Black takes time to prevent that move with, say, 8. … h5, that’s fine too because I have made a developing move and he hasn’t.
Finally, my move was psychologically questionable. By playing 8. g4 I have agreed to play my opponent’s kind of game. Fortunately, a John Hayes kind of game is not all that different from a Dana Mackenzie kind of game, so I did okay. In fact, I won! But still, the fact remains that my opponent was trying to provoke me, and I let myself be provoked.
8. … Be4 9. O-O! …
Fortunately I realized in time that 9. f3 was not good, and played a much better move.
9. …fe 10. de Qh4 11. Nc3 h5
Threatening to open the h-file and checkmate me on h2!
12. Nxh5? …
In this position I needed to realize that Black’s attack was more bark than bite. I should go ahead and eliminate an attacker with 12. Nxe4!, and then on the inevitable 12. … hg I can shut down his attack with the amazing 13. h3! If Black takes his piece back with 13. … de, then White gets an instant counterattack with 14. Qd7+. Black is forced to retreat with 14. … Qe7, and then 15. Qxc6 followed by 16. Qxe4 picks up a couple of dangling pawns and leaves White in a very comfortable position. If Black doesn’t take his piece back, then White will have time either to rescue it with Ng3 or Ng5 or else play Qxg4 and trade queens.
Can you spot the problem with 12. Nxh5?
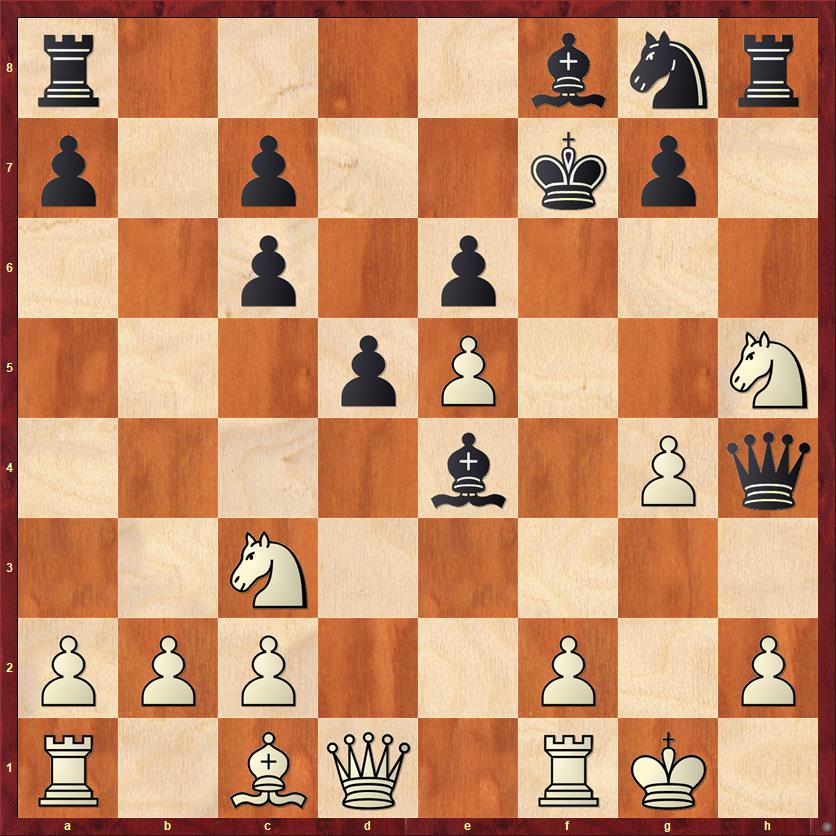
FEN: r4bnr/p1p2kp1/2p1p3/3pP2N/4b1Pq/2N5/PPP2P1P/R1BQ1RK1 b – – 0 12
Actually there are three problems with 12. Nxh5, but two are more general in nature and one is a specific tactic. The first general problem is that the knight is pinned; any move and I get checkmated on h2. This means I have to be careful not to move the knight. The second general problem is that my counterplay with Nxe4 de Qd7+, which stopped Black’s attack in its tracks in the above variations, now is not so threatening because I no longer have the knight on f4 attacking the e6 pawn.
The specific problem, according to Fritz, is that Black can draw immediately with a nice double-desperado sacrifice: 12. … Bxc2! 13. Qxc2 Rxh5! 14. gh. If White had declined either of the sacs I would just be a pawn down. Now I’m a rook up, but Black has a perpetual with 14. … Qg4+ 15. Kh1 Qf3+. This particular perpetual check (the “Qg4-Qf3 perpetual”) is a very common theme, by the way — a good way to salvage half a point out of attacks that aren’t quite strong enough to lead to checkmate.
That being said, the move that Hayes chose was also fine, and probably better from the human point of view. The computer sees that Black has nothing better than equality, so it prefers the more forcing line that draws immediately. The human realizes that there is still a long game ahead, with plenty of chances for each side. I don’t think that Hayes had any inclination to “play for a draw” at this point, and even if he had seen the double-desperado sacrifice I don’t think he would have played it.
12. … g6 13. f3 …
Perfectly timed.
13. … Bc5+ 14. Kh1 gh?
This innocent move was Black’s undoing. Because Black’s bishop is trapped, Hayes may have thought that he had to take my knight, in order to keep the material balance. But what he really has to do is keep the f-file closed. Therefore a much better move was 14. … Bf5! Now a curious situation arises where neither side wants to take the other player’s piece. I don’t want to play 15. gf because it lets Black take over the h-file after 15. … Rxh5. Likewise, Black doesn’t want to take my knight, say with 15. Qe2 gh?, because it closes the h-file and interferes with his own attack. A very unique position, with two pieces en prise and yet both of them at least slightly poisoned.
15. fg+ Kg7 16. g5 …
An obvious move, but a very key point! As mentioned in the previous comment, by capturing on h5 with the pawn Black has closed the very same file (the h-file) that he has tried so hard to open. This move makes sure that the h-file stays closed. Also, it will turn out to be very important that the g-pawn cuts off the only diagonal that Black’s queen can use to retreat.
16. … Ne7 17. Rf4! …
I am very proud to say that from this point I saw how the game was going to end. The winning move on move 20 was not accidental, but deliberately set up by my moves on 17-19.
17. … Qh3
Forced, because 17. … Qxg5? would lose the queen after 18. Rf7+.
18. Na4! Bb6?
Black’s last chance to escape the winning combination was to play 18. … Bb4! But White still has a tremendous position after 19. a3 Ba5 20. Nc5! with pressure on e6. For example, 20. … Bb6 21. Qd3! Qxd3 22. Nxe6+ is a strong in-between move. Black has to play 22. … Kg8 because 22. … Kg6? 23. Rf6+ Kh7 24. Rf7+ Kg6 25. Rg7 is mate! Who would have thought that White’s chaotic pawn structure would be so strong?
19. Nxb6 ab
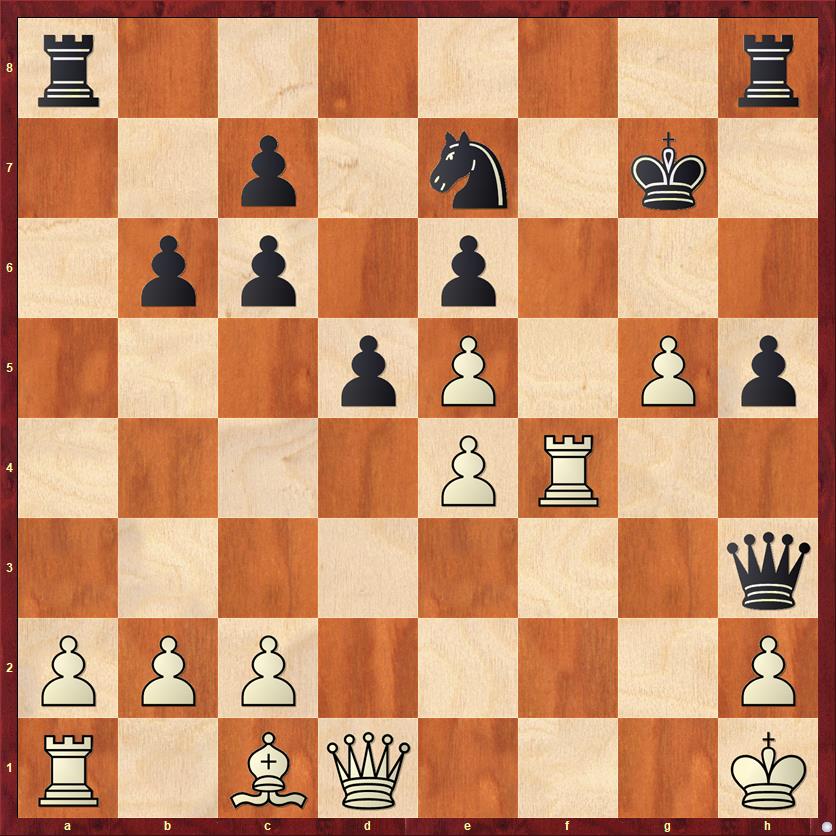
FEN: r6r/2p1n1k1/1pp1p3/3pP1Pp/4PR2/7q/PPP4P/R1BQ3K w – – 0 20
And here it is, the position where I played my favorite winning move ever.
Aside from that, it is one of the most paradoxical positions I have ever seen. It doesn’t even look as if Black is in trouble, yet he loses by force. White has not even touched any of his queenside pieces; his only developed piece is the rather weirdly placed rook on f4. Black’s king is out of trouble, his queen is active, his rooks have (or will have) nice lines, his knight is coming to g6, and his king is safe. White is a pawn up, but with his crippled pawn structure that probably won’t last for long. I’m sure that Hayes felt very optimistic here.
Okay, now I’m going to start giving hints. In spite of everything I just said, the most important thing about this position is that Black’s queen is trapped. If only I could attack it, I would win it. Unfortunately, because of my terrible lack of development, it takes me four full moves to attack his queen: Bd2, Qe2, Rf1, Rf3. That is more than enough time for Black to send a rescue party to her aid.
Unless… unless there is a somewhat less conventional route to attacking the queen. A route that starts with this move:
20. a4!! …
As I mentioned in the introduction, computers find this move instantly. It’s the only winning move; according to Fritz, the evaluation is +5 pawns for White if he finds it, 0.00 if he doesn’t.
Yet for humans, this move is hard to find. We have been brainwashed to develop our pieces, move our rooks to the center, and above all not to move our a-pawn two squares and develop the rook behind it.
This move also continues the paradoxes that I mentioned in my last comment. White wins the game on the kingside by making the most innocuous possible move on the queenside, a2-a4. White is happy that he doesn’t have any pieces developed, because that is why his rook, after coming to a3, will be able to move clear across the board and take the queen on h3. In any normal game, there would be a bunch of pieces in the way. (That, by the way, was the point of my maneuver Nc3-a4xb6. Not to win the bishop for the knight, but to get my knight out of the rook’s way.)
You can have your brilliant queen sacrifices, your zugzwangs, your immortal checkmates. I’m glad to claim this humble pawn push as my best move ever.
Black does have a way to sort of fight on, winning two rooks for the queen, but his position is too disorganized and his king still too vulnerable.
20. … Ng6 21. Ra3 Nxf4 22. Rxh3 Nxh3 23. Qf3 Rxa4
Folding up the tent. Black’s position is hopeless anyway, because the knight falls and White’s queen has so many great targets (especially e6). After the text move, I can switch my focus from winning the knight to winning the king.
24. Qf6+ Kg8 25. g6 Rh7 26. gh+ Kxh7 27. Qf7+ Kh8 28. Qxh5+ resigns
I like the way that White’s bishop on c1 has stayed there the whole game, playing a video game while the battle rages around it.
Lessons:
- You have been brainwashed. Rooks can develop to a3. Kings don’t have to castle. Bishops can stay on their home squares forever. You do not need to develop your pieces.
- Just kidding!
- Meet reckless moves with flexible moves; meet undisguised threats with disguised threats.
- Don’t be afraid to call your opponent’s bluff. If you think his attack is more bark than bite, then ignore his threats and create your own threats.
- The Qf3+-Qg4+ perpetual check (for Black; Qf6+-Qg5+ for White) is a common way to bail out into a draw if you’ve played an attack that isn’t strong enough to checkmate.
- Positions with trapped pieces are among the hardest to evaluate. In these positions especially, every tempo is important, and a single tempo can make the difference between winning and drawing, or losing.


{ 2 comments… read them below or add one }
Several State Championships ago I was Black in a game where my young opponent was crushing me on the queenside, and to save my miserable bishop I had to put it back on c8.
To the amazement of everyone concerned, this move turned out to be the start of a winning kingside attack for me; the bishop was utterly deadly on c8.
Thanks as always, Mary! There’s a British master named Mike Surtees who espouses a “revolutionary opening theory” (or R.O.T. for short) in which he advocates making pawn moves and encourages you, when possible, to develop pieces on their original square. Certainly in this game, the bishop on c1 and rook on a1 both turned out to be “well developed.” However, I think that doing this as a rule is a terrible idea… the abbreviation “R.O.T.” is well deserved.