As I’ve mentioned before, we have moved into the part of my 50-year retrospective that has already been covered in my blog. So it’s not too surprising that my best game from 2009, and the one that I want to show you today, is a game that I already analyzed once before in this blog. My original post, called An Honor to Have Played You, was written on March 4, 2017, in honor of Walter Shipman, who had recently died.
This was the third of four games I played against Walter, and it came at the 2009 Western States Open in Reno. This tournament was truly a charmed event for me. It came at a time when my rating (2086) was at its lowest ebb in decades. Playing in the Master section as usual, I went 4-2 and won the under-2300 prize, which incidentally was the largest money prize ($800) in my entire life. As a result my rating went up 61 points, my largest rating improvement in one tournament since the USCF online records began in 1991.
The people I played in this tournament were no slouches. I started with a draw against FIDE Master Gregg Small, a who had always been a little bit of a nemesis for me. Next came a loss against International Master Ed Formanek, a win against International Master Walter Shipman, a win against FIDE Master Adarsh Jayakumar, a draw against future Grandmaster Daniel Naroditsky (who at that time was “just” a 2378 player), and finally a blowout victory over Jake Kleiman, who became an International Master the following year. I’m pretty sure that this is the only time I ever played a six-round tournament where all six of my opponents either were or became FIDE-titled players — and certainly it was the only time I scored 4-2 against such strong opposition, including 2.5-1.5 against the IM’s and GM’s.
One final cool thing about this tournament was that I earned a USCF Life Master norm — in fact, my fifth and final one. To explain this, I first have to tell you that the USCF did not have a norm system prior to 2009. But for some reason they decided that year to start tracking norms and awarding lifetime titles based on them. The most controversial by far is the Life Master title, because there was already a Life Master title based on playing 300 or more games with a minimum rating of 2200. I have still not earned the Original Life Master title. But the 2009 Western States Open did give the New-Fangled Life Master title, for which the qualifications are achieving a 2200 rating (which I first did in 1988) and earning Life Master norms in five tournaments. My five Life Master norms came in 1992, 1993, 1994, 1999, and… 2009. That ten-year wait between the fourth and fifth norms would have been agonizing, except for the fact that the whole norm system did not exist yet! So I was waiting ten years without realizing that I was waiting.
Okay, enough talk. Let’s get to my game against Shipman. Instead of reinventing the wheel, I will copy and paste a lot of my previous analysis into this post. However, my overall take on this game will be quite different from what I wrote in 2017. In my previous post I was too strongly influenced by the computer, and I emphasized the mistakes too much. What I love about this game is that it was not perfect, but it was incredibly competitive. It is like a 60-move sword fight over the edge of a precipice, with both players slipping off and hauling themselves back up against the odds. If you love fighting chess, you will love this game, too. Annotations from my original post in 2017 are in regular text, and new notes added in 2021 are [in italics].
Walter Shipman – Dana Mackenzie, 10/24/2009
1. d4 Nf6 2. Nc3 d5 3. Bg5 Nbd7 4. Qd3 c5 5. O-O-O c4 6. Qd2 Qa5
Shipman played the Veresov twice against me, and both times I thought I got a terrific position. In our second game with it, I played 6. … b5 here, which may be even better than 6. … Qa5. Nevertheless, that time I only drew.
7. Kb1?! …
Maybe a bit too cautious. This is the first of many times in the game where Shipman played the right move a move too late; 7. f3 is probably a better try. Now Black gets a great position at no risk.
7. … e6 8. f3 Bb4 9. e4 Bxc3 10. Qxc3 Qxc3 11. bc de 12. Bxc4 b5 13. Be2 Rb8 14. Nh3 Nd5 15. Bd3 c3 16. Be1 …
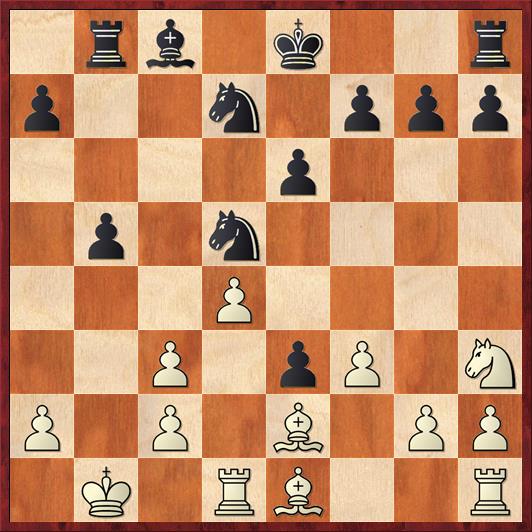
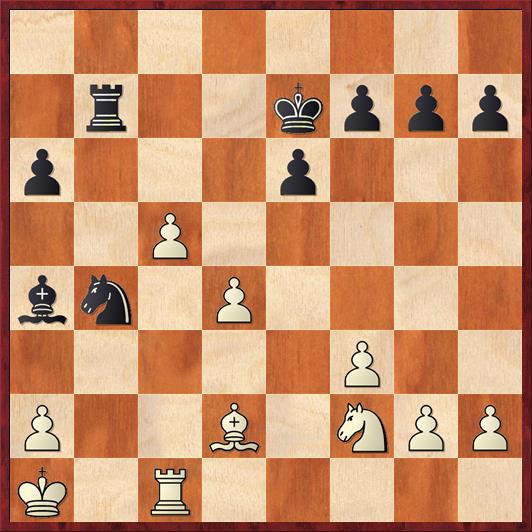
Position after 16. Be1. Black to move.
FEN: 1rb1k2r/p2n1ppp/4p3/1p1n4/3P4/2P1pP1N/P1P1B1PP/1K1RB2R b k – 0 16
So far Black has just been pushing White all over the board. But now I started to drift. My next move is just plain unnecessary. I should continue 16. … Ndb6. I’m happy if White takes the b-pawn, because it helps me open lines against his king. [Another good option is the simple 16. … O-O.]
16. … a6?! 17. Ka1 N7b6 18. Rb1 Bb7?
I had to break the pin with 18. … Rb7, even though it’s slightly awkward. Now Shipman seizes the opportunity to take the initiative.
19. c4! bc 20. Ba5! Bc6 21. Bxc4 O-O!
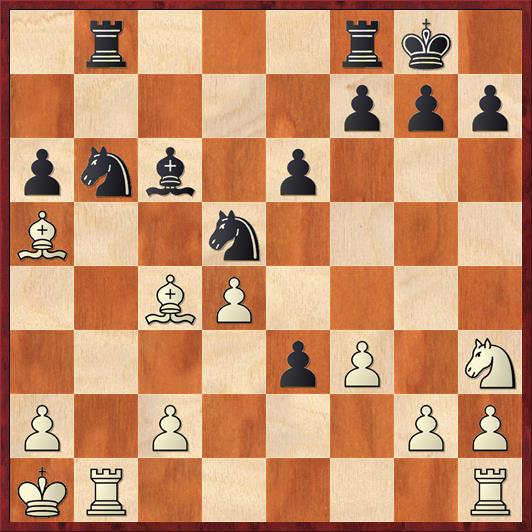
Position after 21. … O-O. White to move.
FEN: 1r3rk1/5ppp/pnb1p3/B2n4/2BP4/4pP1N/P1P3PP/KR5R w – – 0 22
Both sides are fighting for the initiative! This is the kind of chess I love. [I was hoping to lure Shipman into taking the pawn on a6], because after 22. Bxa6? Ra8 23. Bxb6 Rxa6 24. Bc5 Nc3 Black is fine. In fact, after 25. Rb2 R8a8 26. a3 Rxa3+! Black would win.
However, Shipman shows his International Master credentials with the next move.
22. Bxd5! …
Trading away the two bishops and eschewing the poisoned pawn on a6. White gets a clear advantage with this move, because Black cannot defend the e3-pawn. I am forced to scramble for counterplay.
22. … Nxd5 23. c4 Nf6 24. Rbe1? …
In this part of the game I think that Shipman let down his guard. He probably thought there was nothing to worry about. But here he should play 24. Rhe1 and keep a rook on the b-file. By letting me double rooks on the b-file, he gave me the opportunity for counterplay that I wanted.
24. … Rb7 25. Rxe3 R8b8 26. Bc3? …
Also a mistake. I think he was trying to avoid playing Re2 but my next move forces him to play it anyway. This is the second time in the game when he plays the right move one move too late.
26. … Ba4 27. Re2 …
Forced, because black threatens Bc2 with a mate threat.
27. … Rc8
Now we see why 26. Bc3 was a mistake, because the bishop is in the way and White has no way to defend his pawn on c4 except to advance it.
28. c5 Nd5
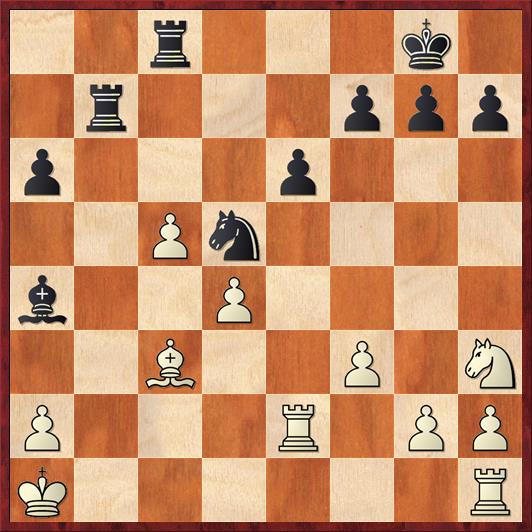
Position after 28. … Nd5. White to move.
FEN: 2r3k1/1r3ppp/p3p3/2Pn4/b2P4/2B2P1N/P3R1PP/K6R w – – 0 29
Black has made tremendous progress over the last few moves and now has really good drawing chances. As I wrote in my notebook, “White’s extra pawn is not going anywhere, and all of Black’s pieces are better than White’s pieces.”
Even so, you would never expect Black to win this game. There are still lots of twists and turns ahead!
29. Rb2 R8b8 30. Rxb7 Rxb7 31. Bd2 Kf8 32. Rc1 Ke7 33. Nf2 Nb4
Position after 33. … Nb4. White to move.
FEN: 8/1r2kppp/p3p3/2P5/bn1P4/5P2/P2B1NPP/K1R5 w – – 0 34
[I knew that this was a somewhat risky move, but to me it was an acceptable risk. I thought that White’s next move was forced; however, the computer spots an amazing winning variation for White that is, in my mind, either beyond human abilities or at the very least is at the super-GM level. For that reason I am rescinding the question marks that I originally gave to this move and White’s next move. Still, if you want a fun challenge, see if you can work out White’s winning idea.]
34. Bxb4 …
The correct move was 34. c6!! The thing that make this hard to find isn’t the move itself but the followup. After 34. … Nxc6, White just seems to have given up a pawn for nothing. But then White plays 35. Ne4!, seemingly a mild-mannered move, after which it turns out that all of Black’s pieces are stepping on each others’ toes. The main point, I would say, is that White wins the bishop or the knight after 35. … Bb5 36. a4! The knight fork on c5 is a killer. A much less obvious point — which still has to be calculated — is that neither 35. … Rc7 nor 35. … Rb6 work because of 36. d5!! ed 37. Nc3!, when now it’s the fork at c3, followed if necessary by a fork at d5, that’s the killer.
This is truly an amazing example of the power of the knight. If you saw all of this, including 36. d5 and Nc3, go to the head of the class. For Shipman, alas, this was the third time when he played the right move one move too late.
34. … Rb4 35. c6!? …
The trouble is that Black’s king is in time to stop the pawn. Now it is White’s turn to scramble for counterplay. [By the way, I really love the way that Black’s pieces coordinate over the next few moves. Every piece gets to just the right place at just the right time — the king, the rook, the bishop.]
35. … Kd8 36. c7+ Kc8 37. Ne4 Rxd4 38. Ng5! …
A nice idea! Even though the knight has to wander far afield, it does win a pawn. [This was really important later on. White’s ability to create a passed h-pawn is a key equalizing idea in the following endgame.]
38. … Rd7
The move 38. … Be8 was tempting, hoping to trap the knight with 39. Nxh7 f6, but I just don’t think it works. In any case, time pressure was definitely a factor by now, and I just wanted to play simply and live to fight in the endgame.
39. Nxh7 Rxc7 40. Rxc7+ Kxc7 41. Ng5 Be8 42. Ne4 Kc6 43. Kb2 Kd5 44. Kc3 …
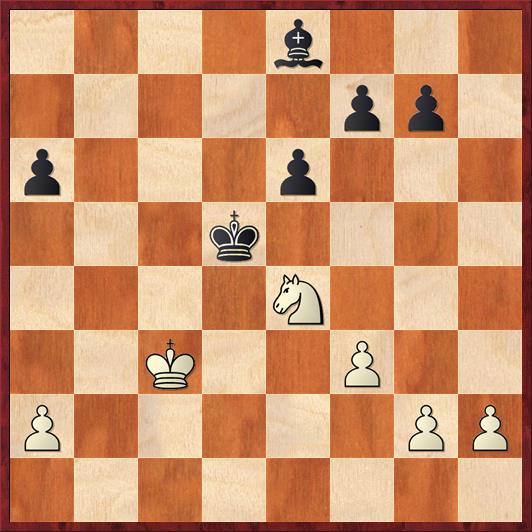
Position after 44. Kc3. Black to move.
FEN: 4b3/5pp1/p3p3/3k4/4N3/2K2P2/P5PP/8 b – – 0 44
After a tough, hard-fought, scrappy opening and middlegame, [the battle is still not over!] In principle, White should be able to draw. But Black has just enough pluses to make it difficult: a bishop against a knight, better king position. I was really proud that against an 80-year-old International Master, whose greatest strength should be the endgame, I outplayed him in the endgame.
My first step is a feisty one. I’m not sure it’s really a good move, but it had the advantage of luring White away from what I think was his best plan.
44. … a5!?
I was trying to take away any ideas White might have of Kb4, but I doubt that was really a threat. The trouble with 44. … a5 is that every time my a-pawn moves, it becomes a bigger target. And yet at the same time, that turns out to be an advantage! Shipman’s eyes got focused on the queenside and he lost focus on the other side of the board. [The kingside is really where White’s counterplay lies. If he can get his pawns to f3-g3-h4, or even better to f3-g4-h5, Black will constantly have to be on guard and have his bishop ready to control the h7 square in case the h-pawn should start to march.]
45. Nd2?! …
[In the spirit of pursuing subjective rather than objective truth, I’m going to call this a mistake even though the computer doesn’t think so. Somewhere online, within the past month, I read an article about “semi-outpost squares.” The position of the White knight on e4 is a classic example. The knight here is tremendously strong, restraining Black’s king because of its ability to leap into d6 and attack the weak underbelly of Black’s position, the f- and g-pawns. The square e4 is not a true outpost because the knight can be driven away by … f5. But this move comes at the cost of creating a true outpost for White’s knight at g5. So e4 is a “semi-outpost,” a square from which the knight can be driven only at the cost of creating a permanent weakness. Therefore, White should not voluntarily retreat his knight from that square. Instead he should place his king on its best square, 45. Kd3, and inquire of Black how he plans to make progress.]
45. … Bb5 46. Nb3 a4 47. Nd2? …
[Again the computer does not consider this a mistake, but I do. The square d2 is a critical one for White’s king and should not therefore be used for the knight. With the knight on d2, White’s king cannot fight effectively against a central pawn march, and the position becomes extremely perilous. The knight needs to go to d4 and then to c2. Then the king and knight are out of each other’s way and the knight does a good job of defending the queening square on e1. Although I don’t want to look at lengthy computer variations, two lines that show the idea very nicely are 47. Nd4! Bf1 48. Nc2!, when Black cannot capture on g2 because of Ne3+, and 47. Nd4! Bc4 48. Nc2!, when Black cannot capture on a2 because of Nb4+. Beautiful stuff!]
47. … e5 48. a3 …
[The computer considers this to be Shipman’s losing move, so I gave it a question mark in 2017. I am rescinding the question mark, because the conceptual mistake occurred on the preceding move.
The reason for the computer’s evaluation is that 48. a3 loses a tempo that White cannot afford to lose. White has to play 48. Kb4! right away, the point being that Black cannot win with the pawn sac I played in the game. If 48. … Be2? Black would be a tempo behind the game, and it would only be a draw at best. So Black would have to retreat the bishop and would have no real path to victory.]
48. … f5 49. Kb4 …
For the fourth, and most critical, time in this game, Shipman plays the right move a tempo too late.
49. … Bc6
I didn’t have the nerve yet to play the pawn sacrifice.
50. Kc3 Bb5 51. Kb4 …
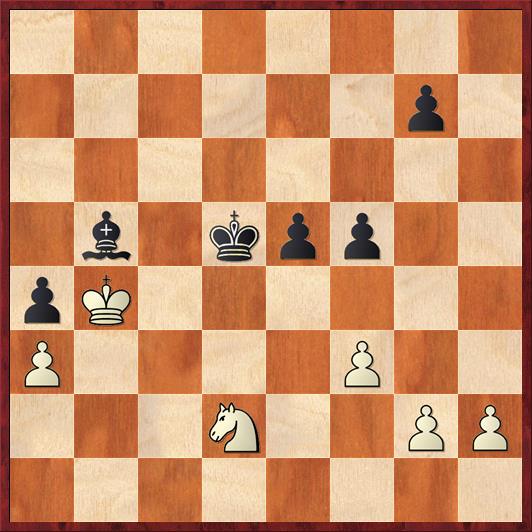
Position after 51. Kb4. Black to move.
FEN: 8/6p1/8/1b1kpp2/pK6/P4P2/3N2PP/8 b – – 0 51
51. … Be2!
The only way to play for a win. It was scary, because I couldn’t actually work it out all the way. [Now if I make a mistake I might even lose.]
52. Kxa4 Kd4?!
Oh no! A mistake right away! The computer says that 52. … e4 was better. [From the strategic point of view, my move was fine. In nine positions out of ten like this one, you want to move the king forward to shoulder out White’s king and help the e-pawn promote. The reason that this position is an exception is that White’s king is already so far away that he can’t stop the e-pawn. After 52. … e4 53. fe fe 54. Kb4 e3 55. Nb3 Bd1 56. Nc1 and instead of 56. … e2??, which would only draw after 57. Nd3, only now is it time for Black’s king to join in with 56. … Kd4! A really instructive line. First, you see why it was so bad for White to put his knight on d2, because it allowed Black to push his e-pawn and gain a tempo due to a threat to win the knight. Second, you see that every move has to be played at the right time. Black’s move … Kd4 is part of the plan, but by playing it too soon I allowed White to get some counterplay.]
53. Kb4 Bd1!
A key move. If 54. Nb3 Bxb3 55. Kxb3 Kd3! White loses, thanks to 56. a4 e4 57. a5 e3 58. a6 e2 59. a7 e1Q 60. a8Q Qb1+ and Black skewers the king and queen next move. We’ll see this same motif in the actual finish of the game.
54. a4 e4 55. fe fe 56. a5 …
White’s last chance for a draw was to sacrifice his knight with 56. Nxe4! But this is extremely hard to evaluate over-the-board. [Tablebases, anyone?] For all White knows, giving up his last piece could be a fatal mistake rather than a saving grace. And finally, it’s quite possible that Shipman thought that the move he played in the game led to a draw, too.
56. … e3 57. a6 ed!
Not 57. … e2??, when White stops the pawn with 58. Nf3! and wins! [These two moves, 57 and 58, are like the last two sword parries, with both players teetering over the edge of the cliff.]
58. a7 …
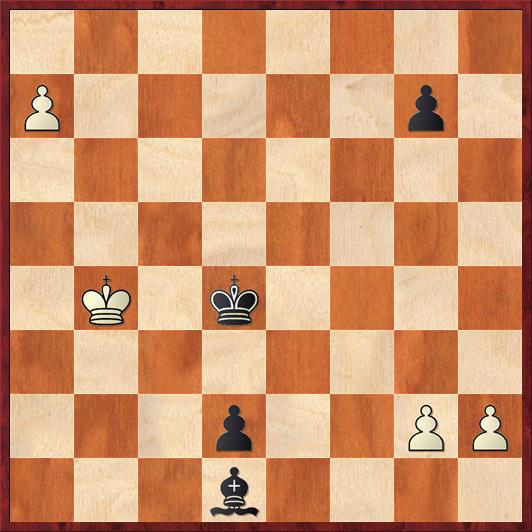
Position after 58. a7. Black to move.
FEN: 8/P5p1/8/8/1K1k4/8/3p2PP/3b4 b – – 0 58
As I said in the note to White’s 56th move, it’s possible that Shipman got to this position in his analysis and thought that it was a draw, because Black has no way to stop White from queening. Do you see what he missed?
(A little extra space for you to think about it.)
58. … Bf3!
[As I fall off the cliff, I reach up and grab its edge. It’s just enough to break my fall, while Shipman tumbles into the abyss.] It turns out that I don’t need to stop the a-pawn, only detain it!
59. gf d1Q 60. White resigns
If 60. a8Q, then we once again have the skewer motif with 60. … Qb1+ followed by 61. … Qa1+.
[I do not think you could have a game with a more thrilling, down-to-the-last moment finish. I hope you enjoyed all the ebbs and flows of this remarkable battle.]